{"/api/v1/ncpl/currencies/getAll":{"body":[{"Name":"U.S. Dollar","Code":"USD","Symbol":"$","Separator":".","Culture":"en-US"},{"Name":"Euro","Code":"EUR","Symbol":"€","Separator":",","Culture":"en-US"},{"Name":"British Pound","Code":"GBP","Symbol":"£","Separator":".","Culture":"en-US"},{"Name":"Canadian Dollars","Code":"CAD","Symbol":"C$","Separator":".","Culture":"en-US"},{"Name":"Australian Dollars","Code":"AUD","Symbol":"A$","Separator":".","Culture":"en-US"},{"Name":"Indian Rupees","Code":"INR","Symbol":"Rs","Separator":".","Culture":"en-US"},{"Name":"China Yuan RMB","Code":"CNY","Symbol":"¥","Separator":".","Culture":"en-US"}],"status":200,"statusText":"OK"},"/api/v1/ncpl/usermanagement/uiuser/getHeaderUserInfo:\"{\\\"hideSupportPin\\\":true}\"":{"body":{"__ctxId":"9E83BEDFE1004F9C9282503EE078A25B","__isError":true,"__errorType":"Nc.Platform.Abstractions.UnauthorizedException","Http_WWW_Authenticate":"Bearer","StatusCode":"Unauthorized","LogLevel":3,"Message":"","InnerException":null,"HelpLink":null,"Source":"Nc.Security.Middleware"},"status":401,"statusText":"Unauthorized"},"/api/v1/ncpl/cart/user/getShoppingCartSummary:\"{\\\"finalTotalOnly\\\":true}\"":{"body":null,"status":200,"statusText":"OK"}}{"/api/v1/ncpl/simplekb/getarticle:\"{\\\"articleId\\\":9951,\\\"categoryId\\\":2182}\"":{"body":{"Id":9951,"FriendlyId":"","ArticleTypeId":0,"Title":"Maintenance mode for different CMS","ArticleName":"Maintenance mode for different CMS","ArticleSummary":null,"PreponedSummary":false,"Approved":true,"Body":"VGhpcyBhcnRpY2xlIGRlc2NyaWJlcyBob3cgdG8gc2V0IHVwIE1haW50ZW5hbmNlIG1vZGUgZm9yIGEgQ01TLWJhc2VkIHdlYnNpdGUuDQoNCjxiciAvPjxiciAvPjxiPk5PVEU8L2I+OiBCZWZvcmUgcHJvY2VlZGluZyB3aXRoIGFueSBjaGFuZ2VzLCB3ZSByZWNvbW1lbmQgZ2VuZXJhdGluZyBhIDxhIGhyZWY9Imh0dHBzOi8vd3d3Lm5hbWVjaGVhcC5jb20vc3VwcG9ydC9rbm93bGVkZ2ViYXNlL2FydGljbGUuYXNweC85MzY1LzIxOTkvaG93LXRvLWNyZWF0ZS1hbmQtcmVzdG9yZS1iYWNrdXBzLWluLWNwYW5lbCI+ZnVsbCBiYWNrdXA8L2E+IG9mIHlvdXIgd2Vic2l0ZS4gSWYgeW91J3ZlIGNyZWF0ZWQgeW91ciBzaXRlIHVzaW5nIFNvZnRhY3Vsb3VzIHNjcmlwdCBpbnN0YWxsZXIsIGZlZWwgZnJlZSB0byByZWZlciB0byA8YSBocmVmPSJodHRwczovL3d3dy5uYW1lY2hlYXAuY29tL3N1cHBvcnQva25vd2xlZGdlYmFzZS9hcnRpY2xlLmFzcHgvMTI1OC8yMTgyL2hvdy10by13b3JrLXdpdGgtc2NyaXB0cy1pbi1zb2Z0YWN1bG91cyI+dGhpcyBndWlkZTwvYT4gc3RlcCAjNCDigJMgQmFja3VwIHNvZnR3YXJlKS48YnIgLz48YnIgLz48YSBocmVmPSIjd29yZHByZXNzIj5Xb3JkUHJlc3M8L2E+PGJyIC8+PGEgaHJlZj0iI2pvb21sYTJ4Ij5Kb29tbGEgMi54PC9hPjxiciAvPjxhIGhyZWY9IiNqb29tbGEzeCI+Sm9vbWxhIDMueDwvYT48YnIgLz48YSBocmVmPSIjb3BlbmNhcnQxeCI+T3BlbmNhcnQgMS54PC9hPjxiciAvPjxhIGhyZWY9IiNvcGVuY2FydDJ4Ij5PcGVuY2FydCAyLngsIDMueCA8L2E+PGJyIC8+PGEgaHJlZj0iI3ByZXN0YXNob3AxNHgiPlByZXN0YXNob3AgMS40Lng8L2E+PGJyIC8+PGEgaHJlZj0iI3ByZXN0YXNob3AxN3giIHN0eWxlPSIiPlByZXN0YXNob3AgMS43Lng8L2E+PGJyIC8+PGEgaHJlZj0iI2RydXBhbDYiPkRydXBhbCA2PC9hPjxiciAvPjxhIGhyZWY9IiNkcnVwYWw3Ij5EcnVwYWwgNzwvYT48YnIgLz48YSBocmVmPSIjZHJ1cGFsOCI+RHJ1cGFsIDg8L2E+PGJyIC8+PGEgaHJlZj0iI21hZ2VudG8xOSI+TWFnZW50byAxLjkgYW5kIG9sZGVyPC9hPjxiciAvPjxhIGhyZWY9IiNtYWdlbnRvMjIiPk1hZ2VudG8gMi4yPC9hPjxiciAvPjxhIGhyZWY9IiNtb29kbGUyOSI+TW9vZGxlIDIuOTwvYT48YnIgLz48YSBocmVmPSIjbW9vZGxlMzMiPk1vb2RsZSAzLjM8L2E+PGJyIC8+PGJyIC8+PGJyIC8+PHU+PGI+PGEgbmFtZT0id29yZHByZXNzIj5Xb3JkUHJlc3M8L2E+PC9iPjwvdT48YnIgLz48YnIgLz4NCg0KTWFpbnRlbmFuY2UgbW9kZSBpbiBXb3JkUHJlc3MgY2FuIGJlIHNldCB1c2luZyBwbHVnaW5zOjxiciAvPjxiciAvPg0KDQoxLiBHbyB0byA8Yj5Xb3JkUHJlc3MgYWRtaW4gZGFzaGJvYXJkPC9iPiAmZ3Q7IDxiPlBsdWdpbnM8L2I+ICZndDsgPGI+QWRkIG5ldzwvYj4gbWVudS4gRmluZCB0aGUgPGI+VW5kZXIgY29uc3RydWN0aW9uPC9iPiBwbHVnaW4gYW5kIGNsaWNrIDxiPkluc3RhbGwgTm93PC9iPiBidXR0b246PGJyIC8+PGJyIC8+PGltZyBjbGFzcz0ia2ItaW1hZ2UiIHNyYz0iaHR0cHM6Ly9OYW1lY2hlYXAuc2ltcGxla2IuY29tL1NpdGVDb250ZW50cy8yLTdDMjJENTIzNkE0NTQzRUI4MjdGM0JEODkzNkUxNTNFL21lZGlhL2NwYWdlMS5wbmciIC8+PGJyIC8+PGJyIC8+DQoNCjIuIE9uY2UgZG9uZSwgY2xpY2sgPGI+QWN0aXZhdGU8L2I+OjxiciAvPjxiciAvPjxpbWcgY2xhc3M9ImtiLWltYWdlIiBzcmM9Imh0dHBzOi8vTmFtZWNoZWFwLnNpbXBsZWtiLmNvbS9TaXRlQ29udGVudHMvMi03QzIyRDUyMzZBNDU0M0VCODI3RjNCRDg5MzZFMTUzRS9tZWRpYS9jcGFnZTIucG5nIiAvPjxiciAvPjxiciAvPg0KDQozLiBZb3Ugd2lsbCBiZSByZWRpcmVjdGVkIHRvIHRoZSBjdXN0b21pemF0aW9uIHBhZ2UuIEhlcmUsIHlvdSBjYW4gZW5hYmxlIDxiPlVuZGVyIENvbnN0cnVjdGlvbiBNb2RlPC9iPiBpbiB0aGUgPGI+TWFpbjwvYj4gc2VjdGlvbjo8YnIgLz48YnIgLz48aW1nIGNsYXNzPSJrYi1pbWFnZSIgc3JjPSJodHRwczovL05hbWVjaGVhcC5zaW1wbGVrYi5jb20vU2l0ZUNvbnRlbnRzLzItN0MyMkQ1MjM2QTQ1NDNFQjgyN0YzQkQ4OTM2RTE1M0UvbWVkaWEvY3BhZ2U0LnBuZyIgLz48YnIgLz48YnIgLz4NCg0KNC4gSW4gdGhlIDxiPkNvbnRlbnQ8L2I+IHNlY3Rpb24geW91IGNhbiBhZGQ6PGJyIC8+PGJyIC8+PGI+SGVhZGxpbmU8L2I+IC0gSGVyZSB5b3UgY2FuIHBsYWNlIGEgdGl0bGUgZm9yIHRoZSBwYWdlLjxiciAvPjxiPkNvbnRlbnQ8L2I+IC0gVGVsbCB5b3VyIHZpc2l0b3JzIHdoYXQgdG8gZXhwZWN0IGZyb20geW91ciBzaXRlLjxiciAvPjxiciAvPjxpbWcgY2xhc3M9ImtiLWltYWdlIiBzcmM9Imh0dHBzOi8vTmFtZWNoZWFwLnNpbXBsZWtiLmNvbS9TaXRlQ29udGVudHMvMi03QzIyRDUyMzZBNDU0M0VCODI3RjNCRDg5MzZFMTUzRS9tZWRpYS9jcGFnZTcucG5nIiAvPjxiciAvPjxiciAvPg0KT25jZSBkb25lLCBjbGljayB0aGUgPGI+U2F2ZSBDaGFuZ2VzPC9iPiBidXR0b246PGJyIC8+PGJyIC8+PGltZyBjbGFzcz0ia2ItaW1hZ2UiIHNyYz0iaHR0cHM6Ly9OYW1lY2hlYXAuc2ltcGxla2IuY29tL1NpdGVDb250ZW50cy8yLTdDMjJENTIzNkE0NTQzRUI4MjdGM0JEODkzNkUxNTNFL21lZGlhL2NwYWdlOC5wbmciIC8+PGJyIC8+PGJyIC8+DQpJbiB0aGUgPGI+RGVzaWduPC9iPiBzZWN0aW9uIHlvdSBjYW4gY2hhbmdlIHRoZSB2aWV3IG9mIHRoZSBjb25zdHJ1Y3Rpb24gcGFnZTo8YnIgLz48YnIgLz48aW1nIGNsYXNzPSJrYi1pbWFnZSIgc3JjPSJodHRwczovL05hbWVjaGVhcC5zaW1wbGVrYi5jb20vU2l0ZUNvbnRlbnRzLzItN0MyMkQ1MjM2QTQ1NDNFQjgyN0YzQkQ4OTM2RTE1M0UvbWVkaWEvY3BhZ2U4LjEucG5nIiAvPjxiciAvPjxiciAvPkNsaWNrIHRoZSA8Yj5BY3RpdmF0ZTwvYj4gYnV0dG9uIG5lYXIgdGhlIHNlbGVjdGVkIHBhZ2UuPGJyIC8+PGJyIC8+DQoNCjUuIExvZyBvdXQgb2YgdGhlIFdvcmRQcmVzcyBBZG1pbiBkYXNoYm9hcmQgdG8gc2VlIHRoZSBjcmVhdGVkIHBhZ2U6PGJyIC8+PGJyIC8+PGltZyBjbGFzcz0ia2ItaW1hZ2UiIHNyYz0iaHR0cHM6Ly9OYW1lY2hlYXAuc2ltcGxla2IuY29tL1NpdGVDb250ZW50cy8yLTdDMjJENTIzNkE0NTQzRUI4MjdGM0JEODkzNkUxNTNFL21lZGlhL2NwYWdlNS5wbmciIC8+PGJyIC8+PGJyIC8+PGI+Tk9URTwvYj46IFlvdSdsbCBzZWUgeW91ciBub3JtYWwgd2Vic2l0ZSB3aGlsZSB5b3UgYXJlIGxvZ2dlZCBpbiB0byB0aGUgV29yZFByZXNzIGFkbWluIGRhc2hib2FyZC4gVGhlIHZpc2l0b3JzIHdpbGwgc2VlIHRoZSBVbmRlciBDb25zdHJ1Y3Rpb24gcGFnZS48YnIgLz48YnIgLz48YnIgLz48dT48Yj5Kb29tbGE8L2I+PC91PjxiciAvPjxiciAvPg0KSm9vbWxhIGhhcyBhIGJ1aWx0LWluIGZlYXR1cmUgZm9yIGVuYWJsaW5nIHRoZSBtYWludGVuYW5jZSBtb2RlLjxiciAvPjxiciAvPjxiPjxhIG5hbWU9Impvb21sYTJ4Ij5Kb29tbGEgMi54PC9hPjwvYj48YnIgLz48YnIgLz4NCjEuIExvZyBpbnRvIDxiPkFkbWluaXN0cmF0b3IgZGFzaGJvYXJkPC9iPiAmZ3Q7IDxiPkdsb2JhbCBDb25maWd1cmF0aW9uPC9iPjoNCjxiciAvPjxiciAvPjxpbWcgY2xhc3M9ImtiLWltYWdlIiBzcmM9Imh0dHBzOi8vTmFtZWNoZWFwLnNpbXBsZWtiLmNvbS9TaXRlQ29udGVudHMvMi03QzIyRDUyMzZBNDU0M0VCODI3RjNCRDg5MzZFMTUzRS9tZWRpYS9NTV82LnBuZyIgLz48YnIgLz48YnIgLz4NCg0KMi4gSW4gdGhlIDxiPlNpdGUgU2V0dGluZ3MgPC9iPnNlY3Rpb24sIGZpbmQgdGhlPGI+IFNpdGUgT2ZmbGluZTwvYj4gb3B0aW9uIGFuZCBjaGFuZ2UgdGhlIHJhZGlvIGJ1dHRvbiBmcm9tIDxiPk5vIDwvYj50byA8Yj5ZZXM8L2I+LjxiciAvPg0KSW4gYWRkaXRpb24sIHlvdSBjYW4gYWRkIDxiPk9mZmxpbmUgTWVzc2FnZSBhbmQgT2ZmbGluZSBJbWFnZSA8L2I+dGhlIHZpc2l0b3JzIHdpbGwgc2VlIG9uIHRoZSB3ZWJzaXRlIHdoaWxlIGl04oCZcyBvZmZsaW5lLjxiciAvPjxiciAvPg0KT25jZSBkb25lLCBjbGljazxiPiBTYXZlPC9iPjoNCjxiciAvPjxiciAvPjxpbWcgY2xhc3M9ImtiLWltYWdlIiBzcmM9Imh0dHBzOi8vTmFtZWNoZWFwLnNpbXBsZWtiLmNvbS9TaXRlQ29udGVudHMvMi03QzIyRDUyMzZBNDU0M0VCODI3RjNCRDg5MzZFMTUzRS9tZWRpYS9NTV83LnBuZyIgLz48YnIgLz48YnIgLz4NCg0KDQozLiBUaGUgd2Vic2l0ZSB3aWxsIGxvb2sgbGlrZSB0aGlzOg0KPGJyIC8+PGJyIC8+PGltZyBjbGFzcz0ia2ItaW1hZ2UiIHNyYz0iaHR0cHM6Ly9OYW1lY2hlYXAuc2ltcGxla2IuY29tL1NpdGVDb250ZW50cy8yLTdDMjJENTIzNkE0NTQzRUI4MjdGM0JEODkzNkUxNTNFL21lZGlhL01NXzgucG5nIiAvPjxiciAvPjxiciAvPjxiPsKgPGEgbmFtZT0iam9vbWxhM3giPkpvb21sYSAzLng8L2E+PC9iPjxiciAvPjxiciAvPg0KMS4gTG9nIGludG8gdGhlIDxiPkFkbWluaXN0cmF0b3IgZGFzaGJvYXJkPC9iPiAmZ3Q7IDxiPkNvbmZpZ3VyYXRpb248L2I+IHNlY3Rpb24gJmd0OyBHbG9iYWw6DQo8YnIgLz48YnIgLz48aW1nIGNsYXNzPSJrYi1pbWFnZSIgc3JjPSJodHRwczovL05hbWVjaGVhcC5zaW1wbGVrYi5jb20vU2l0ZUNvbnRlbnRzLzItN0MyMkQ1MjM2QTQ1NDNFQjgyN0YzQkQ4OTM2RTE1M0UvbWVkaWEvTU1fOS5wbmciIC8+PGJyIC8+PGJyIC8+DQoNCjIuIEZpbmQgdGhlIDxiPlNpdGUgT2ZmbGluZTwvYj4gb3B0aW9uIGFuZCBjbGljayA8Yj5ZZXM8L2I+Og0KPGJyIC8+PGJyIC8+PGltZyBjbGFzcz0ia2ItaW1hZ2UiIHNyYz0iaHR0cHM6Ly9OYW1lY2hlYXAuc2ltcGxla2IuY29tL1NpdGVDb250ZW50cy8yLTdDMjJENTIzNkE0NTQzRUI4MjdGM0JEODkzNkUxNTNFL21lZGlhL01NXzEwLnBuZyIgLz48YnIgLz48YnIgLz48YnIgLz4zLiBBZnRlciB0aGF0LCB5b3Ugd2lsbCBiZSBhYmxlIHRvIGFkZDxiPiBPZmZsaW5lIG1lc3NhZ2UgYW5kIE9mZmxpbmUgaW1hZ2U8L2I+LiA8YnIgLz48YnIgLz5PbmNlIGRvbmUsIGNsaWNrIDxiPlNhdmU8L2I+OjxiciAvPjxiciAvPjxiciAvPjxpbWcgY2xhc3M9ImtiLWltYWdlIiBzcmM9Imh0dHBzOi8vTmFtZWNoZWFwLnNpbXBsZWtiLmNvbS9TaXRlQ29udGVudHMvMi03QzIyRDUyMzZBNDU0M0VCODI3RjNCRDg5MzZFMTUzRS9tZWRpYS9NTV8xMS5wbmciIC8+PGJyIC8+PGJyIC8+DQoNCg0KNC4gVGhlIHdlYnNpdGUgd2lsbCBsb29rIGxpa2UgdGhpczoNCjxiciAvPjxiciAvPjxpbWcgY2xhc3M9ImtiLWltYWdlIiBzcmM9Imh0dHBzOi8vTmFtZWNoZWFwLnNpbXBsZWtiLmNvbS9TaXRlQ29udGVudHMvMi03QzIyRDUyMzZBNDU0M0VCODI3RjNCRDg5MzZFMTUzRS9tZWRpYS9NTV8xMi5wbmciIC8+PGJyIC8+PGJyIC8+PGJyIC8+PHU+PGI+T3BlbmNhcnQNCjwvYj48L3U+PGJyIC8+PGJyIC8+T3BlbmNhcnQgaGFzIGEgYnVpbHQtaW4gZmVhdHVyZSBmb3IgZW5hYmxpbmcgdGhlIG1haW50ZW5hbmNlIG1vZGUuIDxiciAvPjxiciAvPjxiPjxhIG5hbWU9Im9wZW5jYXJ0MXgiPk9wZW5jYXJ0IDEueDwvYT48L2I+PGJyIC8+PGJyIC8+MS4gTG9nIGludG8gPGI+T3BlbmNhcnQgQWRtaW4gZGFzaGJvYXJkPC9iPiAmZ3Q7IDxiPlN5c3RlbSA8L2I+Jmd0OyA8Yj5TZXR0aW5ncyA8L2I+bWVudToNCjxiciAvPjxiciAvPjxpbWcgY2xhc3M9ImtiLWltYWdlIiBzcmM9Imh0dHBzOi8vTmFtZWNoZWFwLnNpbXBsZWtiLmNvbS9TaXRlQ29udGVudHMvMi03QzIyRDUyMzZBNDU0M0VCODI3RjNCRDg5MzZFMTUzRS9tZWRpYS9NTV8xMy5wbmciIC8+PGJyIC8+PGJyIC8+DQoNCjIuIENob29zZSB5b3VyIHN0b3JlIGZyb20gdGhlIGxpc3QgYW5kIGNsaWNrIDxiPkVkaXQ8L2I+Og0KPGJyIC8+PGJyIC8+PGltZyBjbGFzcz0ia2ItaW1hZ2UiIHNyYz0iaHR0cHM6Ly9OYW1lY2hlYXAuc2ltcGxla2IuY29tL1NpdGVDb250ZW50cy8yLTdDMjJENTIzNkE0NTQzRUI4MjdGM0JEODkzNkUxNTNFL21lZGlhL01NXzE0LnBuZyIgLz48YnIgLz48YnIgLz4NCg0KMy4gWW91IHdpbGwgYmUgcmVkaXJlY3RlZCB0byB0aGUgd2Vic2l0ZSBzZXR0aW5ncyBwYWdlLiBHbyB0byB0aGUgPGI+U2VydmVyIDwvYj50YWIuPGJyIC8+DQpGaW5kIHRoZSA8Yj5NYWludGVuYW5jZSBNb2RlPC9iPiBzZWN0aW9uIGFuZCBjaGFuZ2UgdGhlIHJhZGlvIGJ1dHRvbiBmcm9tIDxiPk5vIDwvYj50byA8Yj5ZZXM8L2I+LjxiciAvPg0KT25jZSBkb25lLCBjbGljayA8Yj5TYXZlPC9iPjoNCjxiciAvPjxiciAvPjxpbWcgY2xhc3M9ImtiLWltYWdlIiBzcmM9Imh0dHBzOi8vTmFtZWNoZWFwLnNpbXBsZWtiLmNvbS9TaXRlQ29udGVudHMvMi03QzIyRDUyMzZBNDU0M0VCODI3RjNCRDg5MzZFMTUzRS9tZWRpYS9NTV8xNS5wbmciIC8+PGJyIC8+PGJyIC8+DQoNCg0KNC4gSWYgeW91IGFyZSBsb2dnZWQgaW4sIHlvdSB3aWxsIHNlZSBhIHdvcmtpbmcgd2Vic2l0ZSBpbiB0aGUgYnJvd3Nlci4gTG9nIG91dCBvZiB0aGUgT3BlbmNhcnQgQWRtaW4gZGFzaGJvYXJkIHRvIHNlZSB0aGUgbWFpbnRlbmFuY2UgcGFnZToNCjxiciAvPjxiciAvPjxpbWcgY2xhc3M9ImtiLWltYWdlIiBzcmM9Imh0dHBzOi8vTmFtZWNoZWFwLnNpbXBsZWtiLmNvbS9TaXRlQ29udGVudHMvMi03QzIyRDUyMzZBNDU0M0VCODI3RjNCRDg5MzZFMTUzRS9tZWRpYS9NTV8xNi5wbmciIC8+PGJyIC8+PGJyIC8+PGI+PGEgbmFtZT0ib3BlbmNhcnQyeCI+T3BlbmNhcnQgMi54LCAzLng8L2E+PC9iPjxiciAvPjxiciAvPg0KMS4gTG9nIGludG8gPGI+T3BlbmNhcnQgQWRtaW4gZGFzaGJvYXJkPC9iPiAmZ3Q7IDxiPlN5c3RlbSA8L2I+Jmd0OyA8Yj5TZXR0aW5nczwvYj4uPGJyIC8+DQoyLiBDaG9vc2UgeW91ciBzdG9yZSBmcm9tIHRoZSBsaXN0IGFuZCBjbGljayA8Yj5FZGl0PC9iPjoNCjxiciAvPjxiciAvPjxpbWcgY2xhc3M9ImtiLWltYWdlIiBzcmM9Imh0dHBzOi8vTmFtZWNoZWFwLnNpbXBsZWtiLmNvbS9TaXRlQ29udGVudHMvMi03QzIyRDUyMzZBNDU0M0VCODI3RjNCRDg5MzZFMTUzRS9tZWRpYS9NTV8xNy5wbmciIC8+PGJyIC8+PGJyIC8+DQoNCg0KMy4gWW91IHdpbGwgYmUgcmVkaXJlY3RlZCB0byB0aGUgd2Vic2l0ZSBzZXR0aW5ncyBwYWdlLiBHbyB0byB0aGUgPGI+U2VydmVyIDwvYj50YWIuDQpGaW5kIHRoZSA8Yj5NYWludGVuYW5jZSBNb2RlPC9iPiBzZWN0aW9uIGFuZCBjaGFuZ2UgdGhlIHJhZGlvIGJ1dHRvbiBmcm9tIDxiPk5vIDwvYj50byA8Yj5ZZXM8L2I+Lg0KPGJyIC8+T25jZSBkb25lLCBjbGljayA8Yj5TYXZlPC9iPjoNCjxiciAvPjxiciAvPjxpbWcgY2xhc3M9ImtiLWltYWdlIiBzcmM9Imh0dHBzOi8vTmFtZWNoZWFwLnNpbXBsZWtiLmNvbS9TaXRlQ29udGVudHMvMi03QzIyRDUyMzZBNDU0M0VCODI3RjNCRDg5MzZFMTUzRS9tZWRpYS9NTV8xOC5wbmciIC8+PGJyIC8+PGJyIC8+DQoNCjQuIElmIHlvdSBhcmUgbG9nZ2VkIGluLCB5b3Ugd2lsbCBzZWUgYSB3b3JraW5nIHdlYnNpdGUgaW4gdGhlIGJyb3dzZXIuIExvZyBvdXQgb2YgdGhlIE9wZW5jYXJ0IEFkbWluIGRhc2hib2FyZCB0byBzZWUgdGhlIG1haW50ZW5hbmNlIHBhZ2U6DQo8YnIgLz48YnIgLz48aW1nIGNsYXNzPSJrYi1pbWFnZSIgc3JjPSJodHRwczovL05hbWVjaGVhcC5zaW1wbGVrYi5jb20vU2l0ZUNvbnRlbnRzLzItN0MyMkQ1MjM2QTQ1NDNFQjgyN0YzQkQ4OTM2RTE1M0UvbWVkaWEvTU1fMTkucG5nIiAvPjxiciAvPjxiciAvPjxiciAvPjx1PjxiPlByZXN0YXNob3A8L2I+PC91PjxiciAvPjxiciAvPlByZXN0YXNob3AgaGFzIGEgYnVpbHQtaW4gZmVhdHVyZSBmb3IgZW5hYmxpbmcgdGhlIG1haW50ZW5hbmNlIG1vZGUuPGJyIC8+PGJyIC8+PGI+PGEgbmFtZT0icHJlc3Rhc2hvcDE0eCI+UHJlc3Rhc2hvcCAxLjQueDwvYT48L2I+PGJyIC8+PGJyIC8+MS4gTG9nIGludG8gPGI+UHJlc3Rhc2hvcCBhZG1pbiBkYXNoYm9hcmQ8L2I+ICZndDsgPGI+U3lzdGVtIDwvYj4mZ3Q7IDxiPlByZWZlcmVuY2VzPC9iPi48YnIgLz4NCjIuIEZpbmQgdGhlPGI+IEVuYWJsZSBTaG9wPC9iPiBvcHRpb24gYW5kIGNoYW5nZSB0aGUgcmFkaW8gYnV0dG9uIGZyb20gPGI+WWVzIDwvYj50byA8Yj5ObzwvYj4uIDxiciAvPllvdSBjYW4gYWRkIHlvdXIgbG9jYWwgSVAgYWRkcmVzcyBpbiB0aGUgTWFpbnRlbmFuY2UgSVAgZmllbGQgdG8gc2VlIHRoZSB3b3JraW5nIHdlYnNpdGUgZXZlbiBpbiB0aGUgbWFpbnRlbmFuY2UgbW9kZS48YnIgLz5PbmNlIGRvbmUsIGNsaWNrIDxiPlNhdmU8L2I+Og0KPGJyIC8+PGJyIC8+PGltZyBjbGFzcz0ia2ItaW1hZ2UiIHNyYz0iaHR0cHM6Ly9OYW1lY2hlYXAuc2ltcGxla2IuY29tL1NpdGVDb250ZW50cy8yLTdDMjJENTIzNkE0NTQzRUI4MjdGM0JEODkzNkUxNTNFL21lZGlhL01NXzIzLnBuZyIgLz48YnIgLz48YnIgLz4zLiBUaGUgd2Vic2l0ZSB3aWxsIGxvb2sgbGlrZSB0aGlzOg0KPGJyIC8+PGJyIC8+PGltZyBjbGFzcz0ia2ItaW1hZ2UiIHNyYz0iaHR0cHM6Ly9OYW1lY2hlYXAuc2ltcGxla2IuY29tL1NpdGVDb250ZW50cy8yLTdDMjJENTIzNkE0NTQzRUI4MjdGM0JEODkzNkUxNTNFL21lZGlhL01NXzI1LnBuZyIgLz48YnIgLz48YnIgLz48YnIgLz48dT48Yj48YSBuYW1lPSJwcmVzdGFzaG9wMTZ4Ij5QcmVzdGFzaG9wIDEuNi54PGJyIC8+PC9hPjwvYj48L3U+wqA8YnIgLz4xLiBMb2cgaW50bzxiPiBQcmVzdGFzaG9wIGFkbWluIGRhc2hib2FyZDwvYj4gJmd0OyA8Yj5QcmVmZXJlbmNlcyA8L2I+Jmd0OyA8Yj5NYWludGVuYW5jZSA8L2I+bWVudToNCjxiciAvPjxiciAvPjxpbWcgY2xhc3M9ImtiLWltYWdlIiBzcmM9Imh0dHBzOi8vTmFtZWNoZWFwLnNpbXBsZWtiLmNvbS9TaXRlQ29udGVudHMvMi03QzIyRDUyMzZBNDU0M0VCODI3RjNCRDg5MzZFMTUzRS9tZWRpYS9NTV8yNi5wbmciIC8+PGJyIC8+PGJyIC8+DQoNCjIuIEZpbmQgdGhlIDxiPkVuYWJsZSBTaG9wIDwvYj5vcHRpb24gYW5kIGNoYW5nZSB0aGUgcmFkaW8gYnV0dG9uIGZyb20gPGI+WWVzIDwvYj50byA8Yj5ObzwvYj4uIFlvdSBjYW4gYWRkIHlvdXIgbG9jYWwgSVAgYWRkcmVzcyBpbiB0aGUgTWFpbnRlbmFuY2UgSVAgZmllbGQgdG8gc2VlIHRoZSB3b3JraW5nIHdlYnNpdGUgZXZlbiBpbiB0aGUgbWFpbnRlbmFuY2UgbW9kZS4gPGJyIC8+T25jZSBkb25lLCBjbGljayA8Yj5TYXZlPC9iPjoNCjxiciAvPjxiciAvPjxpbWcgY2xhc3M9ImtiLWltYWdlIiBzcmM9Imh0dHBzOi8vTmFtZWNoZWFwLnNpbXBsZWtiLmNvbS9TaXRlQ29udGVudHMvMi03QzIyRDUyMzZBNDU0M0VCODI3RjNCRDg5MzZFMTUzRS9tZWRpYS9NTV8yNy5wbmciIC8+PGJyIC8+PGJyIC8+DQoNCg0KMy4gVGhlIHdlYnNpdGUgd2lsbCBsb29rIGxpa2UgdGhpczoNCjxiciAvPjxiciAvPjxpbWcgY2xhc3M9ImtiLWltYWdlIiBzcmM9Imh0dHBzOi8vTmFtZWNoZWFwLnNpbXBsZWtiLmNvbS9TaXRlQ29udGVudHMvMi03QzIyRDUyMzZBNDU0M0VCODI3RjNCRDg5MzZFMTUzRS9tZWRpYS9NTV8yOC5wbmciIC8+PGJyIC8+PGJyIC8+DQoNCjQuIFRvIGNoYW5nZSB0aGUgbG9nbyBvbiB0aGUgbWFpbnRlbmFuY2UgcGFnZSwgZ28gdG8gPGI+UHJlZmVyZW5jZXMgPC9iPiZndDsgPGI+VGhlbWUgPC9iPm1lbnUuIENsaWNrIDxiPkFkZCBGaWxlPC9iPiBhbmQgc2VsZWN0IGFuIGltYWdlIGZpbGUgdG8gdXNlIGZvciB0aGUgbG9nby4gQ2xpY2sgPGI+U2F2ZTwvYj46DQo8YnIgLz48YnIgLz48aW1nIGNsYXNzPSJrYi1pbWFnZSIgc3JjPSJodHRwczovL05hbWVjaGVhcC5zaW1wbGVrYi5jb20vU2l0ZUNvbnRlbnRzLzItN0MyMkQ1MjM2QTQ1NDNFQjgyN0YzQkQ4OTM2RTE1M0UvbWVkaWEvTU1fMjhfMS5wbmciIC8+PGJyIC8+PGJyIC8+DQoNCg0KNS4gSWYgeW91IG9wZW4gdGhlIHdlYnNpdGUgaW4gdGhlIGJyb3dzZXIsIHlvdSB3aWxsIHNlZSB0aGUgdXBkYXRlZCBtYWludGVuYW5jZSBwYWdlOg0KPGJyIC8+PGJyIC8+PGltZyBjbGFzcz0ia2ItaW1hZ2UiIHNyYz0iaHR0cHM6Ly9OYW1lY2hlYXAuc2ltcGxla2IuY29tL1NpdGVDb250ZW50cy8yLTdDMjJENTIzNkE0NTQzRUI4MjdGM0JEODkzNkUxNTNFL21lZGlhL01NXzI4XzIucG5nIiAvPjxiciAvPjxiciAvPjxiPjxhIG5hbWU9InByZXN0YXNob3AxN3giPlByZXN0YXNob3AgMS43Lng8L2E+PC9iPjxiciAvPjxiciAvPjEuIExvZyBpbnRvIDxiPlByZXN0YXNob3AgYWRtaW4gZGFzaGJvYXJkPC9iPiAmZ3Q7IDxiPkNvbmZpZ3VyZTwvYj4gc2VjdGlvbiAmZ3Q7IDxiPlNob3AgUGFyYW1ldGVyczwvYj4gJmd0OyA8Yj5HZW5lcmFsIDwvYj5tZW51Og0KPGJyIC8+PGJyIC8+PGltZyBjbGFzcz0ia2ItaW1hZ2UiIHNyYz0iaHR0cHM6Ly9OYW1lY2hlYXAuc2ltcGxla2IuY29tL1NpdGVDb250ZW50cy8yLTdDMjJENTIzNkE0NTQzRUI4MjdGM0JEODkzNkUxNTNFL21lZGlhL01NXzI5LnBuZyIgLz48YnIgLz48YnIgLz4NCg0KMi4gR28gdG8gdGhlIDxiPk1haW50ZW5hbmNlIDwvYj50YWIuIEZpbmQgdGhlIDxiPkVuYWJsZSBTaG9wPC9iPiBvcHRpb24gYW5kIGNoYW5nZSB0aGUgcmFkaW8gYnV0dG9uIGZyb20gPGI+WWVzIDwvYj50byA8Yj5ObzwvYj4uIFlvdSBjYW4gYWRkIHlvdXIgbG9jYWwgSVAgYWRkcmVzcyBpbiB0aGUgTWFpbnRlbmFuY2UgSVAgZmllbGQgdG8gc2VlIHRoZSB3b3JraW5nIHdlYnNpdGUgZXZlbiBpbiB0aGUgbWFpbnRlbmFuY2UgbW9kZS4gQWxzbywgeW91IGNhbiBjdXN0b21pemUgbWFpbnRlbmFuY2UgdGV4dC48YnIgLz48YnIgLz5PbmNlIGRvbmUsIGNsaWNrIDxiPlNhdmU8L2I+Og0KPGJyIC8+PGJyIC8+PGltZyBjbGFzcz0ia2ItaW1hZ2UiIHNyYz0iaHR0cHM6Ly9OYW1lY2hlYXAuc2ltcGxla2IuY29tL1NpdGVDb250ZW50cy8yLTdDMjJENTIzNkE0NTQzRUI4MjdGM0JEODkzNkUxNTNFL21lZGlhL01NXzMwLnBuZyIgLz48YnIgLz48YnIgLz4NCg0KDQozLiBUaGUgd2Vic2l0ZSB3aWxsIGxvb2sgbGlrZSB0aGlzOg0KDQo8YnIgLz48YnIgLz48aW1nIGNsYXNzPSJrYi1pbWFnZSIgc3JjPSJodHRwczovL05hbWVjaGVhcC5zaW1wbGVrYi5jb20vU2l0ZUNvbnRlbnRzLzItN0MyMkQ1MjM2QTQ1NDNFQjgyN0YzQkQ4OTM2RTE1M0UvbWVkaWEvTU1fMzEucG5nIiAvPjxiciAvPjxiciAvPg0KDQo0LiBUbyBjaGFuZ2UgdGhlIGxvZ28gb24gdGhlIG1haW50ZW5hbmNlIHBhZ2UsIGdvIHRvIDxiPkltcHJvdmUgPC9iPiZndDsgPGI+RGVzaWduPC9iPiBtZW51ICZndDsgPGI+VGhlbWUgJmFtcDsgTG9nbzwvYj4uDQoNCkNsaWNrIDxiPkFkZCBGaWxlPC9iPiBhbmQgc2VsZWN0IGEgZmlsZSBvbiB5b3VyIGNvbXB1dGVyIHRvIHVzZSBmb3IgdGhlIGxvZ28uIE9uY2UgZG9uZSwgY2xpY2sgPGI+U2F2ZTwvYj46DQo8YnIgLz48YnIgLz48aW1nIGNsYXNzPSJrYi1pbWFnZSIgc3JjPSJodHRwczovL05hbWVjaGVhcC5zaW1wbGVrYi5jb20vU2l0ZUNvbnRlbnRzLzItN0MyMkQ1MjM2QTQ1NDNFQjgyN0YzQkQ4OTM2RTE1M0UvbWVkaWEvTU1fMzMucG5nIiAvPjxiciAvPjxiciAvPg0KDQo1LiBPcGVuIHRoZSB3ZWJzaXRlIGluIGEgYnJvd3NlciB0byBzZWUgdGhlIHVwZGF0ZWQgbWFpbnRlbmFuY2UgcGFnZTo8YnIgLz48YnIgLz48aW1nIGNsYXNzPSJrYi1pbWFnZSIgc3JjPSJodHRwczovL05hbWVjaGVhcC5zaW1wbGVrYi5jb20vU2l0ZUNvbnRlbnRzLzItN0MyMkQ1MjM2QTQ1NDNFQjgyN0YzQkQ4OTM2RTE1M0UvbWVkaWEvTU1fMzQucG5nIiAvPjxiciAvPjxiciAvPjxiciAvPjx1PjxiPkRydXBhbDxiciAvPjxiciAvPjwvYj48L3U+DQpEcnVwYWwgaGFzIGEgYnVpbHQtaW4gZmVhdHVyZSBmb3IgZW5hYmxpbmcgdGhlIG1haW50ZW5hbmNlIG1vZGUuIDxiciAvPjxiciAvPjxiPjxhIG5hbWU9ImRydXBhbDYiPkRydXBhbCA2PC9hPjwvYj48YnIgLz48YnIgLz4xLiBMb2cgaW50byA8Yj5EcnVwYWwgQWRtaW4gZGFzaGJvYXJkIDwvYj4mZ3Q7IDxiPkFkbWluaXN0ZXIgPC9iPiZndDsgPGI+U2l0ZSBjb25maWd1cmF0aW9uPC9iPiAmZ3Q7IDxiPlNpdGUgbWFpbnRlbmFuY2U8L2I+Og0KPGJyIC8+PGJyIC8+PGltZyBjbGFzcz0ia2ItaW1hZ2UiIHNyYz0iaHR0cHM6Ly9OYW1lY2hlYXAuc2ltcGxla2IuY29tL1NpdGVDb250ZW50cy8yLTdDMjJENTIzNkE0NTQzRUI4MjdGM0JEODkzNkUxNTNFL21lZGlhL01NXzM1LjIucG5nIiAvPjxiciAvPjxiciAvPg0KDQozLiBDaGFuZ2UgdGhlPGI+IFNpdGUgc3RhdHVzPC9iPiBmcm9tIDxiPk9ubGluZTwvYj4gdG8gPGI+T2ZmbGluZTwvYj4uIFlvdSBjYW4gYWxzbyBhZGQgYSBjdXN0b20gJ1NpdGUgb2ZmLWxpbmUgbWVzc2FnZScgaGVyZS4NCjxiciAvPk9uY2UgZG9uZSwgY2xpY2sgPGI+U2F2ZSBjb25maWd1cmF0aW9uPC9iPjoNCjxiciAvPjxiciAvPjxpbWcgY2xhc3M9ImtiLWltYWdlIiBzcmM9Imh0dHBzOi8vTmFtZWNoZWFwLnNpbXBsZWtiLmNvbS9TaXRlQ29udGVudHMvMi03QzIyRDUyMzZBNDU0M0VCODI3RjNCRDg5MzZFMTUzRS9tZWRpYS9NTV8zNi4yLnBuZyIgLz48YnIgLz48YnIgLz4NCg0KNC4gSWYgeW91IGFyZSBsb2dnZWQgaW4sIHlvdSB3aWxsIHNlZSBhIHdvcmtpbmcgd2Vic2l0ZS4gTG9nIG91dCBvZiB0aGUgRHJ1cGFsIEFkbWluIGRhc2hib2FyZCB0byBzZWUgdGhlIG1haW50ZW5hbmNlIHBhZ2U6DQo8YnIgLz48YnIgLz48aW1nIGNsYXNzPSJrYi1pbWFnZSIgc3JjPSJodHRwczovL05hbWVjaGVhcC5zaW1wbGVrYi5jb20vU2l0ZUNvbnRlbnRzLzItN0MyMkQ1MjM2QTQ1NDNFQjgyN0YzQkQ4OTM2RTE1M0UvbWVkaWEvTU1fMzcucG5nIiAvPjxiciAvPjxiciAvPjxiPjxhIG5hbWU9ImRydXBhbDciPkRydXBhbCA3PGJyIC8+PGJyIC8+PC9hPjwvYj4NCjEuIExvZyBpbnRvIDxiPkRydXBhbCBBZG1pbiBkYXNoYm9hcmQ8L2I+ICZndDsgPGI+Q29uZmlndXJhdGlvbjwvYj4gbWVudSAmZ3Q7IDxiPk1haW50ZW5hbmNlIG1vZGU8L2I+OiA8YnIgLz48YnIgLz48aW1nIGNsYXNzPSJrYi1pbWFnZSIgc3JjPSJodHRwczovL05hbWVjaGVhcC5zaW1wbGVrYi5jb20vU2l0ZUNvbnRlbnRzLzItN0MyMkQ1MjM2QTQ1NDNFQjgyN0YzQkQ4OTM2RTE1M0UvbWVkaWEvTU1fMzgucG5nIiAvPjxiciAvPjxiciAvPg0KDQoyLiBTZWxlY3QgPGI+UHV0IHNpdGUgaW50byBtYWludGVuYW5jZSBtb2RlPC9iPi4gWW91IGNhbiBhbHNvIGFkZCBNYWludGVuYW5jZSBtb2RlIG1lc3NhZ2UgaGVyZS4NCjxiciAvPjxiciAvPk9uY2UgZG9uZSwgY2xpY2sgPGI+U2F2ZSBjb25maWd1cmF0aW9uPC9iPjoNCjxiciAvPjxiciAvPjxpbWcgY2xhc3M9ImtiLWltYWdlIiBzcmM9Imh0dHBzOi8vTmFtZWNoZWFwLnNpbXBsZWtiLmNvbS9TaXRlQ29udGVudHMvMi03QzIyRDUyMzZBNDU0M0VCODI3RjNCRDg5MzZFMTUzRS9tZWRpYS9NTV8zOS5wbmciIC8+PGJyIC8+PGJyIC8+DQo0LiBJZiB5b3UgYXJlIGxvZ2dlZCBpbiB5b3Ugd2lsbCBzZWUgYSB3b3JraW5nIHdlYnNpdGUgaW4gdGhlIGJyb3dzZXIuIExvZyBvdXQgb2YgdGhlIERydXBhbCBBZG1pbiBkYXNoYm9hcmQgdG8gc2VlIHRoZSBtYWludGVuYW5jZSBwYWdlOg0KPGJyIC8+PGJyIC8+PGltZyBjbGFzcz0ia2ItaW1hZ2UiIHNyYz0iaHR0cHM6Ly9OYW1lY2hlYXAuc2ltcGxla2IuY29tL1NpdGVDb250ZW50cy8yLTdDMjJENTIzNkE0NTQzRUI4MjdGM0JEODkzNkUxNTNFL21lZGlhL01NXzQwLnBuZyIgLz48YnIgLz48YnIgLz48YSBuYW1lPSJkcnVwYWw4Ij48Yj5EcnVwYWwgODwvYj48YnIgLz48YnIgLz48L2E+DQoxLiBMb2cgaW50byA8Yj5EcnVwYWwgQWRtaW4gZGFzaGJvYXJkPC9iPiAmZ3Q7IDxiPkNvbmZpZ3VyYXRpb24gPC9iPm1lbnUgJmd0OyA8Yj5NYWludGVuYW5jZSBtb2RlPC9iPjoNCjxiciAvPjxiciAvPjxpbWcgY2xhc3M9ImtiLWltYWdlIiBzcmM9Imh0dHBzOi8vTmFtZWNoZWFwLnNpbXBsZWtiLmNvbS9TaXRlQ29udGVudHMvMi03QzIyRDUyMzZBNDU0M0VCODI3RjNCRDg5MzZFMTUzRS9tZWRpYS9NTV80MS4yLnBuZyIgLz48YnIgLz48YnIgLz4NCg0KMi4gU2VsZWN0IHRoZSA8Yj5QdXQgc2l0ZSBpbnRvIG1haW50ZW5hbmNlIG1vZGU8L2I+IG9wdGlvbi4gWW91IGNhbiBhbHNvIGFkZCBNYWludGVuYW5jZSBtb2RlIG1lc3NhZ2UgaGVyZS4NCjxiciAvPjxiciAvPk9uY2UgZG9uZSwgY2xpY2sgPGI+U2F2ZSBjb25maWd1cmF0aW9uPC9iPjoNCjxiciAvPjxiciAvPjxpbWcgY2xhc3M9ImtiLWltYWdlIiBzcmM9Imh0dHBzOi8vTmFtZWNoZWFwLnNpbXBsZWtiLmNvbS9TaXRlQ29udGVudHMvMi03QzIyRDUyMzZBNDU0M0VCODI3RjNCRDg5MzZFMTUzRS9tZWRpYS9NTV80Mi5wbmciIC8+PGJyIC8+PGJyIC8+DQoNCjQuIElmIHlvdSBhcmUgbG9nZ2VkIGluIHlvdSB3aWxsIHNlZSBhIHdvcmtpbmcgd2Vic2l0ZSBpbiB0aGUgYnJvd3Nlci4gTG9nIG91dCBvZiB0aGUgRHJ1cGFsIEFkbWluIGRhc2hib2FyZCB0byBzZWUgdGhlIG1haW50ZW5hbmNlIHBhZ2U6DQo8YnIgLz48YnIgLz48aW1nIGNsYXNzPSJrYi1pbWFnZSIgc3JjPSJodHRwczovL05hbWVjaGVhcC5zaW1wbGVrYi5jb20vU2l0ZUNvbnRlbnRzLzItN0MyMkQ1MjM2QTQ1NDNFQjgyN0YzQkQ4OTM2RTE1M0UvbWVkaWEvTU1fNDMucG5nIiAvPjxiciAvPjxiciAvPjxiciAvPjx1PjxiPk1hZ2VudG88L2I+PC91PjxiciAvPjxiciAvPg0KTWFnZW50byBkb2VzbuKAmXQgaGF2ZSBhIGJ1aWx0LWluIGZlYXR1cmUgZm9yIGVuYWJsaW5nIG1haW50ZW5hbmNlIG1vZGUuPGJyIC8+PGJyIC8+PGI+PGEgbmFtZT0ibWFnZW50bzE5Ij5NYWdlbnRvIDEuOSBhbmQgb2xkZXI8L2E+PC9iPjxiciAvPjxiciAvPjEuIExvZyBpbnRvIHlvdXIgPGI+Y1BhbmVsIDwvYj5hY2NvdW50ICZndDsgPGI+RmlsZXMgPC9iPnNlY3Rpb24gJmd0OyA8Yj5GaWxlIE1hbmFnZXIgPC9iPm1lbnU6DQo8YnIgLz48YnIgLz48aW1nIGNsYXNzPSJrYi1pbWFnZSIgc3JjPSJodHRwczovL05hbWVjaGVhcC5zaW1wbGVrYi5jb20vU2l0ZUNvbnRlbnRzLzItN0MyMkQ1MjM2QTQ1NDNFQjgyN0YzQkQ4OTM2RTE1M0UvbWVkaWEvTU1fNDQucG5nIiAvPjxiciAvPjxiciAvPg0KDQoyLiBHbyB0byB0aGUgcm9vdCBmb2xkZXIgb2YgeW91ciB3ZWJzaXRlIChieSBkZWZhdWx0LCBpdCBpcyBwdWJsaWNfaHRtbCBmb3IgdGhlIG1haW4gZG9tYWluIGFuZCB5b3VyZG9tYWluLmNvbSBmb3IgYWRkb24gZG9tYWlucykgYW5kIGNyZWF0ZSBhIDxiPm5ldyBmaWxlPC9iPiBuYW1lZCA8Yj5tYWludGVuYW5jZS5mbGFnIDwvYj46DQo8YnIgLz48YnIgLz48aW1nIGNsYXNzPSJrYi1pbWFnZSIgc3JjPSJodHRwczovL05hbWVjaGVhcC5zaW1wbGVrYi5jb20vU2l0ZUNvbnRlbnRzLzItN0MyMkQ1MjM2QTQ1NDNFQjgyN0YzQkQ4OTM2RTE1M0UvbWVkaWEvTU1fNDUucG5nIiAvPjxiciAvPjxiciAvPg0KDQoNCg0KMy4gT3BlbiB0aGUgPGI+aW5kZXgucGhwPC9iPiBmaWxlIHdpdGggPGI+Q29kZSBFZGl0b3I8L2I+Og0KPGJyIC8+PGJyIC8+PGltZyBjbGFzcz0ia2ItaW1hZ2UiIHNyYz0iaHR0cHM6Ly9OYW1lY2hlYXAuc2ltcGxla2IuY29tL1NpdGVDb250ZW50cy8yLTdDMjJENTIzNkE0NTQzRUI4MjdGM0JEODkzNkUxNTNFL21lZGlhL01NXzQ3LnBuZyIgLz48YnIgLz48YnIgLz48YnIgLz4gNC4gU2VhcmNoIGZvciB0aGUgZm9sbG93aW5nIGNvZGU6PGJyIC8+PGI+aWYgKGZpbGVfZXhpc3RzKCRtYWludGVuYW5jZUZpbGUpKSANCjwvYj48YnIgLz48YnIgLz48aW1nIGNsYXNzPSJrYi1pbWFnZSIgc3JjPSJodHRwczovL05hbWVjaGVhcC5zaW1wbGVrYi5jb20vU2l0ZUNvbnRlbnRzLzItN0MyMkQ1MjM2QTQ1NDNFQjgyN0YzQkQ4OTM2RTE1M0UvbWVkaWEvTU1fNDgucG5nIiAvPjxiciAvPjxiciAvPg0KDQoNCg0KDQpSZXBsYWNlIHRoZSBhYm92ZSBjb2RlIHdpdGggdGhpczogPGJyIC8+PGJyIC8+PGI+aWYgKGZpbGVfZXhpc3RzKCRtYWludGVuYW5jZUZpbGUpICZhbXA7JmFtcDsgIWluX2FycmF5KCRpcCwgJGFsbG93ZWQpKQ0KPC9iPjxiciAvPjxiciAvPjxpbWcgY2xhc3M9ImtiLWltYWdlIiBzcmM9Imh0dHBzOi8vTmFtZWNoZWFwLnNpbXBsZWtiLmNvbS9TaXRlQ29udGVudHMvMi03QzIyRDUyMzZBNDU0M0VCODI3RjNCRDg5MzZFMTUzRS9tZWRpYS9NTV80OS5wbmciIC8+PGJyIC8+PGJyIC8+DQoNCg0KIA0KDQo1LiBPbmNlIHlvdSBlbmFibGUgdGhlIG1haW50ZW5hbmNlIG1vZGUsIHlvdSB3b24ndCBiZSBhYmxlIHRvIGFjY2VzcyB0aGUgZnJvbnQgZW5kIG9mIHRoZSBzaXRlIGV2ZW4gaWYgeW91IGFyZSBsb2dnZWQgaW50byBBZG1pbiBkYXNoYm9hcmQuIEhvd2V2ZXIsIGl04oCZcyBwb3NzaWJsZSB0byBhbGxvdyB0aGUgYWNjZXNzIHRvIHRoZSB3ZWJzaXRlIGZyb20gYSBzcGVjaWZpYyBJUCBhZGRyZXNzLiA8YnIgLz48YnIgLz5UbyBkbyB0aGlzLCBmaW5kIHRoZSBmb2xsb3dpbmcgY29kZTogPGJyIC8+PGI+JG1haW50ZW5hbmNlRmlsZSA9ICdtYWludGVuYW5jZS5mbGFnJzsgPC9iPjxiciAvPjxiciAvPg0KDQpBZGQgdGhpcyBhZnRlciBpdDo8YnIgLz48cHJlIGNsYXNzPSJwcmV0dHlwcmludCBsaW5lbnVtcyI+JGlwID0gJF9TRVJWRVJbJ1JFTU9URV9BRERSJ107DQokYWxsb3dlZCA9IGFycmF5KCcxMTEuMTExLjExMS4xMTEnLCcyMjIuMjIyLjIyMi4yMjInKTsNCjwvcHJlPg0KV2hlcmUgJzExMS4xMTEuMTExLjExMScgYW5kICcyMjIuMjIyLjIyMi4yMjInIGFyZSBhbGxvd2VkIElQIGFkZHJlc3NlczoNCjxiciAvPjxiciAvPjxpbWcgY2xhc3M9ImtiLWltYWdlIiBzcmM9Imh0dHBzOi8vTmFtZWNoZWFwLnNpbXBsZWtiLmNvbS9TaXRlQ29udGVudHMvMi03QzIyRDUyMzZBNDU0M0VCODI3RjNCRDg5MzZFMTUzRS9tZWRpYS9NTV81MC5wbmciIC8+PGJyIC8+PGJyIC8+DQoNCg0KDQoNCjYuIFRoZSBtYWludGVuYW5jZSBwYWdlIHdpbGwgbG9vayBsaWtlIHRoaXM6DQo8YnIgLz48YnIgLz48aW1nIGNsYXNzPSJrYi1pbWFnZSIgc3JjPSJodHRwczovL05hbWVjaGVhcC5zaW1wbGVrYi5jb20vU2l0ZUNvbnRlbnRzLzItN0MyMkQ1MjM2QTQ1NDNFQjgyN0YzQkQ4OTM2RTE1M0UvbWVkaWEvTU1fNTEucG5nIiAvPjxiciAvPjxiciAvPg0KDQoNCg0KVG8gY2hhbmdlIHRoZSBkZWZhdWx0IHRleHQsIGVkaXQgdGhlIGNvZGUgb2YgdGhlIDxiPjUwMy5waHRtbDwvYj4gZmlsZSBsb2NhdGVkIGluIDxiPi9FcnJvcnMvPC9iPjxiPkRlZmF1bHQgPC9iPmZvbGRlci4NCjxiciAvPjxiciAvPjxhIG5hbWU9Im1hZ2VudG8yMiI+PGI+TWFnZW50byAyLjI8L2I+PGJyIC8+PGJyIC8+PC9hPg0KDQoxLiBMb2cgaW50byB5b3VyIDxiPmNQYW5lbCA8L2I+YWNjb3VudCAmZ3Q7IDxiPkZpbGVzIDwvYj5zZWN0aW9uICZndDsgPGI+RmlsZSBNYW5hZ2VyPC9iPiBtZW51Og0KPGJyIC8+PGJyIC8+PGltZyBjbGFzcz0ia2ItaW1hZ2UiIHNyYz0iaHR0cHM6Ly9OYW1lY2hlYXAuc2ltcGxla2IuY29tL1NpdGVDb250ZW50cy8yLTdDMjJENTIzNkE0NTQzRUI4MjdGM0JEODkzNkUxNTNFL21lZGlhL01NXzQ0LnBuZyIgLz48YnIgLz48YnIgLz4NCg0KDQoyLiBHbyB0byB0aGUgcm9vdCBmb2xkZXIgb2YgeW91ciB3ZWJzaXRlIChieSBkZWZhdWx0LCBpdCBpcyBwdWJsaWNfaHRtbCBmb3IgdGhlIG1haW4gZG9tYWluIGFuZCB5b3VyZG9tYWluLmNvbSBmb3IgYWRkb24gZG9tYWlucyksIGFjY2VzcyB0aGUgPGI+dmFyIDwvYj5mb2xkZXIgYW5kIGNyZWF0ZSBhIDxiPm5ldyBmaWxlPC9iPiBuYW1lZDxiPiAubWFpbnRlbmFuY2UuZmxhZyA8L2I+aW4gaXQ6DQo8YnIgLz48YnIgLz48aW1nIGNsYXNzPSJrYi1pbWFnZSIgc3JjPSJodHRwczovL05hbWVjaGVhcC5zaW1wbGVrYi5jb20vU2l0ZUNvbnRlbnRzLzItN0MyMkQ1MjM2QTQ1NDNFQjgyN0YzQkQ4OTM2RTE1M0UvbWVkaWEvTU1fNTUucG5nIiAvPjxiciAvPjxiciAvPg0KDQoNCg0KDQoNCjMuIFRoZSB3ZWJzaXRlIHdpbGwgc2hvd3MgdGhlIGZvbGxvd2luZyBtZXNzYWdlOg0KPGJyIC8+PGJyIC8+PGltZyBjbGFzcz0ia2ItaW1hZ2UiIHNyYz0iaHR0cHM6Ly9OYW1lY2hlYXAuc2ltcGxla2IuY29tL1NpdGVDb250ZW50cy8yLTdDMjJENTIzNkE0NTQzRUI4MjdGM0JEODkzNkUxNTNFL21lZGlhL01NXzU3LnBuZyIgLz48YnIgLz48YnIgLz4NCg0KDQo0LiBPbmNlIHlvdSBlbmFibGUgdGhlIG1haW50ZW5hbmNlIG1vZGUsIHlvdSB3b24ndCBiZSBhYmxlIHRvIGFjY2VzcyB0aGUgZnJvbnQgZW5kIG9mIHRoZSBzaXRlIGV2ZW4gaWYgeW91IGFyZSBsb2dnZWQgaW4gYXMgdGhlIGFkbWluLiBIb3dldmVyLCBpdOKAmXMgcG9zc2libGUgdG8gYWxsb3cgdGhlIGFjY2VzcyB0byB0aGUgd2Vic2l0ZSBmb3IgYSBzcGVjaWZpYyBJUCBhZGRyZXNzLiBHbyB0byB0aGUgPGI+dmFyIGZvbGRlcjwvYj5hbmQgY3JlYXRlIGFub3RoZXIgZmlsZSBuYW1lZCA8Yj4ubWFpbnRlbmFuY2UuaXA8L2I+Og0KPGJyIC8+PGJyIC8+PGltZyBjbGFzcz0ia2ItaW1hZ2UiIHNyYz0iaHR0cHM6Ly9OYW1lY2hlYXAuc2ltcGxla2IuY29tL1NpdGVDb250ZW50cy8yLTdDMjJENTIzNkE0NTQzRUI4MjdGM0JEODkzNkUxNTNFL21lZGlhL01NXzU4LnBuZyIgLz48YnIgLz48YnIgLz4NCiANCjUuIE9wZW4gaXQgd2l0aCB0aGU8Yj4gQ29kZSBFZGl0b3I8L2I+Og0KPGJyIC8+PGJyIC8+PGltZyBjbGFzcz0ia2ItaW1hZ2UiIHNyYz0iaHR0cHM6Ly9OYW1lY2hlYXAuc2ltcGxla2IuY29tL1NpdGVDb250ZW50cy8yLTdDMjJENTIzNkE0NTQzRUI4MjdGM0JEODkzNkUxNTNFL21lZGlhL01NXzU5LnBuZyIgLz48YnIgLz48YnIgLz4NCg0KNi4gQWRkIHRoZSBsaXN0IG9mIHRoZSBhbGxvd2VkIElQcyBzZXBhcmF0ZWQgYnkgY29tbWE6DQo8YnIgLz48YnIgLz48aW1nIGNsYXNzPSJrYi1pbWFnZSIgc3JjPSJodHRwczovL05hbWVjaGVhcC5zaW1wbGVrYi5jb20vU2l0ZUNvbnRlbnRzLzItN0MyMkQ1MjM2QTQ1NDNFQjgyN0YzQkQ4OTM2RTE1M0UvbWVkaWEvTU1fNjAucG5nIiAvPjxiciAvPjxiciAvPjx1PjxiPk1vb2RsZQ0KPC9iPjwvdT48YnIgLz48YnIgLz5Nb29kbGUgaGFzIGEgYnVpbHQtaW4gZmVhdHVyZSBmb3IgZW5hYmxpbmcgdGhlIG1haW50ZW5hbmNlIG1vZGUuDQoNCjxiciAvPjxiciAvPjxiPjxhIG5hbWU9Im1vb2RsZTI5Ij5Nb29kbGUgMi45PC9hPjwvYj48YnIgLz48YnIgLz4xLiBMb2cgaW50byA8Yj5Nb29kbGUgQWRtaW4gZGFzaGJvYXJkPC9iPiAmZ3Q7IDxiPkFkdmFuY2VkIGZlYXR1cmVzPC9iPiAmZ3Q7IDxiPlNlcnZlciA8L2I+Jmd0OyA8Yj5NYWludGVuYW5jZSBtb2RlPC9iPjoNCjxiciAvPjxiciAvPjxpbWcgY2xhc3M9ImtiLWltYWdlIiBzcmM9Imh0dHBzOi8vTmFtZWNoZWFwLnNpbXBsZWtiLmNvbS9TaXRlQ29udGVudHMvMi03QzIyRDUyMzZBNDU0M0VCODI3RjNCRDg5MzZFMTUzRS9tZWRpYS9NTV82MS5wbmciIC8+PGJyIC8+PGJyIC8+DQoNCjIuIFNlbGVjdCA8Yj5FbmFibGUgPC9iPmZyb20gdGhlIGRyb3AtZG93biBtZW51LiBZb3UgY2FuIGFsc28gYWRkIGEgY3VzdG9tIG1haW50ZW5hbmNlIG1lc3NhZ2UgaGVyZS4NCjxiciAvPjxiciAvPk9uY2UgZG9uZSwgY2xpY2sgPGI+U2F2ZSBjaGFuZ2VzPC9iPjoNCjxiciAvPjxiciAvPjxpbWcgY2xhc3M9ImtiLWltYWdlIiBzcmM9Imh0dHBzOi8vTmFtZWNoZWFwLnNpbXBsZWtiLmNvbS9TaXRlQ29udGVudHMvMi03QzIyRDUyMzZBNDU0M0VCODI3RjNCRDg5MzZFMTUzRS9tZWRpYS9NTV82Mi5wbmciIC8+PGJyIC8+PGJyIC8+DQoNCjMuIElmIHlvdSBvcGVuIHRoZSB3ZWJzaXRlIGluIHRoZSBicm93c2VyLCB5b3Ugd2lsbCBzZWUgdGhlIG1haW50ZW5hbmNlIHBhZ2U6DQo8YnIgLz48YnIgLz48aW1nIGNsYXNzPSJrYi1pbWFnZSIgc3JjPSJodHRwczovL05hbWVjaGVhcC5zaW1wbGVrYi5jb20vU2l0ZUNvbnRlbnRzLzItN0MyMkQ1MjM2QTQ1NDNFQjgyN0YzQkQ4OTM2RTE1M0UvbWVkaWEvTU1fNjMucG5nIiAvPjxiciAvPjxiciAvPjxhIG5hbWU9Im1vb2RsZTMzIj48Yj5Nb29kbGUgMy4zPC9iPjxiciAvPjwvYT7CoDxiciAvPjEuIExvZyBpbnRvIDxiPk1vb2RsZSBBZG1pbiBkYXNoYm9hcmQ8L2I+ICZndDsgPGI+U2l0ZSBBZG1pbmlzdHJhdGlvbjwvYj46DQo8YnIgLz48YnIgLz48aW1nIGNsYXNzPSJrYi1pbWFnZSIgc3JjPSJodHRwczovL05hbWVjaGVhcC5zaW1wbGVrYi5jb20vU2l0ZUNvbnRlbnRzLzItN0MyMkQ1MjM2QTQ1NDNFQjgyN0YzQkQ4OTM2RTE1M0UvbWVkaWEvTU1fNjQucG5nIiAvPjxiciAvPjxiciAvPg0KDQoyLiBOZXh0LCBnbyB0byA8Yj5TZXJ2ZXIgPC9iPiZndDsgPGI+TWFpbnRlbmFuY2UgTW9kZTwvYj46DQo8YnIgLz48YnIgLz48aW1nIGNsYXNzPSJrYi1pbWFnZSIgc3JjPSJodHRwczovL05hbWVjaGVhcC5zaW1wbGVrYi5jb20vU2l0ZUNvbnRlbnRzLzItN0MyMkQ1MjM2QTQ1NDNFQjgyN0YzQkQ4OTM2RTE1M0UvbWVkaWEvTU1fNjUucG5nIiAvPjxiciAvPjxiciAvPg0KDQozLiBPbiB0aGUgTWFpbnRlbmFuY2UgbW9kZSBwYWdlLCBzZWxlY3QgPGI+RW5hYmxlPC9iPiBmcm9tIHRoZSBkcm9wLWRvd24gbWVudS4gWW91IGNhbiBhbHNvIGFkZCBhIGN1c3RvbSBtYWludGVuYW5jZSBtZXNzYWdlIGhlcmUuDQo8YnIgLz5PbmNlIGRvbmUsIGNsaWNrIDxiPlNhdmUgY2hhbmdlczwvYj46PGJyIC8+PGJyIC8+PGltZyBjbGFzcz0ia2ItaW1hZ2UiIHNyYz0iaHR0cHM6Ly9OYW1lY2hlYXAuc2ltcGxla2IuY29tL1NpdGVDb250ZW50cy8yLTdDMjJENTIzNkE0NTQzRUI4MjdGM0JEODkzNkUxNTNFL21lZGlhL01NXzY2LnBuZyIgLz48YnIgLz48YnIgLz4NCg0KNC4gSWYgeW91IG9wZW4gdGhlIHdlYnNpdGUgaW4gdGhlIGJyb3dzZXIgeW91IHdpbGwgc2VlIHRoZSBtYWludGVuYW5jZSBwYWdlOg0KPGJyIC8+PGJyIC8+PGltZyBjbGFzcz0ia2ItaW1hZ2UiIHNyYz0iaHR0cHM6Ly9OYW1lY2hlYXAuc2ltcGxla2IuY29tL1NpdGVDb250ZW50cy8yLTdDMjJENTIzNkE0NTQzRUI4MjdGM0JEODkzNkUxNTNFL21lZGlhL01NXzY3LnBuZyIgLz48YnIgLz48YnIgLz48YnIgLz48YnIgLz48YnIgLz5UaGF0J3MgaXQhPGJyIC8+PGJyIC8+PGJyIC8+PGJyIC8+PGJyIC8+PGRpdiBhbGlnbj0iY2VudGVyIj4gTmVlZCBhbnkgaGVscD8gQ29udGFjdCBvdXIgPGEgaHJlZj0iaHR0cHM6Ly93d3cubmFtZWNoZWFwLmNvbS9oZWxwLWNlbnRlci8iPkhlbHBEZXNrPC9hPjwvZGl2PjxiciAvPjxiciAvPg==","NewTillDate":null,"FeaturedTillDate":null,"ModifiedDateTime":"2022-10-21T11:35:04.0000000","LiveDateTime":"1754-02-02T00:00:00.0000000","CreatedDateTime":"2017-11-19T13:55:53.0000000","ApprovalDatetime":"2017-11-30T06:56:12.0000000","RequestCount":55956,"MarkedAsNew":false,"MarkedAsFeatured":false,"RatingValue":3,"CategoryPaths":[{"__type":"Nc:SimpleKB:Abstractions:Dtos:CategoryPathDto","Level":1,"CategoryId":12,"CategoryName":"Hosting"},{"__type":"Nc:SimpleKB:Abstractions:Dtos:CategoryPathDto","Level":2,"CategoryId":2182,"CategoryName":"cPanel: Software Management"}],"AssociatedCategories":[{"CategoryId":2182,"CategoryName":"cPanel: Software Management","CategoryDisplayName":"HostingcPanel: Software Management"},{"CategoryId":2187,"CategoryName":"cPanel: WordPress","CategoryDisplayName":"HostingcPanel: WordPress"}],"AssociatedTags":[{"TagId":592,"Tag":" wordpress"},{"TagId":30486,"Tag":" joomla"},{"TagId":30487,"Tag":" moodle"},{"TagId":30488,"Tag":" opencart"},{"TagId":80650,"Tag":"maintenance"},{"TagId":80651,"Tag":" prestashop"},{"TagId":80652,"Tag":" coming soon page"}],"RelatedArticles":[{"ArticleId":1257,"PreferedCategoryId":2182,"ArticleTypeId":3,"ArticleName":"How to install software using Softaculous","ArticleTypeName":"How_To","Title":"How to install software using Softaculous","LiveDateTime":null,"ModifiedDateTime":"04/02/2024","MarkedAsNew":false,"MarkedAsFeatured":false}],"AssociatedMedias":[],"PreferredCategoryId":0,"RootParentCategoryName":"","RootParentCategoryId":0},"status":200,"statusText":"OK"},"/api/v1/ncpl/simplekb/getcategorybycategoryid:\"{\\\"categoryId\\\":2182}\"":{"body":{"__type":"Nc:SimpleKB:Abstractions:Dtos:CategoryDto","ParentCategoryId":12,"Parent_Category_Name":"Hosting","FriendlyId":null,"ApprovedYN":true,"TreatAsTopicYN":false,"CreatedDateTime":"03/10/2013 08:02:03","CurrentCategoryPaths":[{"__type":"Nc:SimpleKB:Abstractions:Dtos:CategoryPathDto","Level":1,"CategoryId":12,"CategoryName":"Hosting"},{"__type":"Nc:SimpleKB:Abstractions:Dtos:CategoryPathDto","Level":2,"CategoryId":2182,"CategoryName":"cPanel: Software Management"}],"RelatedCategories":[],"AssociatedArticles":[{"ArticleId":10028,"Title":"What is Website Builder and How to Use It","ArticleName":"What is Website Builder and How to Use It","LiveDateTime":"02/02/1754 00:00:00","NewTillDate":null,"FeaturedTillDate":null,"ModifiedDateTime":"12/22/2025"},{"ArticleId":10046,"Title":"How to install Moodle","ArticleName":"How to install Moodle","LiveDateTime":"02/02/1754 00:00:00","NewTillDate":null,"FeaturedTillDate":null,"ModifiedDateTime":"09/07/2018"},{"ArticleId":10047,"Title":"How to work with Node.js App","ArticleName":"How to work with Node.js App","LiveDateTime":"02/02/1754 00:00:00","NewTillDate":null,"FeaturedTillDate":null,"ModifiedDateTime":"10/10/2025"},{"ArticleId":10048,"Title":"How to work with Python App","ArticleName":"How to work with Python App","LiveDateTime":"02/02/1754 00:00:00","NewTillDate":null,"FeaturedTillDate":null,"ModifiedDateTime":"12/19/2025"},{"ArticleId":10049,"Title":"How to work with Ruby App","ArticleName":"How to work with Ruby App","LiveDateTime":"02/02/1754 00:00:00","NewTillDate":null,"FeaturedTillDate":null,"ModifiedDateTime":"10/10/2025"},{"ArticleId":10055,"Title":"How to Install a Custom Version of Magento","ArticleName":"How to Install a Custom Version of Magento","LiveDateTime":"02/02/1754 00:00:00","NewTillDate":null,"FeaturedTillDate":null,"ModifiedDateTime":"10/08/2025"},{"ArticleId":10135,"Title":"Importing websites using Website Builder","ArticleName":"Importing websites using Website Builder","LiveDateTime":"02/02/1754 00:00:00","NewTillDate":null,"FeaturedTillDate":null,"ModifiedDateTime":"12/22/2024"},{"ArticleId":10162,"Title":"How to create a drop-down menu in Website Builder","ArticleName":"How to create a drop-down menu in Website Builder","LiveDateTime":"02/02/1754 00:00:00","NewTillDate":null,"FeaturedTillDate":null,"ModifiedDateTime":"12/22/2021"},{"ArticleId":10318,"Title":"How to create and use Google Maps Platform API key for Website Builder","ArticleName":"How to create and use Google Maps Platform API key for Website Builder","LiveDateTime":"02/02/1754 00:00:00","NewTillDate":null,"FeaturedTillDate":null,"ModifiedDateTime":"12/01/2021"},{"ArticleId":10714,"Title":"What is Sitejet Builder and how to use it","ArticleName":"What is Sitejet Builder and how to use it","LiveDateTime":"02/02/1754 00:00:00","NewTillDate":null,"FeaturedTillDate":null,"ModifiedDateTime":"05/29/2025"},{"ArticleId":10753,"Title":"How to deploy a Django application on Shared Servers","ArticleName":"How to deploy a Django application on Shared Servers","LiveDateTime":"02/02/1754 00:00:00","NewTillDate":null,"FeaturedTillDate":null,"ModifiedDateTime":"11/24/2025"},{"ArticleId":9399,"Title":"How to speed up and optimize a WordPress website","ArticleName":"How to speed up and optimize a WordPress website","LiveDateTime":"02/02/1754 00:00:00","NewTillDate":null,"FeaturedTillDate":null,"ModifiedDateTime":"01/14/2025"},{"ArticleId":152,"Title":"Does cPanel include Softaculous?","ArticleName":"Does cPanel include Softaculous?","LiveDateTime":"02/02/1754 00:00:00","NewTillDate":null,"FeaturedTillDate":null,"ModifiedDateTime":"09/30/2019"},{"ArticleId":1257,"Title":"How to install software using Softaculous","ArticleName":"How to install software using Softaculous","LiveDateTime":"02/02/1754 00:00:00","NewTillDate":null,"FeaturedTillDate":null,"ModifiedDateTime":"04/02/2024"},{"ArticleId":1258,"Title":"How to work with scripts in Softaculous","ArticleName":"How to work with scripts in Softaculous","LiveDateTime":"02/02/1754 00:00:00","NewTillDate":null,"FeaturedTillDate":null,"ModifiedDateTime":"04/11/2025"},{"ArticleId":9199,"Title":"How to install Joomla with Softaculous","ArticleName":"How to install Joomla with Softaculous","LiveDateTime":"02/02/1754 00:00:00","NewTillDate":null,"FeaturedTillDate":null,"ModifiedDateTime":"07/13/2021"},{"ArticleId":9323,"Title":"How to reset Joomla admin password","ArticleName":"How to reset Joomla admin password","LiveDateTime":"02/02/1754 00:00:00","NewTillDate":null,"FeaturedTillDate":null,"ModifiedDateTime":"12/10/2021"},{"ArticleId":9951,"Title":"Maintenance mode for different CMS","ArticleName":"Maintenance mode for different CMS","LiveDateTime":"02/02/1754 00:00:00","NewTillDate":null,"FeaturedTillDate":null,"ModifiedDateTime":"10/21/2022"},{"ArticleId":9862,"Title":"How to speed up and optimize a Joomla website","ArticleName":"How to speed up and optimize a Joomla website","LiveDateTime":"02/02/1754 00:00:00","NewTillDate":null,"FeaturedTillDate":null,"ModifiedDateTime":"12/21/2021"},{"ArticleId":9839,"Title":"How to change Joomla site address (URL)","ArticleName":"How to change Joomla site address (URL)","LiveDateTime":"02/02/1754 00:00:00","NewTillDate":null,"FeaturedTillDate":null,"ModifiedDateTime":"03/19/2024"},{"ArticleId":9898,"Title":"How to install Joomla templates","ArticleName":"How to install Joomla templates","LiveDateTime":"02/02/1754 00:00:00","NewTillDate":null,"FeaturedTillDate":null,"ModifiedDateTime":"12/21/2021"},{"ArticleId":9520,"Title":"How to flush Joomla caching plugins","ArticleName":"How to flush Joomla caching plugins","LiveDateTime":"02/02/1754 00:00:00","NewTillDate":null,"FeaturedTillDate":null,"ModifiedDateTime":"06/11/2024"},{"ArticleId":9963,"Title":"How to set up HTTPS for Joomla","ArticleName":"How to set up HTTPS for Joomla","LiveDateTime":"02/02/1754 00:00:00","NewTillDate":null,"FeaturedTillDate":null,"ModifiedDateTime":"12/28/2020"},{"ArticleId":9981,"Title":"How to install Flarum","ArticleName":"How to install Flarum","LiveDateTime":"02/02/1754 00:00:00","NewTillDate":null,"FeaturedTillDate":null,"ModifiedDateTime":"06/20/2022"},{"ArticleId":9938,"Title":"How to enable https redirection using Namecheap SSL plugin for Prestashop","ArticleName":"How to enable https redirection using Namecheap SSL plugin for Prestashop","LiveDateTime":"02/02/1754 00:00:00","NewTillDate":null,"FeaturedTillDate":null,"ModifiedDateTime":"03/26/2024"},{"ArticleId":9244,"Title":"How to reset PrestaShop admin password","ArticleName":"How to reset PrestaShop admin password","LiveDateTime":"02/02/1754 00:00:00","NewTillDate":null,"FeaturedTillDate":null,"ModifiedDateTime":"01/25/2022"},{"ArticleId":9940,"Title":"How to enable https redirection using Namecheap SSL plugin for Opencart","ArticleName":"How to enable https redirection using Namecheap SSL plugin for Opencart","LiveDateTime":"02/02/1754 00:00:00","NewTillDate":null,"FeaturedTillDate":null,"ModifiedDateTime":"03/04/2022"},{"ArticleId":9664,"Title":"How to change Opencart URL","ArticleName":"How to change Opencart URL","LiveDateTime":"02/02/1754 00:00:00","NewTillDate":null,"FeaturedTillDate":null,"ModifiedDateTime":"03/19/2024"},{"ArticleId":9695,"Title":"How to install a new theme for OpenCart","ArticleName":"How to install a new theme for OpenCart","LiveDateTime":"02/02/1754 00:00:00","NewTillDate":null,"FeaturedTillDate":null,"ModifiedDateTime":"12/22/2021"},{"ArticleId":9939,"Title":"How to enable https redirection using Namecheap SSL plugin for Magento 2","ArticleName":"How to enable https redirection using Namecheap SSL plugin for Magento 2","LiveDateTime":"02/02/1754 00:00:00","NewTillDate":null,"FeaturedTillDate":null,"ModifiedDateTime":"03/26/2024"},{"ArticleId":9836,"Title":"How to install XenForo","ArticleName":"How to install XenForo","LiveDateTime":"02/02/1754 00:00:00","NewTillDate":null,"FeaturedTillDate":null,"ModifiedDateTime":"12/16/2021"}],"AssociatedTags":[],"CategoryId":2182,"CategoryName":"cPanel: Software Management"},"status":200,"statusText":"OK"},"/api/v1/ncpl/simplekb/getcategories:\"{\\\"parentCategoryId\\\":0,\\\"getTree\\\":true}\"":{"body":[{"__type":"Nc:SimpleKB:Abstractions:Dtos:CategoryItemDto","ParentCategoryId":93,"TreatAsTopicYN":false,"Description":"","ImageUrl":"","ShortDesc":"","CategoryId":2216,"CategoryName":"Spam Protection"},{"__type":"Nc:SimpleKB:Abstractions:Dtos:CategoryItemDto","ParentCategoryId":14,"TreatAsTopicYN":false,"Description":"","ImageUrl":"","ShortDesc":"","CategoryId":2217,"CategoryName":"Renewal"},{"__type":"Nc:SimpleKB:Abstractions:Dtos:CategoryItemDto","ParentCategoryId":14,"TreatAsTopicYN":false,"Description":"","ImageUrl":"","ShortDesc":"","CategoryId":2218,"CategoryName":"cPanel SSL Plugin"},{"__type":"Nc:SimpleKB:Abstractions:Dtos:CategoryItemDto","ParentCategoryId":12,"TreatAsTopicYN":false,"Description":"","ImageUrl":"","ShortDesc":"","CategoryId":2219,"CategoryName":"PHP Configuration"},{"__type":"Nc:SimpleKB:Abstractions:Dtos:CategoryItemDto","ParentCategoryId":14,"TreatAsTopicYN":false,"Description":"","ImageUrl":"","ShortDesc":"","CategoryId":2221,"CategoryName":"Multi-Domain SSL Certificates"},{"__type":"Nc:SimpleKB:Abstractions:Dtos:CategoryItemDto","ParentCategoryId":14,"TreatAsTopicYN":false,"Description":"","ImageUrl":"","ShortDesc":"","CategoryId":2222,"CategoryName":"Cancellation"},{"__type":"Nc:SimpleKB:Abstractions:Dtos:CategoryItemDto","ParentCategoryId":14,"TreatAsTopicYN":false,"Description":"","ImageUrl":"","ShortDesc":"","CategoryId":2223,"CategoryName":"Browser errors"},{"__type":"Nc:SimpleKB:Abstractions:Dtos:CategoryItemDto","ParentCategoryId":14,"TreatAsTopicYN":false,"Description":"","ImageUrl":"","ShortDesc":"","CategoryId":2224,"CategoryName":"Site Seal, Logo"},{"__type":"Nc:SimpleKB:Abstractions:Dtos:CategoryItemDto","ParentCategoryId":12,"TreatAsTopicYN":false,"Description":"","ImageUrl":"","ShortDesc":"","CategoryId":2225,"CategoryName":"SEO"},{"__type":"Nc:SimpleKB:Abstractions:Dtos:CategoryItemDto","ParentCategoryId":93,"TreatAsTopicYN":false,"Description":"","ImageUrl":"","ShortDesc":"","CategoryId":2226,"CategoryName":"Email Migration"},{"__type":"Nc:SimpleKB:Abstractions:Dtos:CategoryItemDto","ParentCategoryId":2211,"TreatAsTopicYN":false,"Description":"","ImageUrl":"","ShortDesc":"","CategoryId":2227,"CategoryName":"SSL Resellers"},{"__type":"Nc:SimpleKB:Abstractions:Dtos:CategoryItemDto","ParentCategoryId":0,"TreatAsTopicYN":true,"Description":"","ImageUrl":"/assets/img/pictograms/150/cloud-red.png","ShortDesc":"","CategoryId":2228,"CategoryName":"Apps","SubCategories":[{"__type":"Nc:SimpleKB:Abstractions:Dtos:CategoryItemDto","ParentCategoryId":2228,"TreatAsTopicYN":false,"Description":"","ImageUrl":"","ShortDesc":"","CategoryId":2251,"CategoryName":"Supersonic CDN"},{"__type":"Nc:SimpleKB:Abstractions:Dtos:CategoryItemDto","ParentCategoryId":2228,"TreatAsTopicYN":false,"Description":"","ImageUrl":"","ShortDesc":"","CategoryId":2298,"CategoryName":"Site Maker"},{"__type":"Nc:SimpleKB:Abstractions:Dtos:CategoryItemDto","ParentCategoryId":2228,"TreatAsTopicYN":false,"Description":"","ImageUrl":"","ShortDesc":"","CategoryId":177,"CategoryName":"Google Workspace (formerly G Suite)"}]},{"__type":"Nc:SimpleKB:Abstractions:Dtos:CategoryItemDto","ParentCategoryId":2211,"TreatAsTopicYN":false,"Description":"","ImageUrl":"","ShortDesc":"","CategoryId":2229,"CategoryName":"Hosting Resellers"},{"__type":"Nc:SimpleKB:Abstractions:Dtos:CategoryItemDto","ParentCategoryId":34,"TreatAsTopicYN":false,"Description":"","ImageUrl":"","ShortDesc":"","CategoryId":2232,"CategoryName":"DNSSEC"},{"__type":"Nc:SimpleKB:Abstractions:Dtos:CategoryItemDto","ParentCategoryId":34,"TreatAsTopicYN":false,"Description":"","ImageUrl":"","ShortDesc":"","CategoryId":2234,"CategoryName":"Google Workspace (formerly G Suite)"},{"__type":"Nc:SimpleKB:Abstractions:Dtos:CategoryItemDto","ParentCategoryId":34,"TreatAsTopicYN":false,"Description":"","ImageUrl":"","ShortDesc":"","CategoryId":2237,"CategoryName":"Host records setup"},{"__type":"Nc:SimpleKB:Abstractions:Dtos:CategoryItemDto","ParentCategoryId":14,"TreatAsTopicYN":false,"Description":"","ImageUrl":"","ShortDesc":"","CategoryId":2238,"CategoryName":"SSL installation errors"},{"__type":"Nc:SimpleKB:Abstractions:Dtos:CategoryItemDto","ParentCategoryId":0,"TreatAsTopicYN":false,"Description":"","ImageUrl":"/assets/img/pictograms/150/easywp-red.png","ShortDesc":"","CategoryId":2239,"CategoryName":"EasyWP","SubCategories":[{"__type":"Nc:SimpleKB:Abstractions:Dtos:CategoryItemDto","ParentCategoryId":2239,"TreatAsTopicYN":false,"Description":"","ImageUrl":"","ShortDesc":"","CategoryId":2280,"CategoryName":"Getting Started"},{"__type":"Nc:SimpleKB:Abstractions:Dtos:CategoryItemDto","ParentCategoryId":2239,"TreatAsTopicYN":false,"Description":"","ImageUrl":"","ShortDesc":"","CategoryId":2279,"CategoryName":"General Information"},{"__type":"Nc:SimpleKB:Abstractions:Dtos:CategoryItemDto","ParentCategoryId":2239,"TreatAsTopicYN":false,"Description":"","ImageUrl":"","ShortDesc":"","CategoryId":2281,"CategoryName":"WordPress Migration"},{"__type":"Nc:SimpleKB:Abstractions:Dtos:CategoryItemDto","ParentCategoryId":2239,"TreatAsTopicYN":false,"Description":"","ImageUrl":"","ShortDesc":"","CategoryId":2282,"CategoryName":"Plugins and Themes"},{"__type":"Nc:SimpleKB:Abstractions:Dtos:CategoryItemDto","ParentCategoryId":2239,"TreatAsTopicYN":false,"Description":"","ImageUrl":"","ShortDesc":"","CategoryId":2284,"CategoryName":"WordPress Management"},{"__type":"Nc:SimpleKB:Abstractions:Dtos:CategoryItemDto","ParentCategoryId":2239,"TreatAsTopicYN":false,"Description":"","ImageUrl":"","ShortDesc":"","CategoryId":2285,"CategoryName":"SFTP and Database access"},{"__type":"Nc:SimpleKB:Abstractions:Dtos:CategoryItemDto","ParentCategoryId":2239,"TreatAsTopicYN":false,"Description":"","ImageUrl":"","ShortDesc":"","CategoryId":2286,"CategoryName":"Domains questions"},{"__type":"Nc:SimpleKB:Abstractions:Dtos:CategoryItemDto","ParentCategoryId":2239,"TreatAsTopicYN":false,"Description":"","ImageUrl":"","ShortDesc":"","CategoryId":2288,"CategoryName":"Billing questions"},{"__type":"Nc:SimpleKB:Abstractions:Dtos:CategoryItemDto","ParentCategoryId":2239,"TreatAsTopicYN":false,"Description":"","ImageUrl":"","ShortDesc":"","CategoryId":2287,"CategoryName":"SSL questions"}]},{"__type":"Nc:SimpleKB:Abstractions:Dtos:CategoryItemDto","ParentCategoryId":2228,"TreatAsTopicYN":false,"Description":"","ImageUrl":"","ShortDesc":"","CategoryId":2251,"CategoryName":"Supersonic CDN"},{"__type":"Nc:SimpleKB:Abstractions:Dtos:CategoryItemDto","ParentCategoryId":12,"TreatAsTopicYN":false,"Description":"","ImageUrl":"","ShortDesc":"","CategoryId":2252,"CategoryName":"InterWorx questions"},{"__type":"Nc:SimpleKB:Abstractions:Dtos:CategoryItemDto","ParentCategoryId":2253,"TreatAsTopicYN":false,"Description":"","ImageUrl":"","ShortDesc":"","CategoryId":2254,"CategoryName":"Domains How-To"},{"__type":"Nc:SimpleKB:Abstractions:Dtos:CategoryItemDto","ParentCategoryId":2253,"TreatAsTopicYN":false,"Description":"","ImageUrl":"","ShortDesc":"","CategoryId":2255,"CategoryName":"Hosting How-To"},{"__type":"Nc:SimpleKB:Abstractions:Dtos:CategoryItemDto","ParentCategoryId":2253,"TreatAsTopicYN":false,"Description":"","ImageUrl":"","ShortDesc":"","CategoryId":2257,"CategoryName":"Sales & Payments How-To"},{"__type":"Nc:SimpleKB:Abstractions:Dtos:CategoryItemDto","ParentCategoryId":2253,"TreatAsTopicYN":false,"Description":"","ImageUrl":"","ShortDesc":"","CategoryId":2258,"CategoryName":"cPanel Email How-To"},{"__type":"Nc:SimpleKB:Abstractions:Dtos:CategoryItemDto","ParentCategoryId":93,"TreatAsTopicYN":false,"Description":"","ImageUrl":"","ShortDesc":"","CategoryId":2260,"CategoryName":"Private Email Contacts and Calendars Setup"},{"__type":"Nc:SimpleKB:Abstractions:Dtos:CategoryItemDto","ParentCategoryId":2253,"TreatAsTopicYN":false,"Description":"","ImageUrl":"","ShortDesc":"","CategoryId":2262,"CategoryName":"EasyWP How-To"},{"__type":"Nc:SimpleKB:Abstractions:Dtos:CategoryItemDto","ParentCategoryId":0,"TreatAsTopicYN":false,"Description":"","ImageUrl":"https://download.namecheap.com/assets/img/domainvault-red@2x.png","ShortDesc":"","CategoryId":2289,"CategoryName":"Domain Vault","SubCategories":[]},{"__type":"Nc:SimpleKB:Abstractions:Dtos:CategoryItemDto","ParentCategoryId":14,"TreatAsTopicYN":false,"Description":"","ImageUrl":"","ShortDesc":"","CategoryId":2290,"CategoryName":"CSR code"},{"__type":"Nc:SimpleKB:Abstractions:Dtos:CategoryItemDto","ParentCategoryId":12,"TreatAsTopicYN":false,"Description":"","ImageUrl":"","ShortDesc":"","CategoryId":2291,"CategoryName":"Webuzo questions"},{"__type":"Nc:SimpleKB:Abstractions:Dtos:CategoryItemDto","ParentCategoryId":2265,"TreatAsTopicYN":false,"Description":"","ImageUrl":"","ShortDesc":"","CategoryId":2292,"CategoryName":"Browser Extensions"},{"__type":"Nc:SimpleKB:Abstractions:Dtos:CategoryItemDto","ParentCategoryId":14,"TreatAsTopicYN":false,"Description":"","ImageUrl":"","ShortDesc":"","CategoryId":2293,"CategoryName":"Automated SSL management"},{"__type":"Nc:SimpleKB:Abstractions:Dtos:CategoryItemDto","ParentCategoryId":2228,"TreatAsTopicYN":false,"Description":"","ImageUrl":"","ShortDesc":"","CategoryId":2298,"CategoryName":"Site Maker"},{"__type":"Nc:SimpleKB:Abstractions:Dtos:CategoryItemDto","ParentCategoryId":12,"TreatAsTopicYN":false,"Description":"","ImageUrl":"","ShortDesc":"","CategoryId":27,"CategoryName":"Getting Started"},{"__type":"Nc:SimpleKB:Abstractions:Dtos:CategoryItemDto","ParentCategoryId":0,"TreatAsTopicYN":false,"Description":"","ImageUrl":"/assets/img/pictograms/150/support-red.png","ShortDesc":"","CategoryId":5,"CategoryName":"General & Support","SubCategories":[]},{"__type":"Nc:SimpleKB:Abstractions:Dtos:CategoryItemDto","ParentCategoryId":2200,"TreatAsTopicYN":false,"Description":"","ImageUrl":"","ShortDesc":"","CategoryId":7,"CategoryName":"Billing FAQ"},{"__type":"Nc:SimpleKB:Abstractions:Dtos:CategoryItemDto","ParentCategoryId":2209,"TreatAsTopicYN":false,"Description":"","ImageUrl":"","ShortDesc":"","CategoryId":8,"CategoryName":"Transfer Information"},{"__type":"Nc:SimpleKB:Abstractions:Dtos:CategoryItemDto","ParentCategoryId":12,"TreatAsTopicYN":false,"Description":"","ImageUrl":"","ShortDesc":"","CategoryId":22,"CategoryName":"Hosting Information"},{"__type":"Nc:SimpleKB:Abstractions:Dtos:CategoryItemDto","ParentCategoryId":14,"TreatAsTopicYN":false,"Description":"","ImageUrl":"","ShortDesc":"","CategoryId":38,"CategoryName":"SSL General"},{"__type":"Nc:SimpleKB:Abstractions:Dtos:CategoryItemDto","ParentCategoryId":9,"TreatAsTopicYN":false,"Description":"","ImageUrl":"","ShortDesc":"","CategoryId":45,"CategoryName":"Account Security"},{"__type":"Nc:SimpleKB:Abstractions:Dtos:CategoryItemDto","ParentCategoryId":34,"TreatAsTopicYN":false,"Description":"","ImageUrl":"","ShortDesc":"","CategoryId":46,"CategoryName":"Domain Management"},{"__type":"Nc:SimpleKB:Abstractions:Dtos:CategoryItemDto","ParentCategoryId":2211,"TreatAsTopicYN":false,"Description":"","ImageUrl":"","ShortDesc":"","CategoryId":63,"CategoryName":"Namecheap API"},{"__type":"Nc:SimpleKB:Abstractions:Dtos:CategoryItemDto","ParentCategoryId":2228,"TreatAsTopicYN":false,"Description":"","ImageUrl":"","ShortDesc":"","CategoryId":177,"CategoryName":"Google Workspace (formerly G Suite)"},{"__type":"Nc:SimpleKB:Abstractions:Dtos:CategoryItemDto","ParentCategoryId":93,"TreatAsTopicYN":false,"Description":"","ImageUrl":"","ShortDesc":"","CategoryId":2179,"CategoryName":"Private Email: General Information"},{"__type":"Nc:SimpleKB:Abstractions:Dtos:CategoryItemDto","ParentCategoryId":2265,"TreatAsTopicYN":false,"Description":"","ImageUrl":"","ShortDesc":"","CategoryId":2274,"CategoryName":"General"},{"__type":"Nc:SimpleKB:Abstractions:Dtos:CategoryItemDto","ParentCategoryId":2239,"TreatAsTopicYN":false,"Description":"","ImageUrl":"","ShortDesc":"","CategoryId":2280,"CategoryName":"Getting Started"},{"__type":"Nc:SimpleKB:Abstractions:Dtos:CategoryItemDto","ParentCategoryId":2239,"TreatAsTopicYN":false,"Description":"","ImageUrl":"","ShortDesc":"","CategoryId":2279,"CategoryName":"General Information"},{"__type":"Nc:SimpleKB:Abstractions:Dtos:CategoryItemDto","ParentCategoryId":93,"TreatAsTopicYN":false,"Description":"","ImageUrl":"","ShortDesc":"","CategoryId":2215,"CategoryName":"Private Email: Mailbox Management"},{"__type":"Nc:SimpleKB:Abstractions:Dtos:CategoryItemDto","ParentCategoryId":2211,"TreatAsTopicYN":false,"Description":"","ImageUrl":"","ShortDesc":"","CategoryId":2196,"CategoryName":"WHMCS module for SSL"},{"__type":"Nc:SimpleKB:Abstractions:Dtos:CategoryItemDto","ParentCategoryId":0,"TreatAsTopicYN":false,"Description":"","ImageUrl":"/assets/img/pictograms/150/savings-red.png","ShortDesc":"","CategoryId":2200,"CategoryName":"Checkout & Billing","SubCategories":[{"__type":"Nc:SimpleKB:Abstractions:Dtos:CategoryItemDto","ParentCategoryId":2200,"TreatAsTopicYN":false,"Description":"","ImageUrl":"","ShortDesc":"","CategoryId":7,"CategoryName":"Billing FAQ"},{"__type":"Nc:SimpleKB:Abstractions:Dtos:CategoryItemDto","ParentCategoryId":2200,"TreatAsTopicYN":false,"Description":"","ImageUrl":"","ShortDesc":"","CategoryId":2201,"CategoryName":"Domains Billing"},{"__type":"Nc:SimpleKB:Abstractions:Dtos:CategoryItemDto","ParentCategoryId":2200,"TreatAsTopicYN":false,"Description":"","ImageUrl":"","ShortDesc":"","CategoryId":21,"CategoryName":"Hosting Billing"},{"__type":"Nc:SimpleKB:Abstractions:Dtos:CategoryItemDto","ParentCategoryId":2200,"TreatAsTopicYN":false,"Description":"","ImageUrl":"","ShortDesc":"","CategoryId":71,"CategoryName":"SSL Certificates Billing"},{"__type":"Nc:SimpleKB:Abstractions:Dtos:CategoryItemDto","ParentCategoryId":2200,"TreatAsTopicYN":false,"Description":"","ImageUrl":"","ShortDesc":"","CategoryId":2177,"CategoryName":"Private Email"}]},{"__type":"Nc:SimpleKB:Abstractions:Dtos:CategoryItemDto","ParentCategoryId":2200,"TreatAsTopicYN":false,"Description":"","ImageUrl":"","ShortDesc":"","CategoryId":2201,"CategoryName":"Domains Billing"},{"__type":"Nc:SimpleKB:Abstractions:Dtos:CategoryItemDto","ParentCategoryId":14,"TreatAsTopicYN":false,"Description":"","ImageUrl":"","ShortDesc":"","CategoryId":67,"CategoryName":"Activation"},{"__type":"Nc:SimpleKB:Abstractions:Dtos:CategoryItemDto","ParentCategoryId":2209,"TreatAsTopicYN":false,"Description":"","ImageUrl":"","ShortDesc":"","CategoryId":83,"CategoryName":"Transfer to Namecheap"},{"__type":"Nc:SimpleKB:Abstractions:Dtos:CategoryItemDto","ParentCategoryId":9,"TreatAsTopicYN":false,"Description":"","ImageUrl":"","ShortDesc":"","CategoryId":43,"CategoryName":"Profile Management"},{"__type":"Nc:SimpleKB:Abstractions:Dtos:CategoryItemDto","ParentCategoryId":34,"TreatAsTopicYN":false,"Description":"","ImageUrl":"","ShortDesc":"","CategoryId":10,"CategoryName":"DNS Questions"},{"__type":"Nc:SimpleKB:Abstractions:Dtos:CategoryItemDto","ParentCategoryId":12,"TreatAsTopicYN":false,"Description":"","ImageUrl":"","ShortDesc":"","CategoryId":29,"CategoryName":"cPanel questions"},{"__type":"Nc:SimpleKB:Abstractions:Dtos:CategoryItemDto","ParentCategoryId":2200,"TreatAsTopicYN":false,"Description":"","ImageUrl":"","ShortDesc":"","CategoryId":21,"CategoryName":"Hosting Billing"},{"__type":"Nc:SimpleKB:Abstractions:Dtos:CategoryItemDto","ParentCategoryId":34,"TreatAsTopicYN":false,"Description":"","ImageUrl":"","ShortDesc":"","CategoryId":11,"CategoryName":"Dynamic DNS"},{"__type":"Nc:SimpleKB:Abstractions:Dtos:CategoryItemDto","ParentCategoryId":9,"TreatAsTopicYN":false,"Description":"","ImageUrl":"","ShortDesc":"","CategoryId":44,"CategoryName":"Account Access"},{"__type":"Nc:SimpleKB:Abstractions:Dtos:CategoryItemDto","ParentCategoryId":2209,"TreatAsTopicYN":false,"Description":"","ImageUrl":"","ShortDesc":"","CategoryId":84,"CategoryName":"Transfer to another provider"},{"__type":"Nc:SimpleKB:Abstractions:Dtos:CategoryItemDto","ParentCategoryId":14,"TreatAsTopicYN":false,"Description":"","ImageUrl":"","ShortDesc":"","CategoryId":68,"CategoryName":"Validation"},{"__type":"Nc:SimpleKB:Abstractions:Dtos:CategoryItemDto","ParentCategoryId":12,"TreatAsTopicYN":false,"Description":"","ImageUrl":"","ShortDesc":"","CategoryId":2182,"CategoryName":"cPanel: Software Management"},{"__type":"Nc:SimpleKB:Abstractions:Dtos:CategoryItemDto","ParentCategoryId":93,"TreatAsTopicYN":false,"Description":"","ImageUrl":"","ShortDesc":"","CategoryId":2214,"CategoryName":"Email Forwarding"},{"__type":"Nc:SimpleKB:Abstractions:Dtos:CategoryItemDto","ParentCategoryId":2265,"TreatAsTopicYN":false,"Description":"","ImageUrl":"","ShortDesc":"","CategoryId":2270,"CategoryName":"Routers"},{"__type":"Nc:SimpleKB:Abstractions:Dtos:CategoryItemDto","ParentCategoryId":2239,"TreatAsTopicYN":false,"Description":"","ImageUrl":"","ShortDesc":"","CategoryId":2281,"CategoryName":"WordPress Migration"},{"__type":"Nc:SimpleKB:Abstractions:Dtos:CategoryItemDto","ParentCategoryId":2239,"TreatAsTopicYN":false,"Description":"","ImageUrl":"","ShortDesc":"","CategoryId":2282,"CategoryName":"Plugins and Themes"},{"__type":"Nc:SimpleKB:Abstractions:Dtos:CategoryItemDto","ParentCategoryId":2265,"TreatAsTopicYN":false,"Description":"","ImageUrl":"","ShortDesc":"","CategoryId":2272,"CategoryName":"TV"},{"__type":"Nc:SimpleKB:Abstractions:Dtos:CategoryItemDto","ParentCategoryId":12,"TreatAsTopicYN":false,"Description":"","ImageUrl":"","ShortDesc":"","CategoryId":2187,"CategoryName":"cPanel: WordPress"},{"__type":"Nc:SimpleKB:Abstractions:Dtos:CategoryItemDto","ParentCategoryId":2209,"TreatAsTopicYN":false,"Description":"","ImageUrl":"","ShortDesc":"","CategoryId":219,"CategoryName":"Canceled Transfers"},{"__type":"Nc:SimpleKB:Abstractions:Dtos:CategoryItemDto","ParentCategoryId":2200,"TreatAsTopicYN":false,"Description":"","ImageUrl":"","ShortDesc":"","CategoryId":71,"CategoryName":"SSL Certificates Billing"},{"__type":"Nc:SimpleKB:Abstractions:Dtos:CategoryItemDto","ParentCategoryId":93,"TreatAsTopicYN":false,"Description":"","ImageUrl":"","ShortDesc":"","CategoryId":2176,"CategoryName":"Private Email: DNS Settings"},{"__type":"Nc:SimpleKB:Abstractions:Dtos:CategoryItemDto","ParentCategoryId":14,"TreatAsTopicYN":false,"Description":"","ImageUrl":"","ShortDesc":"","CategoryId":69,"CategoryName":"Installation"},{"__type":"Nc:SimpleKB:Abstractions:Dtos:CategoryItemDto","ParentCategoryId":0,"TreatAsTopicYN":false,"Description":"","ImageUrl":"/assets/img/pictograms/150/reseller-red.png","ShortDesc":"","CategoryId":34,"CategoryName":"Domains","SubCategories":[{"__type":"Nc:SimpleKB:Abstractions:Dtos:CategoryItemDto","ParentCategoryId":34,"TreatAsTopicYN":false,"Description":"","ImageUrl":"","ShortDesc":"","CategoryId":2232,"CategoryName":"DNSSEC"},{"__type":"Nc:SimpleKB:Abstractions:Dtos:CategoryItemDto","ParentCategoryId":34,"TreatAsTopicYN":false,"Description":"","ImageUrl":"","ShortDesc":"","CategoryId":2234,"CategoryName":"Google Workspace (formerly G Suite)"},{"__type":"Nc:SimpleKB:Abstractions:Dtos:CategoryItemDto","ParentCategoryId":34,"TreatAsTopicYN":false,"Description":"","ImageUrl":"","ShortDesc":"","CategoryId":2237,"CategoryName":"Host records setup"},{"__type":"Nc:SimpleKB:Abstractions:Dtos:CategoryItemDto","ParentCategoryId":34,"TreatAsTopicYN":false,"Description":"","ImageUrl":"","ShortDesc":"","CategoryId":46,"CategoryName":"Domain Management"},{"__type":"Nc:SimpleKB:Abstractions:Dtos:CategoryItemDto","ParentCategoryId":34,"TreatAsTopicYN":false,"Description":"","ImageUrl":"","ShortDesc":"","CategoryId":10,"CategoryName":"DNS Questions"},{"__type":"Nc:SimpleKB:Abstractions:Dtos:CategoryItemDto","ParentCategoryId":34,"TreatAsTopicYN":false,"Description":"","ImageUrl":"","ShortDesc":"","CategoryId":11,"CategoryName":"Dynamic DNS"},{"__type":"Nc:SimpleKB:Abstractions:Dtos:CategoryItemDto","ParentCategoryId":34,"TreatAsTopicYN":false,"Description":"","ImageUrl":"","ShortDesc":"","CategoryId":35,"CategoryName":"Registrations"},{"__type":"Nc:SimpleKB:Abstractions:Dtos:CategoryItemDto","ParentCategoryId":34,"TreatAsTopicYN":false,"Description":"","ImageUrl":"","ShortDesc":"","CategoryId":2207,"CategoryName":"Renewal questions"},{"__type":"Nc:SimpleKB:Abstractions:Dtos:CategoryItemDto","ParentCategoryId":34,"TreatAsTopicYN":false,"Description":"","ImageUrl":"","ShortDesc":"","CategoryId":36,"CategoryName":"Domains with extended attributes"},{"__type":"Nc:SimpleKB:Abstractions:Dtos:CategoryItemDto","ParentCategoryId":34,"TreatAsTopicYN":false,"Description":"","ImageUrl":"","ShortDesc":"","CategoryId":51,"CategoryName":"FreeDNS"},{"__type":"Nc:SimpleKB:Abstractions:Dtos:CategoryItemDto","ParentCategoryId":34,"TreatAsTopicYN":false,"Description":"","ImageUrl":"","ShortDesc":"","CategoryId":15,"CategoryName":"Namecheap Market"},{"__type":"Nc:SimpleKB:Abstractions:Dtos:CategoryItemDto","ParentCategoryId":34,"TreatAsTopicYN":false,"Description":"","ImageUrl":"","ShortDesc":"","CategoryId":2208,"CategoryName":"3rd Party Services Setup"},{"__type":"Nc:SimpleKB:Abstractions:Dtos:CategoryItemDto","ParentCategoryId":34,"TreatAsTopicYN":false,"Description":"","ImageUrl":"","ShortDesc":"","CategoryId":2278,"CategoryName":"Handshake TLDs"}]},{"__type":"Nc:SimpleKB:Abstractions:Dtos:CategoryItemDto","ParentCategoryId":34,"TreatAsTopicYN":false,"Description":"","ImageUrl":"","ShortDesc":"","CategoryId":35,"CategoryName":"Registrations"},{"__type":"Nc:SimpleKB:Abstractions:Dtos:CategoryItemDto","ParentCategoryId":14,"TreatAsTopicYN":false,"Description":"","ImageUrl":"","ShortDesc":"","CategoryId":70,"CategoryName":"Reissuance"},{"__type":"Nc:SimpleKB:Abstractions:Dtos:CategoryItemDto","ParentCategoryId":0,"TreatAsTopicYN":false,"Description":"","ImageUrl":"/assets/img/pictograms/150/protection-red.png","ShortDesc":"","CategoryId":37,"CategoryName":"Domain Privacy Protection","SubCategories":[]},{"__type":"Nc:SimpleKB:Abstractions:Dtos:CategoryItemDto","ParentCategoryId":2200,"TreatAsTopicYN":false,"Description":"","ImageUrl":"","ShortDesc":"","CategoryId":2177,"CategoryName":"Private Email"},{"__type":"Nc:SimpleKB:Abstractions:Dtos:CategoryItemDto","ParentCategoryId":93,"TreatAsTopicYN":false,"Description":"","ImageUrl":"","ShortDesc":"","CategoryId":2178,"CategoryName":"Private Email: Webmail Features"},{"__type":"Nc:SimpleKB:Abstractions:Dtos:CategoryItemDto","ParentCategoryId":34,"TreatAsTopicYN":false,"Description":"","ImageUrl":"","ShortDesc":"","CategoryId":2207,"CategoryName":"Renewal questions"},{"__type":"Nc:SimpleKB:Abstractions:Dtos:CategoryItemDto","ParentCategoryId":12,"TreatAsTopicYN":false,"Description":"","ImageUrl":"","ShortDesc":"","CategoryId":2210,"CategoryName":"cPanel Add-ons"},{"__type":"Nc:SimpleKB:Abstractions:Dtos:CategoryItemDto","ParentCategoryId":2265,"TreatAsTopicYN":false,"Description":"","ImageUrl":"","ShortDesc":"","CategoryId":2273,"CategoryName":"Gaming Consoles"},{"__type":"Nc:SimpleKB:Abstractions:Dtos:CategoryItemDto","ParentCategoryId":2239,"TreatAsTopicYN":false,"Description":"","ImageUrl":"","ShortDesc":"","CategoryId":2284,"CategoryName":"WordPress Management"},{"__type":"Nc:SimpleKB:Abstractions:Dtos:CategoryItemDto","ParentCategoryId":2239,"TreatAsTopicYN":false,"Description":"","ImageUrl":"","ShortDesc":"","CategoryId":2285,"CategoryName":"SFTP and Database access"},{"__type":"Nc:SimpleKB:Abstractions:Dtos:CategoryItemDto","ParentCategoryId":2265,"TreatAsTopicYN":false,"Description":"","ImageUrl":"","ShortDesc":"","CategoryId":2268,"CategoryName":"macOS"},{"__type":"Nc:SimpleKB:Abstractions:Dtos:CategoryItemDto","ParentCategoryId":93,"TreatAsTopicYN":false,"Description":"","ImageUrl":"","ShortDesc":"","CategoryId":2175,"CategoryName":"Private Email: Client Setup"},{"__type":"Nc:SimpleKB:Abstractions:Dtos:CategoryItemDto","ParentCategoryId":0,"TreatAsTopicYN":false,"Description":"","ImageUrl":"/assets/img/pictograms/150/status-red.png","ShortDesc":"","CategoryId":2209,"CategoryName":"Domain Transfers","SubCategories":[{"__type":"Nc:SimpleKB:Abstractions:Dtos:CategoryItemDto","ParentCategoryId":2209,"TreatAsTopicYN":false,"Description":"","ImageUrl":"","ShortDesc":"","CategoryId":8,"CategoryName":"Transfer Information"},{"__type":"Nc:SimpleKB:Abstractions:Dtos:CategoryItemDto","ParentCategoryId":2209,"TreatAsTopicYN":false,"Description":"","ImageUrl":"","ShortDesc":"","CategoryId":83,"CategoryName":"Transfer to Namecheap"},{"__type":"Nc:SimpleKB:Abstractions:Dtos:CategoryItemDto","ParentCategoryId":2209,"TreatAsTopicYN":false,"Description":"","ImageUrl":"","ShortDesc":"","CategoryId":84,"CategoryName":"Transfer to another provider"},{"__type":"Nc:SimpleKB:Abstractions:Dtos:CategoryItemDto","ParentCategoryId":2209,"TreatAsTopicYN":false,"Description":"","ImageUrl":"","ShortDesc":"","CategoryId":219,"CategoryName":"Canceled Transfers"}]},{"__type":"Nc:SimpleKB:Abstractions:Dtos:CategoryItemDto","ParentCategoryId":12,"TreatAsTopicYN":false,"Description":"","ImageUrl":"","ShortDesc":"","CategoryId":48,"CategoryName":"VPS"},{"__type":"Nc:SimpleKB:Abstractions:Dtos:CategoryItemDto","ParentCategoryId":34,"TreatAsTopicYN":false,"Description":"","ImageUrl":"","ShortDesc":"","CategoryId":36,"CategoryName":"Domains with extended attributes"},{"__type":"Nc:SimpleKB:Abstractions:Dtos:CategoryItemDto","ParentCategoryId":0,"TreatAsTopicYN":true,"Description":"","ImageUrl":"/assets/img/pictograms/150/server-red.png","ShortDesc":"","CategoryId":12,"CategoryName":"Hosting","SubCategories":[{"__type":"Nc:SimpleKB:Abstractions:Dtos:CategoryItemDto","ParentCategoryId":12,"TreatAsTopicYN":false,"Description":"","ImageUrl":"","ShortDesc":"","CategoryId":2219,"CategoryName":"PHP Configuration"},{"__type":"Nc:SimpleKB:Abstractions:Dtos:CategoryItemDto","ParentCategoryId":12,"TreatAsTopicYN":false,"Description":"","ImageUrl":"","ShortDesc":"","CategoryId":2225,"CategoryName":"SEO"},{"__type":"Nc:SimpleKB:Abstractions:Dtos:CategoryItemDto","ParentCategoryId":12,"TreatAsTopicYN":false,"Description":"","ImageUrl":"","ShortDesc":"","CategoryId":2252,"CategoryName":"InterWorx questions"},{"__type":"Nc:SimpleKB:Abstractions:Dtos:CategoryItemDto","ParentCategoryId":12,"TreatAsTopicYN":false,"Description":"","ImageUrl":"","ShortDesc":"","CategoryId":2291,"CategoryName":"Webuzo questions"},{"__type":"Nc:SimpleKB:Abstractions:Dtos:CategoryItemDto","ParentCategoryId":12,"TreatAsTopicYN":false,"Description":"","ImageUrl":"","ShortDesc":"","CategoryId":27,"CategoryName":"Getting Started"},{"__type":"Nc:SimpleKB:Abstractions:Dtos:CategoryItemDto","ParentCategoryId":12,"TreatAsTopicYN":false,"Description":"","ImageUrl":"","ShortDesc":"","CategoryId":22,"CategoryName":"Hosting Information"},{"__type":"Nc:SimpleKB:Abstractions:Dtos:CategoryItemDto","ParentCategoryId":12,"TreatAsTopicYN":false,"Description":"","ImageUrl":"","ShortDesc":"","CategoryId":29,"CategoryName":"cPanel questions"},{"__type":"Nc:SimpleKB:Abstractions:Dtos:CategoryItemDto","ParentCategoryId":12,"TreatAsTopicYN":false,"Description":"","ImageUrl":"","ShortDesc":"","CategoryId":2182,"CategoryName":"cPanel: Software Management"},{"__type":"Nc:SimpleKB:Abstractions:Dtos:CategoryItemDto","ParentCategoryId":12,"TreatAsTopicYN":false,"Description":"","ImageUrl":"","ShortDesc":"","CategoryId":2187,"CategoryName":"cPanel: WordPress"},{"__type":"Nc:SimpleKB:Abstractions:Dtos:CategoryItemDto","ParentCategoryId":12,"TreatAsTopicYN":false,"Description":"","ImageUrl":"","ShortDesc":"","CategoryId":2210,"CategoryName":"cPanel Add-ons"},{"__type":"Nc:SimpleKB:Abstractions:Dtos:CategoryItemDto","ParentCategoryId":12,"TreatAsTopicYN":false,"Description":"","ImageUrl":"","ShortDesc":"","CategoryId":48,"CategoryName":"VPS"},{"__type":"Nc:SimpleKB:Abstractions:Dtos:CategoryItemDto","ParentCategoryId":12,"TreatAsTopicYN":false,"Description":"","ImageUrl":"","ShortDesc":"","CategoryId":2188,"CategoryName":"Dedicated Server"},{"__type":"Nc:SimpleKB:Abstractions:Dtos:CategoryItemDto","ParentCategoryId":12,"TreatAsTopicYN":false,"Description":"","ImageUrl":"","ShortDesc":"","CategoryId":30,"CategoryName":"WHM questions"},{"__type":"Nc:SimpleKB:Abstractions:Dtos:CategoryItemDto","ParentCategoryId":12,"TreatAsTopicYN":false,"Description":"","ImageUrl":"","ShortDesc":"","CategoryId":32,"CategoryName":"DNS settings"},{"__type":"Nc:SimpleKB:Abstractions:Dtos:CategoryItemDto","ParentCategoryId":12,"TreatAsTopicYN":false,"Description":"","ImageUrl":"","ShortDesc":"","CategoryId":103,"CategoryName":"LVE (CloudLinux)"},{"__type":"Nc:SimpleKB:Abstractions:Dtos:CategoryItemDto","ParentCategoryId":12,"TreatAsTopicYN":false,"Description":"","ImageUrl":"","ShortDesc":"","CategoryId":89,"CategoryName":"SSH Access"},{"__type":"Nc:SimpleKB:Abstractions:Dtos:CategoryItemDto","ParentCategoryId":12,"TreatAsTopicYN":false,"Description":"","ImageUrl":"","ShortDesc":"","CategoryId":205,"CategoryName":"FTP questions"},{"__type":"Nc:SimpleKB:Abstractions:Dtos:CategoryItemDto","ParentCategoryId":12,"TreatAsTopicYN":false,"Description":"","ImageUrl":"","ShortDesc":"","CategoryId":2180,"CategoryName":"MySQL questions"},{"__type":"Nc:SimpleKB:Abstractions:Dtos:CategoryItemDto","ParentCategoryId":12,"TreatAsTopicYN":false,"Description":"","ImageUrl":"","ShortDesc":"","CategoryId":2199,"CategoryName":"Hosting Migration"},{"__type":"Nc:SimpleKB:Abstractions:Dtos:CategoryItemDto","ParentCategoryId":12,"TreatAsTopicYN":false,"Description":"","ImageUrl":"","ShortDesc":"","CategoryId":2194,"CategoryName":"Tips & Tricks"},{"__type":"Nc:SimpleKB:Abstractions:Dtos:CategoryItemDto","ParentCategoryId":12,"TreatAsTopicYN":false,"Description":"","ImageUrl":"","ShortDesc":"","CategoryId":239,"CategoryName":"WHMCS"},{"__type":"Nc:SimpleKB:Abstractions:Dtos:CategoryItemDto","ParentCategoryId":12,"TreatAsTopicYN":false,"Description":"","ImageUrl":"","ShortDesc":"","CategoryId":33,"CategoryName":"SSL Installation"}]},{"__type":"Nc:SimpleKB:Abstractions:Dtos:CategoryItemDto","ParentCategoryId":93,"TreatAsTopicYN":false,"Description":"","ImageUrl":"","ShortDesc":"","CategoryId":2171,"CategoryName":"Private Email: Active Sync (Exchange) Setup"},{"__type":"Nc:SimpleKB:Abstractions:Dtos:CategoryItemDto","ParentCategoryId":12,"TreatAsTopicYN":false,"Description":"","ImageUrl":"","ShortDesc":"","CategoryId":2188,"CategoryName":"Dedicated Server"},{"__type":"Nc:SimpleKB:Abstractions:Dtos:CategoryItemDto","ParentCategoryId":2265,"TreatAsTopicYN":false,"Description":"","ImageUrl":"","ShortDesc":"","CategoryId":2269,"CategoryName":"iOS"},{"__type":"Nc:SimpleKB:Abstractions:Dtos:CategoryItemDto","ParentCategoryId":2239,"TreatAsTopicYN":false,"Description":"","ImageUrl":"","ShortDesc":"","CategoryId":2286,"CategoryName":"Domains questions"},{"__type":"Nc:SimpleKB:Abstractions:Dtos:CategoryItemDto","ParentCategoryId":2239,"TreatAsTopicYN":false,"Description":"","ImageUrl":"","ShortDesc":"","CategoryId":2288,"CategoryName":"Billing questions"},{"__type":"Nc:SimpleKB:Abstractions:Dtos:CategoryItemDto","ParentCategoryId":2265,"TreatAsTopicYN":false,"Description":"","ImageUrl":"","ShortDesc":"","CategoryId":2271,"CategoryName":"Linux"},{"__type":"Nc:SimpleKB:Abstractions:Dtos:CategoryItemDto","ParentCategoryId":12,"TreatAsTopicYN":false,"Description":"","ImageUrl":"","ShortDesc":"","CategoryId":30,"CategoryName":"WHM questions"},{"__type":"Nc:SimpleKB:Abstractions:Dtos:CategoryItemDto","ParentCategoryId":93,"TreatAsTopicYN":false,"Description":"","ImageUrl":"","ShortDesc":"","CategoryId":31,"CategoryName":"cPanel Email FAQs"},{"__type":"Nc:SimpleKB:Abstractions:Dtos:CategoryItemDto","ParentCategoryId":34,"TreatAsTopicYN":false,"Description":"","ImageUrl":"","ShortDesc":"","CategoryId":51,"CategoryName":"FreeDNS"},{"__type":"Nc:SimpleKB:Abstractions:Dtos:CategoryItemDto","ParentCategoryId":0,"TreatAsTopicYN":false,"Description":"","ImageUrl":"/assets/img/pictograms/150/email-red.png","ShortDesc":"","CategoryId":93,"CategoryName":"Email service","SubCategories":[{"__type":"Nc:SimpleKB:Abstractions:Dtos:CategoryItemDto","ParentCategoryId":93,"TreatAsTopicYN":false,"Description":"","ImageUrl":"","ShortDesc":"","CategoryId":2216,"CategoryName":"Spam Protection"},{"__type":"Nc:SimpleKB:Abstractions:Dtos:CategoryItemDto","ParentCategoryId":93,"TreatAsTopicYN":false,"Description":"","ImageUrl":"","ShortDesc":"","CategoryId":2226,"CategoryName":"Email Migration"},{"__type":"Nc:SimpleKB:Abstractions:Dtos:CategoryItemDto","ParentCategoryId":93,"TreatAsTopicYN":false,"Description":"","ImageUrl":"","ShortDesc":"","CategoryId":2260,"CategoryName":"Private Email Contacts and Calendars Setup"},{"__type":"Nc:SimpleKB:Abstractions:Dtos:CategoryItemDto","ParentCategoryId":93,"TreatAsTopicYN":false,"Description":"","ImageUrl":"","ShortDesc":"","CategoryId":2179,"CategoryName":"Private Email: General Information"},{"__type":"Nc:SimpleKB:Abstractions:Dtos:CategoryItemDto","ParentCategoryId":93,"TreatAsTopicYN":false,"Description":"","ImageUrl":"","ShortDesc":"","CategoryId":2215,"CategoryName":"Private Email: Mailbox Management"},{"__type":"Nc:SimpleKB:Abstractions:Dtos:CategoryItemDto","ParentCategoryId":93,"TreatAsTopicYN":false,"Description":"","ImageUrl":"","ShortDesc":"","CategoryId":2214,"CategoryName":"Email Forwarding"},{"__type":"Nc:SimpleKB:Abstractions:Dtos:CategoryItemDto","ParentCategoryId":93,"TreatAsTopicYN":false,"Description":"","ImageUrl":"","ShortDesc":"","CategoryId":2176,"CategoryName":"Private Email: DNS Settings"},{"__type":"Nc:SimpleKB:Abstractions:Dtos:CategoryItemDto","ParentCategoryId":93,"TreatAsTopicYN":false,"Description":"","ImageUrl":"","ShortDesc":"","CategoryId":2178,"CategoryName":"Private Email: Webmail Features"},{"__type":"Nc:SimpleKB:Abstractions:Dtos:CategoryItemDto","ParentCategoryId":93,"TreatAsTopicYN":false,"Description":"","ImageUrl":"","ShortDesc":"","CategoryId":2175,"CategoryName":"Private Email: Client Setup"},{"__type":"Nc:SimpleKB:Abstractions:Dtos:CategoryItemDto","ParentCategoryId":93,"TreatAsTopicYN":false,"Description":"","ImageUrl":"","ShortDesc":"","CategoryId":2171,"CategoryName":"Private Email: Active Sync (Exchange) Setup"},{"__type":"Nc:SimpleKB:Abstractions:Dtos:CategoryItemDto","ParentCategoryId":93,"TreatAsTopicYN":false,"Description":"","ImageUrl":"","ShortDesc":"","CategoryId":31,"CategoryName":"cPanel Email FAQs"},{"__type":"Nc:SimpleKB:Abstractions:Dtos:CategoryItemDto","ParentCategoryId":93,"TreatAsTopicYN":false,"Description":"","ImageUrl":"","ShortDesc":"","CategoryId":2186,"CategoryName":"cPanel Email: Client Setup"},{"__type":"Nc:SimpleKB:Abstractions:Dtos:CategoryItemDto","ParentCategoryId":93,"TreatAsTopicYN":false,"Description":"","ImageUrl":"","ShortDesc":"","CategoryId":2204,"CategoryName":"Private Email: Video Overview"}]},{"__type":"Nc:SimpleKB:Abstractions:Dtos:CategoryItemDto","ParentCategoryId":12,"TreatAsTopicYN":false,"Description":"","ImageUrl":"","ShortDesc":"","CategoryId":32,"CategoryName":"DNS settings"},{"__type":"Nc:SimpleKB:Abstractions:Dtos:CategoryItemDto","ParentCategoryId":34,"TreatAsTopicYN":false,"Description":"","ImageUrl":"","ShortDesc":"","CategoryId":15,"CategoryName":"Namecheap Market"},{"__type":"Nc:SimpleKB:Abstractions:Dtos:CategoryItemDto","ParentCategoryId":93,"TreatAsTopicYN":false,"Description":"","ImageUrl":"","ShortDesc":"","CategoryId":2186,"CategoryName":"cPanel Email: Client Setup"},{"__type":"Nc:SimpleKB:Abstractions:Dtos:CategoryItemDto","ParentCategoryId":2265,"TreatAsTopicYN":false,"Description":"","ImageUrl":"","ShortDesc":"","CategoryId":2266,"CategoryName":"Windows"},{"__type":"Nc:SimpleKB:Abstractions:Dtos:CategoryItemDto","ParentCategoryId":2239,"TreatAsTopicYN":false,"Description":"","ImageUrl":"","ShortDesc":"","CategoryId":2287,"CategoryName":"SSL questions"},{"__type":"Nc:SimpleKB:Abstractions:Dtos:CategoryItemDto","ParentCategoryId":2265,"TreatAsTopicYN":false,"Description":"","ImageUrl":"","ShortDesc":"","CategoryId":2267,"CategoryName":"Android"},{"__type":"Nc:SimpleKB:Abstractions:Dtos:CategoryItemDto","ParentCategoryId":34,"TreatAsTopicYN":false,"Description":"","ImageUrl":"","ShortDesc":"","CategoryId":2208,"CategoryName":"3rd Party Services Setup"},{"__type":"Nc:SimpleKB:Abstractions:Dtos:CategoryItemDto","ParentCategoryId":93,"TreatAsTopicYN":false,"Description":"","ImageUrl":"","ShortDesc":"","CategoryId":2204,"CategoryName":"Private Email: Video Overview"},{"__type":"Nc:SimpleKB:Abstractions:Dtos:CategoryItemDto","ParentCategoryId":0,"TreatAsTopicYN":false,"Description":"","ImageUrl":"/assets/img/pictograms/150/security-red.png","ShortDesc":"","CategoryId":14,"CategoryName":"SSL Certificates","SubCategories":[{"__type":"Nc:SimpleKB:Abstractions:Dtos:CategoryItemDto","ParentCategoryId":14,"TreatAsTopicYN":false,"Description":"","ImageUrl":"","ShortDesc":"","CategoryId":2217,"CategoryName":"Renewal"},{"__type":"Nc:SimpleKB:Abstractions:Dtos:CategoryItemDto","ParentCategoryId":14,"TreatAsTopicYN":false,"Description":"","ImageUrl":"","ShortDesc":"","CategoryId":2218,"CategoryName":"cPanel SSL Plugin"},{"__type":"Nc:SimpleKB:Abstractions:Dtos:CategoryItemDto","ParentCategoryId":14,"TreatAsTopicYN":false,"Description":"","ImageUrl":"","ShortDesc":"","CategoryId":2221,"CategoryName":"Multi-Domain SSL Certificates"},{"__type":"Nc:SimpleKB:Abstractions:Dtos:CategoryItemDto","ParentCategoryId":14,"TreatAsTopicYN":false,"Description":"","ImageUrl":"","ShortDesc":"","CategoryId":2222,"CategoryName":"Cancellation"},{"__type":"Nc:SimpleKB:Abstractions:Dtos:CategoryItemDto","ParentCategoryId":14,"TreatAsTopicYN":false,"Description":"","ImageUrl":"","ShortDesc":"","CategoryId":2223,"CategoryName":"Browser errors"},{"__type":"Nc:SimpleKB:Abstractions:Dtos:CategoryItemDto","ParentCategoryId":14,"TreatAsTopicYN":false,"Description":"","ImageUrl":"","ShortDesc":"","CategoryId":2224,"CategoryName":"Site Seal, Logo"},{"__type":"Nc:SimpleKB:Abstractions:Dtos:CategoryItemDto","ParentCategoryId":14,"TreatAsTopicYN":false,"Description":"","ImageUrl":"","ShortDesc":"","CategoryId":2238,"CategoryName":"SSL installation errors"},{"__type":"Nc:SimpleKB:Abstractions:Dtos:CategoryItemDto","ParentCategoryId":14,"TreatAsTopicYN":false,"Description":"","ImageUrl":"","ShortDesc":"","CategoryId":2290,"CategoryName":"CSR code"},{"__type":"Nc:SimpleKB:Abstractions:Dtos:CategoryItemDto","ParentCategoryId":14,"TreatAsTopicYN":false,"Description":"","ImageUrl":"","ShortDesc":"","CategoryId":2293,"CategoryName":"Automated SSL management"},{"__type":"Nc:SimpleKB:Abstractions:Dtos:CategoryItemDto","ParentCategoryId":14,"TreatAsTopicYN":false,"Description":"","ImageUrl":"","ShortDesc":"","CategoryId":38,"CategoryName":"SSL General"},{"__type":"Nc:SimpleKB:Abstractions:Dtos:CategoryItemDto","ParentCategoryId":14,"TreatAsTopicYN":false,"Description":"","ImageUrl":"","ShortDesc":"","CategoryId":67,"CategoryName":"Activation"},{"__type":"Nc:SimpleKB:Abstractions:Dtos:CategoryItemDto","ParentCategoryId":14,"TreatAsTopicYN":false,"Description":"","ImageUrl":"","ShortDesc":"","CategoryId":68,"CategoryName":"Validation"},{"__type":"Nc:SimpleKB:Abstractions:Dtos:CategoryItemDto","ParentCategoryId":14,"TreatAsTopicYN":false,"Description":"","ImageUrl":"","ShortDesc":"","CategoryId":69,"CategoryName":"Installation"},{"__type":"Nc:SimpleKB:Abstractions:Dtos:CategoryItemDto","ParentCategoryId":14,"TreatAsTopicYN":false,"Description":"","ImageUrl":"","ShortDesc":"","CategoryId":70,"CategoryName":"Reissuance"}]},{"__type":"Nc:SimpleKB:Abstractions:Dtos:CategoryItemDto","ParentCategoryId":0,"TreatAsTopicYN":true,"Description":"","ImageUrl":"/assets/img/pictograms/150/performance-red.png","ShortDesc":"","CategoryId":9,"CategoryName":"My Account","SubCategories":[{"__type":"Nc:SimpleKB:Abstractions:Dtos:CategoryItemDto","ParentCategoryId":9,"TreatAsTopicYN":false,"Description":"","ImageUrl":"","ShortDesc":"","CategoryId":45,"CategoryName":"Account Security"},{"__type":"Nc:SimpleKB:Abstractions:Dtos:CategoryItemDto","ParentCategoryId":9,"TreatAsTopicYN":false,"Description":"","ImageUrl":"","ShortDesc":"","CategoryId":43,"CategoryName":"Profile Management"},{"__type":"Nc:SimpleKB:Abstractions:Dtos:CategoryItemDto","ParentCategoryId":9,"TreatAsTopicYN":false,"Description":"","ImageUrl":"","ShortDesc":"","CategoryId":44,"CategoryName":"Account Access"}]},{"__type":"Nc:SimpleKB:Abstractions:Dtos:CategoryItemDto","ParentCategoryId":34,"TreatAsTopicYN":false,"Description":"","ImageUrl":"","ShortDesc":"","CategoryId":2278,"CategoryName":"Handshake TLDs"},{"__type":"Nc:SimpleKB:Abstractions:Dtos:CategoryItemDto","ParentCategoryId":12,"TreatAsTopicYN":false,"Description":"","ImageUrl":"","ShortDesc":"","CategoryId":103,"CategoryName":"LVE (CloudLinux)"},{"__type":"Nc:SimpleKB:Abstractions:Dtos:CategoryItemDto","ParentCategoryId":0,"TreatAsTopicYN":false,"Description":"","ImageUrl":"/assets/img/pictograms/150/affiliates-red.png","ShortDesc":"","CategoryId":55,"CategoryName":"Affiliates","SubCategories":[]},{"__type":"Nc:SimpleKB:Abstractions:Dtos:CategoryItemDto","ParentCategoryId":12,"TreatAsTopicYN":false,"Description":"","ImageUrl":"","ShortDesc":"","CategoryId":89,"CategoryName":"SSH Access"},{"__type":"Nc:SimpleKB:Abstractions:Dtos:CategoryItemDto","ParentCategoryId":0,"TreatAsTopicYN":false,"Description":"","ImageUrl":"/assets/img/pictograms/150/tools-red.png","ShortDesc":"","CategoryId":2211,"CategoryName":"API & Resellers","SubCategories":[{"__type":"Nc:SimpleKB:Abstractions:Dtos:CategoryItemDto","ParentCategoryId":2211,"TreatAsTopicYN":false,"Description":"","ImageUrl":"","ShortDesc":"","CategoryId":2227,"CategoryName":"SSL Resellers"},{"__type":"Nc:SimpleKB:Abstractions:Dtos:CategoryItemDto","ParentCategoryId":2211,"TreatAsTopicYN":false,"Description":"","ImageUrl":"","ShortDesc":"","CategoryId":2229,"CategoryName":"Hosting Resellers"},{"__type":"Nc:SimpleKB:Abstractions:Dtos:CategoryItemDto","ParentCategoryId":2211,"TreatAsTopicYN":false,"Description":"","ImageUrl":"","ShortDesc":"","CategoryId":63,"CategoryName":"Namecheap API"},{"__type":"Nc:SimpleKB:Abstractions:Dtos:CategoryItemDto","ParentCategoryId":2211,"TreatAsTopicYN":false,"Description":"","ImageUrl":"","ShortDesc":"","CategoryId":2196,"CategoryName":"WHMCS module for SSL"}]},{"__type":"Nc:SimpleKB:Abstractions:Dtos:CategoryItemDto","ParentCategoryId":0,"TreatAsTopicYN":false,"Description":"","ImageUrl":"/assets/img/pictograms/150/timer-red.png","ShortDesc":"","CategoryId":2212,"CategoryName":"Legacy Products","SubCategories":[]},{"__type":"Nc:SimpleKB:Abstractions:Dtos:CategoryItemDto","ParentCategoryId":12,"TreatAsTopicYN":false,"Description":"","ImageUrl":"","ShortDesc":"","CategoryId":205,"CategoryName":"FTP questions"},{"__type":"Nc:SimpleKB:Abstractions:Dtos:CategoryItemDto","ParentCategoryId":12,"TreatAsTopicYN":false,"Description":"","ImageUrl":"","ShortDesc":"","CategoryId":2180,"CategoryName":"MySQL questions"},{"__type":"Nc:SimpleKB:Abstractions:Dtos:CategoryItemDto","ParentCategoryId":12,"TreatAsTopicYN":false,"Description":"","ImageUrl":"","ShortDesc":"","CategoryId":2199,"CategoryName":"Hosting Migration"},{"__type":"Nc:SimpleKB:Abstractions:Dtos:CategoryItemDto","ParentCategoryId":0,"TreatAsTopicYN":false,"Description":"","ImageUrl":"/assets/img/pictograms/150/premiumdns-red.png","ShortDesc":"","CategoryId":2231,"CategoryName":"PremiumDNS","SubCategories":[]},{"__type":"Nc:SimpleKB:Abstractions:Dtos:CategoryItemDto","ParentCategoryId":12,"TreatAsTopicYN":false,"Description":"","ImageUrl":"","ShortDesc":"","CategoryId":2194,"CategoryName":"Tips & Tricks"},{"__type":"Nc:SimpleKB:Abstractions:Dtos:CategoryItemDto","ParentCategoryId":0,"TreatAsTopicYN":false,"Description":"","ImageUrl":"https://static.nc-img.com/live-resource/icons/knowledgebase/fastVPN_icon-150px.png","ShortDesc":"","CategoryId":2265,"CategoryName":"FastVPN","SubCategories":[{"__type":"Nc:SimpleKB:Abstractions:Dtos:CategoryItemDto","ParentCategoryId":2265,"TreatAsTopicYN":false,"Description":"","ImageUrl":"","ShortDesc":"","CategoryId":2292,"CategoryName":"Browser Extensions"},{"__type":"Nc:SimpleKB:Abstractions:Dtos:CategoryItemDto","ParentCategoryId":2265,"TreatAsTopicYN":false,"Description":"","ImageUrl":"","ShortDesc":"","CategoryId":2274,"CategoryName":"General"},{"__type":"Nc:SimpleKB:Abstractions:Dtos:CategoryItemDto","ParentCategoryId":2265,"TreatAsTopicYN":false,"Description":"","ImageUrl":"","ShortDesc":"","CategoryId":2270,"CategoryName":"Routers"},{"__type":"Nc:SimpleKB:Abstractions:Dtos:CategoryItemDto","ParentCategoryId":2265,"TreatAsTopicYN":false,"Description":"","ImageUrl":"","ShortDesc":"","CategoryId":2272,"CategoryName":"TV"},{"__type":"Nc:SimpleKB:Abstractions:Dtos:CategoryItemDto","ParentCategoryId":2265,"TreatAsTopicYN":false,"Description":"","ImageUrl":"","ShortDesc":"","CategoryId":2273,"CategoryName":"Gaming Consoles"},{"__type":"Nc:SimpleKB:Abstractions:Dtos:CategoryItemDto","ParentCategoryId":2265,"TreatAsTopicYN":false,"Description":"","ImageUrl":"","ShortDesc":"","CategoryId":2268,"CategoryName":"macOS"},{"__type":"Nc:SimpleKB:Abstractions:Dtos:CategoryItemDto","ParentCategoryId":2265,"TreatAsTopicYN":false,"Description":"","ImageUrl":"","ShortDesc":"","CategoryId":2269,"CategoryName":"iOS"},{"__type":"Nc:SimpleKB:Abstractions:Dtos:CategoryItemDto","ParentCategoryId":2265,"TreatAsTopicYN":false,"Description":"","ImageUrl":"","ShortDesc":"","CategoryId":2271,"CategoryName":"Linux"},{"__type":"Nc:SimpleKB:Abstractions:Dtos:CategoryItemDto","ParentCategoryId":2265,"TreatAsTopicYN":false,"Description":"","ImageUrl":"","ShortDesc":"","CategoryId":2266,"CategoryName":"Windows"},{"__type":"Nc:SimpleKB:Abstractions:Dtos:CategoryItemDto","ParentCategoryId":2265,"TreatAsTopicYN":false,"Description":"","ImageUrl":"","ShortDesc":"","CategoryId":2267,"CategoryName":"Android"}]},{"__type":"Nc:SimpleKB:Abstractions:Dtos:CategoryItemDto","ParentCategoryId":12,"TreatAsTopicYN":false,"Description":"","ImageUrl":"","ShortDesc":"","CategoryId":239,"CategoryName":"WHMCS"},{"__type":"Nc:SimpleKB:Abstractions:Dtos:CategoryItemDto","ParentCategoryId":12,"TreatAsTopicYN":false,"Description":"","ImageUrl":"","ShortDesc":"","CategoryId":33,"CategoryName":"SSL Installation"}],"status":200,"statusText":"OK"}}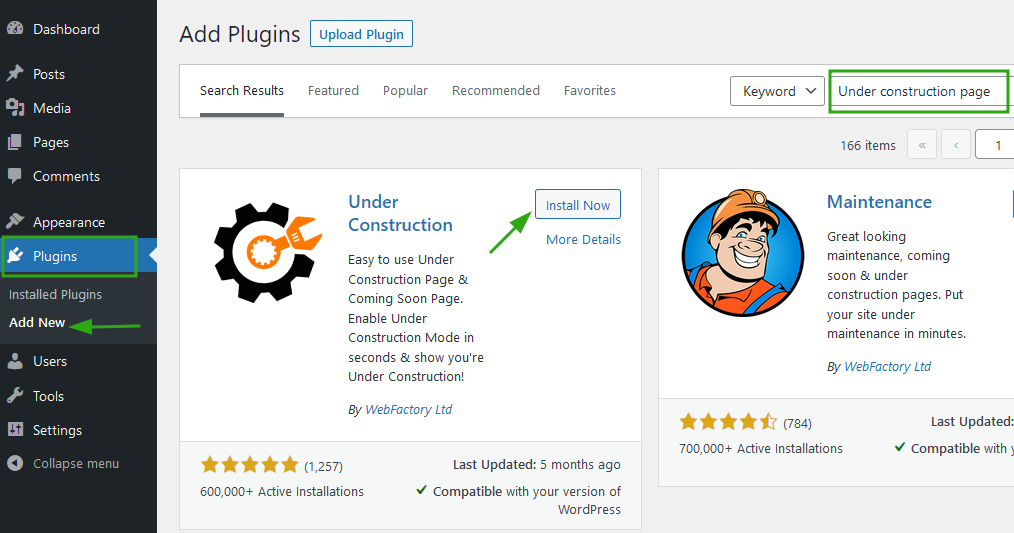
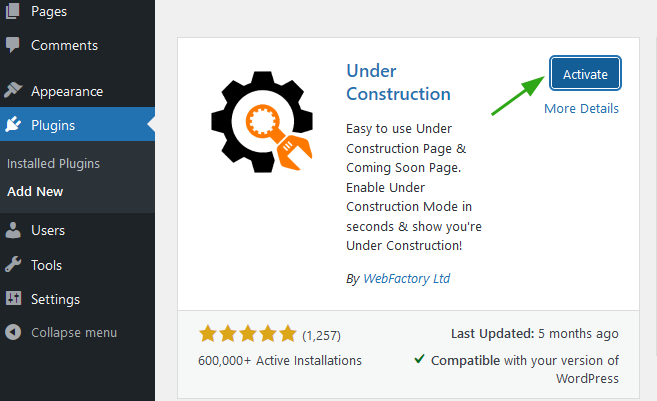
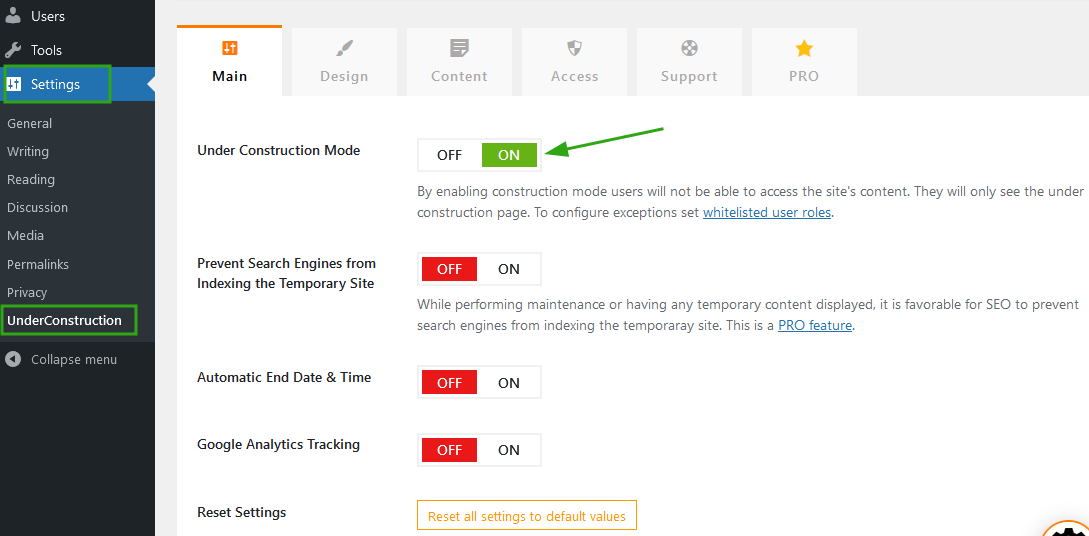
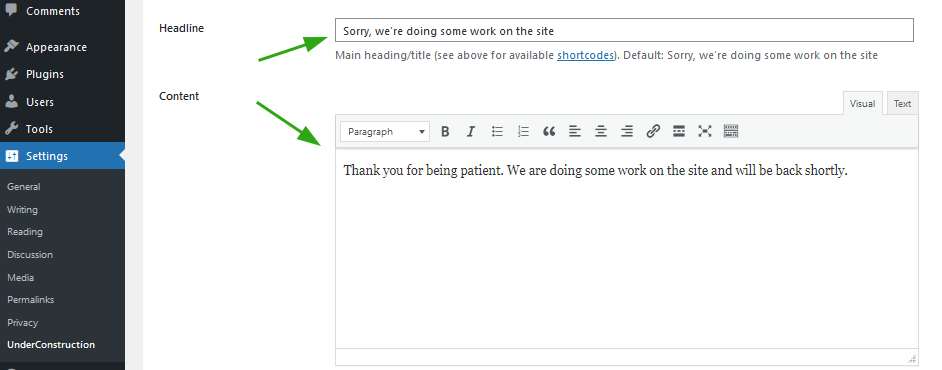

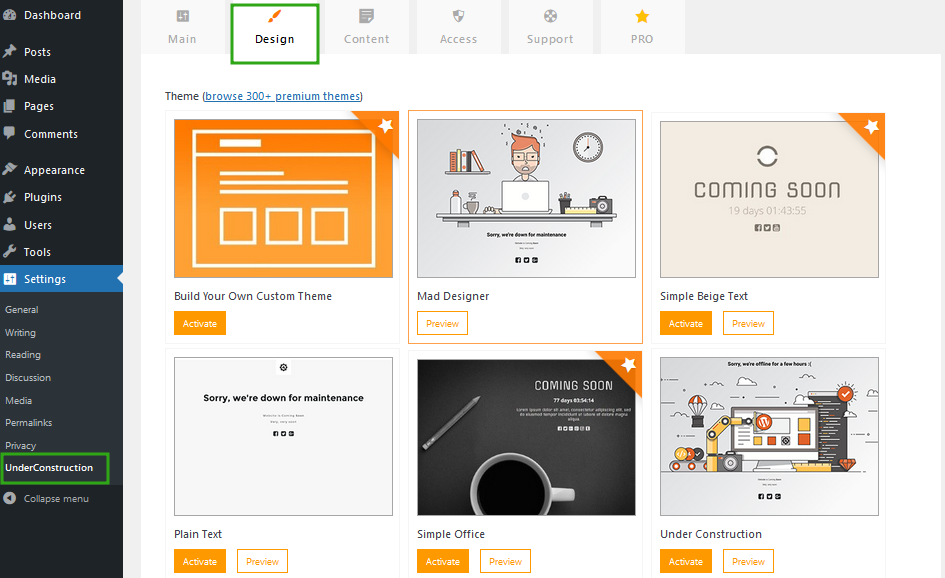

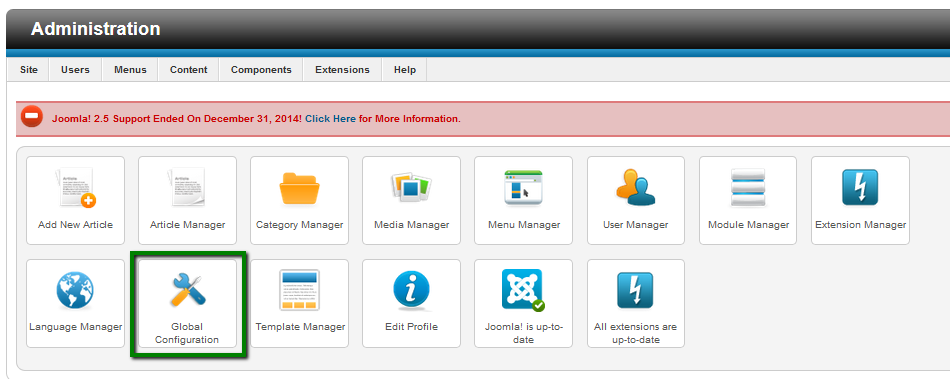
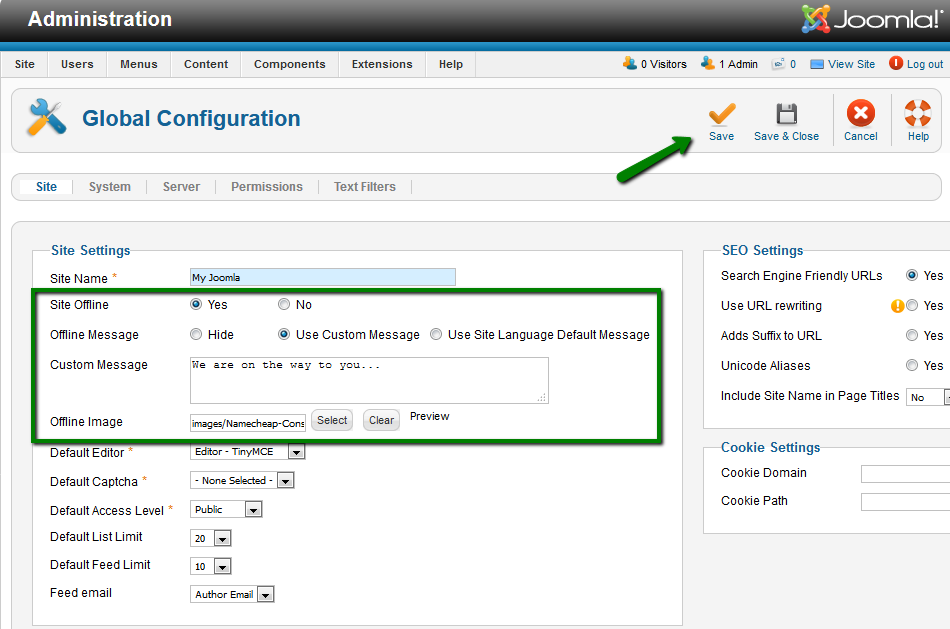
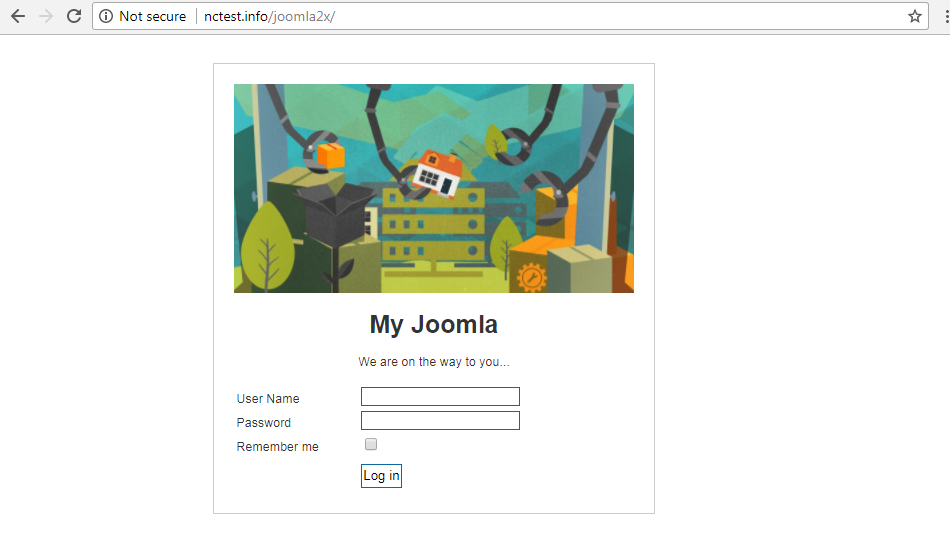
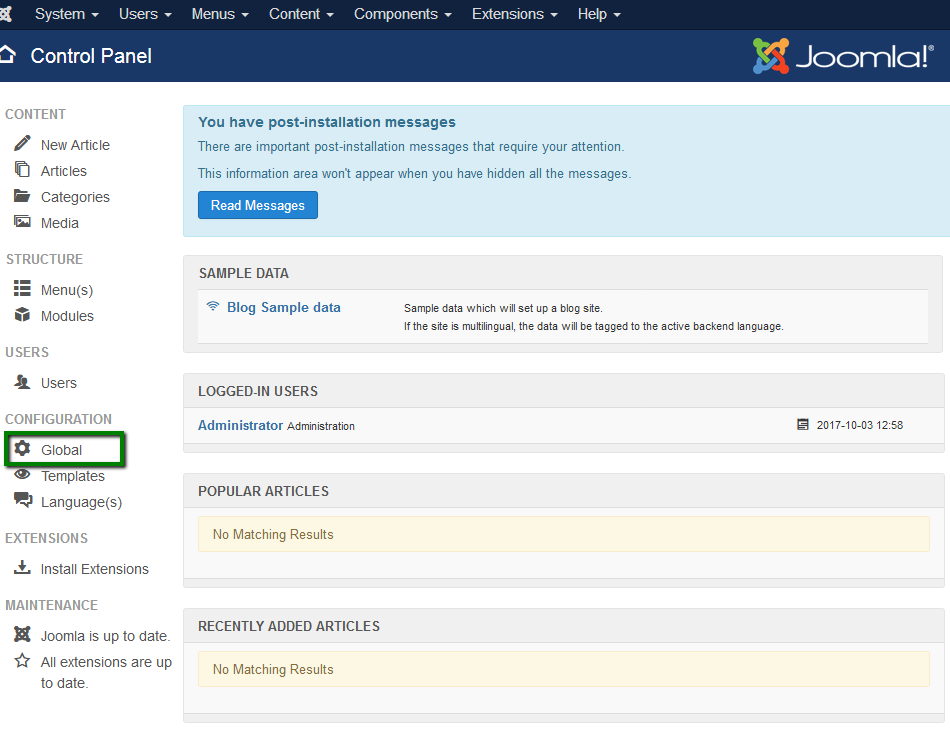
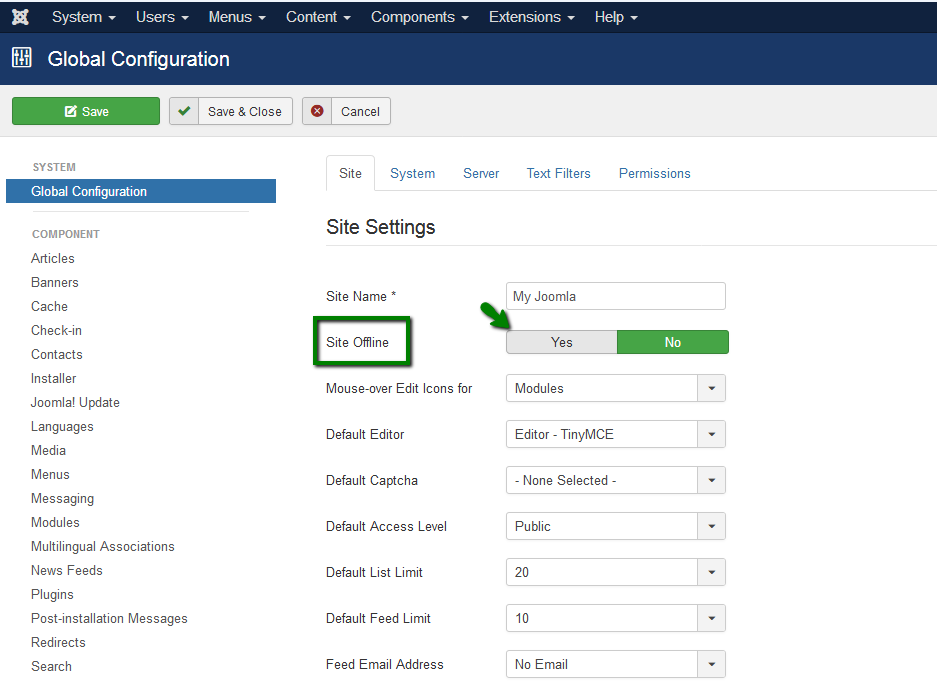
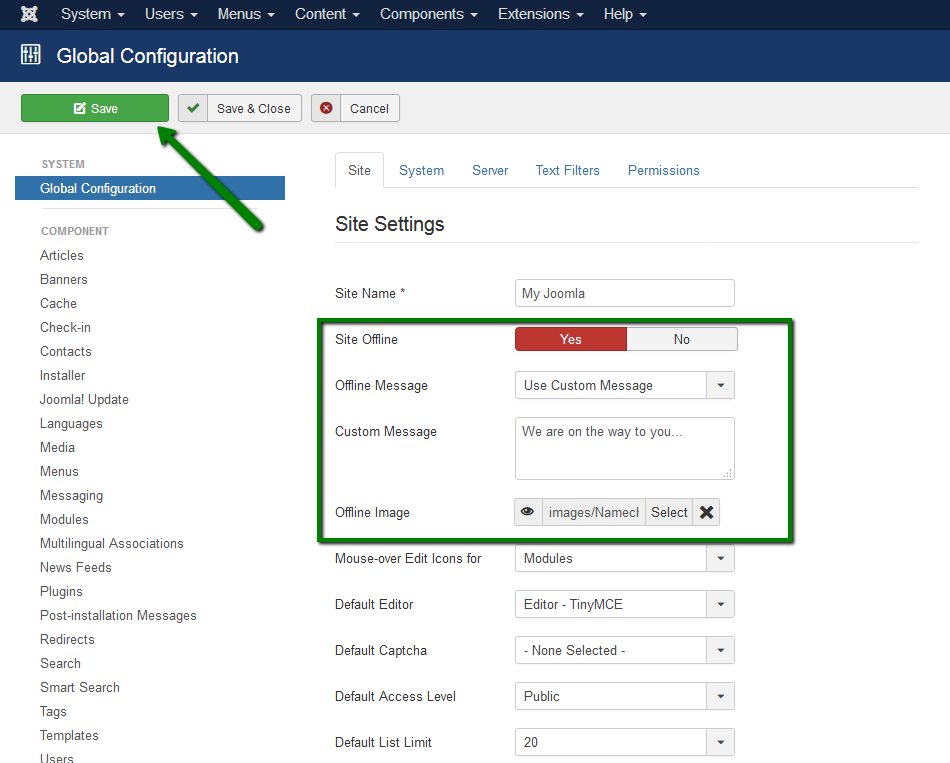
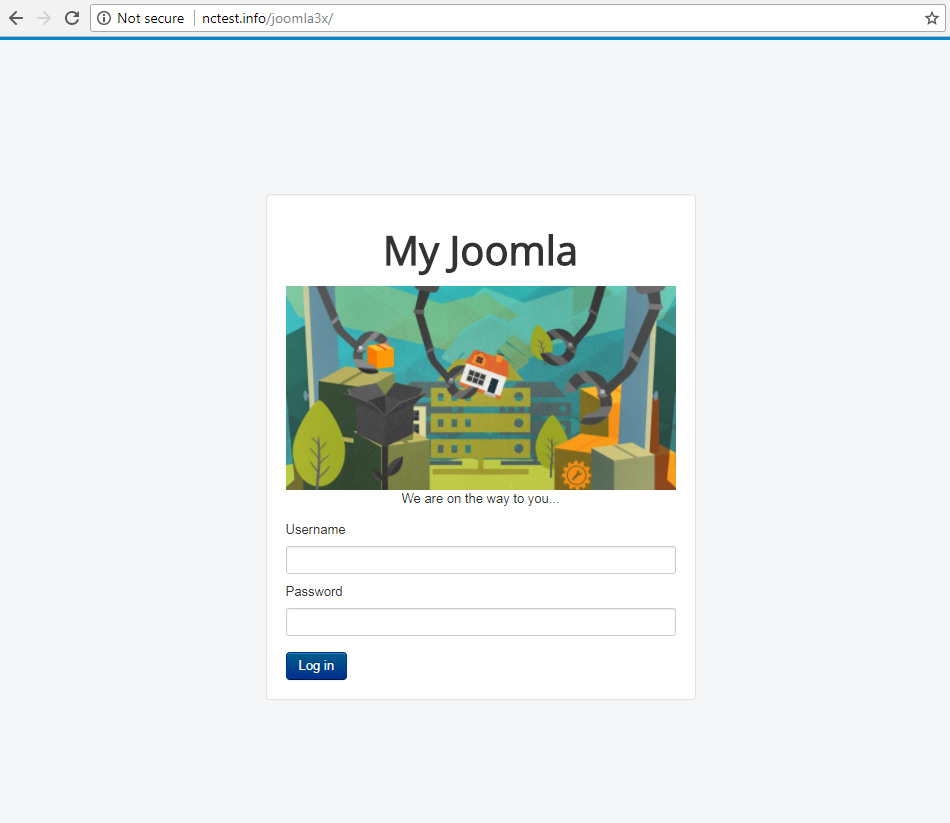
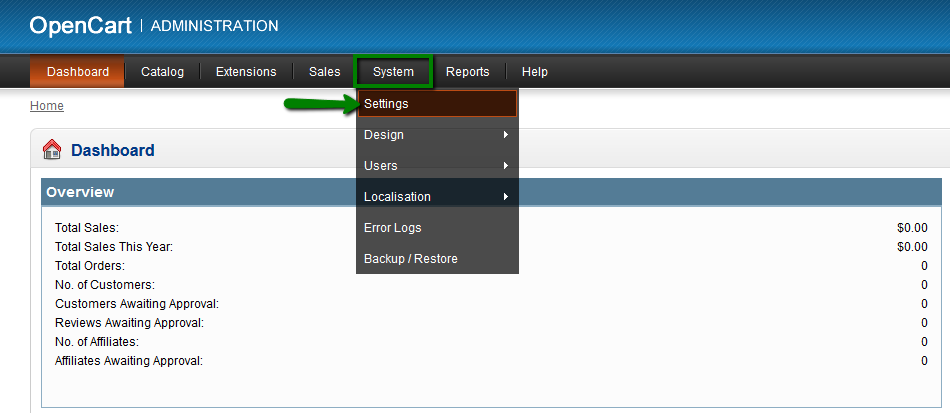

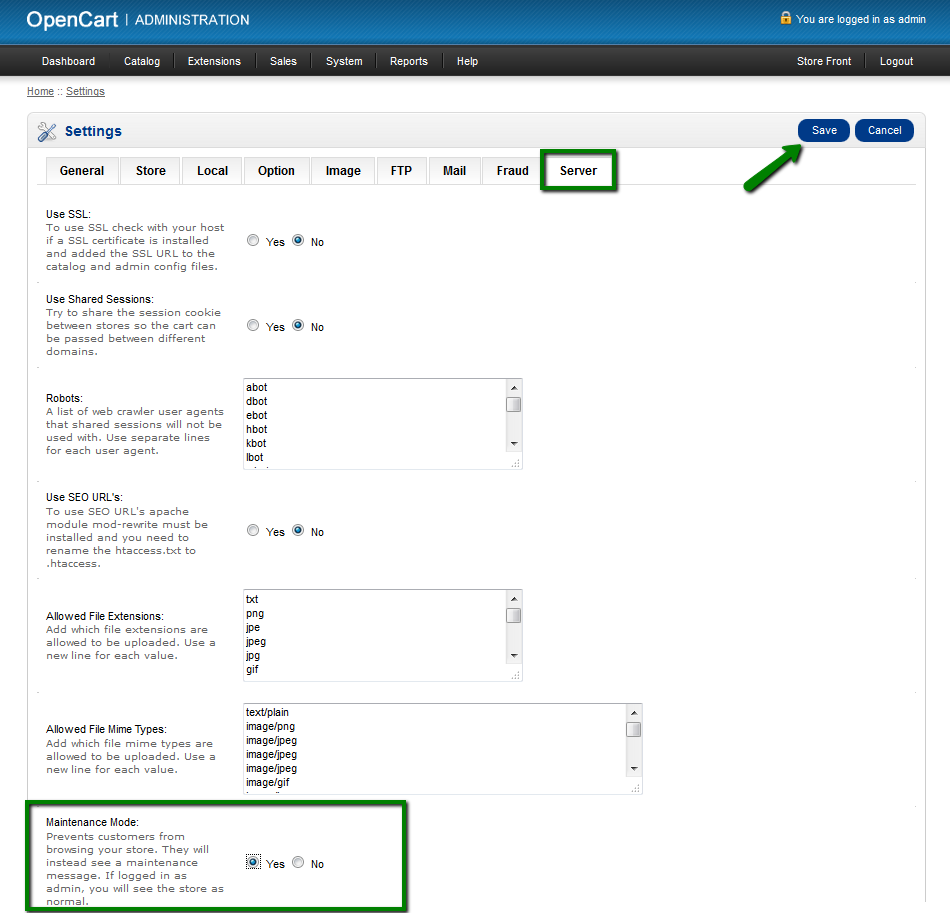
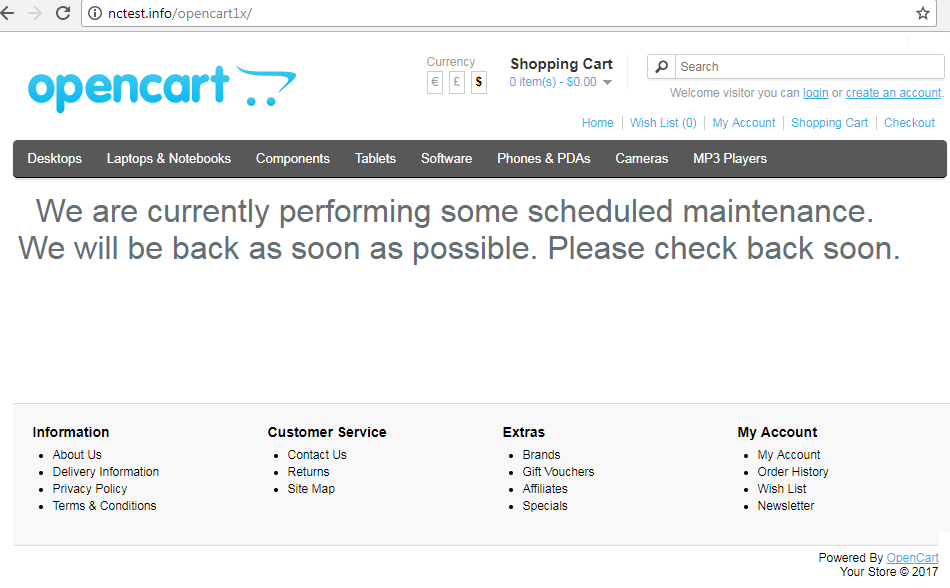
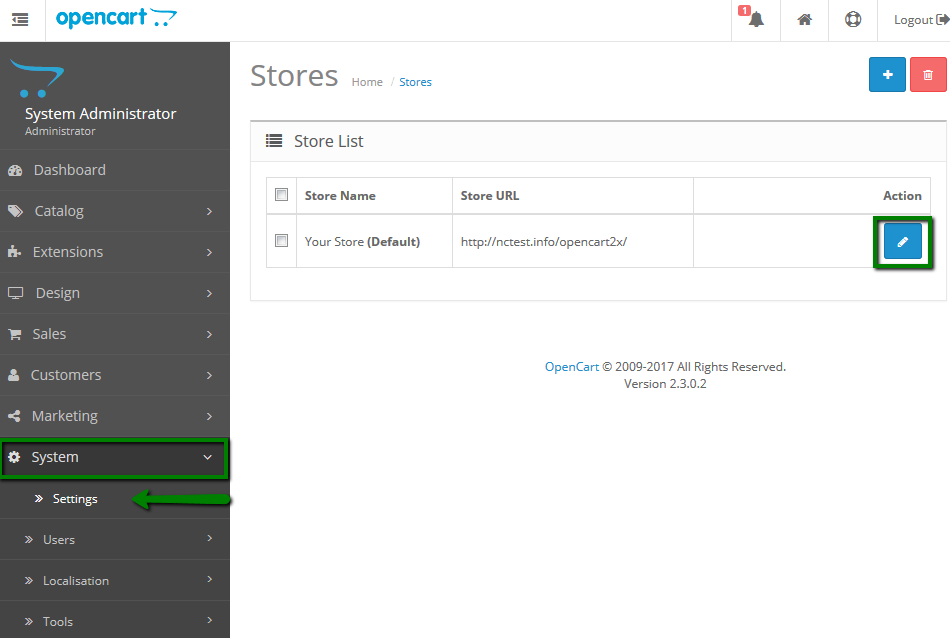
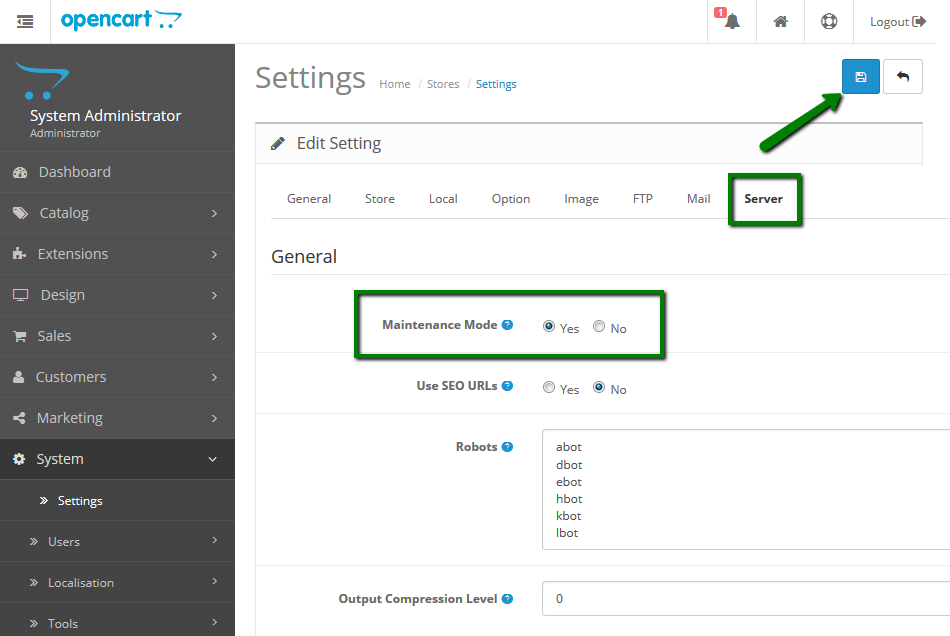
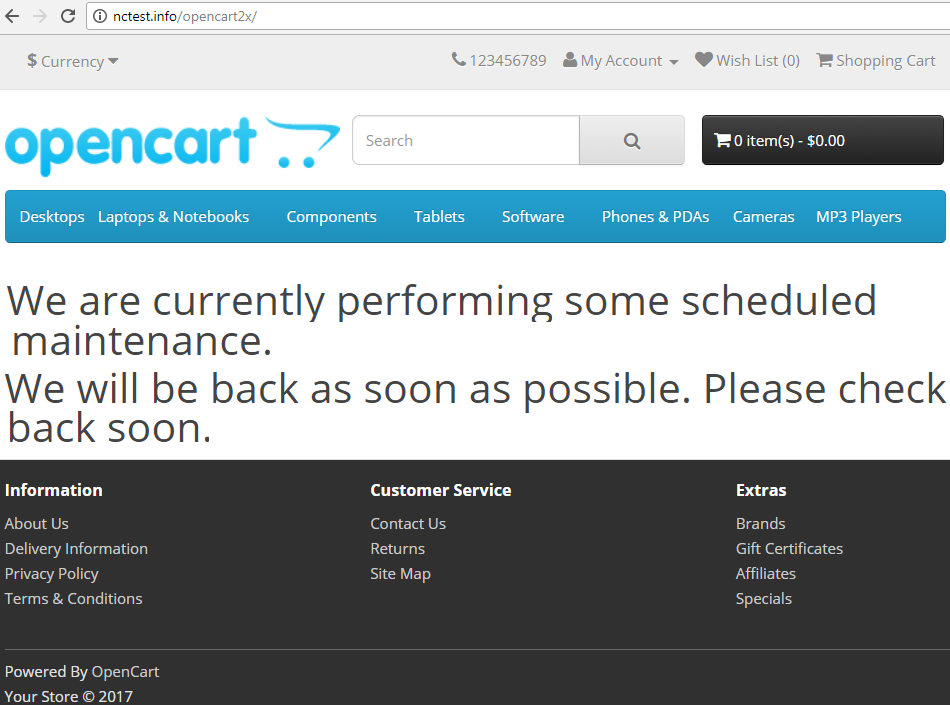
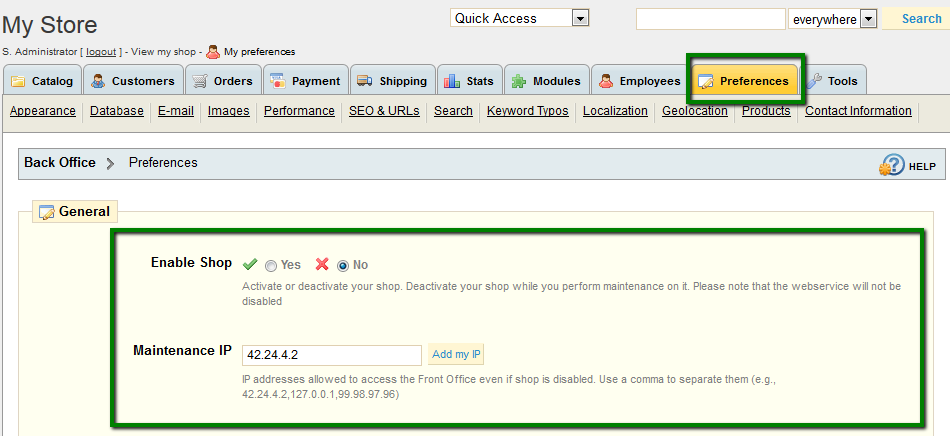
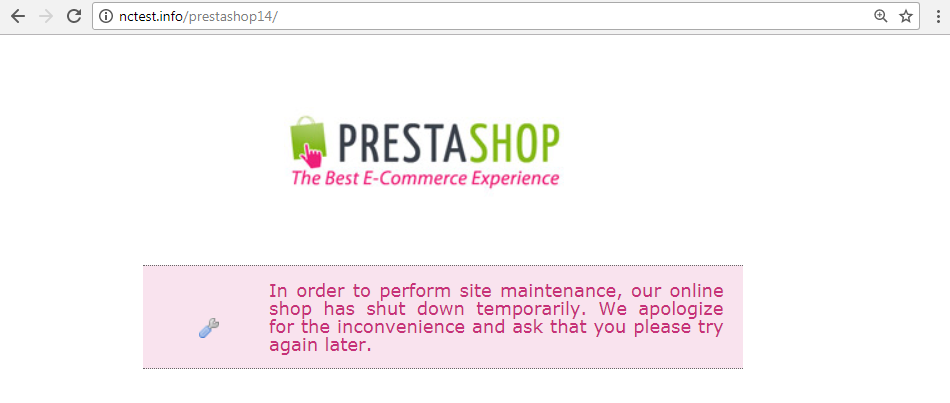
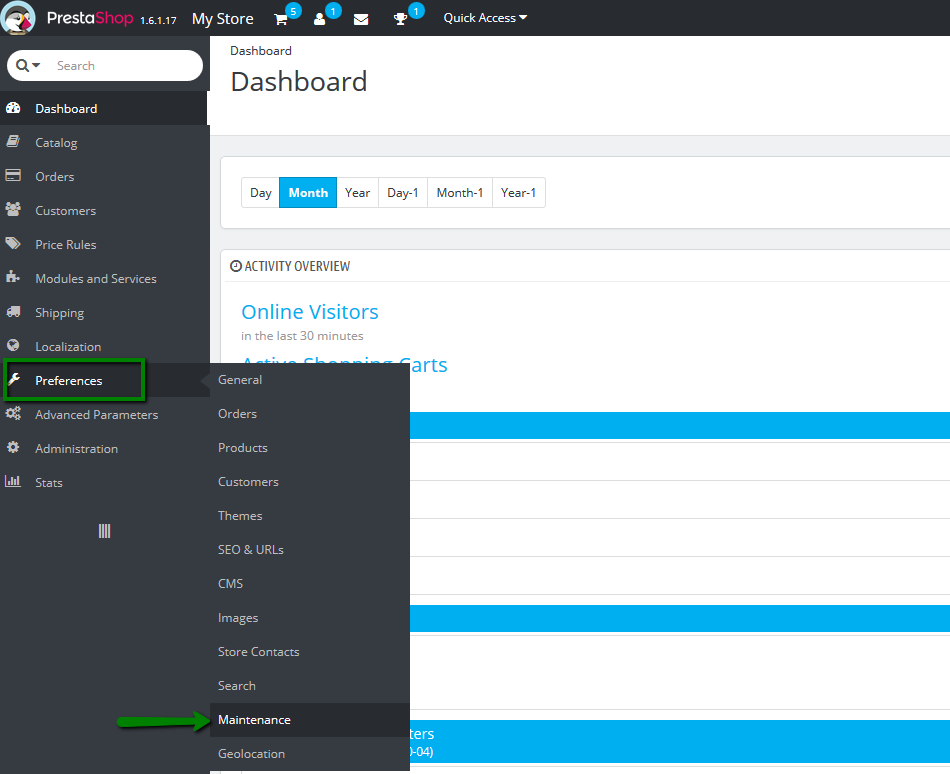
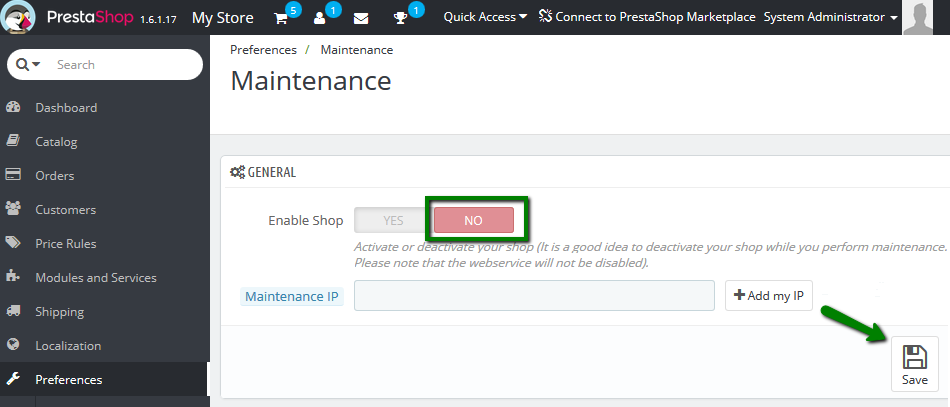
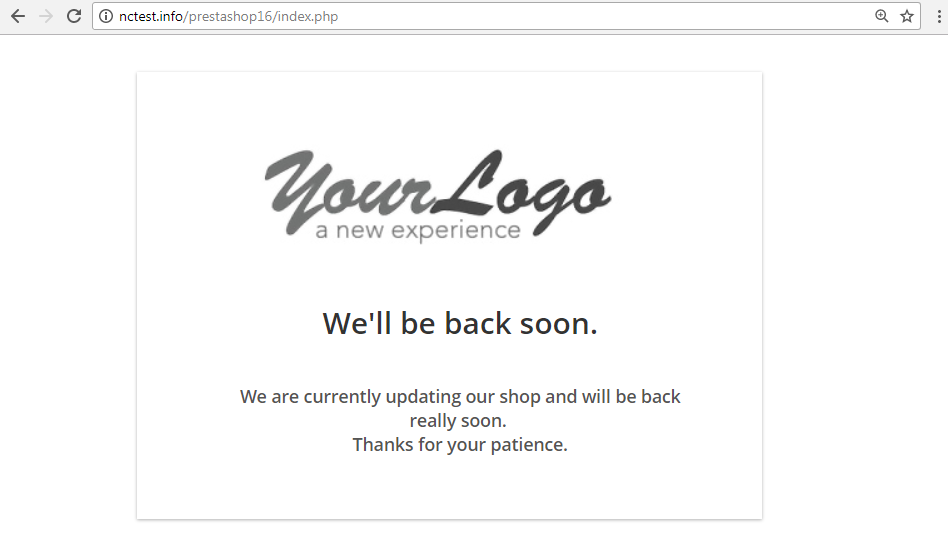
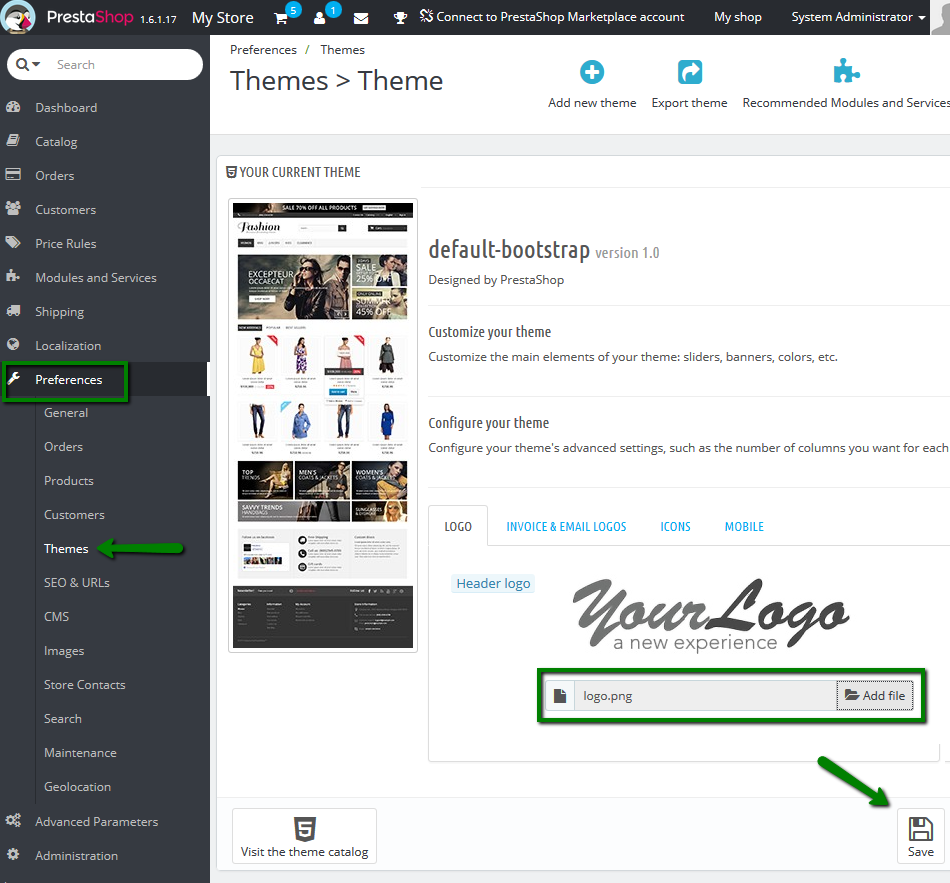
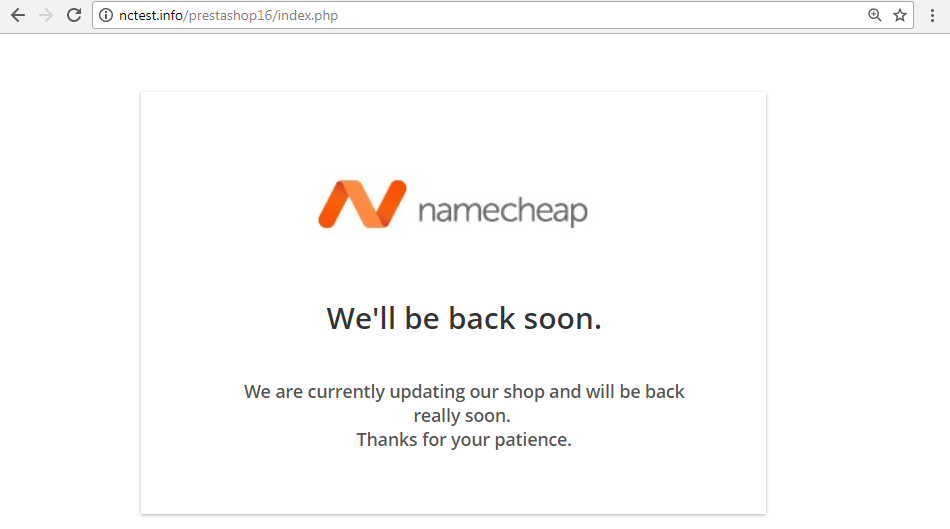
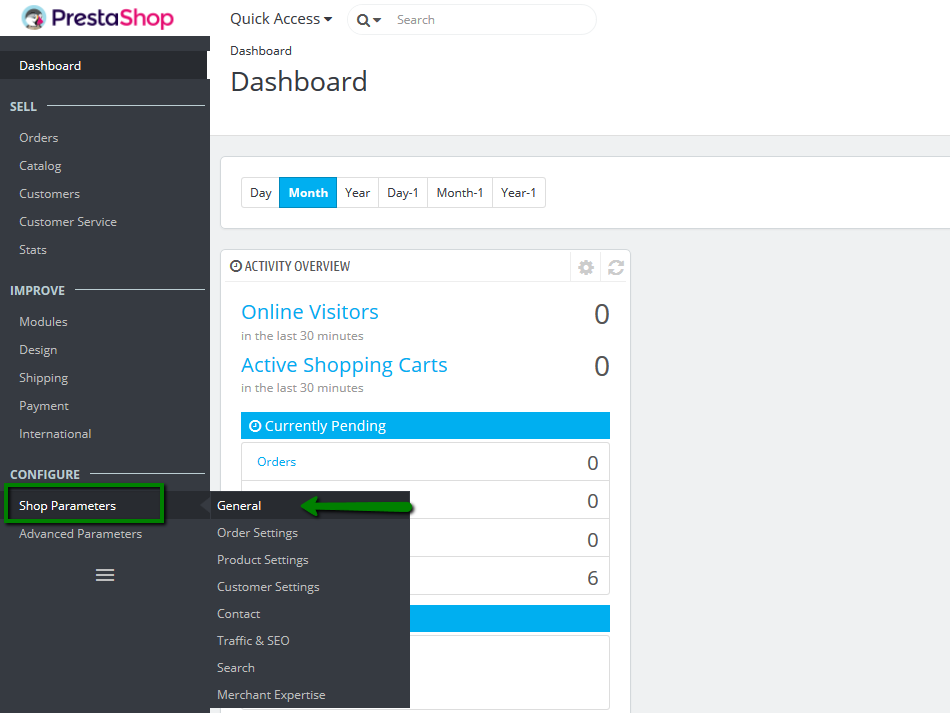
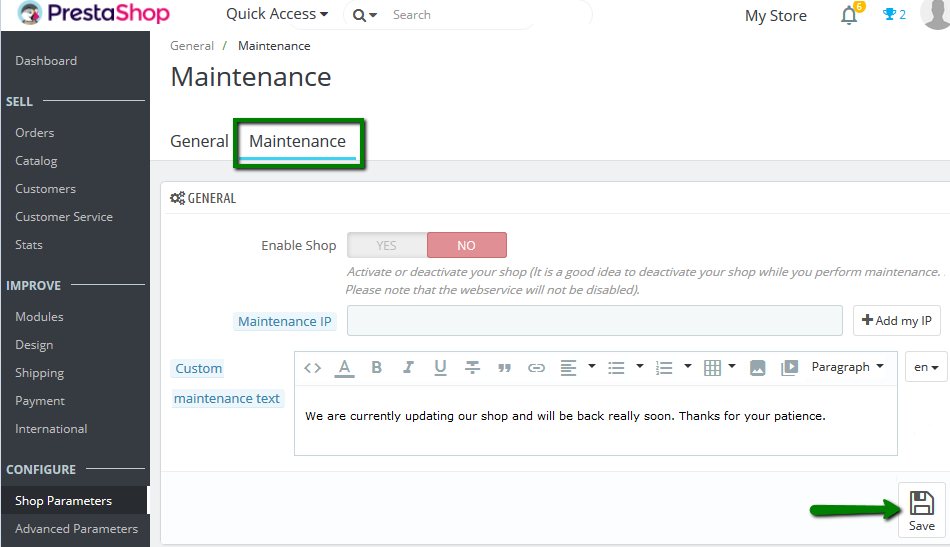
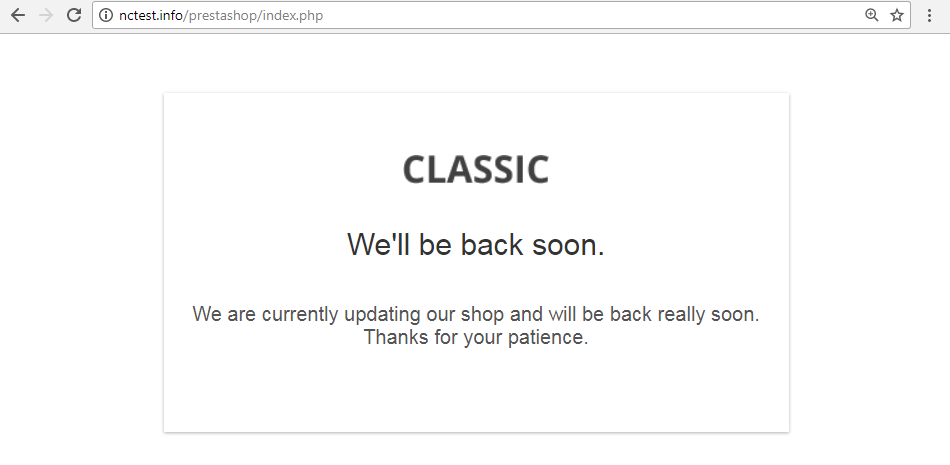
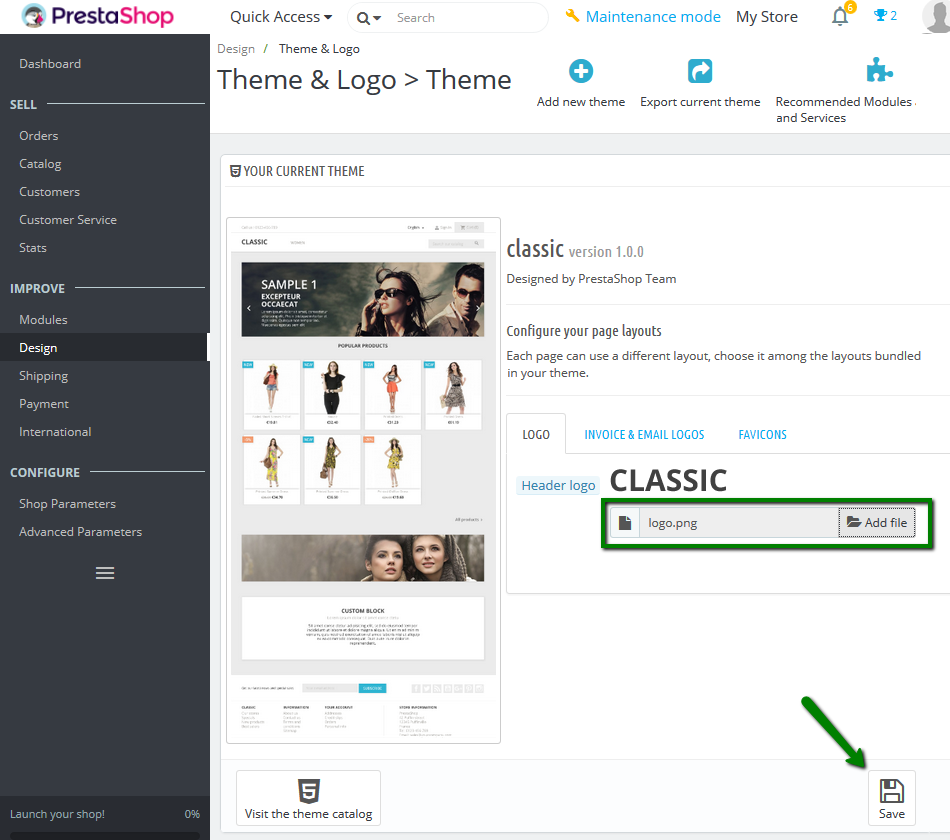
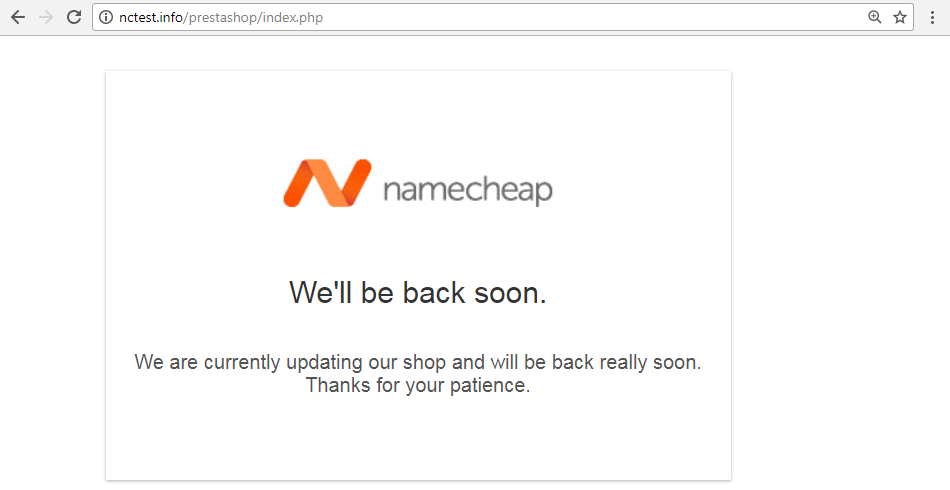
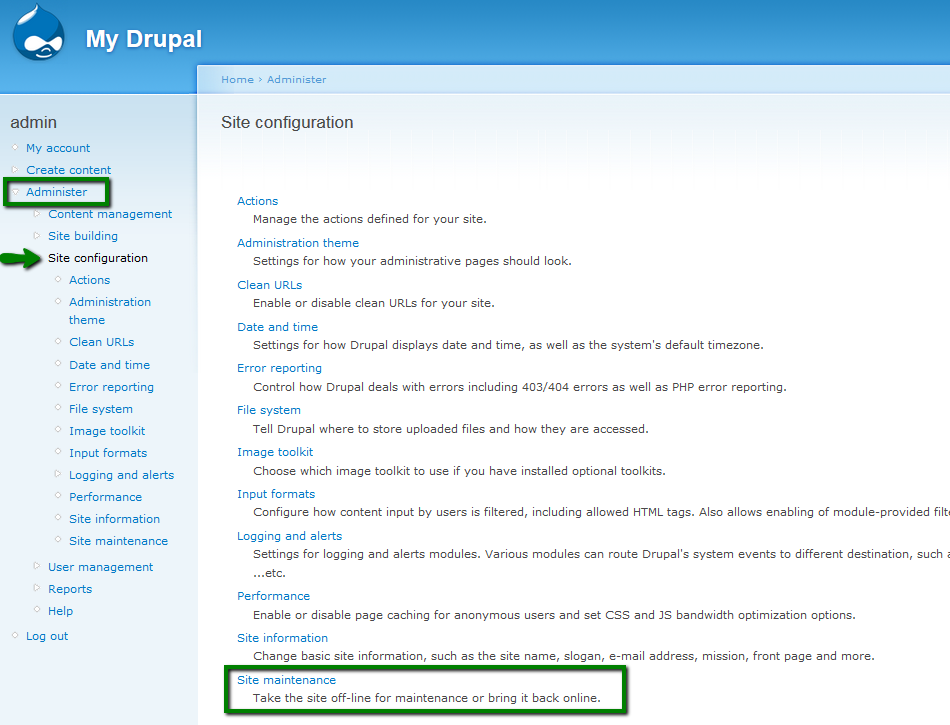
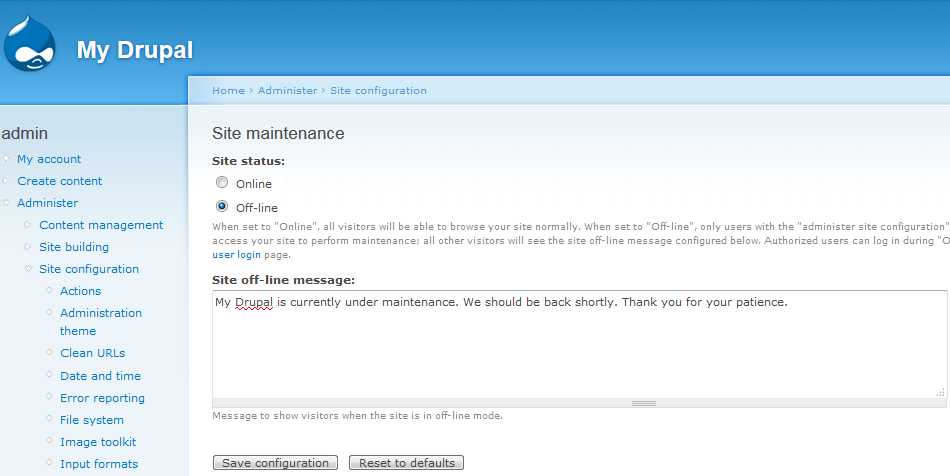
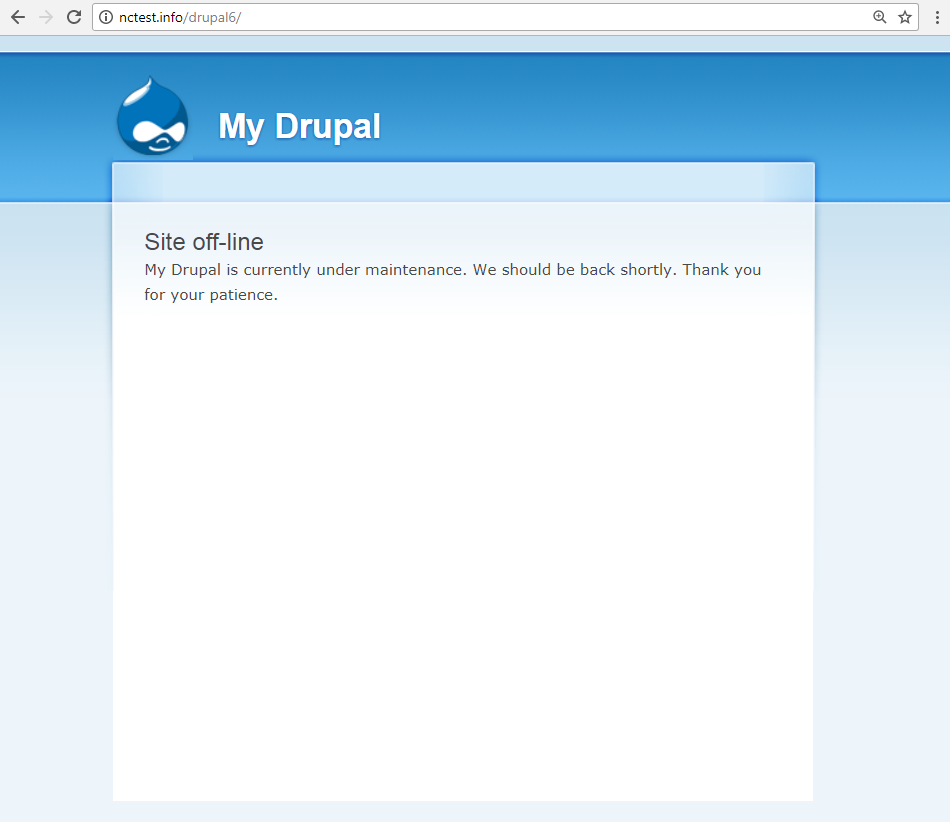
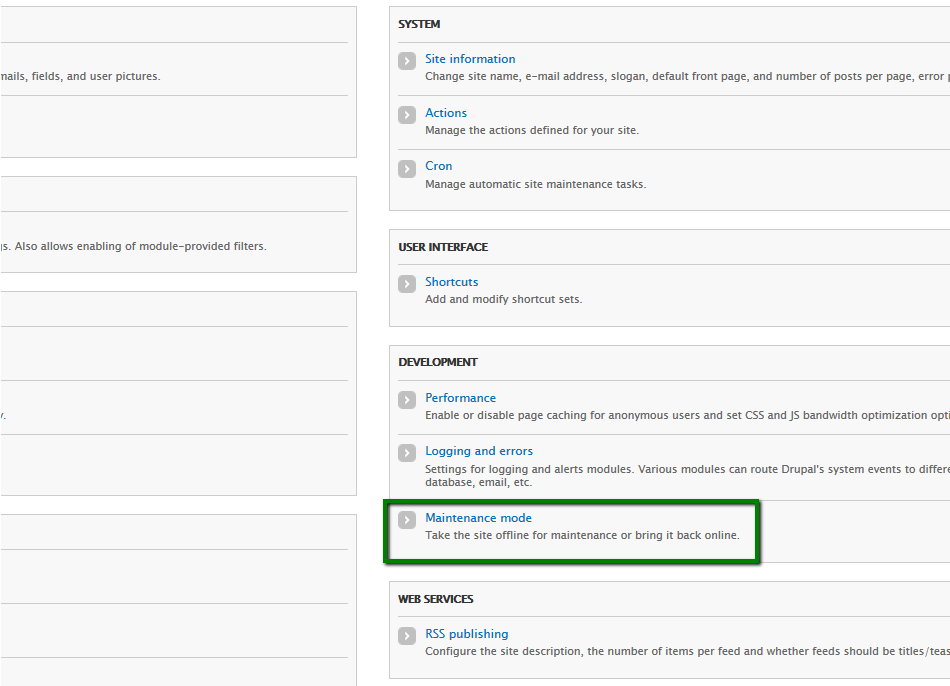
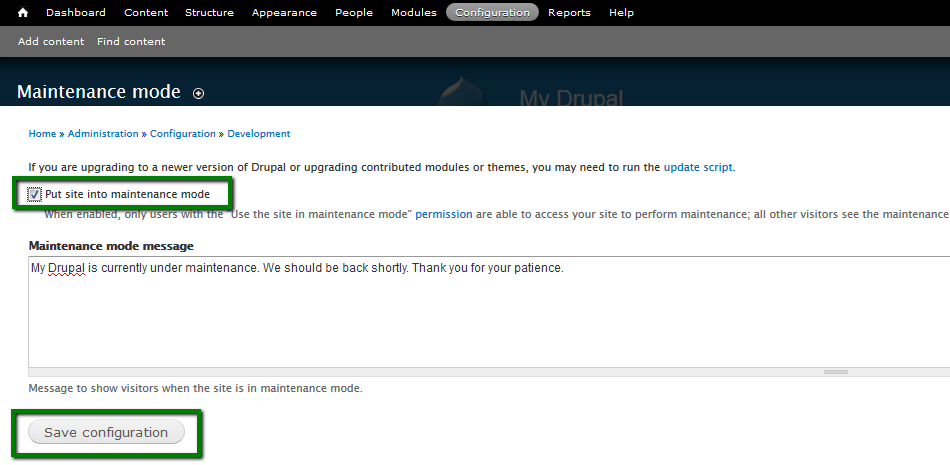
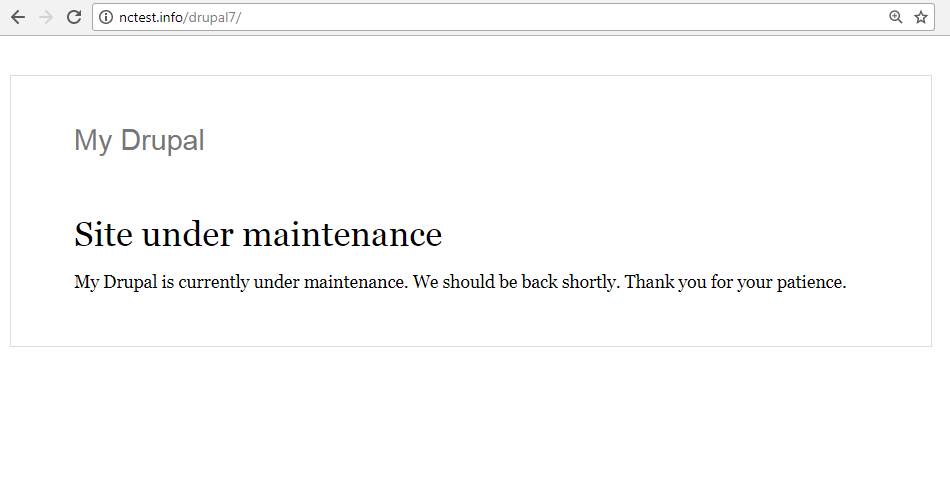
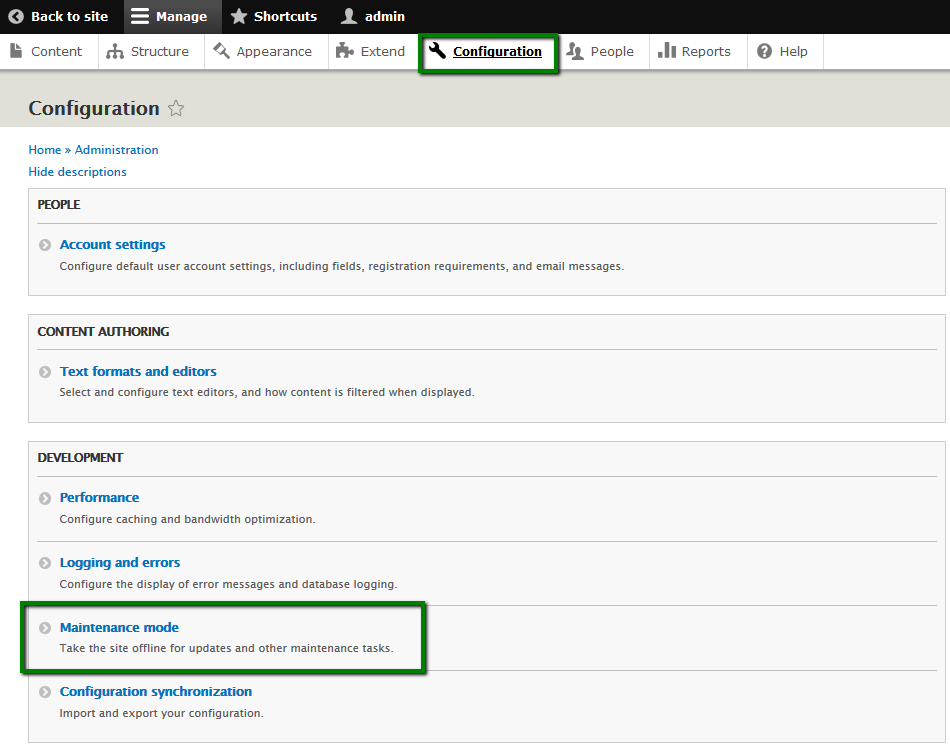

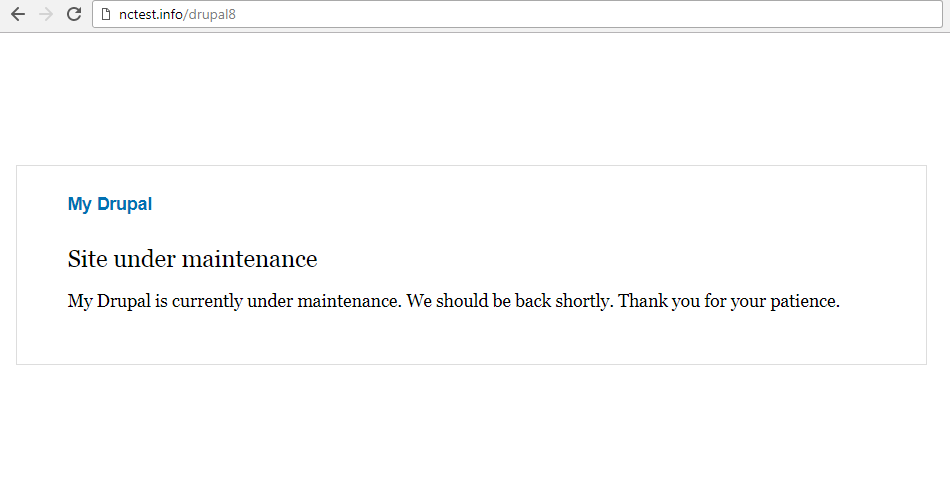


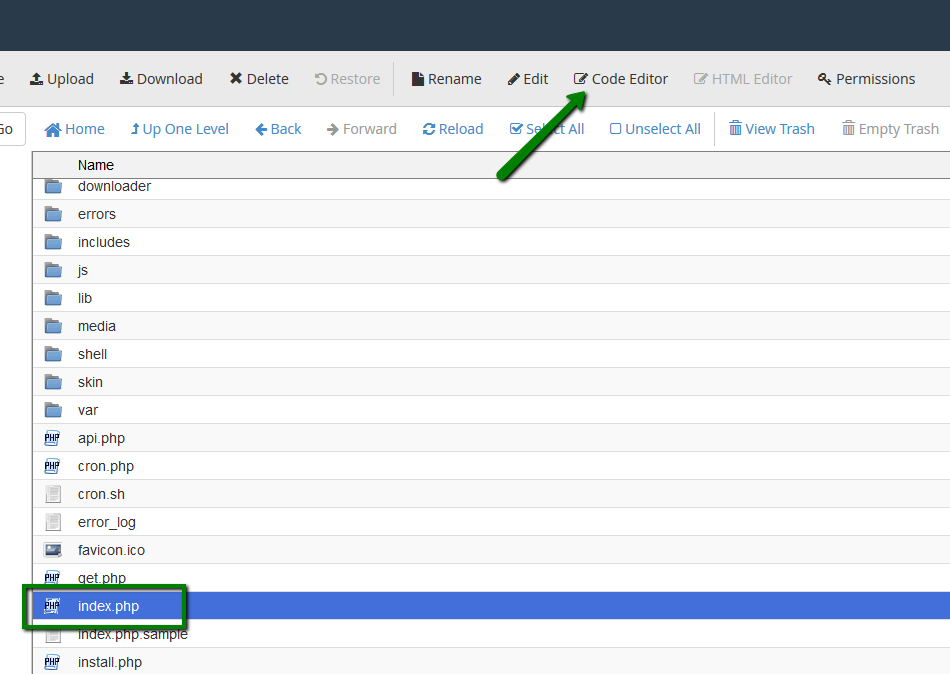
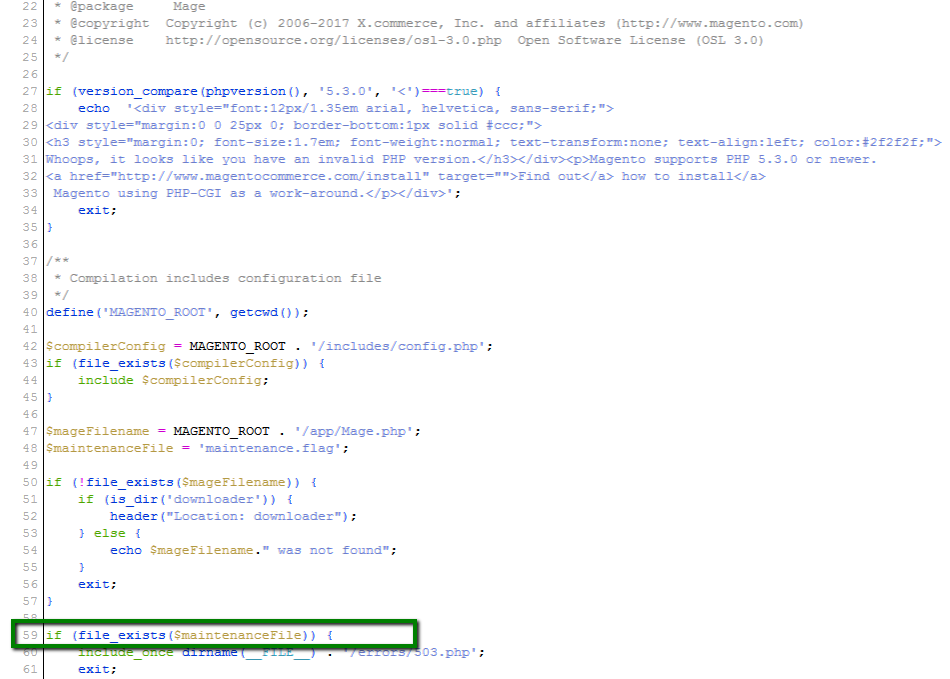
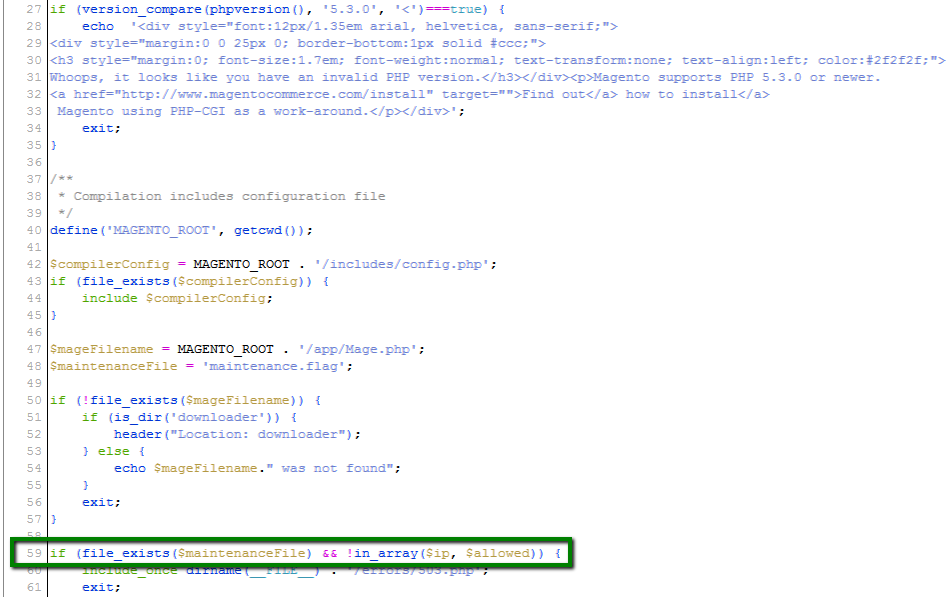
$ip = $_SERVER['REMOTE_ADDR'];
$allowed = array('111.111.111.111','222.222.222.222');
Where '111.111.111.111' and '222.222.222.222' are allowed IP addresses:

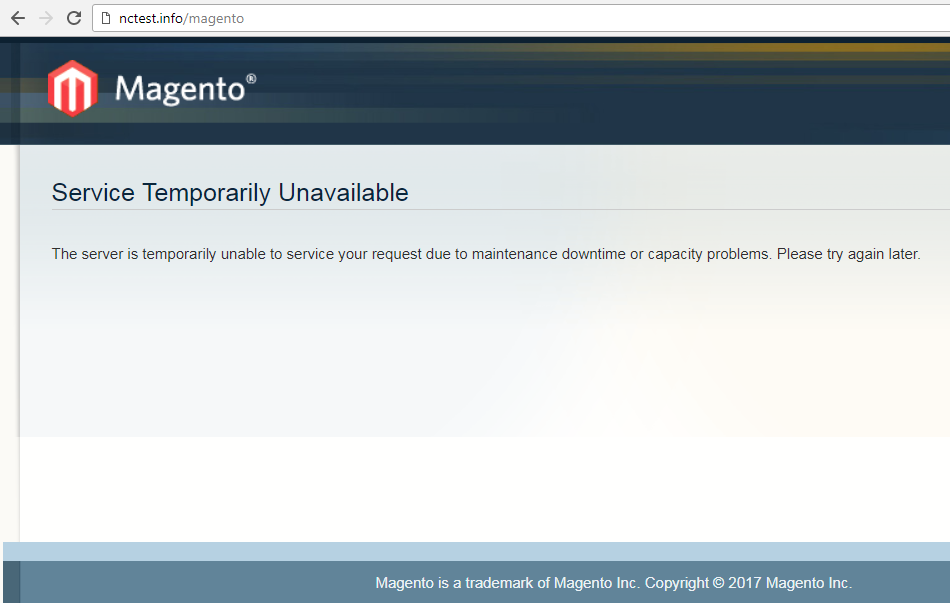

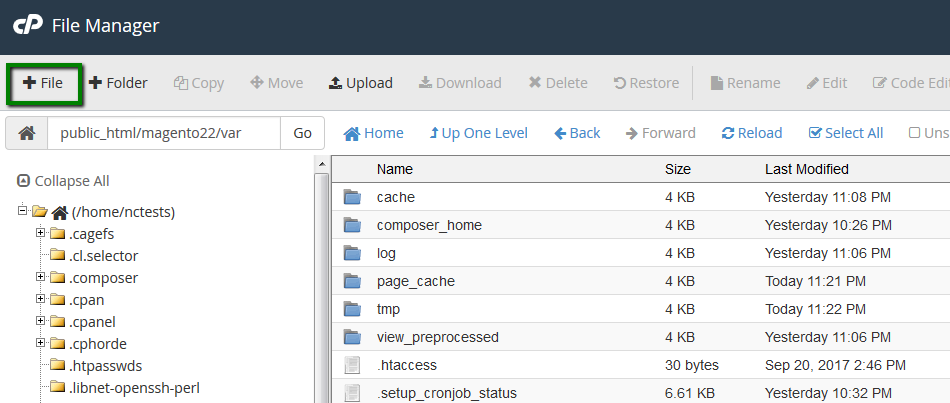

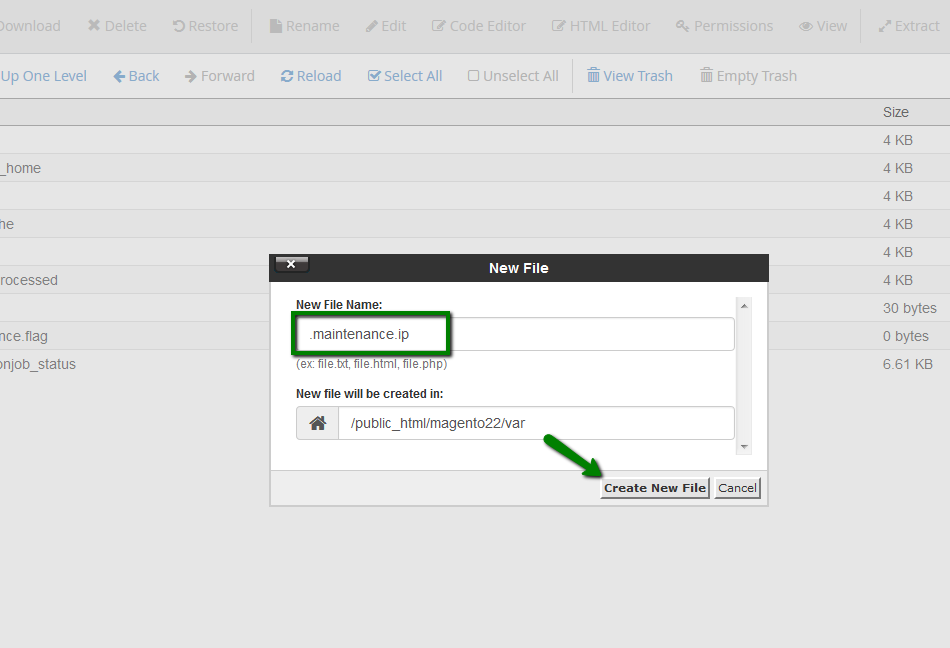
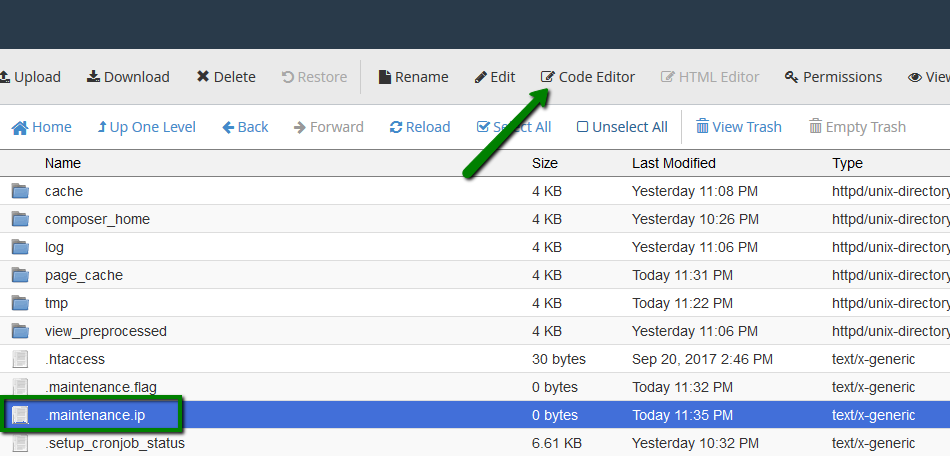

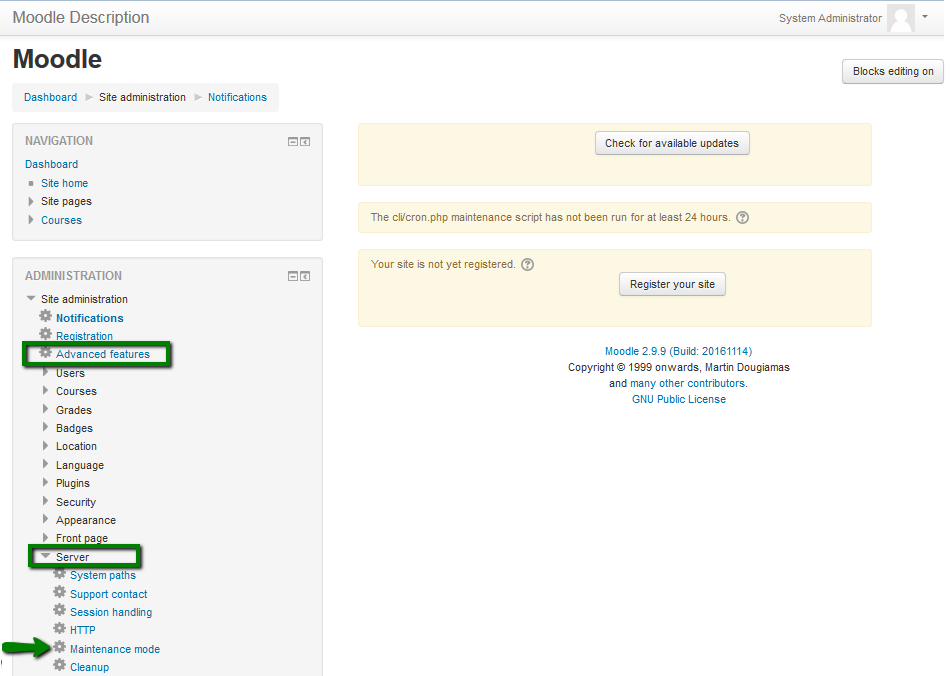
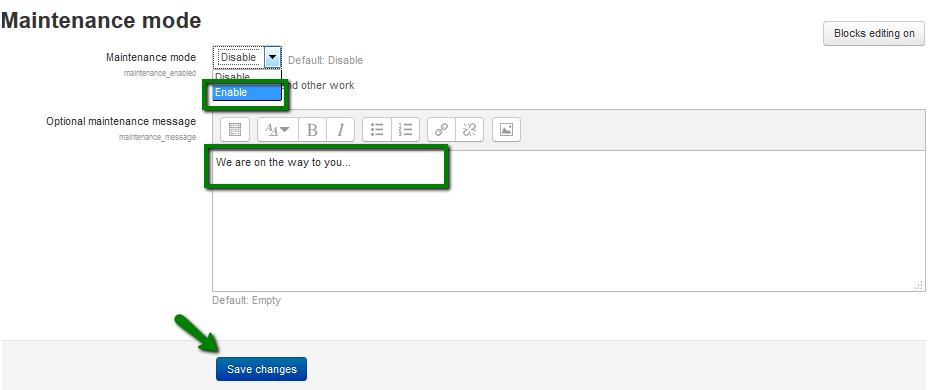

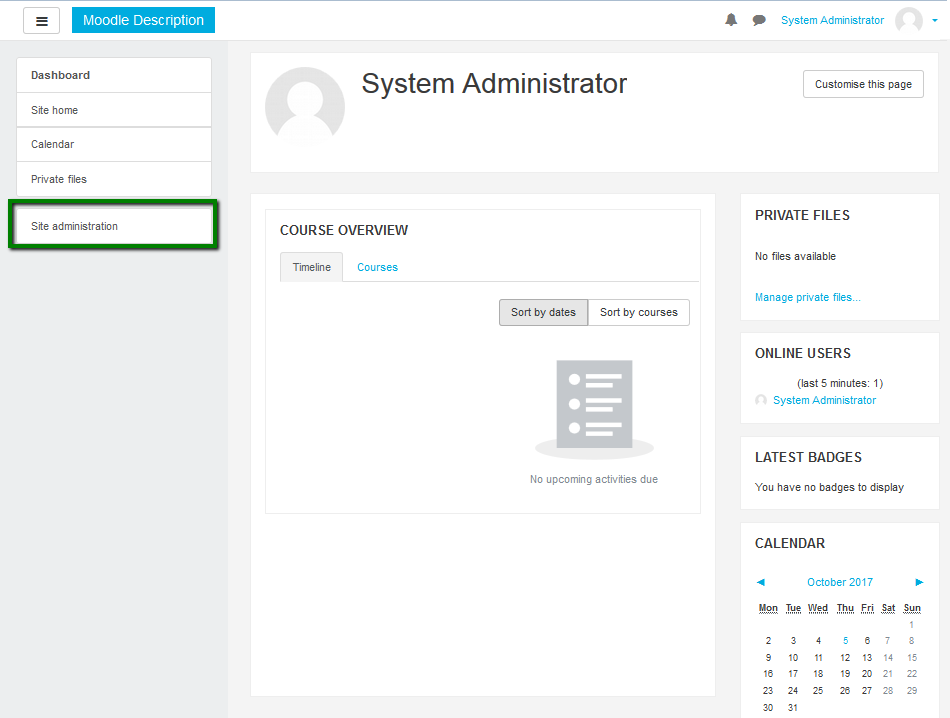
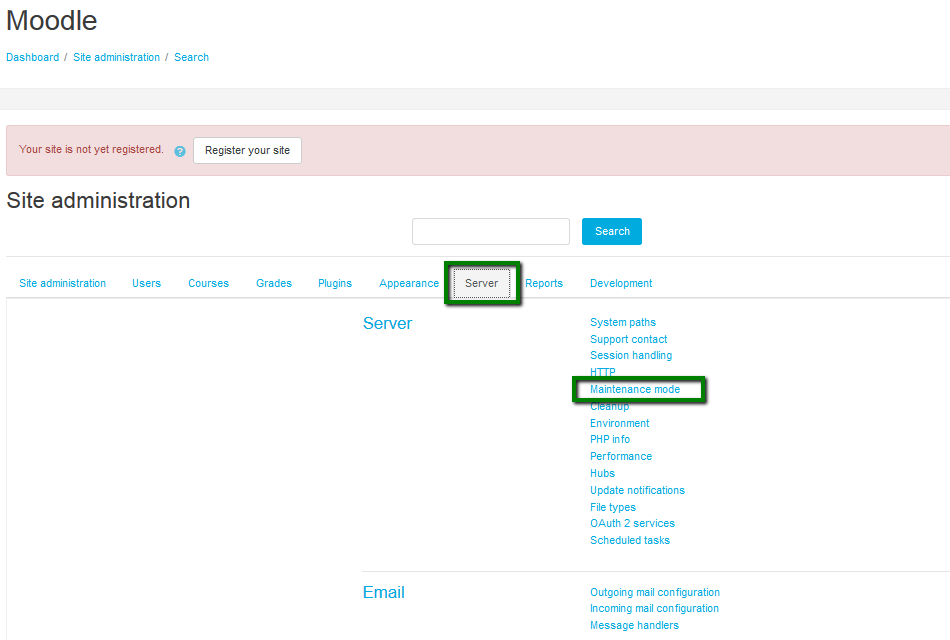
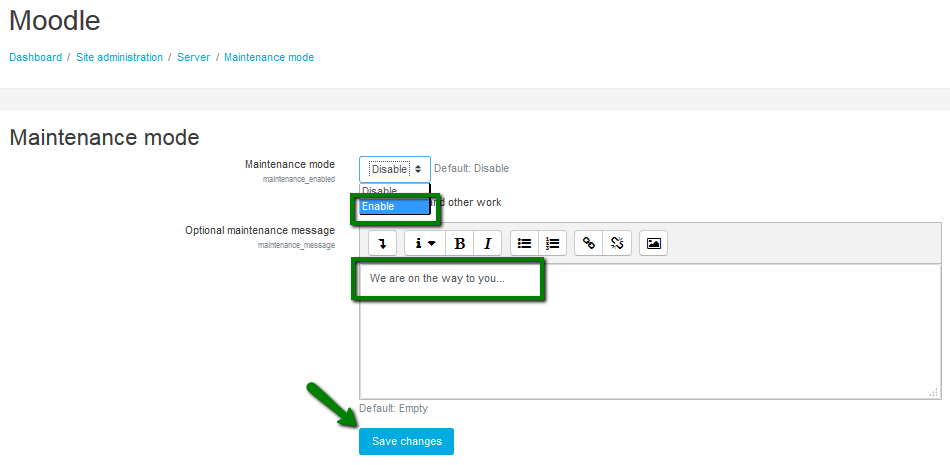
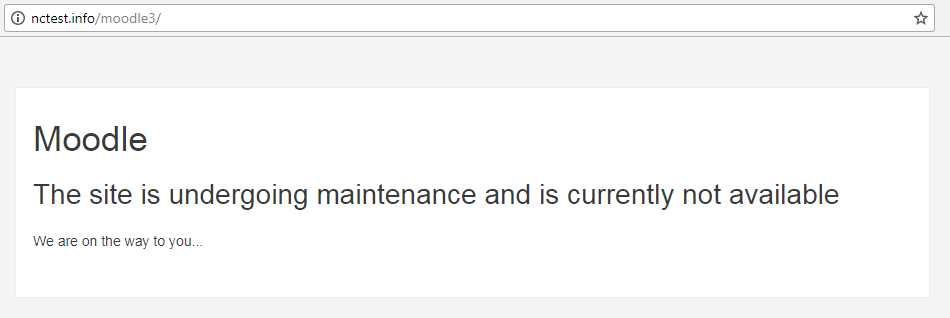
{}Need help? We're always here for you.
{}