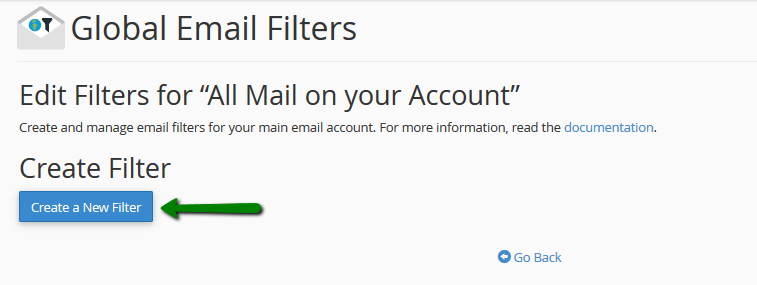
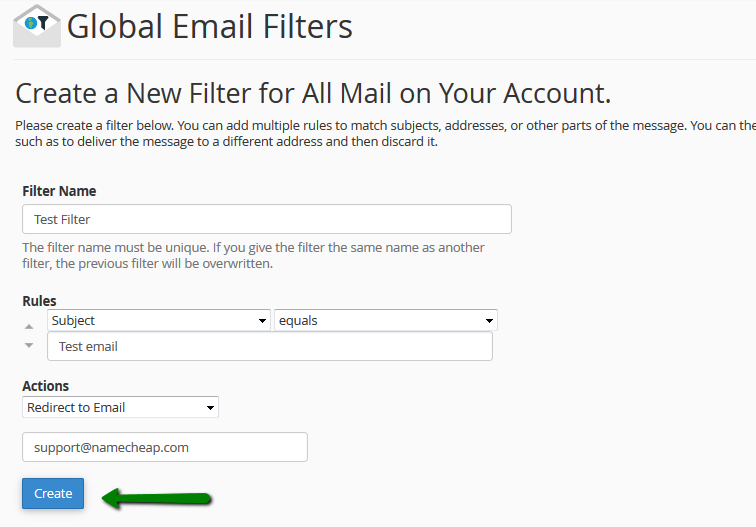
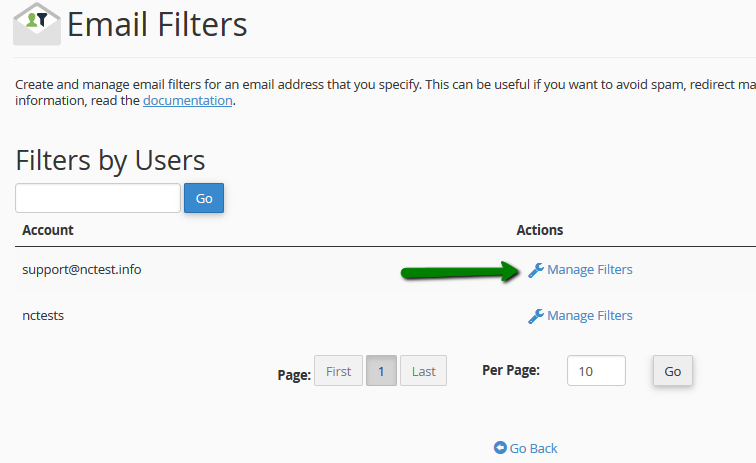
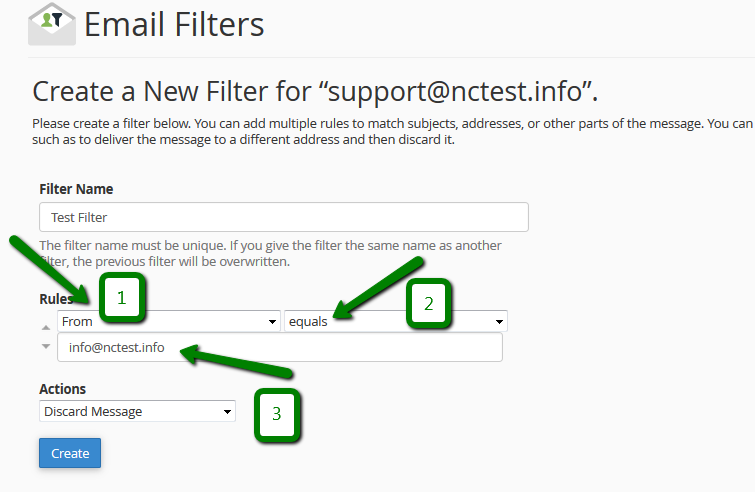
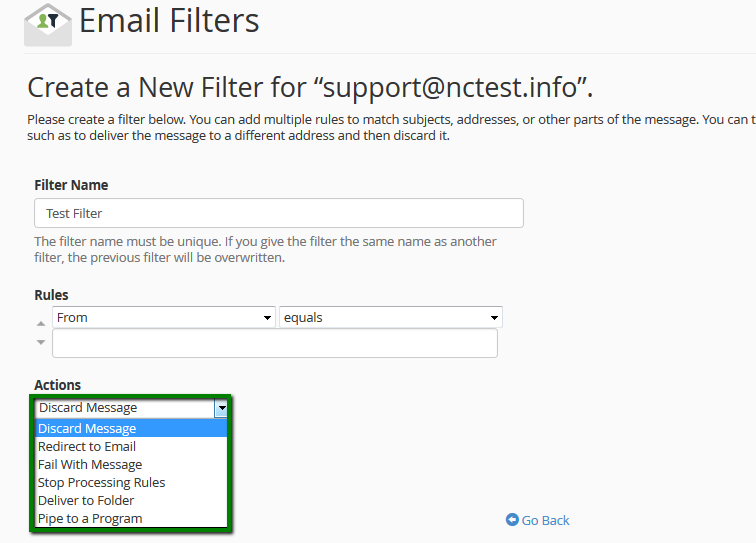
{"/api/v1/ncpl/simplekb/getarticle:\"{\\\"articleId\\\":9609,\\\"categoryId\\\":31}\"":{"body":{"Id":9609,"FriendlyId":"","ArticleTypeId":3,"Title":"How to set up and manage mail filters in cPanel","ArticleName":"How to set up and manage mail filters in cPanel","ArticleSummary":null,"PreponedSummary":false,"Approved":true,"Body":"U2V0dGluZyB1cCBtYWlsIGZpbHRlcnMgaXMgYW4gZWZmaWNpZW50IHdheSB0byBtYW5hZ2UgeW91ciBlbWFpbHMuIEluIHRoaXMgYXJ0aWNsZSwgeW91IHdpbGwgZmluZCBzb21lIHVzZWZ1bCB0aXBzIG9uIGhvdyB0byBzZXQgdXAgYW5kIDxhIGhyZWY9IiNtYW5hZ2UiPm1hbmFnZTwvYT4gKGVkaXQvZGVsZXRlKSBtYWlsIGZpbHRlcnMgaW4geW91ciBjUGFuZWwuPGJyIC8+PGJyIC8+RW1haWwgZmlsdGVycyBhcmUgY3JlYXRlZCBhY2NvcmRpbmcgdG8gdGhlIGNyaXRlcmlhIHRoYXQgc2hvd3MgaG93IG1haWxzIG5lZWQgdG8gYmUgZmlsdGVyZWQuIGNQYW5lbCBwcm92aWRlcyB0d28gaW50ZXJmYWNlcyB0byBjb25maWd1cmUgZW1haWwgZmlsdGVyczo8YnIgLz48YnIgLz48dWw+PGxpPjxiPkFjY291bnQgTGV2ZWwgRmlsdGVyaW5nIDwvYj5pbnRlcmZhY2U8YnIgLz48L2xpPjxsaT48Yj5Vc2VyIExldmVsIEZpbHRlcmluZzwvYj4gaW50ZXJmYWNlPGJyIC8+PC9saT48L3VsPjxpbWcgY2xhc3M9ImtiLWltYWdlIiBzcmM9Imh0dHBzOi8vTmFtZWNoZWFwLnNpbXBsZWtiLmNvbS9TaXRlQ29udGVudHMvMi03QzIyRDUyMzZBNDU0M0VCODI3RjNCRDg5MzZFMTUzRS9tZWRpYS9maWx0ZXJzMS5wbmciIC8+PGI+PGJyIC8+PGJyIC8+QWNjb3VudCBMZXZlbCBGaWx0ZXJpbmcgPC9iPmludGVyZmFjZSBhbGxvd3MgeW91IHRvIGNvbmZpZ3VyZSBmaWx0ZXJzIG9mIGFsbCB0aGUgZW1haWxzIGFycml2aW5nIHRvIHlvdXIgaG9zdGVkIGRvbWFpbnMuIFlvdSBtYXkgY3JlYXRlIHRoZSBmaWx0ZXJzIGluIHRoaXMgaW50ZXJmYWNlIGJ5IHNlbGVjdGluZyB0aGUgaWNvbiBhbmQgY2xpY2tpbmcgb24gPGI+Q3JlYXRlIGEgTmV3IEZpbHRlcjwvYj4gYnV0dG9uOg0KDQo8YnIgLz48YnIgLz48aW1nIGNsYXNzPSJrYi1pbWFnZSIgc3JjPSJodHRwczovL05hbWVjaGVhcC5zaW1wbGVrYi5jb20vU2l0ZUNvbnRlbnRzLzItN0MyMkQ1MjM2QTQ1NDNFQjgyN0YzQkQ4OTM2RTE1M0UvbWVkaWEvcGxfZmlsdGVyaW5nXzIucG5nIiAvPjxiciAvPjxpbWcgY2xhc3M9ImtiLWltYWdlIiBzcmM9Imh0dHBzOi8vTmFtZWNoZWFwLnNpbXBsZWtiLmNvbS9TaXRlQ29udGVudHMvMi03QzIyRDUyMzZBNDU0M0VCODI3RjNCRDg5MzZFMTUzRS9tZWRpYS9wbF9maWx0ZXJpbmdfMy5wbmciIC8+PGJyIC8+PGJyIC8+PGI+VXNlciBMZXZlbCBGaWx0ZXJpbmc8L2I+IGludGVyZmFjZSBhbGxvd3MgeW91IHRvIGZpbHRlciB0aGUgZW1haWxzIG9mIGVhY2ggZW1haWwgYWNjb3VudCBmb3IgeW91ciBkb21haW46DQoNCjxiciAvPjxiciAvPjxpbWcgY2xhc3M9ImtiLWltYWdlIiBzcmM9Imh0dHBzOi8vTmFtZWNoZWFwLnNpbXBsZWtiLmNvbS9TaXRlQ29udGVudHMvMi03QzIyRDUyMzZBNDU0M0VCODI3RjNCRDg5MzZFMTUzRS9tZWRpYS9wbF9maWx0ZXJpbmdfNC5wbmciIC8+PGJyIC8+PGltZyBjbGFzcz0ia2ItaW1hZ2UiIHNyYz0iaHR0cHM6Ly9OYW1lY2hlYXAuc2ltcGxla2IuY29tL1NpdGVDb250ZW50cy8yLTdDMjJENTIzNkE0NTQzRUI4MjdGM0JEODkzNkUxNTNFL21lZGlhL3BsX2ZpbHRlcmluZ181LnBuZyIgLz48YnIgLz48aW1nIGNsYXNzPSJrYi1pbWFnZSIgc3JjPSJodHRwczovL05hbWVjaGVhcC5zaW1wbGVrYi5jb20vU2l0ZUNvbnRlbnRzLzItN0MyMkQ1MjM2QTQ1NDNFQjgyN0YzQkQ4OTM2RTE1M0UvbWVkaWEvcGxfZmlsdGVyaW5nXzYucG5nIiAvPjxiciAvPjxiciAvPkxldOKAmXMgcmV2aWV3IDxiPmZpbHRlciBydWxlIGFuZCBpdHMgY3JpdGVyaWE8L2I+IHdoaWNoIHNwZWNpZnkgdGhlIHBhcnQgb2YgdGhlIGVtYWlsIG1lc3NhZ2UgYW5kIHdoZXRoZXIgdGhlIG1lc3NhZ2UgbWF0Y2hlcyB5b3VyIGZpbHRlciBwYXJhbWV0ZXJzLiBZb3UgbWF5IGNob29zZSBhbW9uZyB0aGUgZm9sbG93aW5nIG9wdGlvbnM6DQoNCjxiciAvPjxiciAvPjxiPkZyb206PC9iPiB0aGUgc2VuZGVyIGVtYWlsIGFkZHJlc3Mgb2YgYSBtZXNzYWdlIA0KPGJyIC8+PGI+U3ViamVjdDo8L2I+IHN1YmplY3Qgb2YgdGhlIGVtYWlsDQo8YnIgLz48Yj5Ubzo8L2I+IHRoZSByZWNpcGllbnQgZW1haWwgYWRkcmVzcyBvZiBhIG1lc3NhZ2UNCjxiciAvPjxiPlJlcGx5IEFkZHJlc3M6PC9iPiB0aGUgYWRkcmVzcyBhdCB3aGljaCB0aGUgc2VuZGVyIHJlY2VpdmVzIHJlcGxpZXMNCjxiciAvPjxiPkJvZHk6PC9iPiB0aGUgY29udGVudCBvZiB0aGUgbWVzc2FnZQ0KPGJyIC8+PGI+QW55IEhlYWRlcjo8L2I+IGFueSBwYXJ0IG9mIHRoZSBoZWFkZXIgb2YgdGhlIG1lc3NhZ2UNCjxiciAvPjxiPkFueSBSZWNpcGllbnQ6PC9iPiBhbnkgcmVjaXBpZW50IG9mIHRoZSBtZXNzYWdlDQo8YnIgLz48Yj5IYXMgTm90IEJlZW4gUHJldmlvdXNseSBEZWxpdmVyZWQ6PC9iPiB0aGUgc3lzdGVtIG9ubHkgZXhhbWluZXMgbWVzc2FnZXMgdGhhdCByZW1haW4gaW4gdGhlIHF1ZXVlIGZvciBkZWxpdmVyeQ0KPGJyIC8+PGI+SXMgYW4gRXJyb3IgTWVzc2FnZTo8L2I+IHRoZSBzeXN0ZW0gb25seSBleGFtaW5lcyBlcnJvciBtZXNzYWdlcyB0aGF0IGFuIGF1dG8tcmVzcG9uc2Ugc3lzdGVtIHNlbmRzDQo8YnIgLz48Yj5MaXN0IElEOjwvYj4gdGhlIG1haWxpbmcgbGlzdHMgb2YgdGhlIGFjY291bnQNCjxiciAvPjxiPlNwYW0gU3RhdHVzOjwvYj4gd2hldGhlciBBcGFjaGUgU3BhbUFzc2Fzc2lu4oSiIG1hcmtlZCB0aGUgbWVzc2FnZSBhcyBzcGFtLiBUaGUgU3BhbSBTdGF0dXMgbGluZSBiZWdpbnMgd2l0aCBZZXMgb3IgTm8NCjxiciAvPjxiPlNwYW0gQmFyOjwvYj4gdGhlIGNvbnRlbnQgb2YgdGhlIFNwYW0gQmFyIGhlYWRlciB0aGF0IEFwYWNoZSBTcGFtQXNzYXNzaW4gZ2VuZXJhdGVkIGZvciB0aGlzIG1lc3NhZ2UuIFRoZSBtb3JlIHBsdXMgc2lnbnMgKCspIHRoYXQgQXBhY2hlIFNwYW1Bc3Nhc3NpbiBhc3NpZ25zIHRvIGEgbWVzc2FnZSwgdGhlIGdyZWF0ZXIgdGhlIGxpa2VsaWhvb2QgdGhhdCB0aGUgc3lzdGVtIG1hcmtzIHRoZSBtZXNzYWdlIGFzIHNwYW0NCjxiciAvPjxiPlNwYW0gU2NvcmU6PC9iPiB0aGUgdG90YWwgbnVtYmVyIG9mIHBsdXMgc2lnbnMgKCspIGluIHRoZSBTcGFtIEJhciB2YWx1ZSwgZXhwcmVzc2VkIGFzIGFuIGludGVnZXINCg0KPGJyIC8+PGJyIC8+PGltZyBjbGFzcz0ia2ItaW1hZ2UiIHNyYz0iaHR0cHM6Ly9OYW1lY2hlYXAuc2ltcGxla2IuY29tL1NpdGVDb250ZW50cy8yLTdDMjJENTIzNkE0NTQzRUI4MjdGM0JEODkzNkUxNTNFL21lZGlhL3BsX2ZpbHRlcmluZ183LnBuZyIgLz48YnIgLz48YnIgLz48Yj5OT1RFOiA8L2I+IFNwYW0gU3RhdHVzLCBTcGFtIEJhciBhbmQgU3BhbSBTY29yZSBvcHRpb25zIGFyZSBhY3RpdmUgd2hlbiBBcGFjaGUgU3BhbUFzc2Fzc2luIGlzIGVuYWJsZWQgZm9yIHRoZSBhY2NvdW50Lg0KPGJyIC8+PGJyIC8+PGJyIC8+PGI+T3BlcmF0b3JzDQo8L2I+PGJyIC8+PGJyIC8+VGhpcyBvcHRpb24gd2lsbCBhbGxvdyB5b3UgdG8gc2VsZWN0IHRoZSB3YXkgdGhlIHBvcnRpb24gb2YgdGhlIGVtYWlsIG1lc3NhZ2Ugd2lsbCBiZSBjb21wYXJlZCBhY2NvcmRpbmcgdG8gdGhlIGNyaXRlcmlhIHlvdSBoYXZlIHNlbGVjdGVkLiBZb3UgbWF5IGNob29zZSBhbW9uZyB0aGUgZm9sbG93aW5nIG9wdGlvbnM6DQoNCjxiciAvPjxiPjxiciAvPkVxdWFsczo8L2I+IHRoZSBtZXNzYWdlIGlzIGV4YWN0bHkgdGhlIHNhbWUgYXMgdGhlIGRlZmluZWQgc3RyaW5nDQo8YnIgLz48Yj5NYXRjaGVzIFJlZ2V4OjwvYj4gdGhlIG1lc3NhZ2UgbWF0Y2hlcyBhIHJlZ3VsYXIgZXhwcmVzc2lvbiB0aGF0IHlvdSBzZXQNCjxiciAvPjxiPkNvbnRhaW5zOjwvYj4gdGhlIG1lc3NhZ2UgaGFzIHRoZSBzdHJpbmcgdGhhdCB5b3UgZGVmaW5lDQo8YnIgLz48Yj5Eb2VzIG5vdCBjb250YWluOjwvYj4gdGhlIG1lc3NhZ2UgZG9lcyBub3QgY29udGFpbiB0aGUgc3RyaW5nIHlvdSBkZWZpbmUNCjxiciAvPjxiPkJlZ2lucyB3aXRoOjwvYj4gdGhlIG1lc3NhZ2UgYmVnaW5zIHdpdGggdGhlIGRlZmluZWQgc3RyaW5nDQo8YnIgLz48Yj5FbmRzIHdpdGg6PC9iPiB0aGUgbWVzc2FnZSBlbmRzIHdpdGggdGhlIGRlZmluZWQgc3RyaW5nDQo8YnIgLz48Yj5Eb2VzIG5vdCBiZWdpbjo8L2I+IHRoZSBtZXNzYWdlIGRvZXMgbm90IGJlZ2luIHdpdGggdGhlIGRlZmluZWQgc3RyaW5nDQo8YnIgLz48Yj5Eb2VzIG5vdCBlbmQgd2l0aDo8L2I+IHRoZSBtZXNzYWdlIGRvZXMgbm90IGVuZCB3aXRoIHRoZSBkZWZpbmVkIHN0cmluZw0KPGJyIC8+PGI+RG9lcyBub3QgbWF0Y2g6PC9iPiB0aGUgbWVzc2FnZSBkb2VzIG5vdCBtYXRjaCB0aGUgZGVmaW5lZCBzdHJpbmcNCjxiciAvPjxiciAvPjxpbWcgY2xhc3M9ImtiLWltYWdlIiBzcmM9Imh0dHBzOi8vTmFtZWNoZWFwLnNpbXBsZWtiLmNvbS9TaXRlQ29udGVudHMvMi03QzIyRDUyMzZBNDU0M0VCODI3RjNCRDg5MzZFMTUzRS9tZWRpYS9wbF9maWx0ZXJpbmdfOC5wbmciIC8+PGJyIC8+PGJyIC8+PGI+Q3JpdGVyaWE8L2I+PGJyIC8+PGJyIC8+VGhpcyBvcHRpb24gZGVmaW5lcyB0aGUgY29tcGFyaXNvbiB0aGF0IHRoZSBzeXN0ZW0gcGVyZm9ybXMuIEZvciBleGFtcGxlLCBpZiB5b3Ugc2VsZWN0IHRoZSBGcm9tIGFuZCBFcXVhbHMgZmlsdGVycywgZW50ZXIgaW5mb0BuY3Rlc3QuaW5mbyBhcyB0aGUgY3JpdGVyaWEsIHRoZSBzeXN0ZW0gd2lsbCBkZXRlcm1pbmUgdGhhdCBhbnkgZW1haWwgZnJvbSBpbmZvQG5jdGVzdC5pbmZvIG1hdGNoZXMgdGhlIGZpbHRlciwgYnV0IGRvZXMgPGI+bm90PC9iPiBtYXRjaCBjb250YWN0QG5jdGVzdC5pbmZvIGJlY2F1c2UgaXQgY29udGFpbnMgYW5vdGhlciBlbWFpbCBhZGRyZXNzOg0KPGJyIC8+PGJyIC8+PGltZyBjbGFzcz0ia2ItaW1hZ2UiIHNyYz0iaHR0cHM6Ly9OYW1lY2hlYXAuc2ltcGxla2IuY29tL1NpdGVDb250ZW50cy8yLTdDMjJENTIzNkE0NTQzRUI4MjdGM0JEODkzNkUxNTNFL21lZGlhL3BsX2ZpbHRlcmluZ185LnBuZyIgLz48YnIgLz48YnIgLz48YnIgLz48Yj5BY3Rpb25zPC9iPjxiciAvPjxiciAvPldoZW4gdGhlIHNlcnZlciBkZXRlcm1pbmVzLCB0aGF0IHRoZSBlbWFpbCBtZXNzYWdlIG1hdGNoZXMgdGhlIGZpbHRlciwgaXQgaGFuZGxlcyB0aGUgbWVzc2FnZSB3aXRoIG9uZSBvZiB0aGUgZm9sbG93aW5nIG9wdGlvbnM6DQoNCjxiciAvPjxiciAvPjxpbWcgY2xhc3M9ImtiLWltYWdlIiBzcmM9Imh0dHBzOi8vTmFtZWNoZWFwLnNpbXBsZWtiLmNvbS9TaXRlQ29udGVudHMvMi03QzIyRDUyMzZBNDU0M0VCODI3RjNCRDg5MzZFMTUzRS9tZWRpYS9wbF9maWx0ZXJpbmdfMTAucG5nIiAvPjxiciAvPjxiciAvPjxiPkRpc2NhcmQgTWVzc2FnZTo8L2I+IHRoZSBtZXNzYWdlIHdpbGwgYmUgZGlzY2FyZGVkIHdpdGhvdXQgZmFpbHVyZSBub3RpY2UNCjxiciAvPjxiPlJlZGlyZWN0IHRvIEVtYWlsOjwvYj4gdGhlIG1lc3NhZ2UgaXMgZm9yd2FyZGVkIHRvIGEgcGFydGljdWxhciBlbWFpbCBhZGRyZXNzDQo8YnIgLz48Yj5GYWlsIFdpdGggTWVzc2FnZTo8L2I+IHRoZSBtZXNzYWdlIHdpbGwgYmUgZGlzY2FyZGVkIGFuZCBhdXRvbWF0aWNhbGx5IHNlbnQgd2l0aCBmYWlsdXJlIG5vdGljZSB0byBhIHNlbmRlcg0KPGJyIC8+PGI+U3RvcCBQcm9jZXNzaW5nIHJ1bGVzOjwvYj4gdGhlIHN5c3RlbSBza2lwcyBhbGwgZmlsdGVyIHJ1bGVzDQo8YnIgLz48Yj5EZWxpdmVyIHRvIEZvbGRlcjo8L2I+IHRoZSBtZXNzYWdlIHdpbGwgYmUgZGVsaXZlcmVkIHRvIGEgc3BlY2lmaWVkIGZvbGRlcg0KPGJyIC8+PGI+UGlwZSB0byBhIFByb2dyYW06PC9iPiB0aGUgbWVzc2FnZSBpcyBzZW50IHRvIGEgcGFydGljdWxhciBwcm9ncmFtIGJ5IHRoZSBzeXN0ZW0NCjxiciAvPjxiciAvPjxiciAvPjxhIG5hbWU9Im1hbmFnZSI+PGI+SG93IHRvIGVkaXQgb3IgZGVsZXRlIGEgZmlsdGVyPC9iPjwvYT48YnIgLz48YnIgLz4NCklmIHlvdSB3YW50IHRvIG1hbmFnZSBtYWlsIGZpbHRlcnMgZm9yIHlvdXIgPGk+bWFpbGJveChlcyk8L2k+LCBpbiB0aGUgPGI+RW1haWwgRmlsdGVyczwvYj4gY1BhbmVsIG1lbnUgY2xpY2sgPGI+TWFuYWdlIEZpbHRlcnM8L2I+IG5leHQgdG8gdGhlIG5lZWRlZCBtYWlsYm94LiBZb3UnbGwgYmUgYWJsZSB0byBlZGl0IG9yIGRlbGV0ZSBjdXJyZW50IGZpbHRlcnMuPGJyIC8+PGJyIC8+DQpUbyBtYW5hZ2UgZmlsdGVycyBmb3IgeW91ciA8aT5jUGFuZWwgYWNjb3VudDwvaT4sIGdvIHRvIHRoZSA8Yj5HbG9iYWwgRW1haWwgRmlsdGVyczwvYj4gbWVudToNCjxiciAvPjxiciAvPjxpbWcgY2xhc3M9ImtiLWltYWdlIiBzcmM9Imh0dHBzOi8vTmFtZWNoZWFwLnNpbXBsZWtiLmNvbS9TaXRlQ29udGVudHMvMi03QzIyRDUyMzZBNDU0M0VCODI3RjNCRDg5MzZFMTUzRS9tZWRpYS9lZGl0X2ZpbHRlcnMucG5nIiAvPjxiciAvPjxiciAvPg0KVG8gZWRpdCBhbiBleGlzdGluZyBmaWx0ZXIsIHBlcmZvcm0gdGhlIGZvbGxvd2luZyBzdGVwczo8YnIgLz48YnIgLz4NCjEuIENsaWNrIDxiPkVkaXQgPC9iPm5leHQgdG8gdGhlIGFwcHJvcHJpYXRlIGZpbHRlciBuYW1lLjxiciAvPg0KMi4gTWFrZSB0aGUgZGVzaXJlZCBjaGFuZ2VzIHRvIHRoZSBmaWx0ZXIuPGJyIC8+DQozLiBDbGljayA8Yj5TYXZlPC9iPi48YnIgLz48YnIgLz4NClRvIGRlbGV0ZSBhIGZpbHRlcjo8YnIgLz48YnIgLz4NCjEuIENsaWNrIDxiPkRlbGV0ZSA8L2I+Zm9yIHRoZSBhcHByb3ByaWF0ZSBmaWx0ZXIgbmFtZS48YnIgLz4NCjIuIENsaWNrIDxiPkRlbGV0ZSBGaWx0ZXI8L2I+Lg0KDQo8YnIgLz48YnIgLz48YnIgLz48YnIgLz5UaGF0J3MgaXQhPGJyIC8+PGJyIC8+DQrCoMKgwqDCoMKgwqDCoMKgwqDCoMKgwqDCoMKgIDxiciAvPsKgwqDCoMKgwqDCoMKgwqDCoMKgwqDCoMKgwqDCoMKgwqDCoMKgwqDCoCBOZWVkIGFueSBoZWxwPyBDb250YWN0IG91ciA8YSBocmVmPSJodHRwczovL3d3dy5uYW1lY2hlYXAuY29tL2hlbHAtY2VudGVyLyI+SGVscERlc2s8L2E+PGJyIC8+PGJyIC8+PHA+PC9wPjxwPjwvcD4=","NewTillDate":null,"FeaturedTillDate":null,"ModifiedDateTime":"2024-11-25T12:50:22.0000000","LiveDateTime":"1754-02-02T00:00:00.0000000","CreatedDateTime":"2015-08-20T03:24:26.0000000","ApprovalDatetime":"2015-08-20T04:00:56.0000000","RequestCount":45595,"MarkedAsNew":false,"MarkedAsFeatured":false,"RatingValue":3,"CategoryPaths":[{"__type":"Nc:SimpleKB:Abstractions:Dtos:CategoryPathDto","Level":1,"CategoryId":93,"CategoryName":"Email service"},{"__type":"Nc:SimpleKB:Abstractions:Dtos:CategoryPathDto","Level":2,"CategoryId":31,"CategoryName":"cPanel Email FAQs"}],"AssociatedCategories":[{"CategoryId":31,"CategoryName":"cPanel Email FAQs","CategoryDisplayName":"Email servicecPanel Email FAQs"}],"AssociatedTags":[{"TagId":64,"Tag":"cpanel"},{"TagId":22957,"Tag":" email account"},{"TagId":23261,"Tag":" mail filter"},{"TagId":82457,"Tag":" user level filtering"},{"TagId":82458,"Tag":" account level filtering"}],"RelatedArticles":[],"AssociatedMedias":[],"PreferredCategoryId":0,"RootParentCategoryName":"","RootParentCategoryId":0},"status":200,"statusText":"OK"},"/api/v1/ncpl/simplekb/getcategorybycategoryid:\"{\\\"categoryId\\\":31}\"":{"body":{"__type":"Nc:SimpleKB:Abstractions:Dtos:CategoryDto","ParentCategoryId":93,"Parent_Category_Name":"Email service","FriendlyId":null,"ApprovedYN":true,"TreatAsTopicYN":false,"CreatedDateTime":"07/21/2008 16:06:06","CurrentCategoryPaths":[{"__type":"Nc:SimpleKB:Abstractions:Dtos:CategoryPathDto","Level":1,"CategoryId":93,"CategoryName":"Email service"},{"__type":"Nc:SimpleKB:Abstractions:Dtos:CategoryPathDto","Level":2,"CategoryId":31,"CategoryName":"cPanel Email FAQs"}],"RelatedCategories":[],"AssociatedArticles":[{"ArticleId":10038,"Title":"How to configure a Contact Form with us","ArticleName":"How to configure a Contact Form with us","LiveDateTime":"02/02/1754 00:00:00","NewTillDate":null,"FeaturedTillDate":null,"ModifiedDateTime":"04/16/2025"},{"ArticleId":10317,"Title":"How to access cPanel Webmail","ArticleName":"How to access cPanel Webmail","LiveDateTime":"02/02/1754 00:00:00","NewTillDate":null,"FeaturedTillDate":null,"ModifiedDateTime":"04/30/2025"},{"ArticleId":10565,"Title":"How to change password for your cPanel email account","ArticleName":"How to change password for your cPanel email account","LiveDateTime":"02/02/1754 00:00:00","NewTillDate":null,"FeaturedTillDate":null,"ModifiedDateTime":"09/25/2024"},{"ArticleId":9751,"Title":"How to configure PHP mail()/SMTP authentication for different CMS","ArticleName":"How to configure PHP mail()/SMTP authentication for different CMS","LiveDateTime":"02/02/1754 00:00:00","NewTillDate":null,"FeaturedTillDate":null,"ModifiedDateTime":"04/30/2024"},{"ArticleId":110,"Title":"How to Create An Email Account in cPanel","ArticleName":"How to Create An Email Account in cPanel","LiveDateTime":"02/02/1754 00:00:00","NewTillDate":null,"FeaturedTillDate":null,"ModifiedDateTime":"09/25/2024"},{"ArticleId":9205,"Title":"How to set up email forwarding in cPanel","ArticleName":"How to set up email forwarding in cPanel","LiveDateTime":"02/02/1754 00:00:00","NewTillDate":null,"FeaturedTillDate":null,"ModifiedDateTime":"07/06/2023"},{"ArticleId":9609,"Title":"How to set up and manage mail filters in cPanel","ArticleName":"How to set up and manage mail filters in cPanel","LiveDateTime":"02/02/1754 00:00:00","NewTillDate":null,"FeaturedTillDate":null,"ModifiedDateTime":"11/25/2024"},{"ArticleId":912,"Title":"How to create a catch-all email address in cPanel","ArticleName":"How to create a catch-all email address in cPanel","LiveDateTime":"02/02/1754 00:00:00","NewTillDate":null,"FeaturedTillDate":null,"ModifiedDateTime":"07/12/2023"},{"ArticleId":1157,"Title":"How to create auto-responder in cPanel","ArticleName":"How to create auto-responder in cPanel","LiveDateTime":"02/02/1754 00:00:00","NewTillDate":null,"FeaturedTillDate":null,"ModifiedDateTime":"07/12/2023"},{"ArticleId":9258,"Title":"How to change MX records and Email Routing in cPanel","ArticleName":"How to change MX records and Email Routing in cPanel","LiveDateTime":"02/02/1754 00:00:00","NewTillDate":null,"FeaturedTillDate":null,"ModifiedDateTime":"09/25/2024"},{"ArticleId":9713,"Title":"How to set up cPanel webmail to go directly to Roundcube","ArticleName":"How to set up cPanel webmail to go directly to Roundcube","LiveDateTime":"02/02/1754 00:00:00","NewTillDate":null,"FeaturedTillDate":null,"ModifiedDateTime":"07/06/2023"},{"ArticleId":9967,"Title":"How to set up DNS records for Namecheap email service with Cloudflare (cPanel and Private Email)","ArticleName":"How to set up DNS records for Namecheap email service with Cloudflare (cPanel and Private Email)","LiveDateTime":"02/02/1754 00:00:00","NewTillDate":null,"FeaturedTillDate":null,"ModifiedDateTime":"01/18/2024"},{"ArticleId":9515,"Title":"How to import/export contacts via cPanel Webmail","ArticleName":"How to import/export contacts via cPanel Webmail","LiveDateTime":"02/02/1754 00:00:00","NewTillDate":null,"FeaturedTillDate":null,"ModifiedDateTime":"12/28/2020"},{"ArticleId":9676,"Title":"How to set up email signature in cPanel webmail","ArticleName":"How to set up email signature in cPanel webmail","LiveDateTime":"02/02/1754 00:00:00","NewTillDate":null,"FeaturedTillDate":null,"ModifiedDateTime":"12/07/2023"},{"ArticleId":9570,"Title":"Dealing with excessive Gmail and Outlook security","ArticleName":"Dealing with excessive Gmail and Outlook security","LiveDateTime":"02/02/1754 00:00:00","NewTillDate":null,"FeaturedTillDate":null,"ModifiedDateTime":"10/05/2022"},{"ArticleId":133,"Title":"Do you have any restrictions on sending out emails?","ArticleName":"Do you have any restrictions on sending out emails?","LiveDateTime":"02/02/1754 00:00:00","NewTillDate":null,"FeaturedTillDate":null,"ModifiedDateTime":"12/22/2025"},{"ArticleId":9214,"Title":"cPanel Email Deliverability Tool – SPF, DKIM, and DMARC Records","ArticleName":"cPanel Email Deliverability Tool – SPF, DKIM, and DMARC Records","LiveDateTime":"02/02/1754 00:00:00","NewTillDate":null,"FeaturedTillDate":null,"ModifiedDateTime":"10/27/2025"},{"ArticleId":9193,"Title":"Differences between Namecheap Private Email and cPanel email","ArticleName":"Differences between Namecheap Private Email and cPanel email","LiveDateTime":"02/02/1754 00:00:00","NewTillDate":null,"FeaturedTillDate":null,"ModifiedDateTime":"01/23/2025"},{"ArticleId":9429,"Title":"User-friendly guide to email headers","ArticleName":"User-friendly guide to email headers","LiveDateTime":"02/02/1754 00:00:00","NewTillDate":null,"FeaturedTillDate":null,"ModifiedDateTime":"02/07/2025"},{"ArticleId":9567,"Title":"Rewrite From Header - Explained","ArticleName":"Rewrite From Header - Explained","LiveDateTime":"02/02/1754 00:00:00","NewTillDate":null,"FeaturedTillDate":null,"ModifiedDateTime":"12/20/2021"}],"AssociatedTags":[{"TagId":8,"Tag":"web hosting"},{"TagId":77,"Tag":" email accounts"}],"CategoryId":31,"CategoryName":"cPanel Email FAQs"},"status":200,"statusText":"OK"},"/api/v1/ncpl/simplekb/getcategories:\"{\\\"parentCategoryId\\\":0,\\\"getTree\\\":true}\"":{"body":[{"__type":"Nc:SimpleKB:Abstractions:Dtos:CategoryItemDto","ParentCategoryId":93,"TreatAsTopicYN":false,"Description":"","ImageUrl":"","ShortDesc":"","CategoryId":2216,"CategoryName":"Spam Protection"},{"__type":"Nc:SimpleKB:Abstractions:Dtos:CategoryItemDto","ParentCategoryId":14,"TreatAsTopicYN":false,"Description":"","ImageUrl":"","ShortDesc":"","CategoryId":2217,"CategoryName":"Renewal"},{"__type":"Nc:SimpleKB:Abstractions:Dtos:CategoryItemDto","ParentCategoryId":14,"TreatAsTopicYN":false,"Description":"","ImageUrl":"","ShortDesc":"","CategoryId":2218,"CategoryName":"cPanel SSL Plugin"},{"__type":"Nc:SimpleKB:Abstractions:Dtos:CategoryItemDto","ParentCategoryId":12,"TreatAsTopicYN":false,"Description":"","ImageUrl":"","ShortDesc":"","CategoryId":2219,"CategoryName":"PHP Configuration"},{"__type":"Nc:SimpleKB:Abstractions:Dtos:CategoryItemDto","ParentCategoryId":14,"TreatAsTopicYN":false,"Description":"","ImageUrl":"","ShortDesc":"","CategoryId":2221,"CategoryName":"Multi-Domain SSL Certificates"},{"__type":"Nc:SimpleKB:Abstractions:Dtos:CategoryItemDto","ParentCategoryId":14,"TreatAsTopicYN":false,"Description":"","ImageUrl":"","ShortDesc":"","CategoryId":2222,"CategoryName":"Cancellation"},{"__type":"Nc:SimpleKB:Abstractions:Dtos:CategoryItemDto","ParentCategoryId":14,"TreatAsTopicYN":false,"Description":"","ImageUrl":"","ShortDesc":"","CategoryId":2223,"CategoryName":"Browser errors"},{"__type":"Nc:SimpleKB:Abstractions:Dtos:CategoryItemDto","ParentCategoryId":14,"TreatAsTopicYN":false,"Description":"","ImageUrl":"","ShortDesc":"","CategoryId":2224,"CategoryName":"Site Seal, Logo"},{"__type":"Nc:SimpleKB:Abstractions:Dtos:CategoryItemDto","ParentCategoryId":12,"TreatAsTopicYN":false,"Description":"","ImageUrl":"","ShortDesc":"","CategoryId":2225,"CategoryName":"SEO"},{"__type":"Nc:SimpleKB:Abstractions:Dtos:CategoryItemDto","ParentCategoryId":93,"TreatAsTopicYN":false,"Description":"","ImageUrl":"","ShortDesc":"","CategoryId":2226,"CategoryName":"Email Migration"},{"__type":"Nc:SimpleKB:Abstractions:Dtos:CategoryItemDto","ParentCategoryId":2211,"TreatAsTopicYN":false,"Description":"","ImageUrl":"","ShortDesc":"","CategoryId":2227,"CategoryName":"SSL Resellers"},{"__type":"Nc:SimpleKB:Abstractions:Dtos:CategoryItemDto","ParentCategoryId":0,"TreatAsTopicYN":true,"Description":"","ImageUrl":"/assets/img/pictograms/150/cloud-red.png","ShortDesc":"","CategoryId":2228,"CategoryName":"Apps","SubCategories":[{"__type":"Nc:SimpleKB:Abstractions:Dtos:CategoryItemDto","ParentCategoryId":2228,"TreatAsTopicYN":false,"Description":"","ImageUrl":"","ShortDesc":"","CategoryId":2251,"CategoryName":"Supersonic CDN"},{"__type":"Nc:SimpleKB:Abstractions:Dtos:CategoryItemDto","ParentCategoryId":2228,"TreatAsTopicYN":false,"Description":"","ImageUrl":"","ShortDesc":"","CategoryId":2298,"CategoryName":"Site Maker"},{"__type":"Nc:SimpleKB:Abstractions:Dtos:CategoryItemDto","ParentCategoryId":2228,"TreatAsTopicYN":false,"Description":"","ImageUrl":"","ShortDesc":"","CategoryId":177,"CategoryName":"Google Workspace (formerly G Suite)"}]},{"__type":"Nc:SimpleKB:Abstractions:Dtos:CategoryItemDto","ParentCategoryId":2211,"TreatAsTopicYN":false,"Description":"","ImageUrl":"","ShortDesc":"","CategoryId":2229,"CategoryName":"Hosting Resellers"},{"__type":"Nc:SimpleKB:Abstractions:Dtos:CategoryItemDto","ParentCategoryId":34,"TreatAsTopicYN":false,"Description":"","ImageUrl":"","ShortDesc":"","CategoryId":2232,"CategoryName":"DNSSEC"},{"__type":"Nc:SimpleKB:Abstractions:Dtos:CategoryItemDto","ParentCategoryId":34,"TreatAsTopicYN":false,"Description":"","ImageUrl":"","ShortDesc":"","CategoryId":2234,"CategoryName":"Google Workspace (formerly G Suite)"},{"__type":"Nc:SimpleKB:Abstractions:Dtos:CategoryItemDto","ParentCategoryId":34,"TreatAsTopicYN":false,"Description":"","ImageUrl":"","ShortDesc":"","CategoryId":2237,"CategoryName":"Host records setup"},{"__type":"Nc:SimpleKB:Abstractions:Dtos:CategoryItemDto","ParentCategoryId":14,"TreatAsTopicYN":false,"Description":"","ImageUrl":"","ShortDesc":"","CategoryId":2238,"CategoryName":"SSL installation errors"},{"__type":"Nc:SimpleKB:Abstractions:Dtos:CategoryItemDto","ParentCategoryId":0,"TreatAsTopicYN":false,"Description":"","ImageUrl":"/assets/img/pictograms/150/easywp-red.png","ShortDesc":"","CategoryId":2239,"CategoryName":"EasyWP","SubCategories":[{"__type":"Nc:SimpleKB:Abstractions:Dtos:CategoryItemDto","ParentCategoryId":2239,"TreatAsTopicYN":false,"Description":"","ImageUrl":"","ShortDesc":"","CategoryId":2280,"CategoryName":"Getting Started"},{"__type":"Nc:SimpleKB:Abstractions:Dtos:CategoryItemDto","ParentCategoryId":2239,"TreatAsTopicYN":false,"Description":"","ImageUrl":"","ShortDesc":"","CategoryId":2279,"CategoryName":"General Information"},{"__type":"Nc:SimpleKB:Abstractions:Dtos:CategoryItemDto","ParentCategoryId":2239,"TreatAsTopicYN":false,"Description":"","ImageUrl":"","ShortDesc":"","CategoryId":2281,"CategoryName":"WordPress Migration"},{"__type":"Nc:SimpleKB:Abstractions:Dtos:CategoryItemDto","ParentCategoryId":2239,"TreatAsTopicYN":false,"Description":"","ImageUrl":"","ShortDesc":"","CategoryId":2282,"CategoryName":"Plugins and Themes"},{"__type":"Nc:SimpleKB:Abstractions:Dtos:CategoryItemDto","ParentCategoryId":2239,"TreatAsTopicYN":false,"Description":"","ImageUrl":"","ShortDesc":"","CategoryId":2284,"CategoryName":"WordPress Management"},{"__type":"Nc:SimpleKB:Abstractions:Dtos:CategoryItemDto","ParentCategoryId":2239,"TreatAsTopicYN":false,"Description":"","ImageUrl":"","ShortDesc":"","CategoryId":2285,"CategoryName":"SFTP and Database access"},{"__type":"Nc:SimpleKB:Abstractions:Dtos:CategoryItemDto","ParentCategoryId":2239,"TreatAsTopicYN":false,"Description":"","ImageUrl":"","ShortDesc":"","CategoryId":2286,"CategoryName":"Domains questions"},{"__type":"Nc:SimpleKB:Abstractions:Dtos:CategoryItemDto","ParentCategoryId":2239,"TreatAsTopicYN":false,"Description":"","ImageUrl":"","ShortDesc":"","CategoryId":2288,"CategoryName":"Billing questions"},{"__type":"Nc:SimpleKB:Abstractions:Dtos:CategoryItemDto","ParentCategoryId":2239,"TreatAsTopicYN":false,"Description":"","ImageUrl":"","ShortDesc":"","CategoryId":2287,"CategoryName":"SSL questions"}]},{"__type":"Nc:SimpleKB:Abstractions:Dtos:CategoryItemDto","ParentCategoryId":2228,"TreatAsTopicYN":false,"Description":"","ImageUrl":"","ShortDesc":"","CategoryId":2251,"CategoryName":"Supersonic CDN"},{"__type":"Nc:SimpleKB:Abstractions:Dtos:CategoryItemDto","ParentCategoryId":12,"TreatAsTopicYN":false,"Description":"","ImageUrl":"","ShortDesc":"","CategoryId":2252,"CategoryName":"InterWorx questions"},{"__type":"Nc:SimpleKB:Abstractions:Dtos:CategoryItemDto","ParentCategoryId":2253,"TreatAsTopicYN":false,"Description":"","ImageUrl":"","ShortDesc":"","CategoryId":2254,"CategoryName":"Domains How-To"},{"__type":"Nc:SimpleKB:Abstractions:Dtos:CategoryItemDto","ParentCategoryId":2253,"TreatAsTopicYN":false,"Description":"","ImageUrl":"","ShortDesc":"","CategoryId":2255,"CategoryName":"Hosting How-To"},{"__type":"Nc:SimpleKB:Abstractions:Dtos:CategoryItemDto","ParentCategoryId":2253,"TreatAsTopicYN":false,"Description":"","ImageUrl":"","ShortDesc":"","CategoryId":2257,"CategoryName":"Sales & Payments How-To"},{"__type":"Nc:SimpleKB:Abstractions:Dtos:CategoryItemDto","ParentCategoryId":2253,"TreatAsTopicYN":false,"Description":"","ImageUrl":"","ShortDesc":"","CategoryId":2258,"CategoryName":"cPanel Email How-To"},{"__type":"Nc:SimpleKB:Abstractions:Dtos:CategoryItemDto","ParentCategoryId":93,"TreatAsTopicYN":false,"Description":"","ImageUrl":"","ShortDesc":"","CategoryId":2260,"CategoryName":"Private Email Contacts and Calendars Setup"},{"__type":"Nc:SimpleKB:Abstractions:Dtos:CategoryItemDto","ParentCategoryId":2253,"TreatAsTopicYN":false,"Description":"","ImageUrl":"","ShortDesc":"","CategoryId":2262,"CategoryName":"EasyWP How-To"},{"__type":"Nc:SimpleKB:Abstractions:Dtos:CategoryItemDto","ParentCategoryId":0,"TreatAsTopicYN":false,"Description":"","ImageUrl":"https://download.namecheap.com/assets/img/domainvault-red@2x.png","ShortDesc":"","CategoryId":2289,"CategoryName":"Domain Vault","SubCategories":[]},{"__type":"Nc:SimpleKB:Abstractions:Dtos:CategoryItemDto","ParentCategoryId":14,"TreatAsTopicYN":false,"Description":"","ImageUrl":"","ShortDesc":"","CategoryId":2290,"CategoryName":"CSR code"},{"__type":"Nc:SimpleKB:Abstractions:Dtos:CategoryItemDto","ParentCategoryId":12,"TreatAsTopicYN":false,"Description":"","ImageUrl":"","ShortDesc":"","CategoryId":2291,"CategoryName":"Webuzo questions"},{"__type":"Nc:SimpleKB:Abstractions:Dtos:CategoryItemDto","ParentCategoryId":2265,"TreatAsTopicYN":false,"Description":"","ImageUrl":"","ShortDesc":"","CategoryId":2292,"CategoryName":"Browser Extensions"},{"__type":"Nc:SimpleKB:Abstractions:Dtos:CategoryItemDto","ParentCategoryId":14,"TreatAsTopicYN":false,"Description":"","ImageUrl":"","ShortDesc":"","CategoryId":2293,"CategoryName":"Automated SSL management"},{"__type":"Nc:SimpleKB:Abstractions:Dtos:CategoryItemDto","ParentCategoryId":2228,"TreatAsTopicYN":false,"Description":"","ImageUrl":"","ShortDesc":"","CategoryId":2298,"CategoryName":"Site Maker"},{"__type":"Nc:SimpleKB:Abstractions:Dtos:CategoryItemDto","ParentCategoryId":12,"TreatAsTopicYN":false,"Description":"","ImageUrl":"","ShortDesc":"","CategoryId":27,"CategoryName":"Getting Started"},{"__type":"Nc:SimpleKB:Abstractions:Dtos:CategoryItemDto","ParentCategoryId":0,"TreatAsTopicYN":false,"Description":"","ImageUrl":"/assets/img/pictograms/150/support-red.png","ShortDesc":"","CategoryId":5,"CategoryName":"General & Support","SubCategories":[]},{"__type":"Nc:SimpleKB:Abstractions:Dtos:CategoryItemDto","ParentCategoryId":2200,"TreatAsTopicYN":false,"Description":"","ImageUrl":"","ShortDesc":"","CategoryId":7,"CategoryName":"Billing FAQ"},{"__type":"Nc:SimpleKB:Abstractions:Dtos:CategoryItemDto","ParentCategoryId":2209,"TreatAsTopicYN":false,"Description":"","ImageUrl":"","ShortDesc":"","CategoryId":8,"CategoryName":"Transfer Information"},{"__type":"Nc:SimpleKB:Abstractions:Dtos:CategoryItemDto","ParentCategoryId":12,"TreatAsTopicYN":false,"Description":"","ImageUrl":"","ShortDesc":"","CategoryId":22,"CategoryName":"Hosting Information"},{"__type":"Nc:SimpleKB:Abstractions:Dtos:CategoryItemDto","ParentCategoryId":14,"TreatAsTopicYN":false,"Description":"","ImageUrl":"","ShortDesc":"","CategoryId":38,"CategoryName":"SSL General"},{"__type":"Nc:SimpleKB:Abstractions:Dtos:CategoryItemDto","ParentCategoryId":9,"TreatAsTopicYN":false,"Description":"","ImageUrl":"","ShortDesc":"","CategoryId":45,"CategoryName":"Account Security"},{"__type":"Nc:SimpleKB:Abstractions:Dtos:CategoryItemDto","ParentCategoryId":34,"TreatAsTopicYN":false,"Description":"","ImageUrl":"","ShortDesc":"","CategoryId":46,"CategoryName":"Domain Management"},{"__type":"Nc:SimpleKB:Abstractions:Dtos:CategoryItemDto","ParentCategoryId":2211,"TreatAsTopicYN":false,"Description":"","ImageUrl":"","ShortDesc":"","CategoryId":63,"CategoryName":"Namecheap API"},{"__type":"Nc:SimpleKB:Abstractions:Dtos:CategoryItemDto","ParentCategoryId":2228,"TreatAsTopicYN":false,"Description":"","ImageUrl":"","ShortDesc":"","CategoryId":177,"CategoryName":"Google Workspace (formerly G Suite)"},{"__type":"Nc:SimpleKB:Abstractions:Dtos:CategoryItemDto","ParentCategoryId":93,"TreatAsTopicYN":false,"Description":"","ImageUrl":"","ShortDesc":"","CategoryId":2179,"CategoryName":"Private Email: General Information"},{"__type":"Nc:SimpleKB:Abstractions:Dtos:CategoryItemDto","ParentCategoryId":2265,"TreatAsTopicYN":false,"Description":"","ImageUrl":"","ShortDesc":"","CategoryId":2274,"CategoryName":"General"},{"__type":"Nc:SimpleKB:Abstractions:Dtos:CategoryItemDto","ParentCategoryId":2239,"TreatAsTopicYN":false,"Description":"","ImageUrl":"","ShortDesc":"","CategoryId":2280,"CategoryName":"Getting Started"},{"__type":"Nc:SimpleKB:Abstractions:Dtos:CategoryItemDto","ParentCategoryId":2239,"TreatAsTopicYN":false,"Description":"","ImageUrl":"","ShortDesc":"","CategoryId":2279,"CategoryName":"General Information"},{"__type":"Nc:SimpleKB:Abstractions:Dtos:CategoryItemDto","ParentCategoryId":93,"TreatAsTopicYN":false,"Description":"","ImageUrl":"","ShortDesc":"","CategoryId":2215,"CategoryName":"Private Email: Mailbox Management"},{"__type":"Nc:SimpleKB:Abstractions:Dtos:CategoryItemDto","ParentCategoryId":2211,"TreatAsTopicYN":false,"Description":"","ImageUrl":"","ShortDesc":"","CategoryId":2196,"CategoryName":"WHMCS module for SSL"},{"__type":"Nc:SimpleKB:Abstractions:Dtos:CategoryItemDto","ParentCategoryId":0,"TreatAsTopicYN":false,"Description":"","ImageUrl":"/assets/img/pictograms/150/savings-red.png","ShortDesc":"","CategoryId":2200,"CategoryName":"Checkout & Billing","SubCategories":[{"__type":"Nc:SimpleKB:Abstractions:Dtos:CategoryItemDto","ParentCategoryId":2200,"TreatAsTopicYN":false,"Description":"","ImageUrl":"","ShortDesc":"","CategoryId":7,"CategoryName":"Billing FAQ"},{"__type":"Nc:SimpleKB:Abstractions:Dtos:CategoryItemDto","ParentCategoryId":2200,"TreatAsTopicYN":false,"Description":"","ImageUrl":"","ShortDesc":"","CategoryId":2201,"CategoryName":"Domains Billing"},{"__type":"Nc:SimpleKB:Abstractions:Dtos:CategoryItemDto","ParentCategoryId":2200,"TreatAsTopicYN":false,"Description":"","ImageUrl":"","ShortDesc":"","CategoryId":21,"CategoryName":"Hosting Billing"},{"__type":"Nc:SimpleKB:Abstractions:Dtos:CategoryItemDto","ParentCategoryId":2200,"TreatAsTopicYN":false,"Description":"","ImageUrl":"","ShortDesc":"","CategoryId":71,"CategoryName":"SSL Certificates Billing"},{"__type":"Nc:SimpleKB:Abstractions:Dtos:CategoryItemDto","ParentCategoryId":2200,"TreatAsTopicYN":false,"Description":"","ImageUrl":"","ShortDesc":"","CategoryId":2177,"CategoryName":"Private Email"}]},{"__type":"Nc:SimpleKB:Abstractions:Dtos:CategoryItemDto","ParentCategoryId":2200,"TreatAsTopicYN":false,"Description":"","ImageUrl":"","ShortDesc":"","CategoryId":2201,"CategoryName":"Domains Billing"},{"__type":"Nc:SimpleKB:Abstractions:Dtos:CategoryItemDto","ParentCategoryId":14,"TreatAsTopicYN":false,"Description":"","ImageUrl":"","ShortDesc":"","CategoryId":67,"CategoryName":"Activation"},{"__type":"Nc:SimpleKB:Abstractions:Dtos:CategoryItemDto","ParentCategoryId":2209,"TreatAsTopicYN":false,"Description":"","ImageUrl":"","ShortDesc":"","CategoryId":83,"CategoryName":"Transfer to Namecheap"},{"__type":"Nc:SimpleKB:Abstractions:Dtos:CategoryItemDto","ParentCategoryId":9,"TreatAsTopicYN":false,"Description":"","ImageUrl":"","ShortDesc":"","CategoryId":43,"CategoryName":"Profile Management"},{"__type":"Nc:SimpleKB:Abstractions:Dtos:CategoryItemDto","ParentCategoryId":34,"TreatAsTopicYN":false,"Description":"","ImageUrl":"","ShortDesc":"","CategoryId":10,"CategoryName":"DNS Questions"},{"__type":"Nc:SimpleKB:Abstractions:Dtos:CategoryItemDto","ParentCategoryId":12,"TreatAsTopicYN":false,"Description":"","ImageUrl":"","ShortDesc":"","CategoryId":29,"CategoryName":"cPanel questions"},{"__type":"Nc:SimpleKB:Abstractions:Dtos:CategoryItemDto","ParentCategoryId":2200,"TreatAsTopicYN":false,"Description":"","ImageUrl":"","ShortDesc":"","CategoryId":21,"CategoryName":"Hosting Billing"},{"__type":"Nc:SimpleKB:Abstractions:Dtos:CategoryItemDto","ParentCategoryId":34,"TreatAsTopicYN":false,"Description":"","ImageUrl":"","ShortDesc":"","CategoryId":11,"CategoryName":"Dynamic DNS"},{"__type":"Nc:SimpleKB:Abstractions:Dtos:CategoryItemDto","ParentCategoryId":9,"TreatAsTopicYN":false,"Description":"","ImageUrl":"","ShortDesc":"","CategoryId":44,"CategoryName":"Account Access"},{"__type":"Nc:SimpleKB:Abstractions:Dtos:CategoryItemDto","ParentCategoryId":2209,"TreatAsTopicYN":false,"Description":"","ImageUrl":"","ShortDesc":"","CategoryId":84,"CategoryName":"Transfer to another provider"},{"__type":"Nc:SimpleKB:Abstractions:Dtos:CategoryItemDto","ParentCategoryId":14,"TreatAsTopicYN":false,"Description":"","ImageUrl":"","ShortDesc":"","CategoryId":68,"CategoryName":"Validation"},{"__type":"Nc:SimpleKB:Abstractions:Dtos:CategoryItemDto","ParentCategoryId":12,"TreatAsTopicYN":false,"Description":"","ImageUrl":"","ShortDesc":"","CategoryId":2182,"CategoryName":"cPanel: Software Management"},{"__type":"Nc:SimpleKB:Abstractions:Dtos:CategoryItemDto","ParentCategoryId":93,"TreatAsTopicYN":false,"Description":"","ImageUrl":"","ShortDesc":"","CategoryId":2214,"CategoryName":"Email Forwarding"},{"__type":"Nc:SimpleKB:Abstractions:Dtos:CategoryItemDto","ParentCategoryId":2265,"TreatAsTopicYN":false,"Description":"","ImageUrl":"","ShortDesc":"","CategoryId":2270,"CategoryName":"Routers"},{"__type":"Nc:SimpleKB:Abstractions:Dtos:CategoryItemDto","ParentCategoryId":2239,"TreatAsTopicYN":false,"Description":"","ImageUrl":"","ShortDesc":"","CategoryId":2281,"CategoryName":"WordPress Migration"},{"__type":"Nc:SimpleKB:Abstractions:Dtos:CategoryItemDto","ParentCategoryId":2239,"TreatAsTopicYN":false,"Description":"","ImageUrl":"","ShortDesc":"","CategoryId":2282,"CategoryName":"Plugins and Themes"},{"__type":"Nc:SimpleKB:Abstractions:Dtos:CategoryItemDto","ParentCategoryId":2265,"TreatAsTopicYN":false,"Description":"","ImageUrl":"","ShortDesc":"","CategoryId":2272,"CategoryName":"TV"},{"__type":"Nc:SimpleKB:Abstractions:Dtos:CategoryItemDto","ParentCategoryId":12,"TreatAsTopicYN":false,"Description":"","ImageUrl":"","ShortDesc":"","CategoryId":2187,"CategoryName":"cPanel: WordPress"},{"__type":"Nc:SimpleKB:Abstractions:Dtos:CategoryItemDto","ParentCategoryId":2209,"TreatAsTopicYN":false,"Description":"","ImageUrl":"","ShortDesc":"","CategoryId":219,"CategoryName":"Canceled Transfers"},{"__type":"Nc:SimpleKB:Abstractions:Dtos:CategoryItemDto","ParentCategoryId":2200,"TreatAsTopicYN":false,"Description":"","ImageUrl":"","ShortDesc":"","CategoryId":71,"CategoryName":"SSL Certificates Billing"},{"__type":"Nc:SimpleKB:Abstractions:Dtos:CategoryItemDto","ParentCategoryId":93,"TreatAsTopicYN":false,"Description":"","ImageUrl":"","ShortDesc":"","CategoryId":2176,"CategoryName":"Private Email: DNS Settings"},{"__type":"Nc:SimpleKB:Abstractions:Dtos:CategoryItemDto","ParentCategoryId":14,"TreatAsTopicYN":false,"Description":"","ImageUrl":"","ShortDesc":"","CategoryId":69,"CategoryName":"Installation"},{"__type":"Nc:SimpleKB:Abstractions:Dtos:CategoryItemDto","ParentCategoryId":0,"TreatAsTopicYN":false,"Description":"","ImageUrl":"/assets/img/pictograms/150/reseller-red.png","ShortDesc":"","CategoryId":34,"CategoryName":"Domains","SubCategories":[{"__type":"Nc:SimpleKB:Abstractions:Dtos:CategoryItemDto","ParentCategoryId":34,"TreatAsTopicYN":false,"Description":"","ImageUrl":"","ShortDesc":"","CategoryId":2232,"CategoryName":"DNSSEC"},{"__type":"Nc:SimpleKB:Abstractions:Dtos:CategoryItemDto","ParentCategoryId":34,"TreatAsTopicYN":false,"Description":"","ImageUrl":"","ShortDesc":"","CategoryId":2234,"CategoryName":"Google Workspace (formerly G Suite)"},{"__type":"Nc:SimpleKB:Abstractions:Dtos:CategoryItemDto","ParentCategoryId":34,"TreatAsTopicYN":false,"Description":"","ImageUrl":"","ShortDesc":"","CategoryId":2237,"CategoryName":"Host records setup"},{"__type":"Nc:SimpleKB:Abstractions:Dtos:CategoryItemDto","ParentCategoryId":34,"TreatAsTopicYN":false,"Description":"","ImageUrl":"","ShortDesc":"","CategoryId":46,"CategoryName":"Domain Management"},{"__type":"Nc:SimpleKB:Abstractions:Dtos:CategoryItemDto","ParentCategoryId":34,"TreatAsTopicYN":false,"Description":"","ImageUrl":"","ShortDesc":"","CategoryId":10,"CategoryName":"DNS Questions"},{"__type":"Nc:SimpleKB:Abstractions:Dtos:CategoryItemDto","ParentCategoryId":34,"TreatAsTopicYN":false,"Description":"","ImageUrl":"","ShortDesc":"","CategoryId":11,"CategoryName":"Dynamic DNS"},{"__type":"Nc:SimpleKB:Abstractions:Dtos:CategoryItemDto","ParentCategoryId":34,"TreatAsTopicYN":false,"Description":"","ImageUrl":"","ShortDesc":"","CategoryId":35,"CategoryName":"Registrations"},{"__type":"Nc:SimpleKB:Abstractions:Dtos:CategoryItemDto","ParentCategoryId":34,"TreatAsTopicYN":false,"Description":"","ImageUrl":"","ShortDesc":"","CategoryId":2207,"CategoryName":"Renewal questions"},{"__type":"Nc:SimpleKB:Abstractions:Dtos:CategoryItemDto","ParentCategoryId":34,"TreatAsTopicYN":false,"Description":"","ImageUrl":"","ShortDesc":"","CategoryId":36,"CategoryName":"Domains with extended attributes"},{"__type":"Nc:SimpleKB:Abstractions:Dtos:CategoryItemDto","ParentCategoryId":34,"TreatAsTopicYN":false,"Description":"","ImageUrl":"","ShortDesc":"","CategoryId":51,"CategoryName":"FreeDNS"},{"__type":"Nc:SimpleKB:Abstractions:Dtos:CategoryItemDto","ParentCategoryId":34,"TreatAsTopicYN":false,"Description":"","ImageUrl":"","ShortDesc":"","CategoryId":15,"CategoryName":"Namecheap Market"},{"__type":"Nc:SimpleKB:Abstractions:Dtos:CategoryItemDto","ParentCategoryId":34,"TreatAsTopicYN":false,"Description":"","ImageUrl":"","ShortDesc":"","CategoryId":2208,"CategoryName":"3rd Party Services Setup"},{"__type":"Nc:SimpleKB:Abstractions:Dtos:CategoryItemDto","ParentCategoryId":34,"TreatAsTopicYN":false,"Description":"","ImageUrl":"","ShortDesc":"","CategoryId":2278,"CategoryName":"Handshake TLDs"}]},{"__type":"Nc:SimpleKB:Abstractions:Dtos:CategoryItemDto","ParentCategoryId":34,"TreatAsTopicYN":false,"Description":"","ImageUrl":"","ShortDesc":"","CategoryId":35,"CategoryName":"Registrations"},{"__type":"Nc:SimpleKB:Abstractions:Dtos:CategoryItemDto","ParentCategoryId":14,"TreatAsTopicYN":false,"Description":"","ImageUrl":"","ShortDesc":"","CategoryId":70,"CategoryName":"Reissuance"},{"__type":"Nc:SimpleKB:Abstractions:Dtos:CategoryItemDto","ParentCategoryId":0,"TreatAsTopicYN":false,"Description":"","ImageUrl":"/assets/img/pictograms/150/protection-red.png","ShortDesc":"","CategoryId":37,"CategoryName":"Domain Privacy Protection","SubCategories":[]},{"__type":"Nc:SimpleKB:Abstractions:Dtos:CategoryItemDto","ParentCategoryId":2200,"TreatAsTopicYN":false,"Description":"","ImageUrl":"","ShortDesc":"","CategoryId":2177,"CategoryName":"Private Email"},{"__type":"Nc:SimpleKB:Abstractions:Dtos:CategoryItemDto","ParentCategoryId":93,"TreatAsTopicYN":false,"Description":"","ImageUrl":"","ShortDesc":"","CategoryId":2178,"CategoryName":"Private Email: Webmail Features"},{"__type":"Nc:SimpleKB:Abstractions:Dtos:CategoryItemDto","ParentCategoryId":34,"TreatAsTopicYN":false,"Description":"","ImageUrl":"","ShortDesc":"","CategoryId":2207,"CategoryName":"Renewal questions"},{"__type":"Nc:SimpleKB:Abstractions:Dtos:CategoryItemDto","ParentCategoryId":12,"TreatAsTopicYN":false,"Description":"","ImageUrl":"","ShortDesc":"","CategoryId":2210,"CategoryName":"cPanel Add-ons"},{"__type":"Nc:SimpleKB:Abstractions:Dtos:CategoryItemDto","ParentCategoryId":2265,"TreatAsTopicYN":false,"Description":"","ImageUrl":"","ShortDesc":"","CategoryId":2273,"CategoryName":"Gaming Consoles"},{"__type":"Nc:SimpleKB:Abstractions:Dtos:CategoryItemDto","ParentCategoryId":2239,"TreatAsTopicYN":false,"Description":"","ImageUrl":"","ShortDesc":"","CategoryId":2284,"CategoryName":"WordPress Management"},{"__type":"Nc:SimpleKB:Abstractions:Dtos:CategoryItemDto","ParentCategoryId":2239,"TreatAsTopicYN":false,"Description":"","ImageUrl":"","ShortDesc":"","CategoryId":2285,"CategoryName":"SFTP and Database access"},{"__type":"Nc:SimpleKB:Abstractions:Dtos:CategoryItemDto","ParentCategoryId":2265,"TreatAsTopicYN":false,"Description":"","ImageUrl":"","ShortDesc":"","CategoryId":2268,"CategoryName":"macOS"},{"__type":"Nc:SimpleKB:Abstractions:Dtos:CategoryItemDto","ParentCategoryId":93,"TreatAsTopicYN":false,"Description":"","ImageUrl":"","ShortDesc":"","CategoryId":2175,"CategoryName":"Private Email: Client Setup"},{"__type":"Nc:SimpleKB:Abstractions:Dtos:CategoryItemDto","ParentCategoryId":0,"TreatAsTopicYN":false,"Description":"","ImageUrl":"/assets/img/pictograms/150/status-red.png","ShortDesc":"","CategoryId":2209,"CategoryName":"Domain Transfers","SubCategories":[{"__type":"Nc:SimpleKB:Abstractions:Dtos:CategoryItemDto","ParentCategoryId":2209,"TreatAsTopicYN":false,"Description":"","ImageUrl":"","ShortDesc":"","CategoryId":8,"CategoryName":"Transfer Information"},{"__type":"Nc:SimpleKB:Abstractions:Dtos:CategoryItemDto","ParentCategoryId":2209,"TreatAsTopicYN":false,"Description":"","ImageUrl":"","ShortDesc":"","CategoryId":83,"CategoryName":"Transfer to Namecheap"},{"__type":"Nc:SimpleKB:Abstractions:Dtos:CategoryItemDto","ParentCategoryId":2209,"TreatAsTopicYN":false,"Description":"","ImageUrl":"","ShortDesc":"","CategoryId":84,"CategoryName":"Transfer to another provider"},{"__type":"Nc:SimpleKB:Abstractions:Dtos:CategoryItemDto","ParentCategoryId":2209,"TreatAsTopicYN":false,"Description":"","ImageUrl":"","ShortDesc":"","CategoryId":219,"CategoryName":"Canceled Transfers"}]},{"__type":"Nc:SimpleKB:Abstractions:Dtos:CategoryItemDto","ParentCategoryId":12,"TreatAsTopicYN":false,"Description":"","ImageUrl":"","ShortDesc":"","CategoryId":48,"CategoryName":"VPS"},{"__type":"Nc:SimpleKB:Abstractions:Dtos:CategoryItemDto","ParentCategoryId":34,"TreatAsTopicYN":false,"Description":"","ImageUrl":"","ShortDesc":"","CategoryId":36,"CategoryName":"Domains with extended attributes"},{"__type":"Nc:SimpleKB:Abstractions:Dtos:CategoryItemDto","ParentCategoryId":0,"TreatAsTopicYN":true,"Description":"","ImageUrl":"/assets/img/pictograms/150/server-red.png","ShortDesc":"","CategoryId":12,"CategoryName":"Hosting","SubCategories":[{"__type":"Nc:SimpleKB:Abstractions:Dtos:CategoryItemDto","ParentCategoryId":12,"TreatAsTopicYN":false,"Description":"","ImageUrl":"","ShortDesc":"","CategoryId":2219,"CategoryName":"PHP Configuration"},{"__type":"Nc:SimpleKB:Abstractions:Dtos:CategoryItemDto","ParentCategoryId":12,"TreatAsTopicYN":false,"Description":"","ImageUrl":"","ShortDesc":"","CategoryId":2225,"CategoryName":"SEO"},{"__type":"Nc:SimpleKB:Abstractions:Dtos:CategoryItemDto","ParentCategoryId":12,"TreatAsTopicYN":false,"Description":"","ImageUrl":"","ShortDesc":"","CategoryId":2252,"CategoryName":"InterWorx questions"},{"__type":"Nc:SimpleKB:Abstractions:Dtos:CategoryItemDto","ParentCategoryId":12,"TreatAsTopicYN":false,"Description":"","ImageUrl":"","ShortDesc":"","CategoryId":2291,"CategoryName":"Webuzo questions"},{"__type":"Nc:SimpleKB:Abstractions:Dtos:CategoryItemDto","ParentCategoryId":12,"TreatAsTopicYN":false,"Description":"","ImageUrl":"","ShortDesc":"","CategoryId":27,"CategoryName":"Getting Started"},{"__type":"Nc:SimpleKB:Abstractions:Dtos:CategoryItemDto","ParentCategoryId":12,"TreatAsTopicYN":false,"Description":"","ImageUrl":"","ShortDesc":"","CategoryId":22,"CategoryName":"Hosting Information"},{"__type":"Nc:SimpleKB:Abstractions:Dtos:CategoryItemDto","ParentCategoryId":12,"TreatAsTopicYN":false,"Description":"","ImageUrl":"","ShortDesc":"","CategoryId":29,"CategoryName":"cPanel questions"},{"__type":"Nc:SimpleKB:Abstractions:Dtos:CategoryItemDto","ParentCategoryId":12,"TreatAsTopicYN":false,"Description":"","ImageUrl":"","ShortDesc":"","CategoryId":2182,"CategoryName":"cPanel: Software Management"},{"__type":"Nc:SimpleKB:Abstractions:Dtos:CategoryItemDto","ParentCategoryId":12,"TreatAsTopicYN":false,"Description":"","ImageUrl":"","ShortDesc":"","CategoryId":2187,"CategoryName":"cPanel: WordPress"},{"__type":"Nc:SimpleKB:Abstractions:Dtos:CategoryItemDto","ParentCategoryId":12,"TreatAsTopicYN":false,"Description":"","ImageUrl":"","ShortDesc":"","CategoryId":2210,"CategoryName":"cPanel Add-ons"},{"__type":"Nc:SimpleKB:Abstractions:Dtos:CategoryItemDto","ParentCategoryId":12,"TreatAsTopicYN":false,"Description":"","ImageUrl":"","ShortDesc":"","CategoryId":48,"CategoryName":"VPS"},{"__type":"Nc:SimpleKB:Abstractions:Dtos:CategoryItemDto","ParentCategoryId":12,"TreatAsTopicYN":false,"Description":"","ImageUrl":"","ShortDesc":"","CategoryId":2188,"CategoryName":"Dedicated Server"},{"__type":"Nc:SimpleKB:Abstractions:Dtos:CategoryItemDto","ParentCategoryId":12,"TreatAsTopicYN":false,"Description":"","ImageUrl":"","ShortDesc":"","CategoryId":30,"CategoryName":"WHM questions"},{"__type":"Nc:SimpleKB:Abstractions:Dtos:CategoryItemDto","ParentCategoryId":12,"TreatAsTopicYN":false,"Description":"","ImageUrl":"","ShortDesc":"","CategoryId":32,"CategoryName":"DNS settings"},{"__type":"Nc:SimpleKB:Abstractions:Dtos:CategoryItemDto","ParentCategoryId":12,"TreatAsTopicYN":false,"Description":"","ImageUrl":"","ShortDesc":"","CategoryId":103,"CategoryName":"LVE (CloudLinux)"},{"__type":"Nc:SimpleKB:Abstractions:Dtos:CategoryItemDto","ParentCategoryId":12,"TreatAsTopicYN":false,"Description":"","ImageUrl":"","ShortDesc":"","CategoryId":89,"CategoryName":"SSH Access"},{"__type":"Nc:SimpleKB:Abstractions:Dtos:CategoryItemDto","ParentCategoryId":12,"TreatAsTopicYN":false,"Description":"","ImageUrl":"","ShortDesc":"","CategoryId":205,"CategoryName":"FTP questions"},{"__type":"Nc:SimpleKB:Abstractions:Dtos:CategoryItemDto","ParentCategoryId":12,"TreatAsTopicYN":false,"Description":"","ImageUrl":"","ShortDesc":"","CategoryId":2180,"CategoryName":"MySQL questions"},{"__type":"Nc:SimpleKB:Abstractions:Dtos:CategoryItemDto","ParentCategoryId":12,"TreatAsTopicYN":false,"Description":"","ImageUrl":"","ShortDesc":"","CategoryId":2199,"CategoryName":"Hosting Migration"},{"__type":"Nc:SimpleKB:Abstractions:Dtos:CategoryItemDto","ParentCategoryId":12,"TreatAsTopicYN":false,"Description":"","ImageUrl":"","ShortDesc":"","CategoryId":2194,"CategoryName":"Tips & Tricks"},{"__type":"Nc:SimpleKB:Abstractions:Dtos:CategoryItemDto","ParentCategoryId":12,"TreatAsTopicYN":false,"Description":"","ImageUrl":"","ShortDesc":"","CategoryId":239,"CategoryName":"WHMCS"},{"__type":"Nc:SimpleKB:Abstractions:Dtos:CategoryItemDto","ParentCategoryId":12,"TreatAsTopicYN":false,"Description":"","ImageUrl":"","ShortDesc":"","CategoryId":33,"CategoryName":"SSL Installation"}]},{"__type":"Nc:SimpleKB:Abstractions:Dtos:CategoryItemDto","ParentCategoryId":93,"TreatAsTopicYN":false,"Description":"","ImageUrl":"","ShortDesc":"","CategoryId":2171,"CategoryName":"Private Email: Active Sync (Exchange) Setup"},{"__type":"Nc:SimpleKB:Abstractions:Dtos:CategoryItemDto","ParentCategoryId":12,"TreatAsTopicYN":false,"Description":"","ImageUrl":"","ShortDesc":"","CategoryId":2188,"CategoryName":"Dedicated Server"},{"__type":"Nc:SimpleKB:Abstractions:Dtos:CategoryItemDto","ParentCategoryId":2265,"TreatAsTopicYN":false,"Description":"","ImageUrl":"","ShortDesc":"","CategoryId":2269,"CategoryName":"iOS"},{"__type":"Nc:SimpleKB:Abstractions:Dtos:CategoryItemDto","ParentCategoryId":2239,"TreatAsTopicYN":false,"Description":"","ImageUrl":"","ShortDesc":"","CategoryId":2286,"CategoryName":"Domains questions"},{"__type":"Nc:SimpleKB:Abstractions:Dtos:CategoryItemDto","ParentCategoryId":2239,"TreatAsTopicYN":false,"Description":"","ImageUrl":"","ShortDesc":"","CategoryId":2288,"CategoryName":"Billing questions"},{"__type":"Nc:SimpleKB:Abstractions:Dtos:CategoryItemDto","ParentCategoryId":2265,"TreatAsTopicYN":false,"Description":"","ImageUrl":"","ShortDesc":"","CategoryId":2271,"CategoryName":"Linux"},{"__type":"Nc:SimpleKB:Abstractions:Dtos:CategoryItemDto","ParentCategoryId":12,"TreatAsTopicYN":false,"Description":"","ImageUrl":"","ShortDesc":"","CategoryId":30,"CategoryName":"WHM questions"},{"__type":"Nc:SimpleKB:Abstractions:Dtos:CategoryItemDto","ParentCategoryId":93,"TreatAsTopicYN":false,"Description":"","ImageUrl":"","ShortDesc":"","CategoryId":31,"CategoryName":"cPanel Email FAQs"},{"__type":"Nc:SimpleKB:Abstractions:Dtos:CategoryItemDto","ParentCategoryId":34,"TreatAsTopicYN":false,"Description":"","ImageUrl":"","ShortDesc":"","CategoryId":51,"CategoryName":"FreeDNS"},{"__type":"Nc:SimpleKB:Abstractions:Dtos:CategoryItemDto","ParentCategoryId":0,"TreatAsTopicYN":false,"Description":"","ImageUrl":"/assets/img/pictograms/150/email-red.png","ShortDesc":"","CategoryId":93,"CategoryName":"Email service","SubCategories":[{"__type":"Nc:SimpleKB:Abstractions:Dtos:CategoryItemDto","ParentCategoryId":93,"TreatAsTopicYN":false,"Description":"","ImageUrl":"","ShortDesc":"","CategoryId":2216,"CategoryName":"Spam Protection"},{"__type":"Nc:SimpleKB:Abstractions:Dtos:CategoryItemDto","ParentCategoryId":93,"TreatAsTopicYN":false,"Description":"","ImageUrl":"","ShortDesc":"","CategoryId":2226,"CategoryName":"Email Migration"},{"__type":"Nc:SimpleKB:Abstractions:Dtos:CategoryItemDto","ParentCategoryId":93,"TreatAsTopicYN":false,"Description":"","ImageUrl":"","ShortDesc":"","CategoryId":2260,"CategoryName":"Private Email Contacts and Calendars Setup"},{"__type":"Nc:SimpleKB:Abstractions:Dtos:CategoryItemDto","ParentCategoryId":93,"TreatAsTopicYN":false,"Description":"","ImageUrl":"","ShortDesc":"","CategoryId":2179,"CategoryName":"Private Email: General Information"},{"__type":"Nc:SimpleKB:Abstractions:Dtos:CategoryItemDto","ParentCategoryId":93,"TreatAsTopicYN":false,"Description":"","ImageUrl":"","ShortDesc":"","CategoryId":2215,"CategoryName":"Private Email: Mailbox Management"},{"__type":"Nc:SimpleKB:Abstractions:Dtos:CategoryItemDto","ParentCategoryId":93,"TreatAsTopicYN":false,"Description":"","ImageUrl":"","ShortDesc":"","CategoryId":2214,"CategoryName":"Email Forwarding"},{"__type":"Nc:SimpleKB:Abstractions:Dtos:CategoryItemDto","ParentCategoryId":93,"TreatAsTopicYN":false,"Description":"","ImageUrl":"","ShortDesc":"","CategoryId":2176,"CategoryName":"Private Email: DNS Settings"},{"__type":"Nc:SimpleKB:Abstractions:Dtos:CategoryItemDto","ParentCategoryId":93,"TreatAsTopicYN":false,"Description":"","ImageUrl":"","ShortDesc":"","CategoryId":2178,"CategoryName":"Private Email: Webmail Features"},{"__type":"Nc:SimpleKB:Abstractions:Dtos:CategoryItemDto","ParentCategoryId":93,"TreatAsTopicYN":false,"Description":"","ImageUrl":"","ShortDesc":"","CategoryId":2175,"CategoryName":"Private Email: Client Setup"},{"__type":"Nc:SimpleKB:Abstractions:Dtos:CategoryItemDto","ParentCategoryId":93,"TreatAsTopicYN":false,"Description":"","ImageUrl":"","ShortDesc":"","CategoryId":2171,"CategoryName":"Private Email: Active Sync (Exchange) Setup"},{"__type":"Nc:SimpleKB:Abstractions:Dtos:CategoryItemDto","ParentCategoryId":93,"TreatAsTopicYN":false,"Description":"","ImageUrl":"","ShortDesc":"","CategoryId":31,"CategoryName":"cPanel Email FAQs"},{"__type":"Nc:SimpleKB:Abstractions:Dtos:CategoryItemDto","ParentCategoryId":93,"TreatAsTopicYN":false,"Description":"","ImageUrl":"","ShortDesc":"","CategoryId":2186,"CategoryName":"cPanel Email: Client Setup"},{"__type":"Nc:SimpleKB:Abstractions:Dtos:CategoryItemDto","ParentCategoryId":93,"TreatAsTopicYN":false,"Description":"","ImageUrl":"","ShortDesc":"","CategoryId":2204,"CategoryName":"Private Email: Video Overview"}]},{"__type":"Nc:SimpleKB:Abstractions:Dtos:CategoryItemDto","ParentCategoryId":12,"TreatAsTopicYN":false,"Description":"","ImageUrl":"","ShortDesc":"","CategoryId":32,"CategoryName":"DNS settings"},{"__type":"Nc:SimpleKB:Abstractions:Dtos:CategoryItemDto","ParentCategoryId":34,"TreatAsTopicYN":false,"Description":"","ImageUrl":"","ShortDesc":"","CategoryId":15,"CategoryName":"Namecheap Market"},{"__type":"Nc:SimpleKB:Abstractions:Dtos:CategoryItemDto","ParentCategoryId":93,"TreatAsTopicYN":false,"Description":"","ImageUrl":"","ShortDesc":"","CategoryId":2186,"CategoryName":"cPanel Email: Client Setup"},{"__type":"Nc:SimpleKB:Abstractions:Dtos:CategoryItemDto","ParentCategoryId":2265,"TreatAsTopicYN":false,"Description":"","ImageUrl":"","ShortDesc":"","CategoryId":2266,"CategoryName":"Windows"},{"__type":"Nc:SimpleKB:Abstractions:Dtos:CategoryItemDto","ParentCategoryId":2239,"TreatAsTopicYN":false,"Description":"","ImageUrl":"","ShortDesc":"","CategoryId":2287,"CategoryName":"SSL questions"},{"__type":"Nc:SimpleKB:Abstractions:Dtos:CategoryItemDto","ParentCategoryId":2265,"TreatAsTopicYN":false,"Description":"","ImageUrl":"","ShortDesc":"","CategoryId":2267,"CategoryName":"Android"},{"__type":"Nc:SimpleKB:Abstractions:Dtos:CategoryItemDto","ParentCategoryId":34,"TreatAsTopicYN":false,"Description":"","ImageUrl":"","ShortDesc":"","CategoryId":2208,"CategoryName":"3rd Party Services Setup"},{"__type":"Nc:SimpleKB:Abstractions:Dtos:CategoryItemDto","ParentCategoryId":93,"TreatAsTopicYN":false,"Description":"","ImageUrl":"","ShortDesc":"","CategoryId":2204,"CategoryName":"Private Email: Video Overview"},{"__type":"Nc:SimpleKB:Abstractions:Dtos:CategoryItemDto","ParentCategoryId":0,"TreatAsTopicYN":false,"Description":"","ImageUrl":"/assets/img/pictograms/150/security-red.png","ShortDesc":"","CategoryId":14,"CategoryName":"SSL Certificates","SubCategories":[{"__type":"Nc:SimpleKB:Abstractions:Dtos:CategoryItemDto","ParentCategoryId":14,"TreatAsTopicYN":false,"Description":"","ImageUrl":"","ShortDesc":"","CategoryId":2217,"CategoryName":"Renewal"},{"__type":"Nc:SimpleKB:Abstractions:Dtos:CategoryItemDto","ParentCategoryId":14,"TreatAsTopicYN":false,"Description":"","ImageUrl":"","ShortDesc":"","CategoryId":2218,"CategoryName":"cPanel SSL Plugin"},{"__type":"Nc:SimpleKB:Abstractions:Dtos:CategoryItemDto","ParentCategoryId":14,"TreatAsTopicYN":false,"Description":"","ImageUrl":"","ShortDesc":"","CategoryId":2221,"CategoryName":"Multi-Domain SSL Certificates"},{"__type":"Nc:SimpleKB:Abstractions:Dtos:CategoryItemDto","ParentCategoryId":14,"TreatAsTopicYN":false,"Description":"","ImageUrl":"","ShortDesc":"","CategoryId":2222,"CategoryName":"Cancellation"},{"__type":"Nc:SimpleKB:Abstractions:Dtos:CategoryItemDto","ParentCategoryId":14,"TreatAsTopicYN":false,"Description":"","ImageUrl":"","ShortDesc":"","CategoryId":2223,"CategoryName":"Browser errors"},{"__type":"Nc:SimpleKB:Abstractions:Dtos:CategoryItemDto","ParentCategoryId":14,"TreatAsTopicYN":false,"Description":"","ImageUrl":"","ShortDesc":"","CategoryId":2224,"CategoryName":"Site Seal, Logo"},{"__type":"Nc:SimpleKB:Abstractions:Dtos:CategoryItemDto","ParentCategoryId":14,"TreatAsTopicYN":false,"Description":"","ImageUrl":"","ShortDesc":"","CategoryId":2238,"CategoryName":"SSL installation errors"},{"__type":"Nc:SimpleKB:Abstractions:Dtos:CategoryItemDto","ParentCategoryId":14,"TreatAsTopicYN":false,"Description":"","ImageUrl":"","ShortDesc":"","CategoryId":2290,"CategoryName":"CSR code"},{"__type":"Nc:SimpleKB:Abstractions:Dtos:CategoryItemDto","ParentCategoryId":14,"TreatAsTopicYN":false,"Description":"","ImageUrl":"","ShortDesc":"","CategoryId":2293,"CategoryName":"Automated SSL management"},{"__type":"Nc:SimpleKB:Abstractions:Dtos:CategoryItemDto","ParentCategoryId":14,"TreatAsTopicYN":false,"Description":"","ImageUrl":"","ShortDesc":"","CategoryId":38,"CategoryName":"SSL General"},{"__type":"Nc:SimpleKB:Abstractions:Dtos:CategoryItemDto","ParentCategoryId":14,"TreatAsTopicYN":false,"Description":"","ImageUrl":"","ShortDesc":"","CategoryId":67,"CategoryName":"Activation"},{"__type":"Nc:SimpleKB:Abstractions:Dtos:CategoryItemDto","ParentCategoryId":14,"TreatAsTopicYN":false,"Description":"","ImageUrl":"","ShortDesc":"","CategoryId":68,"CategoryName":"Validation"},{"__type":"Nc:SimpleKB:Abstractions:Dtos:CategoryItemDto","ParentCategoryId":14,"TreatAsTopicYN":false,"Description":"","ImageUrl":"","ShortDesc":"","CategoryId":69,"CategoryName":"Installation"},{"__type":"Nc:SimpleKB:Abstractions:Dtos:CategoryItemDto","ParentCategoryId":14,"TreatAsTopicYN":false,"Description":"","ImageUrl":"","ShortDesc":"","CategoryId":70,"CategoryName":"Reissuance"}]},{"__type":"Nc:SimpleKB:Abstractions:Dtos:CategoryItemDto","ParentCategoryId":0,"TreatAsTopicYN":true,"Description":"","ImageUrl":"/assets/img/pictograms/150/performance-red.png","ShortDesc":"","CategoryId":9,"CategoryName":"My Account","SubCategories":[{"__type":"Nc:SimpleKB:Abstractions:Dtos:CategoryItemDto","ParentCategoryId":9,"TreatAsTopicYN":false,"Description":"","ImageUrl":"","ShortDesc":"","CategoryId":45,"CategoryName":"Account Security"},{"__type":"Nc:SimpleKB:Abstractions:Dtos:CategoryItemDto","ParentCategoryId":9,"TreatAsTopicYN":false,"Description":"","ImageUrl":"","ShortDesc":"","CategoryId":43,"CategoryName":"Profile Management"},{"__type":"Nc:SimpleKB:Abstractions:Dtos:CategoryItemDto","ParentCategoryId":9,"TreatAsTopicYN":false,"Description":"","ImageUrl":"","ShortDesc":"","CategoryId":44,"CategoryName":"Account Access"}]},{"__type":"Nc:SimpleKB:Abstractions:Dtos:CategoryItemDto","ParentCategoryId":34,"TreatAsTopicYN":false,"Description":"","ImageUrl":"","ShortDesc":"","CategoryId":2278,"CategoryName":"Handshake TLDs"},{"__type":"Nc:SimpleKB:Abstractions:Dtos:CategoryItemDto","ParentCategoryId":12,"TreatAsTopicYN":false,"Description":"","ImageUrl":"","ShortDesc":"","CategoryId":103,"CategoryName":"LVE (CloudLinux)"},{"__type":"Nc:SimpleKB:Abstractions:Dtos:CategoryItemDto","ParentCategoryId":0,"TreatAsTopicYN":false,"Description":"","ImageUrl":"/assets/img/pictograms/150/affiliates-red.png","ShortDesc":"","CategoryId":55,"CategoryName":"Affiliates","SubCategories":[]},{"__type":"Nc:SimpleKB:Abstractions:Dtos:CategoryItemDto","ParentCategoryId":12,"TreatAsTopicYN":false,"Description":"","ImageUrl":"","ShortDesc":"","CategoryId":89,"CategoryName":"SSH Access"},{"__type":"Nc:SimpleKB:Abstractions:Dtos:CategoryItemDto","ParentCategoryId":0,"TreatAsTopicYN":false,"Description":"","ImageUrl":"/assets/img/pictograms/150/tools-red.png","ShortDesc":"","CategoryId":2211,"CategoryName":"API & Resellers","SubCategories":[{"__type":"Nc:SimpleKB:Abstractions:Dtos:CategoryItemDto","ParentCategoryId":2211,"TreatAsTopicYN":false,"Description":"","ImageUrl":"","ShortDesc":"","CategoryId":2227,"CategoryName":"SSL Resellers"},{"__type":"Nc:SimpleKB:Abstractions:Dtos:CategoryItemDto","ParentCategoryId":2211,"TreatAsTopicYN":false,"Description":"","ImageUrl":"","ShortDesc":"","CategoryId":2229,"CategoryName":"Hosting Resellers"},{"__type":"Nc:SimpleKB:Abstractions:Dtos:CategoryItemDto","ParentCategoryId":2211,"TreatAsTopicYN":false,"Description":"","ImageUrl":"","ShortDesc":"","CategoryId":63,"CategoryName":"Namecheap API"},{"__type":"Nc:SimpleKB:Abstractions:Dtos:CategoryItemDto","ParentCategoryId":2211,"TreatAsTopicYN":false,"Description":"","ImageUrl":"","ShortDesc":"","CategoryId":2196,"CategoryName":"WHMCS module for SSL"}]},{"__type":"Nc:SimpleKB:Abstractions:Dtos:CategoryItemDto","ParentCategoryId":0,"TreatAsTopicYN":false,"Description":"","ImageUrl":"/assets/img/pictograms/150/timer-red.png","ShortDesc":"","CategoryId":2212,"CategoryName":"Legacy Products","SubCategories":[]},{"__type":"Nc:SimpleKB:Abstractions:Dtos:CategoryItemDto","ParentCategoryId":12,"TreatAsTopicYN":false,"Description":"","ImageUrl":"","ShortDesc":"","CategoryId":205,"CategoryName":"FTP questions"},{"__type":"Nc:SimpleKB:Abstractions:Dtos:CategoryItemDto","ParentCategoryId":12,"TreatAsTopicYN":false,"Description":"","ImageUrl":"","ShortDesc":"","CategoryId":2180,"CategoryName":"MySQL questions"},{"__type":"Nc:SimpleKB:Abstractions:Dtos:CategoryItemDto","ParentCategoryId":12,"TreatAsTopicYN":false,"Description":"","ImageUrl":"","ShortDesc":"","CategoryId":2199,"CategoryName":"Hosting Migration"},{"__type":"Nc:SimpleKB:Abstractions:Dtos:CategoryItemDto","ParentCategoryId":0,"TreatAsTopicYN":false,"Description":"","ImageUrl":"/assets/img/pictograms/150/premiumdns-red.png","ShortDesc":"","CategoryId":2231,"CategoryName":"PremiumDNS","SubCategories":[]},{"__type":"Nc:SimpleKB:Abstractions:Dtos:CategoryItemDto","ParentCategoryId":12,"TreatAsTopicYN":false,"Description":"","ImageUrl":"","ShortDesc":"","CategoryId":2194,"CategoryName":"Tips & Tricks"},{"__type":"Nc:SimpleKB:Abstractions:Dtos:CategoryItemDto","ParentCategoryId":0,"TreatAsTopicYN":false,"Description":"","ImageUrl":"https://static.nc-img.com/live-resource/icons/knowledgebase/fastVPN_icon-150px.png","ShortDesc":"","CategoryId":2265,"CategoryName":"FastVPN","SubCategories":[{"__type":"Nc:SimpleKB:Abstractions:Dtos:CategoryItemDto","ParentCategoryId":2265,"TreatAsTopicYN":false,"Description":"","ImageUrl":"","ShortDesc":"","CategoryId":2292,"CategoryName":"Browser Extensions"},{"__type":"Nc:SimpleKB:Abstractions:Dtos:CategoryItemDto","ParentCategoryId":2265,"TreatAsTopicYN":false,"Description":"","ImageUrl":"","ShortDesc":"","CategoryId":2274,"CategoryName":"General"},{"__type":"Nc:SimpleKB:Abstractions:Dtos:CategoryItemDto","ParentCategoryId":2265,"TreatAsTopicYN":false,"Description":"","ImageUrl":"","ShortDesc":"","CategoryId":2270,"CategoryName":"Routers"},{"__type":"Nc:SimpleKB:Abstractions:Dtos:CategoryItemDto","ParentCategoryId":2265,"TreatAsTopicYN":false,"Description":"","ImageUrl":"","ShortDesc":"","CategoryId":2272,"CategoryName":"TV"},{"__type":"Nc:SimpleKB:Abstractions:Dtos:CategoryItemDto","ParentCategoryId":2265,"TreatAsTopicYN":false,"Description":"","ImageUrl":"","ShortDesc":"","CategoryId":2273,"CategoryName":"Gaming Consoles"},{"__type":"Nc:SimpleKB:Abstractions:Dtos:CategoryItemDto","ParentCategoryId":2265,"TreatAsTopicYN":false,"Description":"","ImageUrl":"","ShortDesc":"","CategoryId":2268,"CategoryName":"macOS"},{"__type":"Nc:SimpleKB:Abstractions:Dtos:CategoryItemDto","ParentCategoryId":2265,"TreatAsTopicYN":false,"Description":"","ImageUrl":"","ShortDesc":"","CategoryId":2269,"CategoryName":"iOS"},{"__type":"Nc:SimpleKB:Abstractions:Dtos:CategoryItemDto","ParentCategoryId":2265,"TreatAsTopicYN":false,"Description":"","ImageUrl":"","ShortDesc":"","CategoryId":2271,"CategoryName":"Linux"},{"__type":"Nc:SimpleKB:Abstractions:Dtos:CategoryItemDto","ParentCategoryId":2265,"TreatAsTopicYN":false,"Description":"","ImageUrl":"","ShortDesc":"","CategoryId":2266,"CategoryName":"Windows"},{"__type":"Nc:SimpleKB:Abstractions:Dtos:CategoryItemDto","ParentCategoryId":2265,"TreatAsTopicYN":false,"Description":"","ImageUrl":"","ShortDesc":"","CategoryId":2267,"CategoryName":"Android"}]},{"__type":"Nc:SimpleKB:Abstractions:Dtos:CategoryItemDto","ParentCategoryId":12,"TreatAsTopicYN":false,"Description":"","ImageUrl":"","ShortDesc":"","CategoryId":239,"CategoryName":"WHMCS"},{"__type":"Nc:SimpleKB:Abstractions:Dtos:CategoryItemDto","ParentCategoryId":12,"TreatAsTopicYN":false,"Description":"","ImageUrl":"","ShortDesc":"","CategoryId":33,"CategoryName":"SSL Installation"}],"status":200,"statusText":"OK"}}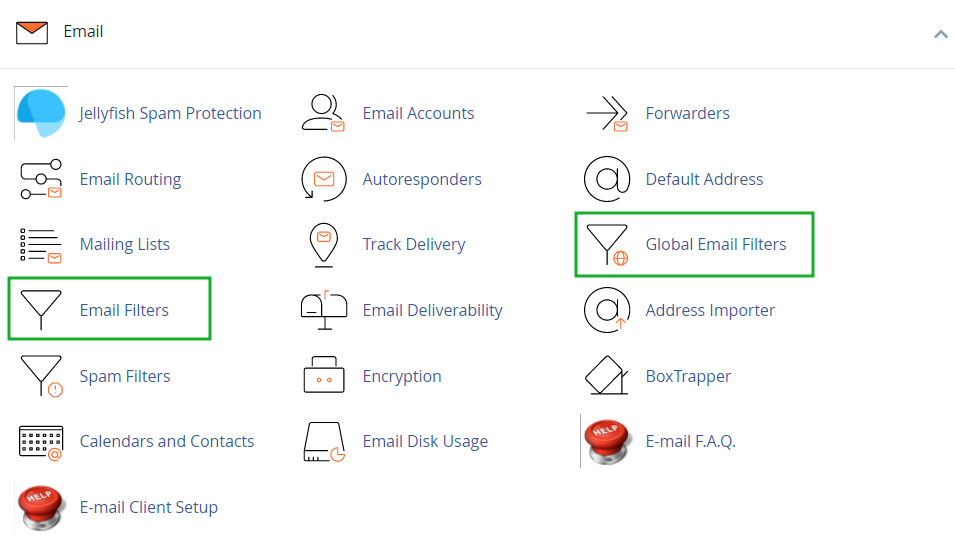

Need help? We're always here for you.