| Subtotal | $0.00 |
| Subtotal | $0.00 |
Nameserver is a server on the internet specialized in handling queries regarding the location of a domain name’s various services.
Nameservers are a fundamental part of the Domain Name System (DNS). They allow using domains instead of IP addresses. It is like contacting your friend by phone: before calling, you look up his/her telephone number or write it down not to enter the numbers each time.
In easy words, nameservers define your domain’s current DNS provider. Most domain name registrars provide default DNS service. There is also a FreeDNS service. FreeDNS is a DNS hosting service provided to help people whose domain registrars do not include DNS hosting with domain registrations.
With Namecheap, you can either use FreeDNS (you can learn more here) or DNS provided with domain registration and hosting services.
When you get a domain from us, the following nameservers are provided by default:
dns1.registrar-servers.com
dns2.registrar-servers.com
1. Sign into your Namecheap account. (The Sign In option is available in the header of the page).
2. Select Domain List from the left sidebar and click on the Manage button next to your domain:
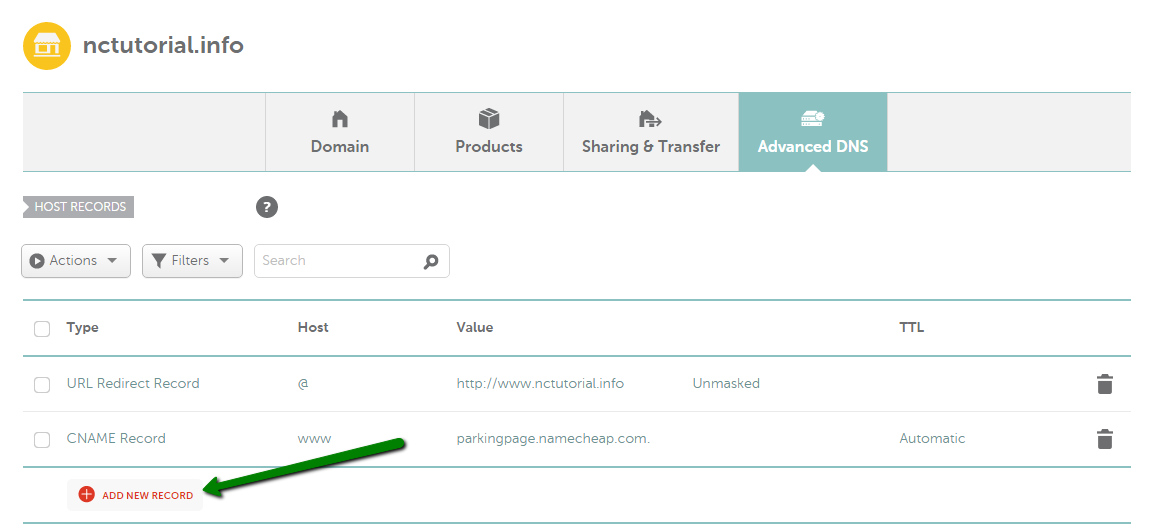
3. Navigate the Advanced DNS tab at the top of the page:

4. Find the Host records section. To add a new record, click on the corresponding button:

NOTE: The Host Records menu is visible when a domain name is pointed to our default nameservers. The absence of this menu means the domain is pointed to third-party nameservers (or our hosting ones) at the moment.
Once you decided to use a hosting service with us and point a domain to our hosting nameservers, the server your account is created on will act also as a DNS server – it means that you will be able to use it not only for web hosting, but for DNS hosting as well.
With our shared hosting plans, it is recommended to use our shared hosting (cluster) nameservers. A DNS cluster is a group of servers that share records and act as a single system.
If your domain is registered with us, follow this guide to switch the nameservers to our shared hosting ones.
NOTE 1: Once the nameservers are changed, all the custom DNS records for your domain will be overwritten to our hosting ones. You will be able to re-create them in your cPanel Zone Editor menu where you can manage domain's email settings.
NOTE 2: When you switch nameservers for a domain name, these changes are not accepted instantly all over the world. It may take up to 24 hours (in rare cases more) for the DNS changes to take effect.
From now on, the DNS requests will be sent to the hosting nameservers which will forward these requests to the exact server your account is located on. As we provide cPanel hosting, the DNS records for a domain will be managed through the Zone Editor menu:

The detailed guide on how to create most common DNS records in cPanel can be found here.
Below, you can find the table of main differences between our default nameservers and shared hosting nameservers:
Default Nameservers | Hosting Nameservers | |
DNS servers | dns1.registrar-servers.com
dns2.registrar-servers.com |
dns1.namecheaphosting.com
dns2.namecheaphosting.com |
Place to edit DNS records | Namecheap account,the Advanced DNS section | cPanel, the Zone Editor menu |
Free Email Forwarding feature | Available | Not Available (here is an alternative Forwarders menu in cPanel) |
Ability to edit most common DNS entries | Yes | Yes |
DNS Systems | DNS System v1 | DNS Cluster |
Available | Not Available (Shared servers have static IP addresses) | |
|
Ability to customize a parking page for a domain | Not Available |
Available (Through HTML Editor in cPanel) |
If you have any questions, feel free to contact our Support Team.
Need help? We're always here for you.