{"/api/v1/ncpl/simplekb/getarticle:\"{\\\"articleId\\\":9411,\\\"categoryId\\\":2187}\"":{"body":{"Id":9411,"FriendlyId":"","ArticleTypeId":3,"Title":"How to set up and manage WordPress Multisite (WPMU)","ArticleName":"How to set up and manage WordPress Multisite (WPMU)","ArticleSummary":null,"PreponedSummary":false,"Approved":true,"Body":"QXMgeW91ciBsaXN0IG9mIFdvcmRQcmVzcyB3ZWJzaXRlcyBncm93cywgeW91IG1heSBmaW5kIGFjY2Vzc2luZyBlYWNoIGluZGl2aWR1YWwgcHJvamVjdCB0aXJlc29tZS4gTWFuYWdpbmcgYSBzaW5nbGUgd2Vic2l0ZSBpcyBubyB3YWxrIGluIHRoZSBwYXJrLiBNYW5hZ2luZyBzZXZlcmFsIGluIHRhbmRlbSBjYW4gcXVpY2tseSBlc2NhbGF0ZSBpbnRvIGNoYW9zLiBUaGluZ3MgbGlrZSB1cGRhdGVzIGFuZCBiYWNrdXBzIGNhbiBlYXNpbHkgYmUgb3Zlcmxvb2tlZC4gV2l0aCB0aGUgcmlnaHQgdG9vbHMsIHlvdSBjYW4gbWFuYWdlIG11bHRpcGxlIFdvcmRQcmVzcyBzaXRlcywgd2l0aG91dCB3b3JyeWluZyBhYm91dCBrZWVwaW5nIG9uIHRvcCBvZiB0aGVzZSBjcnVjaWFsIG1haW50ZW5hbmNlIHRhc2tzLjxiciAvPjxiciAvPg0KIA0KTHVja2lseSwgdGhlcmUgYXJlIHNldmVyYWwgV29yZFByZXNzIHRvb2xzIHRvIG1ha2UgbWFuYWdpbmcgbXVsdGlwbGUgc2l0ZXMgbW9yZSBjb252ZW5pZW50LiBJbiB0aGlzIGFydGljbGUsIHdlIHdpbGwgbG9vayBhdCBzb21lIG9mIHRoZSBiZXN0IG9wdGlvbnMgYXZhaWxhYmxlLCBhcyB3ZWxsIGFzIHNhbXBsZSB1c2UgY2FzZXMgdG8gaGVscCB5b3UgdW5kZXJzdGFuZCBob3cgeW91IGNhbiBlYXNpbHkgbWFuYWdlIHlvdXIgc2l0ZXMgbGlrZSBhIHByby48YnIgLz48YnIgLz4NClRoaXMgYXJ0aWNsZSBnaXZlcyBhbiBvdmVydmlldyBvZiBXb3JkUHJlc3MgTXVsdGlzaXRlLCBkZXNjcmliZXMgaG93IGl0IHdvcmtzLCBpdHMgYWR2YW50YWdlcyBhbmQgcHJvdmlkZXMgaW5zdGFsbGF0aW9uIGd1aWRlbGluZXMuDQoNCjxiciAvPjxhIG5hbWU9InBhcGVyX2xhbnRlcm4iPjxiciAvPjxiciAvPjwvYT48YSBocmVmPSIjd2hhdDEiPjEuIFdoYXQgaXMgV29yZFByZXNzIE11bHRpc2l0ZSAoV1BNVSk8L2E+PGJyIC8+PGEgaHJlZj0iI3Byb3MxIj4yLiBQcm9zIGFuZCBjb25zIG9mIFdQTVU8L2E+PGJyIC8+PGEgaHJlZj0iI2luc3RhbDEiPjMuIEluc3RhbGxpbmcgV1BNVTwvYT48YnIgLz48YSBocmVmPSIjd3BtdTEiPjQuIFR1cm5pbmcgcmVndWxhciBXb3JkUHJlc3MgaW5zdGFsbGF0aW9uIGludG8gV1BNVTwvYT48YnIgLz48YSBocmVmPSIjc3ViMSI+NS4gQ3JlYXRpbmcgc3ViZG9tYWlucyBhbmQgc3ViZm9sZGVyczwvYT48YnIgLz48YSBocmVmPSIjbWFwMSI+Ni4gQ29ubmVjdGluZyBhbm90aGVyIGRvbWFpbiB0byBXUE1VIHNpdGU8L2E+PGJyIC8+PGJyIC8+PGJyIC8+PGI+PGEgbmFtZT0id2hhdDEiPjEuIFdoYXQgaXMgV29yZFByZXNzIE11bHRpc2l0ZSAoV1BNVSk8L2E+PC9iPjxiciAvPjxiciAvPldvcmRQcmVzcyBNdWx0aXNpdGUgKG9yIFdvcmRQcmVzcyBNdWx0aVVzZXIvV1BNVSkgaXMgYSBXb3JkUHJlc3MgZmVhdHVyZSB0aGF0IGFsbG93cyB5b3UgdG8gcnVuIG11bHRpcGxlIFdvcmRQcmVzcyBzaXRlcyBmcm9tIHdpdGhpbiBvbmUgV29yZFByZXNzIGluc3RhbGxhdGlvbi4gDQogDQo8YnIgLz48YnIgLz5BbGwgdGhlc2UgaW5zdGFsbGF0aW9ucyBtYWtlIHVwIGEgc28tY2FsbGVkICduZXR3b3JrJy4gQWxsIHRoZSBzaXRlcyBpbiB0aGlzIG5ldHdvcmsgc2hhcmUgb25lIGRhdGFiYXNlLCBob3dldmVyLMKgIHRoZXkgaGF2ZSBzZXBhcmF0ZSB0YWJsZXMgd2l0aGluIHRoaXMgZGF0YWJhc2UgYW5kIGRpZmZlcmVudCBkaXJlY3RvcmllcyBmb3IgbWVkaWEgdXBsb2Fkcy4gQWxzbywgdGhlc2Ugc2l0ZXMgc2hhcmUgdGhlIHNhbWUgcGx1Z2lucyBhbmQgdGhlbWVzLiANCiANCjxiciAvPjxiciAvPlRoZSBOZXR3b3JrIEFkbWluIGlzIHRoZSBvbmx5IG9uZSB0aGF0IGNhbiBtYW5hZ2UgcGx1Z2lucyBhbmQgdGhlbWVzIGZvciBhbGwgdGhlIHNpdGVzIGZyb20gb25lIHNpbmdsZSBBZG1pbiBEYXNoYm9hcmQuIA0KIA0KIA0KPGJyIC8+PGJyIC8+PGJyIC8+PGI+PGEgbmFtZT0icHJvczEiPjIuIFByb3MgYW5kIGNvbnMgb2YgV1BNVTwvYT48L2I+PGJyIC8+PGJyIC8+V29yZFByZXNzIE11bHRpc2l0ZSBoYXMgaXRzIGFkdmFudGFnZXMgYW5kIGRpc2FkdmFudGFnZXMuIDxiciAvPjxiciAvPjxiPlRoZSBwcm9zIG9mIFdQTVU6PC9iPjxiciAvPjxwPjwvcD48dWw+PGxpPkFiaWxpdHkgdG8gbWFuYWdlIG11bHRpcGxlIFdvcmRQcmVzcyBibG9ncyBmcm9tIG9uZSBkYXNoYm9hcmQuPC9saT48bGk+T25lLWNsaWNrIGluc3RhbGxhdGlvbiBvZiBXb3JkUHJlc3MgYmxvZ3MgaW5zaWRlIHRoZSBuZXR3b3JrICh5b3UganVzdCBuZWVkIHRvIGVudGVyIHRoZSBibG9nIG5hbWUgYW5kIEFkbWluIGVtYWlsIGFkZHJlc3MpLjwvbGk+PGxpPkl0IGlzIHBvc3NpYmxlIHRvIGhhdmUgbXVsdGlwbGUgc2l0ZXMvYmxvZ3MgZm9yIHRoZSBzYW1lIGFkbWluL3VzZXIgdGhhdCB3aWxsIGJlIGFibGUgdG8gbWFuYWdlIHRoZXNlIHNpdGVzIGZyb20gdGhlIHNhbWUgZGFzaGJvYXJkLjwvbGk+PGxpPlN1cGVyIEFkbWluIGhhcyBhY2Nlc3MgdG8gYWxsIHRoZSBibG9ncyBhbmQgY2FuIG1hbmFnZSB0aGVtLjwvbGk+PGxpPllvdSBuZWVkIHRvIHVwZGF0ZSBXb3JkUHJlc3MsIGEgcGx1Z2luIG9yIHRoZW1lIHZlcnNpb24gb25seSBvbmNlIGZvciBhbGwgdGhlIHNpdGVzIHdpdGhpbiB0aGUgbmV0d29yay48L2xpPjxsaT5Gb3IgYSBTdXBlciBBZG1pbiwgaXQgaXMgcG9zc2libGUgdG8gbWFuYWdlIHByaXZhY3kgc2V0dGluZ3MgYW5kIGRlY2lkZSB3aGF0IG9wdGlvbnMgb3IgZmVhdHVyZXMgdGhlIHVzZXJzIHdpbGwgaGF2ZSBhY2Nlc3MgdG8uPGJyIC8+PC9saT48L3VsPjxwIHN0eWxlPSJ0ZXh0LWluZGVudDogMjVweDsiPjxiciAvPjxiPlRoZSBjb25zIG9mIFdQTVU6PC9iPjxiciAvPjwvcD48dWw+PGxpPlRoZSBTdXBlciBBZG1pbiBzaG91bGQgaGF2ZSBzb21lIGV4cGVyaWVuY2UgaW4gbWFuYWdpbmcgV29yZFByZXNzIGJsb2dzIGFuZCBzaG91bGQga25vdyBob3cgdG8gZWRpdCBXb3JkUHJlc3MgY29yZSBmaWxlcyBvbiB0aGUgc2VydmVyLjwvbGk+PGxpPlNvbWUgdGhlbWVzIGFuZCBwbHVnaW5zIGRlc2lnbmVkIGZvciBhIHJlZ3VsYXIgV29yZFByZXNzIHdlYnNpdGUgbWF5IG5vdCB3b3JrIHNvIHdlbGwgZm9yIFdNUFUsIHNvIGl0IG1pZ2h0IGJlIG5lY2Vzc2FyeSB0byBmaW5kIGFsdGVybmF0aXZlcy48L2xpPjxsaT5JZiB0aGUgbWFpbiBpbnN0YWxsYXRpb24gaXMgYWZmZWN0ZWQgb3IgaGFja2VkLCB0aGVuIGFsbCB0aGUgYmxvZ3MgaW4gdGhlIG5ldHdvcmsgd2lsbCBiZSBhZmZlY3RlZC9oYWNrZWQgdG9vLjwvbGk+PGJyIC8+T3RoZXIgb3B0aW9ucyBleGlzdCBvdXRzaWRlIG9mIHRoZSBXb3JkUHJlc3MgTXVsdGlzaXRlIGVjb3N5c3RlbSBkZXNjcmliZWQgaGVyZS4gVGhlc2UgdG9vbHMgd29yayBzaW1pbGFybHkgdG8gTXVsdGlzaXRlIGluIHRoYXQgeW91IGdldCBhIHNpbmdsZSBkYXNoYm9hcmQgdG8gbWFuYWdlIHlvdXIgd2Vic2l0ZXMuIFRoZXJlIGFyZSBwbGVudHkgb2Ygd2VsbC1wcmljZWQgc29sdXRpb25zIHRoYXQgc2NhbGUgdG8geW91ciBuZWVkcy4gV2l0aCBFYXN5V1AgYnkgTmFtZWNoZWFwLCB5b3UgY2FuIGFkZCBtYW55IHNpbmdsZSBpbnN0YWxsYXRpb25zIHRvIDxhIGhyZWY9Imh0dHBzOi8vd3d3Lm5hbWVjaGVhcC5jb20vd29yZHByZXNzLyI+b25lIFdvcmRQcmVzcyBob3N0aW5nIGFjY291bnQ8L2E+LCBhbmQgc3dpdGNoIGJldHdlZW4gdGhlbSB5b3UgYXMgYW5kIHdoZW4geW91IHdpc2guPGJyIC8+PC91bD48cCBzdHlsZT0idGV4dC1pbmRlbnQ6IDI1cHg7Ij48YnIgLz48YnIgLz48Yj48YSBuYW1lPSJpbnN0YWwxIj4zLiBJbnN0YWxsaW5nIFdQTVU8L2E+PC9iPjxiciAvPjxiciAvPldQTVUgbWF5IGJlIGVhc2lseSBpbnN0YWxsZWQgdmlhIDxiPlNvZnRhY3Vsb3VzIEFwcHMgSW5zdGFsbGVyPC9iPiBpbiBjUGFuZWw6IA0KDQo8YnIgLz48YnIgLz4xLiBHbyB0byB5b3VyIGNQYW5lbCBhbmQgZmluZCA8Yj5FeGNsdXNpdmUgZm9yIE5hbWVjaGVhcCBjdXN0b21lcnM8L2I+IHNlY3Rpb246DQoNCjxiciAvPjxiciAvPjxpbWcgY2xhc3M9ImtiLWltYWdlIiBzcmM9Imh0dHBzOi8vTmFtZWNoZWFwLnNpbXBsZWtiLmNvbS9TaXRlQ29udGVudHMvMi03QzIyRDUyMzZBNDU0M0VCODI3RjNCRDg5MzZFMTUzRS9tZWRpYS9wbF93bXB1XzEucG5nIiAvPjxiciAvPjxiciAvPg0KDQoyLiBGaW5kIDxiPldvcmRQcmVzczwvYj4gYW5kIGl0cyBpY29uIHRvIGluc3RhbGw6PGJyIC8+PGJyIC8+PGltZyBjbGFzcz0ia2ItaW1hZ2UiIHNyYz0iaHR0cHM6Ly9OYW1lY2hlYXAuc2ltcGxla2IuY29tL1NpdGVDb250ZW50cy8yLTdDMjJENTIzNkE0NTQzRUI4MjdGM0JEODkzNkUxNTNFL21lZGlhL3NvZnRhY3Vsb3VzX3dwbXVfMS5wbmciIC8+PGJyIC8+PGJyIC8+DQoNCjMuIEZpbGwgb3V0IHRoZSBkZXRhaWxzIGZvciB5b3VyIHdlYnNpdGUsIHNjcm9sbCBkb3duIGFuZCBjbGljayA8Yj5JbnN0YWxsPC9iPi4NCg0KDQo8YnIgLz48YnIgLz48Yj5OT1RFPC9iPjogVGhlIGNvcnJlc3BvbmRpbmcgb3B0aW9uIEVuYWJsZSBNdWx0aXNpdGUgKFdQTVUpIHNob3VsZCBiZSBjaGVja2VkIGR1cmluZyB0aGUgaW5zdGFsbGF0aW9uLiANCg0KPGJyIC8+PGJyIC8+PGltZyBjbGFzcz0ia2ItaW1hZ2UiIHNyYz0iaHR0cHM6Ly9OYW1lY2hlYXAuc2ltcGxla2IuY29tL1NpdGVDb250ZW50cy8yLTdDMjJENTIzNkE0NTQzRUI4MjdGM0JEODkzNkUxNTNFL21lZGlhL3NvZnRhY3Vsb3VzX3dwbXVfMy5wbmciIC8+PGJyIC8+PGJyIC8+NC4gWW91IHdpbGwgZ2V0IGEgbm90aWZpY2F0aW9uIHRoYXQgV1BNVSBpcyBzdWNjZXNzZnVsbHkgaW5zdGFsbGVkIGZvciB5b3VyIGRvbWFpbi4gVGhpcyBpcyB0aGUgZWFzaWVzdCB3YXkgdG8gaW5zdGFsbCBXUE1VIGZvciB5b3VyIGRvbWFpbi4NCg0KDQo8YnIgLz48YnIgLz48YnIgLz48Yj5Ib3cgY2FuIHlvdSBjaGVjayBpZiBXUE1VIGlzIGFscmVhZHkgZW5hYmxlZCBmb3IgeW91ciBzaXRlPyANCjwvYj48YnIgLz48YnIgLz5Zb3UgbmVlZCB0byBmaW5kIHRoZSA8Yj53cC1jb25maWcucGhwIDwvYj5maWxlLiBUaGVyZSB5b3Ugd2lsbCBzZWUgdGhlIGZvbGxvd2luZyBsaW5lcyB0aGF0IHN0YXRlIFdQTVUgaXMgZW5hYmxlZDoNCiANCjxiciAvPjxiciAvPjxpPi8qIE11bHRpc2l0ZSAqLw0KPGJyIC8+ZGVmaW5lKCAnV1BfQUxMT1dfTVVMVElTSVRFJywgdHJ1ZSApOw0KPGJyIC8+ZGVmaW5lKCdNVUxUSVNJVEUnLCB0cnVlKTsNCjxiciAvPmRlZmluZSgnU1VCRE9NQUlOX0lOU1RBTEwnLCBmYWxzZSk7DQo8YnIgLz5kZWZpbmUoJ0RPTUFJTl9DVVJSRU5UX1NJVEUnLCAneW91cmRvbWFpbi5jb20nKTsNCjxiciAvPmRlZmluZSgnUEFUSF9DVVJSRU5UX1NJVEUnLCAnLycpOw0KPGJyIC8+ZGVmaW5lKCdTSVRFX0lEX0NVUlJFTlRfU0lURScsIDEpOw0KPGJyIC8+ZGVmaW5lKCdCTE9HX0lEX0NVUlJFTlRfU0lURScsIDEpOzwvaT48YnIgLz48YnIgLz48YnIgLz48YnIgLz48Yj48YSBuYW1lPSJ3cG11MSI+NC4gVHVybmluZyBhIHJlZ3VsYXIgV29yZFByZXNzIGluc3RhbGxhdGlvbiBpbnRvIFdQTVU8L2E+PC9iPjxiciAvPjxiciAvPklmIHlvdSBoYXZlIGEgcmVndWxhciBXb3JkUHJlc3MgaW5zdGFsbGF0aW9uIGJ1dCBkZWNpZGVkIHRvIG1ha2UgTXVsdGlzaXRlLCB0aGVyZSBpcyBubyBuZWVkIHRvIHJlLWluc3RhbGwgb3IgcmVtb3ZlIHlvdXIgV29yZFByZXNzLiBZb3UgbWF5IGFzIHdlbGwgZW5hYmxlIE11bHRpc2l0ZSBmb3IgaXQgZm9sbG93aW5nIHRoZSBpbnN0cnVjdGlvbnMgYmVsb3cuDQogDQo8YnIgLz48YnIgLz5XZSByZWNvbW1lbmQgeW91IHRvIGJhY2sgdXAgdGhlIFdvcmRQcmVzcyB3ZWJzaXRlIGJlZm9yZSB5b3Ugc3RhcnQgaW4gY2FzZSBzb21lIHN0ZXBzIGFyZSBmb2xsb3dlZCBpbXByb3Blcmx5LjxiciAvPjxiciAvPllvdSBtYXkgYmVnaW4gd2l0aCB0aGUgPGI+d3AtY29uZmlnLnBocDwvYj4gZmlsZSBlZGl0aW5nLiBJdCBpcyBwb3NzaWJsZSB0byBkbyBpdCB2aWEgRlRQIG9yIGRpcmVjdGx5IGluIGNQYW5lbC4gDQogDQo8YnIgLz48YnIgLz4xLiBHbyB0byB5b3VyIGNQYW5lbCAmZ3Q7IDxiPkZpbGUgbWFuYWdlciAmZ3Q7IHB1YmxpY19odG1sPC9iPiBmb2xkZXIgKG9yIHRoZSBzdWJmb2xkZXIgd2hlcmUgV29yZFByZXNzIGZpbGVzIGFyZSBsb2NhdGVkKSAmZ3Q7IGNob29zZSB0aGUgPGI+d3AtY29uZmlnLnBocDwvYj4gZmlsZSBhbmQgY2xpY2sgPGI+RWRpdDwvYj46DQoNCjxiciAvPjxiciAvPjxpbWcgY2xhc3M9ImtiLWltYWdlIiBzcmM9Imh0dHBzOi8vTmFtZWNoZWFwLnNpbXBsZWtiLmNvbS9TaXRlQ29udGVudHMvMi03QzIyRDUyMzZBNDU0M0VCODI3RjNCRDg5MzZFMTUzRS9tZWRpYS9wbF93bXB1XzE0LnBuZyIgLz48YnIgLz48aW1nIGNsYXNzPSJrYi1pbWFnZSIgc3JjPSJodHRwczovL05hbWVjaGVhcC5zaW1wbGVrYi5jb20vU2l0ZUNvbnRlbnRzLzItN0MyMkQ1MjM2QTQ1NDNFQjgyN0YzQkQ4OTM2RTE1M0UvbWVkaWEvcGxfd21wdV80LnBuZyIgLz48YnIgLz48YnIgLz5Zb3UgbmVlZCB0byBhZGQgdGhlIGZvbGxvd2luZyBsaW5lIGluIHRoZSBzYW1lIHBsYWNlIGFzIHNob3duIGluIHRoZSBzY3JlZW5zaG90Og0KIA0KPGJyIC8+PGJyIC8+wqDCoMKgwqDCoMKgwqDCoMKgwqDCoMKgwqDCoMKgwqDCoMKgwqDCoMKgPGk+wqAgZGVmaW5lKCdXUF9BTExPV19NVUxUSVNJVEUnLCB0cnVlKTsNCjwvaT48YnIgLz48YnIgLz48YnIgLz48aW1nIGNsYXNzPSJrYi1pbWFnZSIgc3JjPSJodHRwczovL05hbWVjaGVhcC5zaW1wbGVrYi5jb20vU2l0ZUNvbnRlbnRzLzItN0MyMkQ1MjM2QTQ1NDNFQjgyN0YzQkQ4OTM2RTE1M0UvbWVkaWEvcGxfd21wdV81LnBuZyIgLz48YnIgLz48YnIgLz5PbmNlIGRvbmUsIHNhdmUgdGhlIGNoYW5nZXMuPGJyIC8+PGJyIC8+Mi4gTG9nIGluIHRvIHlvdXIgQWRtaW4gRGFzaGJvYXJkIGFuZCBjaGVjayAgdGhhdCA8Yj5OZXR3b3JrIFNldHVwIDwvYj5oYXMgYmVlbiBhZGRlZCB0byB5b3VyPGI+IFRvb2xzPC9iPiBtZW51Og0KPGJyIC8+PGJyIC8+PGltZyBjbGFzcz0ia2ItaW1hZ2UiIHNyYz0iaHR0cHM6Ly9OYW1lY2hlYXAuc2ltcGxla2IuY29tL1NpdGVDb250ZW50cy8yLTdDMjJENTIzNkE0NTQzRUI4MjdGM0JEODkzNkUxNTNFL21lZGlhL3dwbV82LnBuZyIgLz48YnIgLz48YnIgLz5Zb3Ugd2lsbCBzZWUgdGhlIGZvbGxvd2luZzoNCg0KPGJyIC8+PGJyIC8+PGltZyBjbGFzcz0ia2ItaW1hZ2UiIHNyYz0iaHR0cHM6Ly9OYW1lY2hlYXAuc2ltcGxla2IuY29tL1NpdGVDb250ZW50cy8yLTdDMjJENTIzNkE0NTQzRUI4MjdGM0JEODkzNkUxNTNFL21lZGlhL3BsX3dtcHVfNi5wbmciIC8+PGJyIC8+PGJyIC8+PGI+Tk9URTwvYj46IE1ha2Ugc3VyZSB0aGUgQXBhY2hlIDxpPm1vZF9yZXdyaXRlPC9pPiBtb2R1bGUgaXMgaW5zdGFsbGVkIGFzIGl0IHdpbGwgYmUgdXNlZCBhdCB0aGUgZW5kIG9mIHRoaXMgaW5zdGFsbGF0aW9uLiBJZiBtb2RfcmV3cml0ZSBpcyBkaXNhYmxlZCwgYXNrIHlvdXIgYWRtaW5pc3RyYXRvciB0byBlbmFibGUgdGhhdCBtb2R1bGUgb3IgY2hlY2sgdGhlIEFwYWNoZSBkb2N1bWVudGF0aW9uIG9yIGVsc2V3aGVyZSB0byBzZXQgaXQgdXAuPGJyIC8+PGJyIC8+VGhlIDxpPm1vZF9yZXdyaXRlPC9pPiBtb2R1bGUgaXMgPGI+ZW5hYmxlZCBieSBkZWZhdWx0PC9iPiBvbiBvdXIgc2VydmVycywgc28geW91IG1heSBkaXNyZWdhcmQgdGhpcyBub3RpZmljYXRpb24uDQoNCg0KPGJyIC8+PGJyIC8+My4gWW91IG5lZWQgdG8gY2hvb3NlIHdoZXRoZXIgeW91IHdvdWxkIGxpa2UgeW91ciBzaXRlcyB0byB1c2UgYSBzdWJkb21haW4gb3Igc3ViLWRpcmVjdG9yaWVzIGluIHlvdXIgV29yZFByZXNzLjxiciAvPjxiciAvPjxiPlRoZSBTdWItZG9tYWluczwvYj4gb3B0aW9uIHdpbGwgZ2V0IHlvdXIgc2l0ZXMgVVJMcyBhcyA8aT5zaXRlMS55b3VyZG9tYWluLmNvbTwvaT4sICA8aT5zaXRlMi55b3VyZG9tYWluLmNvbTwvaT4sIGV0Yy4gDQogICAgIDxiciAvPjxiciAvPjxiPk5PVEU8L2I+OiBZb3Ugd2lsbCBuZWVkIHRvIHNldCB1cCBhIHdpbGRjYXJkIHN1YmRvbWFpbiBmaXJzdCBpbiBvcmRlciB0byB1c2Ugc3ViZG9tYWlucy4gWW91IG1heSBmaW5kIHRoZSBjb3JyZXNwb25kaW5nIHR1dG9yaWFsIG9uIHRoZSB3aWxkY2FyZCBzdWJkb21haW4gc2V0dXAgPGEgaHJlZj0iaHR0cHM6Ly93d3cubmFtZWNoZWFwLmNvbS9zdXBwb3J0L2tub3dsZWRnZWJhc2UvYXJ0aWNsZS5hc3B4LzkxOTEvMjkvaG93LWRvLWktY3JlYXRlLWEtd2lsZGNhcmQtc3ViZG9tYWluLWluLWNwYW5lbCI+aGVyZTwvYT4uDQo8YnIgLz48YnIgLz48Yj5UaGUgU3ViLWRpcmVjdG9yaWVzPC9iPiBvcHRpb24gd2lsbCBlbmFibGUgeW91IHRvIGhhdmUgc2l0ZXMgVVJMcyBsaWtlIDxpPnlvdXJkb21haW4uY29tL3NpdGUxPC9pPiwgPGk+eW91cmRvbWFpbi5jb20vc2l0ZTI8L2k+LCBldGMuIFRoaXMgb3B0aW9uIGRvZXNuJ3QgcmVxdWlyZSBhbnkgYWRkaXRpb25hbCBhZGp1c3RtZW50cy4gDQoNCg0KPGJyIC8+PGJyIC8+SXQgaXMgbm90IHBvc3NpYmxlIHRvIGhhdmUgYm90aCBvcHRpb25zIGVuYWJsZWQgYXQgdGhlIHNhbWUgdGltZS4gT25jZSB5b3UgaGF2ZSBjaG9zZW4gd2hpY2ggaXMgYmVzdCBmb3IgeW91LCBwcm9jZWVkIGFuZCBjbGljayA8Yj5JbnN0YWxsPC9iPi4gDQoNCg0KPGJyIC8+PGJyIC8+NC4gTmV4dCwgeW91IHdpbGwgc2VlIHRoZSBwYWdlIGNhbGxlZCA8Yj5DcmVhdGUgYSBOZXR3b3JrIG9mIFdvcmRQcmVzcyBzaXRlcy4gRW5hYmxpbmcgbmV0d29yazwvYj4uIDxiciAvPjxiciAvPkluIG9yZGVyIHRvIGNvbXBsZXRlIGVuYWJsaW5nIE11bHRpc2l0ZSwgPGI+d3AtY29uZmlnLnBocDwvYj4gYW5kIDxiPi5odGFjY2VzczwvYj4gZmlsZXMgYXJlIHRvIGJlIG1vZGlmaWVkLiBGb3IgdGhpcywgZm9sbG93IHRoZSBzdGVwcyBhcyBkZXNjcmliZWQgb24gdGhlIHBhZ2UgKG1ha2Ugc3VyZSB5b3UgY29weS1wYXN0ZSBjb2RlIGFic3RyYWN0cyBwcmVjaXNlbHkpOjxiciAvPjxiciAvPjxpbWcgY2xhc3M9ImtiLWltYWdlIiBzcmM9Imh0dHBzOi8vTmFtZWNoZWFwLnNpbXBsZWtiLmNvbS9TaXRlQ29udGVudHMvMi03QzIyRDUyMzZBNDU0M0VCODI3RjNCRDg5MzZFMTUzRS9tZWRpYS9wbF93bXB1XzcucG5nIiAvPjxiciAvPjxiciAvPk9uY2UgYm90aCBmaWxlcyBhcmUgZWRpdGVkLCB5b3VyIG5ldHdvcmsgaXMgZW5hYmxlZCBhbmQgY29uZmlndXJlZC4gDQoNCkNsaWNrIG9uIDxiPkxvZyBJbjwvYj4gYW5kIHJlLWFjY2VzcyB5b3VyIFdvcmRQcmVzcyBhZG1pbiBkYXNoYm9hcmQgdXNpbmcgdGhlIHNhbWUgbG9naW4gZGV0YWlscy4gPGJyIC8+PGJyIC8+NS4gVGhlIGxhc3Qgc3RlcCBpcyB0aGUgY3JlYXRpb24gb2YgYTxiPiBtdS1wbHVnaW5zIDwvYj5mb2xkZXIgd2l0aCB0aGUgcGx1Z2lucyBhY3RpdmF0ZWQgYnkgZGVmYXVsdCBhbmQgYWZmZWN0aW5nIGFsbCB0aGUgc2l0ZXMgaW4gdGhlIFdQTVUgaW5zdGFsbGF0aW9uLiANCg0KPGJyIC8+PGJyIC8+TmF2aWdhdGUgdG8gPGI+RmlsZSBNYW5hZ2VyPC9iPiBtZW51IGFuZCBsb2NhdGUgdGhlIHJvb3QgZm9sZGVyIGZvciB5b3VyIFdvcmRQcmVzcyBpbnN0YWxsYXRpb24uIE1vdmUgdG88Yj4gd3AtY29udGVudDwvYj4gZm9sZGVyICZndDsgY2xpY2sgdGhlIDxiPk5ldyBmb2xkZXI8L2I+IGJ1dHRvbiBpbiB0aGUgdG9wIG1lbnUgJmd0OyB0eXBlIDxiPm11LXBsdWdpbnM8L2I+IGluIHRoZSBjb3JyZXNwb25kaW5nIGZpZWxkICZndDsgY2xpY2sgPGI+Q3JlYXRlIGEgTmV3IEZvbGRlcjwvYj4uDQoNCkVuc3VyZSB0aGUgcGVybWlzc2lvbnMgZm9yIHRoZSBuZXdseSBjcmVhdGVkIGZvbGRlciBhcmUgc2V0IHRvIDxpPjA3NTU8L2k+Ojx1PjxiciAvPjxiciAvPjwvdT48aW1nIGNsYXNzPSJrYi1pbWFnZSIgc3JjPSJodHRwczovL05hbWVjaGVhcC5zaW1wbGVrYi5jb20vU2l0ZUNvbnRlbnRzLzItN0MyMkQ1MjM2QTQ1NDNFQjgyN0YzQkQ4OTM2RTE1M0UvbWVkaWEvcGxfd21wdV84LnBuZyIgLz48YnIgLz48YnIgLz42LiBOb3cgeW91IGNhbiBsb2cgaW50byB5b3VyIEFkbWluIERhc2hib2FyZCBhZ2FpbiBhbmQgY2hlY2sgaWYgdGhlIG5ldHdvcmsgaXMgZW5hYmxlZDo8YnIgLz48YnIgLz48aW1nIGNsYXNzPSJrYi1pbWFnZSIgc3JjPSJodHRwczovL05hbWVjaGVhcC5zaW1wbGVrYi5jb20vU2l0ZUNvbnRlbnRzLzItN0MyMkQ1MjM2QTQ1NDNFQjgyN0YzQkQ4OTM2RTE1M0UvbWVkaWEvd3BtXzEwLnBuZyIgLz48YnIgLz48Yj5OZXR3b3JrIEFkbWluPC9iPiBpcyBhIHN1cGVyIGFkbWluIHRoYXQgaGFzIGFjY2VzcyB0byB0aGUgd2hvbGUgTmV0d29yayBNYW5hZ2VtZW50IGFuZCBhbGwgb3RoZXIgV29yZFByZXNzIGRhc2hib2FyZHMuPGJyIC8+PGJyIC8+PGJyIC8+PGJyIC8+PGI+PGEgbmFtZT0ic3ViMSI+NS4gQ3JlYXRpbmcgc3ViZG9tYWlucyBhbmQgc3ViZm9sZGVyczwvYT48YnIgLz48YnIgLz48L2I+WW91IHdpbGwgbmVlZCB0byBjcmVhdGUgbmV3IHNpdGVzIGluIHRoZSBXb3JkUHJlc3MgTmV0d29yayB2aWEgTmV0d29yayBBZG1pbi4NCg0KPGJyIC8+MS4gR28gdG8geW91ciA8Yj5Xb3JkUHJlc3MgYWRtaW4gcGFuZWwgJmd0OyBNeSBTaXRlcyAmZ3Q7IE5ldHdvcmsgQWRtaW4gJmd0OyBTaXRlczwvYj46PGJyIC8+PGJyIC8+PGltZyBjbGFzcz0ia2ItaW1hZ2UiIHNyYz0iaHR0cHM6Ly9OYW1lY2hlYXAuc2ltcGxla2IuY29tL1NpdGVDb250ZW50cy8yLTdDMjJENTIzNkE0NTQzRUI4MjdGM0JEODkzNkUxNTNFL21lZGlhL3dwbV8xMS5wbmciIC8+PGJyIC8+PGJyIC8+PGJyIC8+Mi4gQ2xpY2sgPGI+QWRkIE5ldyA8L2I+dG8gY3JlYXRlIGEgbmV3IHNpdGU6IDxiciAvPjxiciAvPjxiPjxpbWcgY2xhc3M9ImtiLWltYWdlIiBzcmM9Imh0dHBzOi8vTmFtZWNoZWFwLnNpbXBsZWtiLmNvbS9TaXRlQ29udGVudHMvMi03QzIyRDUyMzZBNDU0M0VCODI3RjNCRDg5MzZFMTUzRS9tZWRpYS93cG1fMTIucG5nIiAvPjxiciAvPjxiciAvPk5PVEUgMTwvYj46IElmIHlvdSBoYXZlIGluc3RhbGxlZCBXUE1VIHZpYSBTb2Z0YWN1bG91cywgeW91IHdpbGwgaGF2ZSB0aGUgPGI+c3ViZGlyZWN0b3J5PC9iPiBvcHRpb24gKDxpPnlvdXJkb21haW4uY29tL3NpdGUxPC9pPikgc2V0IHVwIGJ5IGRlZmF1bHQsIHNvIGl0IHdpbGwgYmUgcG9zc2libGUgdG8gYWRkIG5ldyBXb3JkUHJlc3Mgc2l0ZSB0byB0aGUgc3ViLWRpcmVjdG9yeSBhcyBkZXNjcmliZWQgYmVsb3cuIA0KDQo8YnIgLz48YnIgLz48Yj5OT1RFIDI8L2I+OiBUaGUgYWRtaW4gZW1haWwgZmllbGQg4oCTIGlmIHlvdSB1c2UgdGhlIGVtYWlsIGFkZHJlc3MgYWxyZWFkeSBhc3NpZ25lZCB0byBTdXBlciBBZG1pbiBvciBBZG1pbiBvZiB0aGUgcmVndWxhciBXb3JkUHJlc3MgaW5zdGFsbGF0aW9ucyBpbnNpZGUgdGhlIG5ldHdvcmssIHlvdSB3aWxsIG5lZWQgdG8gYWNjZXNzIHRoZSBBZG1pbiBEYXNoYm9hcmQgZm9yIHRoZSBuZXcgc2l0ZSB3aXRoIHRoZSBzYW1lIGRldGFpbHMuPGJyIC8+PGJyIC8+SWYgeW91IHVzZSB0aGUgbmV3IGVtYWlsIGFkZHJlc3MsIHdoaWNoIGlzIG5vdCBhc3NpZ25lZCB0byBhbnkgdXNlciB5ZXQgYW5kIGRvZXMgbm90IGV4aXN0IGluIHRoZSBXb3JkUHJlc3MgZGF0YWJhc2UsIHRoZSBuZXcgdXNlciB3aWxsIGJlIGNyZWF0ZWQsIGFuZCB0aGUgbG9naW4gZGV0YWlscyB3aWxsIGJlIHNlbnQgdG8gdGhlIHNwZWNpZmllZCBlbWFpbCBhZGRyZXNzOjxiciAvPjxiciAvPjxpbWcgY2xhc3M9ImtiLWltYWdlIiBzcmM9Imh0dHBzOi8vTmFtZWNoZWFwLnNpbXBsZWtiLmNvbS9TaXRlQ29udGVudHMvMi03QzIyRDUyMzZBNDU0M0VCODI3RjNCRDg5MzZFMTUzRS9tZWRpYS93cG1fMTMucG5nIiAvPjxiciAvPjxiciAvPklmIHlvdSB3b3VsZCBsaWtlIHRvIGluc3RhbGwgV29yZFByZXNzIHNpdGUgdG8gdGhlIDxiPnN1YmRvbWFpbjwvYj4sIG5vdCB0byB0aGUgc3ViZGlyZWN0b3J5LCB5b3UgbmVlZCB0byBkbyB0aGUgZm9sbG93aW5nIGZpcnN0Og0KIA0KPGJyIC8+PGJyIC8+MS4gQ3JlYXRlIGEgd2lsZGNhcmQgc3ViZG9tYWluIGluIDxiPlN1YmRvbWFpbnM8L2I+IG1lbnUgaW4gY1BhbmVsOg0KDQo8YnIgLz48YnIgLz48aW1nIGNsYXNzPSJrYi1pbWFnZSIgc3JjPSJodHRwczovL05hbWVjaGVhcC5zaW1wbGVrYi5jb20vU2l0ZUNvbnRlbnRzLzItN0MyMkQ1MjM2QTQ1NDNFQjgyN0YzQkQ4OTM2RTE1M0UvbWVkaWEvcGxfd21wdV85LnBuZyIgLz48YnIgLz48YnIgLz5XaGlsZSBjcmVhdGluZyBzdWNoIGEgc3ViZG9tYWluLCBtYWtlIHN1cmUgdG8gcG9pbnQgPGI+RG9jdW1lbnQgUm9vdDwvYj4gdG8gdGhlIHJvb3QgZGlyZWN0b3J5IG9mIHRoZSBtdWx0aXNpdGUgaW5zdGFsbGF0aW9uLjxiciAvPjxiciAvPjxpbWcgY2xhc3M9ImtiLWltYWdlIiBzcmM9Imh0dHBzOi8vTmFtZWNoZWFwLnNpbXBsZWtiLmNvbS9TaXRlQ29udGVudHMvMi03QzIyRDUyMzZBNDU0M0VCODI3RjNCRDg5MzZFMTUzRS9tZWRpYS9wbF93bXB1XzEwLnBuZyIgLz48YnIgLz48YnIgLz4yLiBDaGFuZ2UgPGI+U3ViZG9tYWluX0luc3RhbGw8L2I+IG9wdGlvbiBpbiB0aGUgPGI+d3AtY29uZmlnLnBocDwvYj4gZmlsZSBmcm9tIDxpPmZhbHNlIDwvaT50byA8aT50cnVlIDwvaT5hbmQgc2F2ZSB0aGUgY2hhbmdlczo8YnIgLz48YnIgLz48aW1nIGNsYXNzPSJrYi1pbWFnZSIgc3JjPSJodHRwczovL05hbWVjaGVhcC5zaW1wbGVrYi5jb20vU2l0ZUNvbnRlbnRzLzItN0MyMkQ1MjM2QTQ1NDNFQjgyN0YzQkQ4OTM2RTE1M0UvbWVkaWEvd3BtXzE1LnBuZyIgLz48YnIgLz48YnIgLz4zLiBPbmNlIGRvbmUsIHlvdSBjYW4gYWNjZXNzIDxiPk5ldHdvcmsgQWRtaW4gRGFzaGJvYXJkPC9iPiBhbmQgaW5zdGFsbCBXb3JkUHJlc3MgdG8gdGhlIHN1YmRvbWFpbjoNCjxiciAvPjxiciAvPjxpbWcgY2xhc3M9ImtiLWltYWdlIiBzcmM9Imh0dHBzOi8vTmFtZWNoZWFwLnNpbXBsZWtiLmNvbS9TaXRlQ29udGVudHMvMi03QzIyRDUyMzZBNDU0M0VCODI3RjNCRDg5MzZFMTUzRS9tZWRpYS93cG1fMTYucG5nIiAvPjxiciAvPjxiciAvPklmIHlvdSBzd2l0Y2ggdGhlIDxiPlN1YmRvbWFpbl9JbnN0YWxsPC9iPiBvcHRpb24gYmFjayB0byA8aT5mYWxzZTwvaT4sIGl0IHdpbGwgYmUgcG9zc2libGUgdG8gY3JlYXRlIHRoZSBzdWJkaXJlY3RvcmllcyBhZ2Fpbi4gDQo8YnIgLz5BcyBhIHJlc3VsdCwgeW91IGNhbiBzd2l0Y2ggZnJvbSBzdWJkb21haW5zIHRvIHN1YmRpcmVjdG9yaWVzIGRlcGVuZGluZyBvbiB0aGUgbmVlZHMuPGJyIC8+PGJyIC8+PGJyIC8+PGJyIC8+PGI+PGEgbmFtZT0ibWFwMSI+Ni4gQ29ubmVjdGluZyBhbm90aGVyIGRvbWFpbiB0byBXUE1VIHNpdGU8L2E+PC9iPjxiciAvPjxiciAvPjxiPk5PVEU8L2I+OiBUaGUgZG9tYWlucyB5b3Ugd2FudCB0byBjb25uZWN0IG5lZWQgdG8gYmUgYWRkZWQgYXMgcGFya2VkIG9uZXMgb3IgYWRkb25zIHBvaW50ZWQgdG8gdGhlIHJvb3QgZm9sZGVyIG9mIHRoZSBtYWluIGRvbWFpbi4gDQo8YnIgLz48YnIgLz4NClRvIGNoYW5nZSB0aGUgV1BNVSBzaXRlIFVSTDoNCjxiciAvPjxiciAvPjEuIEluIHRoZSBOZXR3b3JrIEFkbWluIGRhc2hib2FyZCwgZ28gdG8gPGI+U2l0ZXMgPC9iPiZndDsgPGI+QWxsIFNpdGVzPC9iPiBhbmQgY2xpY2sgPGI+RWRpdCA8L2I+dW5kZXIgdGhlIHNpdGUgeW91IHdpc2ggdG8gY2hhbmdlOg0KPGJyIC8+PGJyIC8+PGltZyBjbGFzcz0ia2ItaW1hZ2UiIHNyYz0iaHR0cHM6Ly9OYW1lY2hlYXAuc2ltcGxla2IuY29tL1NpdGVDb250ZW50cy8yLTdDMjJENTIzNkE0NTQzRUI4MjdGM0JEODkzNkUxNTNFL21lZGlhL3dwbV8xNy4yLnBuZyIgLz48YnIgLz48YnIgLz4NCjIuIENoYW5nZSB0aGUgPGI+U2l0ZSBBZGRyZXNzIChVUkwpPC9iPiB0byB5b3VyIGRvbWFpbidzIFVSTCBhbmQgY2xpY2sgPGI+U2F2ZSBDaGFuZ2VzPC9iPjoNCjxiciAvPjxiciAvPjxpbWcgY2xhc3M9ImtiLWltYWdlIiBzcmM9Imh0dHBzOi8vTmFtZWNoZWFwLnNpbXBsZWtiLmNvbS9TaXRlQ29udGVudHMvMi03QzIyRDUyMzZBNDU0M0VCODI3RjNCRDg5MzZFMTUzRS9tZWRpYS93cG1fMTcuMy5wbmciIC8+PGJyIC8+PGJyIC8+DQpZb3VyIGRvbWFpbiB3aWxsIHNob3cgdGhlIGNvbnRlbnQgb2YgdGhlIFdQTVUgc2l0ZSBub3cuDQogDQo8YnIgLz48YnIgLz48YnIgLz5UaGF0J3MgaXQhPGJyIC8+PGJyIC8+DQrCoMKgwqDCoMKgwqDCoMKgwqDCoMKgwqDCoMKgIDxiciAvPsKgwqDCoMKgwqDCoMKgwqDCoMKgwqDCoMKgwqDCoMKgwqDCoMKgwqDCoCBOZWVkIGFueSBoZWxwPyBDb250YWN0IG91ciA8YSBocmVmPSJodHRwczovL3d3dy5uYW1lY2hlYXAuY29tL2hlbHAtY2VudGVyLyI+SGVscERlc2s8L2E+PGJyIC8+PGJyIC8+PC9wPjxwPjwvcD4=","NewTillDate":null,"FeaturedTillDate":null,"ModifiedDateTime":"2022-08-03T14:00:54.0000000","LiveDateTime":"1754-02-02T00:00:00.0000000","CreatedDateTime":"2014-10-24T20:44:46.0000000","ApprovalDatetime":"2014-10-24T21:44:53.0000000","RequestCount":89866,"MarkedAsNew":false,"MarkedAsFeatured":false,"RatingValue":3,"CategoryPaths":[{"__type":"Nc:SimpleKB:Abstractions:Dtos:CategoryPathDto","Level":1,"CategoryId":12,"CategoryName":"Hosting"},{"__type":"Nc:SimpleKB:Abstractions:Dtos:CategoryPathDto","Level":2,"CategoryId":2187,"CategoryName":"cPanel: WordPress"}],"AssociatedCategories":[{"CategoryId":2187,"CategoryName":"cPanel: WordPress","CategoryDisplayName":"HostingcPanel: WordPress"}],"AssociatedTags":[{"TagId":19688,"Tag":" site"},{"TagId":19780,"Tag":"wordpress"},{"TagId":20112,"Tag":" wpmu"},{"TagId":20114,"Tag":" multisite"},{"TagId":80403,"Tag":" multi"}],"RelatedArticles":[{"ArticleId":9399,"PreferedCategoryId":2187,"ArticleTypeId":3,"ArticleName":"How to speed up and optimize a WordPress website","ArticleTypeName":"How_To","Title":"How to speed up and optimize a WordPress website","LiveDateTime":null,"ModifiedDateTime":"01/14/2025","MarkedAsNew":false,"MarkedAsFeatured":false}],"AssociatedMedias":[],"PreferredCategoryId":0,"RootParentCategoryName":"","RootParentCategoryId":0},"status":200,"statusText":"OK"},"/api/v1/ncpl/simplekb/getcategorybycategoryid:\"{\\\"categoryId\\\":2187}\"":{"body":{"__type":"Nc:SimpleKB:Abstractions:Dtos:CategoryDto","ParentCategoryId":12,"Parent_Category_Name":"Hosting","FriendlyId":null,"ApprovedYN":true,"TreatAsTopicYN":false,"CreatedDateTime":"04/19/2013 16:31:19","CurrentCategoryPaths":[{"__type":"Nc:SimpleKB:Abstractions:Dtos:CategoryPathDto","Level":1,"CategoryId":12,"CategoryName":"Hosting"},{"__type":"Nc:SimpleKB:Abstractions:Dtos:CategoryPathDto","Level":2,"CategoryId":2187,"CategoryName":"cPanel: WordPress"}],"RelatedCategories":[],"AssociatedArticles":[{"ArticleId":10008,"Title":"How to manage WordPress website with iPhone application","ArticleName":"How to manage WordPress website with iPhone application","LiveDateTime":"02/02/1754 00:00:00","NewTillDate":null,"FeaturedTillDate":null,"ModifiedDateTime":"12/10/2021"},{"ArticleId":10076,"Title":"How to Create a WordPress Staging Site","ArticleName":"How to Create a WordPress Staging Site","LiveDateTime":"02/02/1754 00:00:00","NewTillDate":null,"FeaturedTillDate":null,"ModifiedDateTime":"01/18/2022"},{"ArticleId":10115,"Title":"How to fix WordPress blank page (white screen)","ArticleName":"How to fix WordPress blank page (white screen)","LiveDateTime":"02/02/1754 00:00:00","NewTillDate":null,"FeaturedTillDate":null,"ModifiedDateTime":"06/25/2024"},{"ArticleId":10185,"Title":"How to deal with the hacked WordPress website?","ArticleName":"How to deal with the hacked WordPress website?","LiveDateTime":"02/02/1754 00:00:00","NewTillDate":null,"FeaturedTillDate":null,"ModifiedDateTime":"01/31/2025"},{"ArticleId":10316,"Title":"How to change upload filesize limit in WordPress multisite","ArticleName":"How to change upload filesize limit in WordPress multisite","LiveDateTime":"02/02/1754 00:00:00","NewTillDate":null,"FeaturedTillDate":null,"ModifiedDateTime":"09/24/2020"},{"ArticleId":10645,"Title":"How to fix a WordPress critical error","ArticleName":"How to fix a WordPress critical error","LiveDateTime":"02/02/1754 00:00:00","NewTillDate":null,"FeaturedTillDate":null,"ModifiedDateTime":"12/19/2025"},{"ArticleId":10649,"Title":"Extendify Overview","ArticleName":"Extendify Overview","LiveDateTime":"02/02/1754 00:00:00","NewTillDate":null,"FeaturedTillDate":null,"ModifiedDateTime":"10/03/2025"},{"ArticleId":10752,"Title":"How to update WordPress admin email via a database","ArticleName":"How to update WordPress admin email via a database","LiveDateTime":"02/02/1754 00:00:00","NewTillDate":null,"FeaturedTillDate":null,"ModifiedDateTime":"10/09/2025"},{"ArticleId":1255,"Title":"How to install WordPress using Softaculous","ArticleName":"How to install WordPress using Softaculous","LiveDateTime":"02/02/1754 00:00:00","NewTillDate":null,"FeaturedTillDate":null,"ModifiedDateTime":"09/25/2024"},{"ArticleId":9495,"Title":"How to move WordPress from a subfolder","ArticleName":"How to move WordPress from a subfolder","LiveDateTime":"02/02/1754 00:00:00","NewTillDate":null,"FeaturedTillDate":null,"ModifiedDateTime":"12/21/2021"},{"ArticleId":9202,"Title":"How to reset/change WordPress admin password","ArticleName":"How to reset/change WordPress admin password","LiveDateTime":"02/02/1754 00:00:00","NewTillDate":null,"FeaturedTillDate":null,"ModifiedDateTime":"04/27/2025"},{"ArticleId":9972,"Title":"How to log in to WordPress using Softaculous","ArticleName":"How to log in to WordPress using Softaculous","LiveDateTime":"02/02/1754 00:00:00","NewTillDate":null,"FeaturedTillDate":null,"ModifiedDateTime":"12/27/2022"},{"ArticleId":9809,"Title":"How to change your WordPress Admin URL","ArticleName":"How to change your WordPress Admin URL","LiveDateTime":"02/02/1754 00:00:00","NewTillDate":null,"FeaturedTillDate":null,"ModifiedDateTime":"12/21/2021"},{"ArticleId":9451,"Title":"How to manage WordPress user roles","ArticleName":"How to manage WordPress user roles","LiveDateTime":"02/02/1754 00:00:00","NewTillDate":null,"FeaturedTillDate":null,"ModifiedDateTime":"10/23/2024"},{"ArticleId":9328,"Title":"How to install a new theme for WordPress","ArticleName":"How to install a new theme for WordPress","LiveDateTime":"02/02/1754 00:00:00","NewTillDate":null,"FeaturedTillDate":null,"ModifiedDateTime":"09/25/2024"},{"ArticleId":9761,"Title":"How to add a favicon to a WordPress website","ArticleName":"How to add a favicon to a WordPress website","LiveDateTime":"02/02/1754 00:00:00","NewTillDate":null,"FeaturedTillDate":null,"ModifiedDateTime":"12/10/2021"},{"ArticleId":9433,"Title":"How to manage plugins in WordPress","ArticleName":"How to manage plugins in WordPress","LiveDateTime":"02/02/1754 00:00:00","NewTillDate":null,"FeaturedTillDate":null,"ModifiedDateTime":"09/25/2024"},{"ArticleId":9555,"Title":"How to disable WordPress plugins","ArticleName":"How to disable WordPress plugins","LiveDateTime":"02/02/1754 00:00:00","NewTillDate":null,"FeaturedTillDate":null,"ModifiedDateTime":"09/25/2024"},{"ArticleId":9516,"Title":"How to flush WordPress caching plugins","ArticleName":"How to flush WordPress caching plugins","LiveDateTime":"02/02/1754 00:00:00","NewTillDate":null,"FeaturedTillDate":null,"ModifiedDateTime":"12/15/2021"},{"ArticleId":9201,"Title":"How to change WordPress site address (URL)","ArticleName":"How to change WordPress site address (URL)","LiveDateTime":"02/02/1754 00:00:00","NewTillDate":null,"FeaturedTillDate":null,"ModifiedDateTime":"09/25/2024"},{"ArticleId":9452,"Title":"How to set up WordPress Contact Form 7","ArticleName":"How to set up WordPress Contact Form 7","LiveDateTime":"02/02/1754 00:00:00","NewTillDate":null,"FeaturedTillDate":null,"ModifiedDateTime":"09/25/2024"},{"ArticleId":1414,"Title":"How to back up a WordPress site using CodeGuard","ArticleName":"How to back up a WordPress site using CodeGuard","LiveDateTime":"02/02/1754 00:00:00","NewTillDate":null,"FeaturedTillDate":null,"ModifiedDateTime":"07/08/2019"},{"ArticleId":9948,"Title":"What is WordPress cron and how to work with it","ArticleName":"What is WordPress cron and how to work with it","LiveDateTime":"02/02/1754 00:00:00","NewTillDate":null,"FeaturedTillDate":null,"ModifiedDateTime":"05/30/2024"},{"ArticleId":9971,"Title":"What is WordPress heartbeat and how to deal with admin-ajax.php usage","ArticleName":"What is WordPress heartbeat and how to deal with admin-ajax.php usage","LiveDateTime":"02/02/1754 00:00:00","NewTillDate":null,"FeaturedTillDate":null,"ModifiedDateTime":"04/24/2020"},{"ArticleId":9491,"Title":"How to set up HTTPS for WordPress","ArticleName":"How to set up HTTPS for WordPress","LiveDateTime":"02/02/1754 00:00:00","NewTillDate":null,"FeaturedTillDate":null,"ModifiedDateTime":"04/04/2022"},{"ArticleId":9937,"Title":"How to create temporary login details for WordPress","ArticleName":"How to create temporary login details for WordPress","LiveDateTime":"02/02/1754 00:00:00","NewTillDate":null,"FeaturedTillDate":null,"ModifiedDateTime":"12/10/2021"},{"ArticleId":9941,"Title":"How to manually add an admin user to the WordPress database via phpMyAdmin","ArticleName":"How to manually add an admin user to the WordPress database via phpMyAdmin","LiveDateTime":"02/02/1754 00:00:00","NewTillDate":null,"FeaturedTillDate":null,"ModifiedDateTime":"05/20/2024"},{"ArticleId":9951,"Title":"Maintenance mode for different CMS","ArticleName":"Maintenance mode for different CMS","LiveDateTime":"02/02/1754 00:00:00","NewTillDate":null,"FeaturedTillDate":null,"ModifiedDateTime":"10/21/2022"},{"ArticleId":9399,"Title":"How to speed up and optimize a WordPress website","ArticleName":"How to speed up and optimize a WordPress website","LiveDateTime":"02/02/1754 00:00:00","NewTillDate":null,"FeaturedTillDate":null,"ModifiedDateTime":"01/14/2025"},{"ArticleId":9564,"Title":"How to create a mobile version of a WordPress website","ArticleName":"How to create a mobile version of a WordPress website","LiveDateTime":"02/02/1754 00:00:00","NewTillDate":null,"FeaturedTillDate":null,"ModifiedDateTime":"11/30/2021"},{"ArticleId":9892,"Title":"How to edit wp-config.php file in WordPress","ArticleName":"How to edit wp-config.php file in WordPress","LiveDateTime":"02/02/1754 00:00:00","NewTillDate":null,"FeaturedTillDate":null,"ModifiedDateTime":"06/24/2025"},{"ArticleId":9959,"Title":"How to add Google AdSense to your WordPress website","ArticleName":"How to add Google AdSense to your WordPress website","LiveDateTime":"02/02/1754 00:00:00","NewTillDate":null,"FeaturedTillDate":null,"ModifiedDateTime":"11/22/2021"},{"ArticleId":9663,"Title":"How to fix Error Establishing A Database Connection in WordPress","ArticleName":"How to fix Error Establishing A Database Connection in WordPress","LiveDateTime":"02/02/1754 00:00:00","NewTillDate":null,"FeaturedTillDate":null,"ModifiedDateTime":"09/25/2024"},{"ArticleId":9947,"Title":"How to increase WordPress memory limit","ArticleName":"How to increase WordPress memory limit","LiveDateTime":"02/02/1754 00:00:00","NewTillDate":null,"FeaturedTillDate":null,"ModifiedDateTime":"11/29/2021"},{"ArticleId":9463,"Title":"What is the robots.txt file and how to use it","ArticleName":"What is the robots.txt file and how to use it","LiveDateTime":"02/02/1754 00:00:00","NewTillDate":null,"FeaturedTillDate":null,"ModifiedDateTime":"01/09/2024"},{"ArticleId":9156,"Title":"How to improve WordPress website security","ArticleName":"How to improve WordPress website security","LiveDateTime":"02/02/1754 00:00:00","NewTillDate":null,"FeaturedTillDate":null,"ModifiedDateTime":"11/23/2023"},{"ArticleId":9411,"Title":"How to set up and manage WordPress Multisite (WPMU)","ArticleName":"How to set up and manage WordPress Multisite (WPMU)","LiveDateTime":"02/02/1754 00:00:00","NewTillDate":null,"FeaturedTillDate":null,"ModifiedDateTime":"08/03/2022"},{"ArticleId":9427,"Title":"How to transfer WordPress Multisite (WPMU)","ArticleName":"How to transfer WordPress Multisite (WPMU)","LiveDateTime":"02/02/1754 00:00:00","NewTillDate":null,"FeaturedTillDate":null,"ModifiedDateTime":"05/30/2024"},{"ArticleId":9243,"Title":"How to transfer a WordPress website to Namecheap manually","ArticleName":"How to transfer a WordPress website to Namecheap manually","LiveDateTime":"02/02/1754 00:00:00","NewTillDate":null,"FeaturedTillDate":null,"ModifiedDateTime":"05/10/2025"},{"ArticleId":9359,"Title":"How to migrate website from wordpress.com to Namecheap","ArticleName":"How to migrate website from wordpress.com to Namecheap","LiveDateTime":"02/02/1754 00:00:00","NewTillDate":null,"FeaturedTillDate":null,"ModifiedDateTime":"12/10/2021"},{"ArticleId":9950,"Title":"How to move a website from Wix to WordPress","ArticleName":"How to move a website from Wix to WordPress","LiveDateTime":"02/02/1754 00:00:00","NewTillDate":null,"FeaturedTillDate":null,"ModifiedDateTime":"12/28/2020"},{"ArticleId":9949,"Title":"How to move a website from Squarespace to WordPress","ArticleName":"How to move a website from Squarespace to WordPress","LiveDateTime":"02/02/1754 00:00:00","NewTillDate":null,"FeaturedTillDate":null,"ModifiedDateTime":"12/14/2021"},{"ArticleId":9714,"Title":"How to move from Blogger to WordPress hosted with us","ArticleName":"How to move from Blogger to WordPress hosted with us","LiveDateTime":"02/02/1754 00:00:00","NewTillDate":null,"FeaturedTillDate":null,"ModifiedDateTime":"12/10/2021"}],"AssociatedTags":[],"CategoryId":2187,"CategoryName":"cPanel: WordPress"},"status":200,"statusText":"OK"},"/api/v1/ncpl/simplekb/getcategories:\"{\\\"parentCategoryId\\\":0,\\\"getTree\\\":true}\"":{"body":[{"__type":"Nc:SimpleKB:Abstractions:Dtos:CategoryItemDto","ParentCategoryId":93,"TreatAsTopicYN":false,"Description":"","ImageUrl":"","ShortDesc":"","CategoryId":2216,"CategoryName":"Spam Protection"},{"__type":"Nc:SimpleKB:Abstractions:Dtos:CategoryItemDto","ParentCategoryId":14,"TreatAsTopicYN":false,"Description":"","ImageUrl":"","ShortDesc":"","CategoryId":2217,"CategoryName":"Renewal"},{"__type":"Nc:SimpleKB:Abstractions:Dtos:CategoryItemDto","ParentCategoryId":14,"TreatAsTopicYN":false,"Description":"","ImageUrl":"","ShortDesc":"","CategoryId":2218,"CategoryName":"cPanel SSL Plugin"},{"__type":"Nc:SimpleKB:Abstractions:Dtos:CategoryItemDto","ParentCategoryId":12,"TreatAsTopicYN":false,"Description":"","ImageUrl":"","ShortDesc":"","CategoryId":2219,"CategoryName":"PHP Configuration"},{"__type":"Nc:SimpleKB:Abstractions:Dtos:CategoryItemDto","ParentCategoryId":14,"TreatAsTopicYN":false,"Description":"","ImageUrl":"","ShortDesc":"","CategoryId":2221,"CategoryName":"Multi-Domain SSL Certificates"},{"__type":"Nc:SimpleKB:Abstractions:Dtos:CategoryItemDto","ParentCategoryId":14,"TreatAsTopicYN":false,"Description":"","ImageUrl":"","ShortDesc":"","CategoryId":2222,"CategoryName":"Cancellation"},{"__type":"Nc:SimpleKB:Abstractions:Dtos:CategoryItemDto","ParentCategoryId":14,"TreatAsTopicYN":false,"Description":"","ImageUrl":"","ShortDesc":"","CategoryId":2223,"CategoryName":"Browser errors"},{"__type":"Nc:SimpleKB:Abstractions:Dtos:CategoryItemDto","ParentCategoryId":14,"TreatAsTopicYN":false,"Description":"","ImageUrl":"","ShortDesc":"","CategoryId":2224,"CategoryName":"Site Seal, Logo"},{"__type":"Nc:SimpleKB:Abstractions:Dtos:CategoryItemDto","ParentCategoryId":12,"TreatAsTopicYN":false,"Description":"","ImageUrl":"","ShortDesc":"","CategoryId":2225,"CategoryName":"SEO"},{"__type":"Nc:SimpleKB:Abstractions:Dtos:CategoryItemDto","ParentCategoryId":93,"TreatAsTopicYN":false,"Description":"","ImageUrl":"","ShortDesc":"","CategoryId":2226,"CategoryName":"Email Migration"},{"__type":"Nc:SimpleKB:Abstractions:Dtos:CategoryItemDto","ParentCategoryId":2211,"TreatAsTopicYN":false,"Description":"","ImageUrl":"","ShortDesc":"","CategoryId":2227,"CategoryName":"SSL Resellers"},{"__type":"Nc:SimpleKB:Abstractions:Dtos:CategoryItemDto","ParentCategoryId":0,"TreatAsTopicYN":true,"Description":"","ImageUrl":"/assets/img/pictograms/150/cloud-red.png","ShortDesc":"","CategoryId":2228,"CategoryName":"Apps","SubCategories":[{"__type":"Nc:SimpleKB:Abstractions:Dtos:CategoryItemDto","ParentCategoryId":2228,"TreatAsTopicYN":false,"Description":"","ImageUrl":"","ShortDesc":"","CategoryId":2251,"CategoryName":"Supersonic CDN"},{"__type":"Nc:SimpleKB:Abstractions:Dtos:CategoryItemDto","ParentCategoryId":2228,"TreatAsTopicYN":false,"Description":"","ImageUrl":"","ShortDesc":"","CategoryId":2298,"CategoryName":"Site Maker"},{"__type":"Nc:SimpleKB:Abstractions:Dtos:CategoryItemDto","ParentCategoryId":2228,"TreatAsTopicYN":false,"Description":"","ImageUrl":"","ShortDesc":"","CategoryId":177,"CategoryName":"Google Workspace (formerly G Suite)"}]},{"__type":"Nc:SimpleKB:Abstractions:Dtos:CategoryItemDto","ParentCategoryId":2211,"TreatAsTopicYN":false,"Description":"","ImageUrl":"","ShortDesc":"","CategoryId":2229,"CategoryName":"Hosting Resellers"},{"__type":"Nc:SimpleKB:Abstractions:Dtos:CategoryItemDto","ParentCategoryId":34,"TreatAsTopicYN":false,"Description":"","ImageUrl":"","ShortDesc":"","CategoryId":2232,"CategoryName":"DNSSEC"},{"__type":"Nc:SimpleKB:Abstractions:Dtos:CategoryItemDto","ParentCategoryId":34,"TreatAsTopicYN":false,"Description":"","ImageUrl":"","ShortDesc":"","CategoryId":2234,"CategoryName":"Google Workspace (formerly G Suite)"},{"__type":"Nc:SimpleKB:Abstractions:Dtos:CategoryItemDto","ParentCategoryId":34,"TreatAsTopicYN":false,"Description":"","ImageUrl":"","ShortDesc":"","CategoryId":2237,"CategoryName":"Host records setup"},{"__type":"Nc:SimpleKB:Abstractions:Dtos:CategoryItemDto","ParentCategoryId":14,"TreatAsTopicYN":false,"Description":"","ImageUrl":"","ShortDesc":"","CategoryId":2238,"CategoryName":"SSL installation errors"},{"__type":"Nc:SimpleKB:Abstractions:Dtos:CategoryItemDto","ParentCategoryId":0,"TreatAsTopicYN":false,"Description":"","ImageUrl":"/assets/img/pictograms/150/easywp-red.png","ShortDesc":"","CategoryId":2239,"CategoryName":"EasyWP","SubCategories":[{"__type":"Nc:SimpleKB:Abstractions:Dtos:CategoryItemDto","ParentCategoryId":2239,"TreatAsTopicYN":false,"Description":"","ImageUrl":"","ShortDesc":"","CategoryId":2280,"CategoryName":"Getting Started"},{"__type":"Nc:SimpleKB:Abstractions:Dtos:CategoryItemDto","ParentCategoryId":2239,"TreatAsTopicYN":false,"Description":"","ImageUrl":"","ShortDesc":"","CategoryId":2279,"CategoryName":"General Information"},{"__type":"Nc:SimpleKB:Abstractions:Dtos:CategoryItemDto","ParentCategoryId":2239,"TreatAsTopicYN":false,"Description":"","ImageUrl":"","ShortDesc":"","CategoryId":2281,"CategoryName":"WordPress Migration"},{"__type":"Nc:SimpleKB:Abstractions:Dtos:CategoryItemDto","ParentCategoryId":2239,"TreatAsTopicYN":false,"Description":"","ImageUrl":"","ShortDesc":"","CategoryId":2282,"CategoryName":"Plugins and Themes"},{"__type":"Nc:SimpleKB:Abstractions:Dtos:CategoryItemDto","ParentCategoryId":2239,"TreatAsTopicYN":false,"Description":"","ImageUrl":"","ShortDesc":"","CategoryId":2284,"CategoryName":"WordPress Management"},{"__type":"Nc:SimpleKB:Abstractions:Dtos:CategoryItemDto","ParentCategoryId":2239,"TreatAsTopicYN":false,"Description":"","ImageUrl":"","ShortDesc":"","CategoryId":2285,"CategoryName":"SFTP and Database access"},{"__type":"Nc:SimpleKB:Abstractions:Dtos:CategoryItemDto","ParentCategoryId":2239,"TreatAsTopicYN":false,"Description":"","ImageUrl":"","ShortDesc":"","CategoryId":2286,"CategoryName":"Domains questions"},{"__type":"Nc:SimpleKB:Abstractions:Dtos:CategoryItemDto","ParentCategoryId":2239,"TreatAsTopicYN":false,"Description":"","ImageUrl":"","ShortDesc":"","CategoryId":2288,"CategoryName":"Billing questions"},{"__type":"Nc:SimpleKB:Abstractions:Dtos:CategoryItemDto","ParentCategoryId":2239,"TreatAsTopicYN":false,"Description":"","ImageUrl":"","ShortDesc":"","CategoryId":2287,"CategoryName":"SSL questions"}]},{"__type":"Nc:SimpleKB:Abstractions:Dtos:CategoryItemDto","ParentCategoryId":2228,"TreatAsTopicYN":false,"Description":"","ImageUrl":"","ShortDesc":"","CategoryId":2251,"CategoryName":"Supersonic CDN"},{"__type":"Nc:SimpleKB:Abstractions:Dtos:CategoryItemDto","ParentCategoryId":12,"TreatAsTopicYN":false,"Description":"","ImageUrl":"","ShortDesc":"","CategoryId":2252,"CategoryName":"InterWorx questions"},{"__type":"Nc:SimpleKB:Abstractions:Dtos:CategoryItemDto","ParentCategoryId":2253,"TreatAsTopicYN":false,"Description":"","ImageUrl":"","ShortDesc":"","CategoryId":2254,"CategoryName":"Domains How-To"},{"__type":"Nc:SimpleKB:Abstractions:Dtos:CategoryItemDto","ParentCategoryId":2253,"TreatAsTopicYN":false,"Description":"","ImageUrl":"","ShortDesc":"","CategoryId":2255,"CategoryName":"Hosting How-To"},{"__type":"Nc:SimpleKB:Abstractions:Dtos:CategoryItemDto","ParentCategoryId":2253,"TreatAsTopicYN":false,"Description":"","ImageUrl":"","ShortDesc":"","CategoryId":2257,"CategoryName":"Sales & Payments How-To"},{"__type":"Nc:SimpleKB:Abstractions:Dtos:CategoryItemDto","ParentCategoryId":2253,"TreatAsTopicYN":false,"Description":"","ImageUrl":"","ShortDesc":"","CategoryId":2258,"CategoryName":"cPanel Email How-To"},{"__type":"Nc:SimpleKB:Abstractions:Dtos:CategoryItemDto","ParentCategoryId":93,"TreatAsTopicYN":false,"Description":"","ImageUrl":"","ShortDesc":"","CategoryId":2260,"CategoryName":"Private Email Contacts and Calendars Setup"},{"__type":"Nc:SimpleKB:Abstractions:Dtos:CategoryItemDto","ParentCategoryId":2253,"TreatAsTopicYN":false,"Description":"","ImageUrl":"","ShortDesc":"","CategoryId":2262,"CategoryName":"EasyWP How-To"},{"__type":"Nc:SimpleKB:Abstractions:Dtos:CategoryItemDto","ParentCategoryId":0,"TreatAsTopicYN":false,"Description":"","ImageUrl":"https://download.namecheap.com/assets/img/domainvault-red@2x.png","ShortDesc":"","CategoryId":2289,"CategoryName":"Domain Vault","SubCategories":[]},{"__type":"Nc:SimpleKB:Abstractions:Dtos:CategoryItemDto","ParentCategoryId":14,"TreatAsTopicYN":false,"Description":"","ImageUrl":"","ShortDesc":"","CategoryId":2290,"CategoryName":"CSR code"},{"__type":"Nc:SimpleKB:Abstractions:Dtos:CategoryItemDto","ParentCategoryId":12,"TreatAsTopicYN":false,"Description":"","ImageUrl":"","ShortDesc":"","CategoryId":2291,"CategoryName":"Webuzo questions"},{"__type":"Nc:SimpleKB:Abstractions:Dtos:CategoryItemDto","ParentCategoryId":2265,"TreatAsTopicYN":false,"Description":"","ImageUrl":"","ShortDesc":"","CategoryId":2292,"CategoryName":"Browser Extensions"},{"__type":"Nc:SimpleKB:Abstractions:Dtos:CategoryItemDto","ParentCategoryId":14,"TreatAsTopicYN":false,"Description":"","ImageUrl":"","ShortDesc":"","CategoryId":2293,"CategoryName":"Automated SSL management"},{"__type":"Nc:SimpleKB:Abstractions:Dtos:CategoryItemDto","ParentCategoryId":2228,"TreatAsTopicYN":false,"Description":"","ImageUrl":"","ShortDesc":"","CategoryId":2298,"CategoryName":"Site Maker"},{"__type":"Nc:SimpleKB:Abstractions:Dtos:CategoryItemDto","ParentCategoryId":12,"TreatAsTopicYN":false,"Description":"","ImageUrl":"","ShortDesc":"","CategoryId":27,"CategoryName":"Getting Started"},{"__type":"Nc:SimpleKB:Abstractions:Dtos:CategoryItemDto","ParentCategoryId":0,"TreatAsTopicYN":false,"Description":"","ImageUrl":"/assets/img/pictograms/150/support-red.png","ShortDesc":"","CategoryId":5,"CategoryName":"General & Support","SubCategories":[]},{"__type":"Nc:SimpleKB:Abstractions:Dtos:CategoryItemDto","ParentCategoryId":2200,"TreatAsTopicYN":false,"Description":"","ImageUrl":"","ShortDesc":"","CategoryId":7,"CategoryName":"Billing FAQ"},{"__type":"Nc:SimpleKB:Abstractions:Dtos:CategoryItemDto","ParentCategoryId":2209,"TreatAsTopicYN":false,"Description":"","ImageUrl":"","ShortDesc":"","CategoryId":8,"CategoryName":"Transfer Information"},{"__type":"Nc:SimpleKB:Abstractions:Dtos:CategoryItemDto","ParentCategoryId":12,"TreatAsTopicYN":false,"Description":"","ImageUrl":"","ShortDesc":"","CategoryId":22,"CategoryName":"Hosting Information"},{"__type":"Nc:SimpleKB:Abstractions:Dtos:CategoryItemDto","ParentCategoryId":14,"TreatAsTopicYN":false,"Description":"","ImageUrl":"","ShortDesc":"","CategoryId":38,"CategoryName":"SSL General"},{"__type":"Nc:SimpleKB:Abstractions:Dtos:CategoryItemDto","ParentCategoryId":9,"TreatAsTopicYN":false,"Description":"","ImageUrl":"","ShortDesc":"","CategoryId":45,"CategoryName":"Account Security"},{"__type":"Nc:SimpleKB:Abstractions:Dtos:CategoryItemDto","ParentCategoryId":34,"TreatAsTopicYN":false,"Description":"","ImageUrl":"","ShortDesc":"","CategoryId":46,"CategoryName":"Domain Management"},{"__type":"Nc:SimpleKB:Abstractions:Dtos:CategoryItemDto","ParentCategoryId":2211,"TreatAsTopicYN":false,"Description":"","ImageUrl":"","ShortDesc":"","CategoryId":63,"CategoryName":"Namecheap API"},{"__type":"Nc:SimpleKB:Abstractions:Dtos:CategoryItemDto","ParentCategoryId":2228,"TreatAsTopicYN":false,"Description":"","ImageUrl":"","ShortDesc":"","CategoryId":177,"CategoryName":"Google Workspace (formerly G Suite)"},{"__type":"Nc:SimpleKB:Abstractions:Dtos:CategoryItemDto","ParentCategoryId":93,"TreatAsTopicYN":false,"Description":"","ImageUrl":"","ShortDesc":"","CategoryId":2179,"CategoryName":"Private Email: General Information"},{"__type":"Nc:SimpleKB:Abstractions:Dtos:CategoryItemDto","ParentCategoryId":2265,"TreatAsTopicYN":false,"Description":"","ImageUrl":"","ShortDesc":"","CategoryId":2274,"CategoryName":"General"},{"__type":"Nc:SimpleKB:Abstractions:Dtos:CategoryItemDto","ParentCategoryId":2239,"TreatAsTopicYN":false,"Description":"","ImageUrl":"","ShortDesc":"","CategoryId":2280,"CategoryName":"Getting Started"},{"__type":"Nc:SimpleKB:Abstractions:Dtos:CategoryItemDto","ParentCategoryId":2239,"TreatAsTopicYN":false,"Description":"","ImageUrl":"","ShortDesc":"","CategoryId":2279,"CategoryName":"General Information"},{"__type":"Nc:SimpleKB:Abstractions:Dtos:CategoryItemDto","ParentCategoryId":93,"TreatAsTopicYN":false,"Description":"","ImageUrl":"","ShortDesc":"","CategoryId":2215,"CategoryName":"Private Email: Mailbox Management"},{"__type":"Nc:SimpleKB:Abstractions:Dtos:CategoryItemDto","ParentCategoryId":2211,"TreatAsTopicYN":false,"Description":"","ImageUrl":"","ShortDesc":"","CategoryId":2196,"CategoryName":"WHMCS module for SSL"},{"__type":"Nc:SimpleKB:Abstractions:Dtos:CategoryItemDto","ParentCategoryId":0,"TreatAsTopicYN":false,"Description":"","ImageUrl":"/assets/img/pictograms/150/savings-red.png","ShortDesc":"","CategoryId":2200,"CategoryName":"Checkout & Billing","SubCategories":[{"__type":"Nc:SimpleKB:Abstractions:Dtos:CategoryItemDto","ParentCategoryId":2200,"TreatAsTopicYN":false,"Description":"","ImageUrl":"","ShortDesc":"","CategoryId":7,"CategoryName":"Billing FAQ"},{"__type":"Nc:SimpleKB:Abstractions:Dtos:CategoryItemDto","ParentCategoryId":2200,"TreatAsTopicYN":false,"Description":"","ImageUrl":"","ShortDesc":"","CategoryId":2201,"CategoryName":"Domains Billing"},{"__type":"Nc:SimpleKB:Abstractions:Dtos:CategoryItemDto","ParentCategoryId":2200,"TreatAsTopicYN":false,"Description":"","ImageUrl":"","ShortDesc":"","CategoryId":21,"CategoryName":"Hosting Billing"},{"__type":"Nc:SimpleKB:Abstractions:Dtos:CategoryItemDto","ParentCategoryId":2200,"TreatAsTopicYN":false,"Description":"","ImageUrl":"","ShortDesc":"","CategoryId":71,"CategoryName":"SSL Certificates Billing"},{"__type":"Nc:SimpleKB:Abstractions:Dtos:CategoryItemDto","ParentCategoryId":2200,"TreatAsTopicYN":false,"Description":"","ImageUrl":"","ShortDesc":"","CategoryId":2177,"CategoryName":"Private Email"}]},{"__type":"Nc:SimpleKB:Abstractions:Dtos:CategoryItemDto","ParentCategoryId":2200,"TreatAsTopicYN":false,"Description":"","ImageUrl":"","ShortDesc":"","CategoryId":2201,"CategoryName":"Domains Billing"},{"__type":"Nc:SimpleKB:Abstractions:Dtos:CategoryItemDto","ParentCategoryId":14,"TreatAsTopicYN":false,"Description":"","ImageUrl":"","ShortDesc":"","CategoryId":67,"CategoryName":"Activation"},{"__type":"Nc:SimpleKB:Abstractions:Dtos:CategoryItemDto","ParentCategoryId":2209,"TreatAsTopicYN":false,"Description":"","ImageUrl":"","ShortDesc":"","CategoryId":83,"CategoryName":"Transfer to Namecheap"},{"__type":"Nc:SimpleKB:Abstractions:Dtos:CategoryItemDto","ParentCategoryId":9,"TreatAsTopicYN":false,"Description":"","ImageUrl":"","ShortDesc":"","CategoryId":43,"CategoryName":"Profile Management"},{"__type":"Nc:SimpleKB:Abstractions:Dtos:CategoryItemDto","ParentCategoryId":34,"TreatAsTopicYN":false,"Description":"","ImageUrl":"","ShortDesc":"","CategoryId":10,"CategoryName":"DNS Questions"},{"__type":"Nc:SimpleKB:Abstractions:Dtos:CategoryItemDto","ParentCategoryId":12,"TreatAsTopicYN":false,"Description":"","ImageUrl":"","ShortDesc":"","CategoryId":29,"CategoryName":"cPanel questions"},{"__type":"Nc:SimpleKB:Abstractions:Dtos:CategoryItemDto","ParentCategoryId":2200,"TreatAsTopicYN":false,"Description":"","ImageUrl":"","ShortDesc":"","CategoryId":21,"CategoryName":"Hosting Billing"},{"__type":"Nc:SimpleKB:Abstractions:Dtos:CategoryItemDto","ParentCategoryId":34,"TreatAsTopicYN":false,"Description":"","ImageUrl":"","ShortDesc":"","CategoryId":11,"CategoryName":"Dynamic DNS"},{"__type":"Nc:SimpleKB:Abstractions:Dtos:CategoryItemDto","ParentCategoryId":9,"TreatAsTopicYN":false,"Description":"","ImageUrl":"","ShortDesc":"","CategoryId":44,"CategoryName":"Account Access"},{"__type":"Nc:SimpleKB:Abstractions:Dtos:CategoryItemDto","ParentCategoryId":2209,"TreatAsTopicYN":false,"Description":"","ImageUrl":"","ShortDesc":"","CategoryId":84,"CategoryName":"Transfer to another provider"},{"__type":"Nc:SimpleKB:Abstractions:Dtos:CategoryItemDto","ParentCategoryId":14,"TreatAsTopicYN":false,"Description":"","ImageUrl":"","ShortDesc":"","CategoryId":68,"CategoryName":"Validation"},{"__type":"Nc:SimpleKB:Abstractions:Dtos:CategoryItemDto","ParentCategoryId":12,"TreatAsTopicYN":false,"Description":"","ImageUrl":"","ShortDesc":"","CategoryId":2182,"CategoryName":"cPanel: Software Management"},{"__type":"Nc:SimpleKB:Abstractions:Dtos:CategoryItemDto","ParentCategoryId":93,"TreatAsTopicYN":false,"Description":"","ImageUrl":"","ShortDesc":"","CategoryId":2214,"CategoryName":"Email Forwarding"},{"__type":"Nc:SimpleKB:Abstractions:Dtos:CategoryItemDto","ParentCategoryId":2265,"TreatAsTopicYN":false,"Description":"","ImageUrl":"","ShortDesc":"","CategoryId":2270,"CategoryName":"Routers"},{"__type":"Nc:SimpleKB:Abstractions:Dtos:CategoryItemDto","ParentCategoryId":2239,"TreatAsTopicYN":false,"Description":"","ImageUrl":"","ShortDesc":"","CategoryId":2281,"CategoryName":"WordPress Migration"},{"__type":"Nc:SimpleKB:Abstractions:Dtos:CategoryItemDto","ParentCategoryId":2239,"TreatAsTopicYN":false,"Description":"","ImageUrl":"","ShortDesc":"","CategoryId":2282,"CategoryName":"Plugins and Themes"},{"__type":"Nc:SimpleKB:Abstractions:Dtos:CategoryItemDto","ParentCategoryId":2265,"TreatAsTopicYN":false,"Description":"","ImageUrl":"","ShortDesc":"","CategoryId":2272,"CategoryName":"TV"},{"__type":"Nc:SimpleKB:Abstractions:Dtos:CategoryItemDto","ParentCategoryId":12,"TreatAsTopicYN":false,"Description":"","ImageUrl":"","ShortDesc":"","CategoryId":2187,"CategoryName":"cPanel: WordPress"},{"__type":"Nc:SimpleKB:Abstractions:Dtos:CategoryItemDto","ParentCategoryId":2209,"TreatAsTopicYN":false,"Description":"","ImageUrl":"","ShortDesc":"","CategoryId":219,"CategoryName":"Canceled Transfers"},{"__type":"Nc:SimpleKB:Abstractions:Dtos:CategoryItemDto","ParentCategoryId":2200,"TreatAsTopicYN":false,"Description":"","ImageUrl":"","ShortDesc":"","CategoryId":71,"CategoryName":"SSL Certificates Billing"},{"__type":"Nc:SimpleKB:Abstractions:Dtos:CategoryItemDto","ParentCategoryId":93,"TreatAsTopicYN":false,"Description":"","ImageUrl":"","ShortDesc":"","CategoryId":2176,"CategoryName":"Private Email: DNS Settings"},{"__type":"Nc:SimpleKB:Abstractions:Dtos:CategoryItemDto","ParentCategoryId":14,"TreatAsTopicYN":false,"Description":"","ImageUrl":"","ShortDesc":"","CategoryId":69,"CategoryName":"Installation"},{"__type":"Nc:SimpleKB:Abstractions:Dtos:CategoryItemDto","ParentCategoryId":0,"TreatAsTopicYN":false,"Description":"","ImageUrl":"/assets/img/pictograms/150/reseller-red.png","ShortDesc":"","CategoryId":34,"CategoryName":"Domains","SubCategories":[{"__type":"Nc:SimpleKB:Abstractions:Dtos:CategoryItemDto","ParentCategoryId":34,"TreatAsTopicYN":false,"Description":"","ImageUrl":"","ShortDesc":"","CategoryId":2232,"CategoryName":"DNSSEC"},{"__type":"Nc:SimpleKB:Abstractions:Dtos:CategoryItemDto","ParentCategoryId":34,"TreatAsTopicYN":false,"Description":"","ImageUrl":"","ShortDesc":"","CategoryId":2234,"CategoryName":"Google Workspace (formerly G Suite)"},{"__type":"Nc:SimpleKB:Abstractions:Dtos:CategoryItemDto","ParentCategoryId":34,"TreatAsTopicYN":false,"Description":"","ImageUrl":"","ShortDesc":"","CategoryId":2237,"CategoryName":"Host records setup"},{"__type":"Nc:SimpleKB:Abstractions:Dtos:CategoryItemDto","ParentCategoryId":34,"TreatAsTopicYN":false,"Description":"","ImageUrl":"","ShortDesc":"","CategoryId":46,"CategoryName":"Domain Management"},{"__type":"Nc:SimpleKB:Abstractions:Dtos:CategoryItemDto","ParentCategoryId":34,"TreatAsTopicYN":false,"Description":"","ImageUrl":"","ShortDesc":"","CategoryId":10,"CategoryName":"DNS Questions"},{"__type":"Nc:SimpleKB:Abstractions:Dtos:CategoryItemDto","ParentCategoryId":34,"TreatAsTopicYN":false,"Description":"","ImageUrl":"","ShortDesc":"","CategoryId":11,"CategoryName":"Dynamic DNS"},{"__type":"Nc:SimpleKB:Abstractions:Dtos:CategoryItemDto","ParentCategoryId":34,"TreatAsTopicYN":false,"Description":"","ImageUrl":"","ShortDesc":"","CategoryId":35,"CategoryName":"Registrations"},{"__type":"Nc:SimpleKB:Abstractions:Dtos:CategoryItemDto","ParentCategoryId":34,"TreatAsTopicYN":false,"Description":"","ImageUrl":"","ShortDesc":"","CategoryId":2207,"CategoryName":"Renewal questions"},{"__type":"Nc:SimpleKB:Abstractions:Dtos:CategoryItemDto","ParentCategoryId":34,"TreatAsTopicYN":false,"Description":"","ImageUrl":"","ShortDesc":"","CategoryId":36,"CategoryName":"Domains with extended attributes"},{"__type":"Nc:SimpleKB:Abstractions:Dtos:CategoryItemDto","ParentCategoryId":34,"TreatAsTopicYN":false,"Description":"","ImageUrl":"","ShortDesc":"","CategoryId":51,"CategoryName":"FreeDNS"},{"__type":"Nc:SimpleKB:Abstractions:Dtos:CategoryItemDto","ParentCategoryId":34,"TreatAsTopicYN":false,"Description":"","ImageUrl":"","ShortDesc":"","CategoryId":15,"CategoryName":"Namecheap Market"},{"__type":"Nc:SimpleKB:Abstractions:Dtos:CategoryItemDto","ParentCategoryId":34,"TreatAsTopicYN":false,"Description":"","ImageUrl":"","ShortDesc":"","CategoryId":2208,"CategoryName":"3rd Party Services Setup"},{"__type":"Nc:SimpleKB:Abstractions:Dtos:CategoryItemDto","ParentCategoryId":34,"TreatAsTopicYN":false,"Description":"","ImageUrl":"","ShortDesc":"","CategoryId":2278,"CategoryName":"Handshake TLDs"}]},{"__type":"Nc:SimpleKB:Abstractions:Dtos:CategoryItemDto","ParentCategoryId":34,"TreatAsTopicYN":false,"Description":"","ImageUrl":"","ShortDesc":"","CategoryId":35,"CategoryName":"Registrations"},{"__type":"Nc:SimpleKB:Abstractions:Dtos:CategoryItemDto","ParentCategoryId":14,"TreatAsTopicYN":false,"Description":"","ImageUrl":"","ShortDesc":"","CategoryId":70,"CategoryName":"Reissuance"},{"__type":"Nc:SimpleKB:Abstractions:Dtos:CategoryItemDto","ParentCategoryId":0,"TreatAsTopicYN":false,"Description":"","ImageUrl":"/assets/img/pictograms/150/protection-red.png","ShortDesc":"","CategoryId":37,"CategoryName":"Domain Privacy Protection","SubCategories":[]},{"__type":"Nc:SimpleKB:Abstractions:Dtos:CategoryItemDto","ParentCategoryId":2200,"TreatAsTopicYN":false,"Description":"","ImageUrl":"","ShortDesc":"","CategoryId":2177,"CategoryName":"Private Email"},{"__type":"Nc:SimpleKB:Abstractions:Dtos:CategoryItemDto","ParentCategoryId":93,"TreatAsTopicYN":false,"Description":"","ImageUrl":"","ShortDesc":"","CategoryId":2178,"CategoryName":"Private Email: Webmail Features"},{"__type":"Nc:SimpleKB:Abstractions:Dtos:CategoryItemDto","ParentCategoryId":34,"TreatAsTopicYN":false,"Description":"","ImageUrl":"","ShortDesc":"","CategoryId":2207,"CategoryName":"Renewal questions"},{"__type":"Nc:SimpleKB:Abstractions:Dtos:CategoryItemDto","ParentCategoryId":12,"TreatAsTopicYN":false,"Description":"","ImageUrl":"","ShortDesc":"","CategoryId":2210,"CategoryName":"cPanel Add-ons"},{"__type":"Nc:SimpleKB:Abstractions:Dtos:CategoryItemDto","ParentCategoryId":2265,"TreatAsTopicYN":false,"Description":"","ImageUrl":"","ShortDesc":"","CategoryId":2273,"CategoryName":"Gaming Consoles"},{"__type":"Nc:SimpleKB:Abstractions:Dtos:CategoryItemDto","ParentCategoryId":2239,"TreatAsTopicYN":false,"Description":"","ImageUrl":"","ShortDesc":"","CategoryId":2284,"CategoryName":"WordPress Management"},{"__type":"Nc:SimpleKB:Abstractions:Dtos:CategoryItemDto","ParentCategoryId":2239,"TreatAsTopicYN":false,"Description":"","ImageUrl":"","ShortDesc":"","CategoryId":2285,"CategoryName":"SFTP and Database access"},{"__type":"Nc:SimpleKB:Abstractions:Dtos:CategoryItemDto","ParentCategoryId":2265,"TreatAsTopicYN":false,"Description":"","ImageUrl":"","ShortDesc":"","CategoryId":2268,"CategoryName":"macOS"},{"__type":"Nc:SimpleKB:Abstractions:Dtos:CategoryItemDto","ParentCategoryId":93,"TreatAsTopicYN":false,"Description":"","ImageUrl":"","ShortDesc":"","CategoryId":2175,"CategoryName":"Private Email: Client Setup"},{"__type":"Nc:SimpleKB:Abstractions:Dtos:CategoryItemDto","ParentCategoryId":0,"TreatAsTopicYN":false,"Description":"","ImageUrl":"/assets/img/pictograms/150/status-red.png","ShortDesc":"","CategoryId":2209,"CategoryName":"Domain Transfers","SubCategories":[{"__type":"Nc:SimpleKB:Abstractions:Dtos:CategoryItemDto","ParentCategoryId":2209,"TreatAsTopicYN":false,"Description":"","ImageUrl":"","ShortDesc":"","CategoryId":8,"CategoryName":"Transfer Information"},{"__type":"Nc:SimpleKB:Abstractions:Dtos:CategoryItemDto","ParentCategoryId":2209,"TreatAsTopicYN":false,"Description":"","ImageUrl":"","ShortDesc":"","CategoryId":83,"CategoryName":"Transfer to Namecheap"},{"__type":"Nc:SimpleKB:Abstractions:Dtos:CategoryItemDto","ParentCategoryId":2209,"TreatAsTopicYN":false,"Description":"","ImageUrl":"","ShortDesc":"","CategoryId":84,"CategoryName":"Transfer to another provider"},{"__type":"Nc:SimpleKB:Abstractions:Dtos:CategoryItemDto","ParentCategoryId":2209,"TreatAsTopicYN":false,"Description":"","ImageUrl":"","ShortDesc":"","CategoryId":219,"CategoryName":"Canceled Transfers"}]},{"__type":"Nc:SimpleKB:Abstractions:Dtos:CategoryItemDto","ParentCategoryId":12,"TreatAsTopicYN":false,"Description":"","ImageUrl":"","ShortDesc":"","CategoryId":48,"CategoryName":"VPS"},{"__type":"Nc:SimpleKB:Abstractions:Dtos:CategoryItemDto","ParentCategoryId":34,"TreatAsTopicYN":false,"Description":"","ImageUrl":"","ShortDesc":"","CategoryId":36,"CategoryName":"Domains with extended attributes"},{"__type":"Nc:SimpleKB:Abstractions:Dtos:CategoryItemDto","ParentCategoryId":0,"TreatAsTopicYN":true,"Description":"","ImageUrl":"/assets/img/pictograms/150/server-red.png","ShortDesc":"","CategoryId":12,"CategoryName":"Hosting","SubCategories":[{"__type":"Nc:SimpleKB:Abstractions:Dtos:CategoryItemDto","ParentCategoryId":12,"TreatAsTopicYN":false,"Description":"","ImageUrl":"","ShortDesc":"","CategoryId":2219,"CategoryName":"PHP Configuration"},{"__type":"Nc:SimpleKB:Abstractions:Dtos:CategoryItemDto","ParentCategoryId":12,"TreatAsTopicYN":false,"Description":"","ImageUrl":"","ShortDesc":"","CategoryId":2225,"CategoryName":"SEO"},{"__type":"Nc:SimpleKB:Abstractions:Dtos:CategoryItemDto","ParentCategoryId":12,"TreatAsTopicYN":false,"Description":"","ImageUrl":"","ShortDesc":"","CategoryId":2252,"CategoryName":"InterWorx questions"},{"__type":"Nc:SimpleKB:Abstractions:Dtos:CategoryItemDto","ParentCategoryId":12,"TreatAsTopicYN":false,"Description":"","ImageUrl":"","ShortDesc":"","CategoryId":2291,"CategoryName":"Webuzo questions"},{"__type":"Nc:SimpleKB:Abstractions:Dtos:CategoryItemDto","ParentCategoryId":12,"TreatAsTopicYN":false,"Description":"","ImageUrl":"","ShortDesc":"","CategoryId":27,"CategoryName":"Getting Started"},{"__type":"Nc:SimpleKB:Abstractions:Dtos:CategoryItemDto","ParentCategoryId":12,"TreatAsTopicYN":false,"Description":"","ImageUrl":"","ShortDesc":"","CategoryId":22,"CategoryName":"Hosting Information"},{"__type":"Nc:SimpleKB:Abstractions:Dtos:CategoryItemDto","ParentCategoryId":12,"TreatAsTopicYN":false,"Description":"","ImageUrl":"","ShortDesc":"","CategoryId":29,"CategoryName":"cPanel questions"},{"__type":"Nc:SimpleKB:Abstractions:Dtos:CategoryItemDto","ParentCategoryId":12,"TreatAsTopicYN":false,"Description":"","ImageUrl":"","ShortDesc":"","CategoryId":2182,"CategoryName":"cPanel: Software Management"},{"__type":"Nc:SimpleKB:Abstractions:Dtos:CategoryItemDto","ParentCategoryId":12,"TreatAsTopicYN":false,"Description":"","ImageUrl":"","ShortDesc":"","CategoryId":2187,"CategoryName":"cPanel: WordPress"},{"__type":"Nc:SimpleKB:Abstractions:Dtos:CategoryItemDto","ParentCategoryId":12,"TreatAsTopicYN":false,"Description":"","ImageUrl":"","ShortDesc":"","CategoryId":2210,"CategoryName":"cPanel Add-ons"},{"__type":"Nc:SimpleKB:Abstractions:Dtos:CategoryItemDto","ParentCategoryId":12,"TreatAsTopicYN":false,"Description":"","ImageUrl":"","ShortDesc":"","CategoryId":48,"CategoryName":"VPS"},{"__type":"Nc:SimpleKB:Abstractions:Dtos:CategoryItemDto","ParentCategoryId":12,"TreatAsTopicYN":false,"Description":"","ImageUrl":"","ShortDesc":"","CategoryId":2188,"CategoryName":"Dedicated Server"},{"__type":"Nc:SimpleKB:Abstractions:Dtos:CategoryItemDto","ParentCategoryId":12,"TreatAsTopicYN":false,"Description":"","ImageUrl":"","ShortDesc":"","CategoryId":30,"CategoryName":"WHM questions"},{"__type":"Nc:SimpleKB:Abstractions:Dtos:CategoryItemDto","ParentCategoryId":12,"TreatAsTopicYN":false,"Description":"","ImageUrl":"","ShortDesc":"","CategoryId":32,"CategoryName":"DNS settings"},{"__type":"Nc:SimpleKB:Abstractions:Dtos:CategoryItemDto","ParentCategoryId":12,"TreatAsTopicYN":false,"Description":"","ImageUrl":"","ShortDesc":"","CategoryId":103,"CategoryName":"LVE (CloudLinux)"},{"__type":"Nc:SimpleKB:Abstractions:Dtos:CategoryItemDto","ParentCategoryId":12,"TreatAsTopicYN":false,"Description":"","ImageUrl":"","ShortDesc":"","CategoryId":89,"CategoryName":"SSH Access"},{"__type":"Nc:SimpleKB:Abstractions:Dtos:CategoryItemDto","ParentCategoryId":12,"TreatAsTopicYN":false,"Description":"","ImageUrl":"","ShortDesc":"","CategoryId":205,"CategoryName":"FTP questions"},{"__type":"Nc:SimpleKB:Abstractions:Dtos:CategoryItemDto","ParentCategoryId":12,"TreatAsTopicYN":false,"Description":"","ImageUrl":"","ShortDesc":"","CategoryId":2180,"CategoryName":"MySQL questions"},{"__type":"Nc:SimpleKB:Abstractions:Dtos:CategoryItemDto","ParentCategoryId":12,"TreatAsTopicYN":false,"Description":"","ImageUrl":"","ShortDesc":"","CategoryId":2199,"CategoryName":"Hosting Migration"},{"__type":"Nc:SimpleKB:Abstractions:Dtos:CategoryItemDto","ParentCategoryId":12,"TreatAsTopicYN":false,"Description":"","ImageUrl":"","ShortDesc":"","CategoryId":2194,"CategoryName":"Tips & Tricks"},{"__type":"Nc:SimpleKB:Abstractions:Dtos:CategoryItemDto","ParentCategoryId":12,"TreatAsTopicYN":false,"Description":"","ImageUrl":"","ShortDesc":"","CategoryId":239,"CategoryName":"WHMCS"},{"__type":"Nc:SimpleKB:Abstractions:Dtos:CategoryItemDto","ParentCategoryId":12,"TreatAsTopicYN":false,"Description":"","ImageUrl":"","ShortDesc":"","CategoryId":33,"CategoryName":"SSL Installation"}]},{"__type":"Nc:SimpleKB:Abstractions:Dtos:CategoryItemDto","ParentCategoryId":93,"TreatAsTopicYN":false,"Description":"","ImageUrl":"","ShortDesc":"","CategoryId":2171,"CategoryName":"Private Email: Active Sync (Exchange) Setup"},{"__type":"Nc:SimpleKB:Abstractions:Dtos:CategoryItemDto","ParentCategoryId":12,"TreatAsTopicYN":false,"Description":"","ImageUrl":"","ShortDesc":"","CategoryId":2188,"CategoryName":"Dedicated Server"},{"__type":"Nc:SimpleKB:Abstractions:Dtos:CategoryItemDto","ParentCategoryId":2265,"TreatAsTopicYN":false,"Description":"","ImageUrl":"","ShortDesc":"","CategoryId":2269,"CategoryName":"iOS"},{"__type":"Nc:SimpleKB:Abstractions:Dtos:CategoryItemDto","ParentCategoryId":2239,"TreatAsTopicYN":false,"Description":"","ImageUrl":"","ShortDesc":"","CategoryId":2286,"CategoryName":"Domains questions"},{"__type":"Nc:SimpleKB:Abstractions:Dtos:CategoryItemDto","ParentCategoryId":2239,"TreatAsTopicYN":false,"Description":"","ImageUrl":"","ShortDesc":"","CategoryId":2288,"CategoryName":"Billing questions"},{"__type":"Nc:SimpleKB:Abstractions:Dtos:CategoryItemDto","ParentCategoryId":2265,"TreatAsTopicYN":false,"Description":"","ImageUrl":"","ShortDesc":"","CategoryId":2271,"CategoryName":"Linux"},{"__type":"Nc:SimpleKB:Abstractions:Dtos:CategoryItemDto","ParentCategoryId":12,"TreatAsTopicYN":false,"Description":"","ImageUrl":"","ShortDesc":"","CategoryId":30,"CategoryName":"WHM questions"},{"__type":"Nc:SimpleKB:Abstractions:Dtos:CategoryItemDto","ParentCategoryId":93,"TreatAsTopicYN":false,"Description":"","ImageUrl":"","ShortDesc":"","CategoryId":31,"CategoryName":"cPanel Email FAQs"},{"__type":"Nc:SimpleKB:Abstractions:Dtos:CategoryItemDto","ParentCategoryId":34,"TreatAsTopicYN":false,"Description":"","ImageUrl":"","ShortDesc":"","CategoryId":51,"CategoryName":"FreeDNS"},{"__type":"Nc:SimpleKB:Abstractions:Dtos:CategoryItemDto","ParentCategoryId":0,"TreatAsTopicYN":false,"Description":"","ImageUrl":"/assets/img/pictograms/150/email-red.png","ShortDesc":"","CategoryId":93,"CategoryName":"Email service","SubCategories":[{"__type":"Nc:SimpleKB:Abstractions:Dtos:CategoryItemDto","ParentCategoryId":93,"TreatAsTopicYN":false,"Description":"","ImageUrl":"","ShortDesc":"","CategoryId":2216,"CategoryName":"Spam Protection"},{"__type":"Nc:SimpleKB:Abstractions:Dtos:CategoryItemDto","ParentCategoryId":93,"TreatAsTopicYN":false,"Description":"","ImageUrl":"","ShortDesc":"","CategoryId":2226,"CategoryName":"Email Migration"},{"__type":"Nc:SimpleKB:Abstractions:Dtos:CategoryItemDto","ParentCategoryId":93,"TreatAsTopicYN":false,"Description":"","ImageUrl":"","ShortDesc":"","CategoryId":2260,"CategoryName":"Private Email Contacts and Calendars Setup"},{"__type":"Nc:SimpleKB:Abstractions:Dtos:CategoryItemDto","ParentCategoryId":93,"TreatAsTopicYN":false,"Description":"","ImageUrl":"","ShortDesc":"","CategoryId":2179,"CategoryName":"Private Email: General Information"},{"__type":"Nc:SimpleKB:Abstractions:Dtos:CategoryItemDto","ParentCategoryId":93,"TreatAsTopicYN":false,"Description":"","ImageUrl":"","ShortDesc":"","CategoryId":2215,"CategoryName":"Private Email: Mailbox Management"},{"__type":"Nc:SimpleKB:Abstractions:Dtos:CategoryItemDto","ParentCategoryId":93,"TreatAsTopicYN":false,"Description":"","ImageUrl":"","ShortDesc":"","CategoryId":2214,"CategoryName":"Email Forwarding"},{"__type":"Nc:SimpleKB:Abstractions:Dtos:CategoryItemDto","ParentCategoryId":93,"TreatAsTopicYN":false,"Description":"","ImageUrl":"","ShortDesc":"","CategoryId":2176,"CategoryName":"Private Email: DNS Settings"},{"__type":"Nc:SimpleKB:Abstractions:Dtos:CategoryItemDto","ParentCategoryId":93,"TreatAsTopicYN":false,"Description":"","ImageUrl":"","ShortDesc":"","CategoryId":2178,"CategoryName":"Private Email: Webmail Features"},{"__type":"Nc:SimpleKB:Abstractions:Dtos:CategoryItemDto","ParentCategoryId":93,"TreatAsTopicYN":false,"Description":"","ImageUrl":"","ShortDesc":"","CategoryId":2175,"CategoryName":"Private Email: Client Setup"},{"__type":"Nc:SimpleKB:Abstractions:Dtos:CategoryItemDto","ParentCategoryId":93,"TreatAsTopicYN":false,"Description":"","ImageUrl":"","ShortDesc":"","CategoryId":2171,"CategoryName":"Private Email: Active Sync (Exchange) Setup"},{"__type":"Nc:SimpleKB:Abstractions:Dtos:CategoryItemDto","ParentCategoryId":93,"TreatAsTopicYN":false,"Description":"","ImageUrl":"","ShortDesc":"","CategoryId":31,"CategoryName":"cPanel Email FAQs"},{"__type":"Nc:SimpleKB:Abstractions:Dtos:CategoryItemDto","ParentCategoryId":93,"TreatAsTopicYN":false,"Description":"","ImageUrl":"","ShortDesc":"","CategoryId":2186,"CategoryName":"cPanel Email: Client Setup"},{"__type":"Nc:SimpleKB:Abstractions:Dtos:CategoryItemDto","ParentCategoryId":93,"TreatAsTopicYN":false,"Description":"","ImageUrl":"","ShortDesc":"","CategoryId":2204,"CategoryName":"Private Email: Video Overview"}]},{"__type":"Nc:SimpleKB:Abstractions:Dtos:CategoryItemDto","ParentCategoryId":12,"TreatAsTopicYN":false,"Description":"","ImageUrl":"","ShortDesc":"","CategoryId":32,"CategoryName":"DNS settings"},{"__type":"Nc:SimpleKB:Abstractions:Dtos:CategoryItemDto","ParentCategoryId":34,"TreatAsTopicYN":false,"Description":"","ImageUrl":"","ShortDesc":"","CategoryId":15,"CategoryName":"Namecheap Market"},{"__type":"Nc:SimpleKB:Abstractions:Dtos:CategoryItemDto","ParentCategoryId":93,"TreatAsTopicYN":false,"Description":"","ImageUrl":"","ShortDesc":"","CategoryId":2186,"CategoryName":"cPanel Email: Client Setup"},{"__type":"Nc:SimpleKB:Abstractions:Dtos:CategoryItemDto","ParentCategoryId":2265,"TreatAsTopicYN":false,"Description":"","ImageUrl":"","ShortDesc":"","CategoryId":2266,"CategoryName":"Windows"},{"__type":"Nc:SimpleKB:Abstractions:Dtos:CategoryItemDto","ParentCategoryId":2239,"TreatAsTopicYN":false,"Description":"","ImageUrl":"","ShortDesc":"","CategoryId":2287,"CategoryName":"SSL questions"},{"__type":"Nc:SimpleKB:Abstractions:Dtos:CategoryItemDto","ParentCategoryId":2265,"TreatAsTopicYN":false,"Description":"","ImageUrl":"","ShortDesc":"","CategoryId":2267,"CategoryName":"Android"},{"__type":"Nc:SimpleKB:Abstractions:Dtos:CategoryItemDto","ParentCategoryId":34,"TreatAsTopicYN":false,"Description":"","ImageUrl":"","ShortDesc":"","CategoryId":2208,"CategoryName":"3rd Party Services Setup"},{"__type":"Nc:SimpleKB:Abstractions:Dtos:CategoryItemDto","ParentCategoryId":93,"TreatAsTopicYN":false,"Description":"","ImageUrl":"","ShortDesc":"","CategoryId":2204,"CategoryName":"Private Email: Video Overview"},{"__type":"Nc:SimpleKB:Abstractions:Dtos:CategoryItemDto","ParentCategoryId":0,"TreatAsTopicYN":false,"Description":"","ImageUrl":"/assets/img/pictograms/150/security-red.png","ShortDesc":"","CategoryId":14,"CategoryName":"SSL Certificates","SubCategories":[{"__type":"Nc:SimpleKB:Abstractions:Dtos:CategoryItemDto","ParentCategoryId":14,"TreatAsTopicYN":false,"Description":"","ImageUrl":"","ShortDesc":"","CategoryId":2217,"CategoryName":"Renewal"},{"__type":"Nc:SimpleKB:Abstractions:Dtos:CategoryItemDto","ParentCategoryId":14,"TreatAsTopicYN":false,"Description":"","ImageUrl":"","ShortDesc":"","CategoryId":2218,"CategoryName":"cPanel SSL Plugin"},{"__type":"Nc:SimpleKB:Abstractions:Dtos:CategoryItemDto","ParentCategoryId":14,"TreatAsTopicYN":false,"Description":"","ImageUrl":"","ShortDesc":"","CategoryId":2221,"CategoryName":"Multi-Domain SSL Certificates"},{"__type":"Nc:SimpleKB:Abstractions:Dtos:CategoryItemDto","ParentCategoryId":14,"TreatAsTopicYN":false,"Description":"","ImageUrl":"","ShortDesc":"","CategoryId":2222,"CategoryName":"Cancellation"},{"__type":"Nc:SimpleKB:Abstractions:Dtos:CategoryItemDto","ParentCategoryId":14,"TreatAsTopicYN":false,"Description":"","ImageUrl":"","ShortDesc":"","CategoryId":2223,"CategoryName":"Browser errors"},{"__type":"Nc:SimpleKB:Abstractions:Dtos:CategoryItemDto","ParentCategoryId":14,"TreatAsTopicYN":false,"Description":"","ImageUrl":"","ShortDesc":"","CategoryId":2224,"CategoryName":"Site Seal, Logo"},{"__type":"Nc:SimpleKB:Abstractions:Dtos:CategoryItemDto","ParentCategoryId":14,"TreatAsTopicYN":false,"Description":"","ImageUrl":"","ShortDesc":"","CategoryId":2238,"CategoryName":"SSL installation errors"},{"__type":"Nc:SimpleKB:Abstractions:Dtos:CategoryItemDto","ParentCategoryId":14,"TreatAsTopicYN":false,"Description":"","ImageUrl":"","ShortDesc":"","CategoryId":2290,"CategoryName":"CSR code"},{"__type":"Nc:SimpleKB:Abstractions:Dtos:CategoryItemDto","ParentCategoryId":14,"TreatAsTopicYN":false,"Description":"","ImageUrl":"","ShortDesc":"","CategoryId":2293,"CategoryName":"Automated SSL management"},{"__type":"Nc:SimpleKB:Abstractions:Dtos:CategoryItemDto","ParentCategoryId":14,"TreatAsTopicYN":false,"Description":"","ImageUrl":"","ShortDesc":"","CategoryId":38,"CategoryName":"SSL General"},{"__type":"Nc:SimpleKB:Abstractions:Dtos:CategoryItemDto","ParentCategoryId":14,"TreatAsTopicYN":false,"Description":"","ImageUrl":"","ShortDesc":"","CategoryId":67,"CategoryName":"Activation"},{"__type":"Nc:SimpleKB:Abstractions:Dtos:CategoryItemDto","ParentCategoryId":14,"TreatAsTopicYN":false,"Description":"","ImageUrl":"","ShortDesc":"","CategoryId":68,"CategoryName":"Validation"},{"__type":"Nc:SimpleKB:Abstractions:Dtos:CategoryItemDto","ParentCategoryId":14,"TreatAsTopicYN":false,"Description":"","ImageUrl":"","ShortDesc":"","CategoryId":69,"CategoryName":"Installation"},{"__type":"Nc:SimpleKB:Abstractions:Dtos:CategoryItemDto","ParentCategoryId":14,"TreatAsTopicYN":false,"Description":"","ImageUrl":"","ShortDesc":"","CategoryId":70,"CategoryName":"Reissuance"}]},{"__type":"Nc:SimpleKB:Abstractions:Dtos:CategoryItemDto","ParentCategoryId":0,"TreatAsTopicYN":true,"Description":"","ImageUrl":"/assets/img/pictograms/150/performance-red.png","ShortDesc":"","CategoryId":9,"CategoryName":"My Account","SubCategories":[{"__type":"Nc:SimpleKB:Abstractions:Dtos:CategoryItemDto","ParentCategoryId":9,"TreatAsTopicYN":false,"Description":"","ImageUrl":"","ShortDesc":"","CategoryId":45,"CategoryName":"Account Security"},{"__type":"Nc:SimpleKB:Abstractions:Dtos:CategoryItemDto","ParentCategoryId":9,"TreatAsTopicYN":false,"Description":"","ImageUrl":"","ShortDesc":"","CategoryId":43,"CategoryName":"Profile Management"},{"__type":"Nc:SimpleKB:Abstractions:Dtos:CategoryItemDto","ParentCategoryId":9,"TreatAsTopicYN":false,"Description":"","ImageUrl":"","ShortDesc":"","CategoryId":44,"CategoryName":"Account Access"}]},{"__type":"Nc:SimpleKB:Abstractions:Dtos:CategoryItemDto","ParentCategoryId":34,"TreatAsTopicYN":false,"Description":"","ImageUrl":"","ShortDesc":"","CategoryId":2278,"CategoryName":"Handshake TLDs"},{"__type":"Nc:SimpleKB:Abstractions:Dtos:CategoryItemDto","ParentCategoryId":12,"TreatAsTopicYN":false,"Description":"","ImageUrl":"","ShortDesc":"","CategoryId":103,"CategoryName":"LVE (CloudLinux)"},{"__type":"Nc:SimpleKB:Abstractions:Dtos:CategoryItemDto","ParentCategoryId":0,"TreatAsTopicYN":false,"Description":"","ImageUrl":"/assets/img/pictograms/150/affiliates-red.png","ShortDesc":"","CategoryId":55,"CategoryName":"Affiliates","SubCategories":[]},{"__type":"Nc:SimpleKB:Abstractions:Dtos:CategoryItemDto","ParentCategoryId":12,"TreatAsTopicYN":false,"Description":"","ImageUrl":"","ShortDesc":"","CategoryId":89,"CategoryName":"SSH Access"},{"__type":"Nc:SimpleKB:Abstractions:Dtos:CategoryItemDto","ParentCategoryId":0,"TreatAsTopicYN":false,"Description":"","ImageUrl":"/assets/img/pictograms/150/tools-red.png","ShortDesc":"","CategoryId":2211,"CategoryName":"API & Resellers","SubCategories":[{"__type":"Nc:SimpleKB:Abstractions:Dtos:CategoryItemDto","ParentCategoryId":2211,"TreatAsTopicYN":false,"Description":"","ImageUrl":"","ShortDesc":"","CategoryId":2227,"CategoryName":"SSL Resellers"},{"__type":"Nc:SimpleKB:Abstractions:Dtos:CategoryItemDto","ParentCategoryId":2211,"TreatAsTopicYN":false,"Description":"","ImageUrl":"","ShortDesc":"","CategoryId":2229,"CategoryName":"Hosting Resellers"},{"__type":"Nc:SimpleKB:Abstractions:Dtos:CategoryItemDto","ParentCategoryId":2211,"TreatAsTopicYN":false,"Description":"","ImageUrl":"","ShortDesc":"","CategoryId":63,"CategoryName":"Namecheap API"},{"__type":"Nc:SimpleKB:Abstractions:Dtos:CategoryItemDto","ParentCategoryId":2211,"TreatAsTopicYN":false,"Description":"","ImageUrl":"","ShortDesc":"","CategoryId":2196,"CategoryName":"WHMCS module for SSL"}]},{"__type":"Nc:SimpleKB:Abstractions:Dtos:CategoryItemDto","ParentCategoryId":0,"TreatAsTopicYN":false,"Description":"","ImageUrl":"/assets/img/pictograms/150/timer-red.png","ShortDesc":"","CategoryId":2212,"CategoryName":"Legacy Products","SubCategories":[]},{"__type":"Nc:SimpleKB:Abstractions:Dtos:CategoryItemDto","ParentCategoryId":12,"TreatAsTopicYN":false,"Description":"","ImageUrl":"","ShortDesc":"","CategoryId":205,"CategoryName":"FTP questions"},{"__type":"Nc:SimpleKB:Abstractions:Dtos:CategoryItemDto","ParentCategoryId":12,"TreatAsTopicYN":false,"Description":"","ImageUrl":"","ShortDesc":"","CategoryId":2180,"CategoryName":"MySQL questions"},{"__type":"Nc:SimpleKB:Abstractions:Dtos:CategoryItemDto","ParentCategoryId":12,"TreatAsTopicYN":false,"Description":"","ImageUrl":"","ShortDesc":"","CategoryId":2199,"CategoryName":"Hosting Migration"},{"__type":"Nc:SimpleKB:Abstractions:Dtos:CategoryItemDto","ParentCategoryId":0,"TreatAsTopicYN":false,"Description":"","ImageUrl":"/assets/img/pictograms/150/premiumdns-red.png","ShortDesc":"","CategoryId":2231,"CategoryName":"PremiumDNS","SubCategories":[]},{"__type":"Nc:SimpleKB:Abstractions:Dtos:CategoryItemDto","ParentCategoryId":12,"TreatAsTopicYN":false,"Description":"","ImageUrl":"","ShortDesc":"","CategoryId":2194,"CategoryName":"Tips & Tricks"},{"__type":"Nc:SimpleKB:Abstractions:Dtos:CategoryItemDto","ParentCategoryId":0,"TreatAsTopicYN":false,"Description":"","ImageUrl":"https://static.nc-img.com/live-resource/icons/knowledgebase/fastVPN_icon-150px.png","ShortDesc":"","CategoryId":2265,"CategoryName":"FastVPN","SubCategories":[{"__type":"Nc:SimpleKB:Abstractions:Dtos:CategoryItemDto","ParentCategoryId":2265,"TreatAsTopicYN":false,"Description":"","ImageUrl":"","ShortDesc":"","CategoryId":2292,"CategoryName":"Browser Extensions"},{"__type":"Nc:SimpleKB:Abstractions:Dtos:CategoryItemDto","ParentCategoryId":2265,"TreatAsTopicYN":false,"Description":"","ImageUrl":"","ShortDesc":"","CategoryId":2274,"CategoryName":"General"},{"__type":"Nc:SimpleKB:Abstractions:Dtos:CategoryItemDto","ParentCategoryId":2265,"TreatAsTopicYN":false,"Description":"","ImageUrl":"","ShortDesc":"","CategoryId":2270,"CategoryName":"Routers"},{"__type":"Nc:SimpleKB:Abstractions:Dtos:CategoryItemDto","ParentCategoryId":2265,"TreatAsTopicYN":false,"Description":"","ImageUrl":"","ShortDesc":"","CategoryId":2272,"CategoryName":"TV"},{"__type":"Nc:SimpleKB:Abstractions:Dtos:CategoryItemDto","ParentCategoryId":2265,"TreatAsTopicYN":false,"Description":"","ImageUrl":"","ShortDesc":"","CategoryId":2273,"CategoryName":"Gaming Consoles"},{"__type":"Nc:SimpleKB:Abstractions:Dtos:CategoryItemDto","ParentCategoryId":2265,"TreatAsTopicYN":false,"Description":"","ImageUrl":"","ShortDesc":"","CategoryId":2268,"CategoryName":"macOS"},{"__type":"Nc:SimpleKB:Abstractions:Dtos:CategoryItemDto","ParentCategoryId":2265,"TreatAsTopicYN":false,"Description":"","ImageUrl":"","ShortDesc":"","CategoryId":2269,"CategoryName":"iOS"},{"__type":"Nc:SimpleKB:Abstractions:Dtos:CategoryItemDto","ParentCategoryId":2265,"TreatAsTopicYN":false,"Description":"","ImageUrl":"","ShortDesc":"","CategoryId":2271,"CategoryName":"Linux"},{"__type":"Nc:SimpleKB:Abstractions:Dtos:CategoryItemDto","ParentCategoryId":2265,"TreatAsTopicYN":false,"Description":"","ImageUrl":"","ShortDesc":"","CategoryId":2266,"CategoryName":"Windows"},{"__type":"Nc:SimpleKB:Abstractions:Dtos:CategoryItemDto","ParentCategoryId":2265,"TreatAsTopicYN":false,"Description":"","ImageUrl":"","ShortDesc":"","CategoryId":2267,"CategoryName":"Android"}]},{"__type":"Nc:SimpleKB:Abstractions:Dtos:CategoryItemDto","ParentCategoryId":12,"TreatAsTopicYN":false,"Description":"","ImageUrl":"","ShortDesc":"","CategoryId":239,"CategoryName":"WHMCS"},{"__type":"Nc:SimpleKB:Abstractions:Dtos:CategoryItemDto","ParentCategoryId":12,"TreatAsTopicYN":false,"Description":"","ImageUrl":"","ShortDesc":"","CategoryId":33,"CategoryName":"SSL Installation"}],"status":200,"statusText":"OK"}}
The cons of WPMU:
3. Installing WPMU
WPMU may be easily installed via Softaculous Apps Installer in cPanel:
1. Go to your cPanel and find Exclusive for Namecheap customers section:

2. Find WordPress and its icon to install: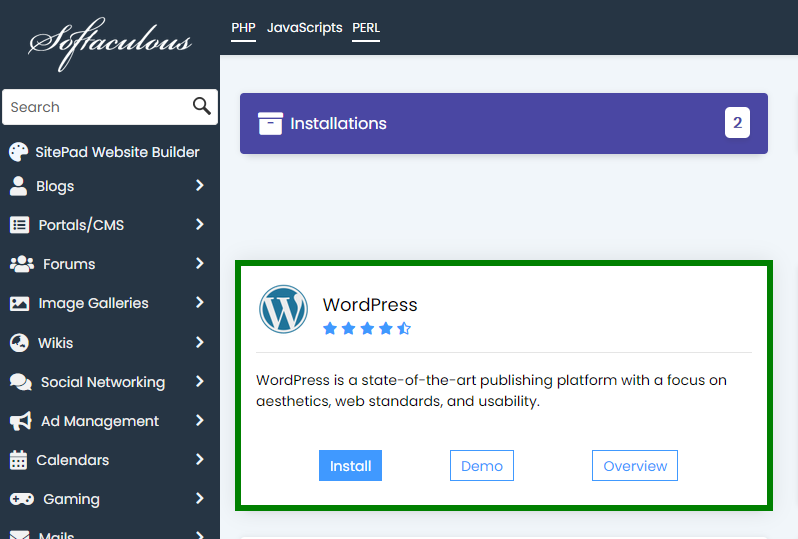
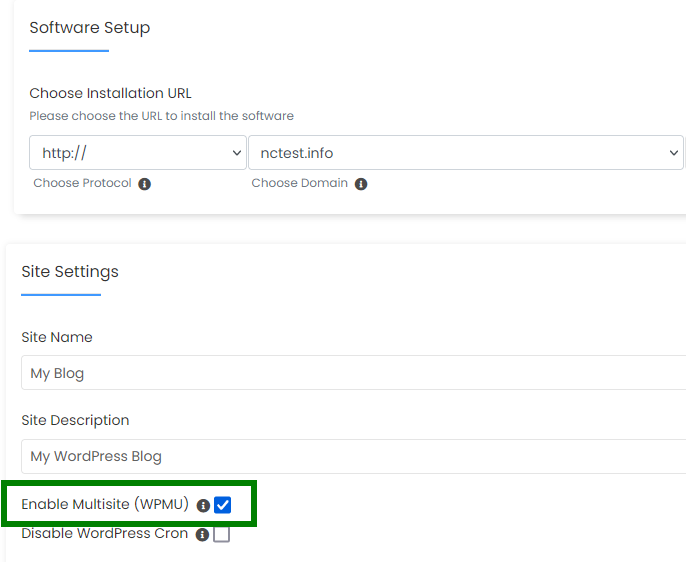
3. Fill out the details for your website, scroll down and click Install.
NOTE: The corresponding option Enable Multisite (WPMU) should be checked during the installation.
4. You will get a notification that WPMU is successfully installed for your domain. This is the easiest way to install WPMU for your domain.
How can you check if WPMU is already enabled for your site?
You need to find the wp-config.php file. There you will see the following lines that state WPMU is enabled:
/* Multisite */
define( 'WP_ALLOW_MULTISITE', true );
define('MULTISITE', true);
define('SUBDOMAIN_INSTALL', false);
define('DOMAIN_CURRENT_SITE', 'yourdomain.com');
define('PATH_CURRENT_SITE', '/');
define('SITE_ID_CURRENT_SITE', 1);
define('BLOG_ID_CURRENT_SITE', 1);
4. Turning a regular WordPress installation into WPMU
If you have a regular WordPress installation but decided to make Multisite, there is no need to re-install or remove your WordPress. You may as well enable Multisite for it following the instructions below.
We recommend you to back up the WordPress website before you start in case some steps are followed improperly.
You may begin with the wp-config.php file editing. It is possible to do it via FTP or directly in cPanel.
1. Go to your cPanel > File manager > public_html folder (or the subfolder where WordPress files are located) > choose the wp-config.php file and click Edit:
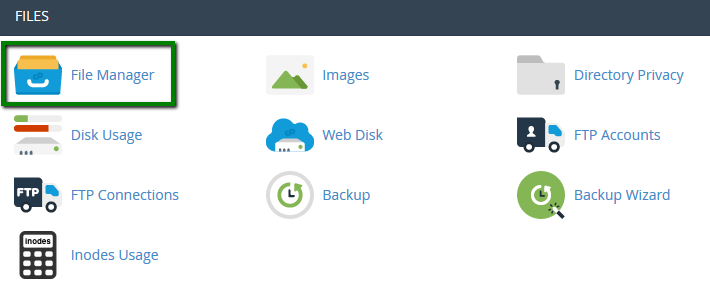
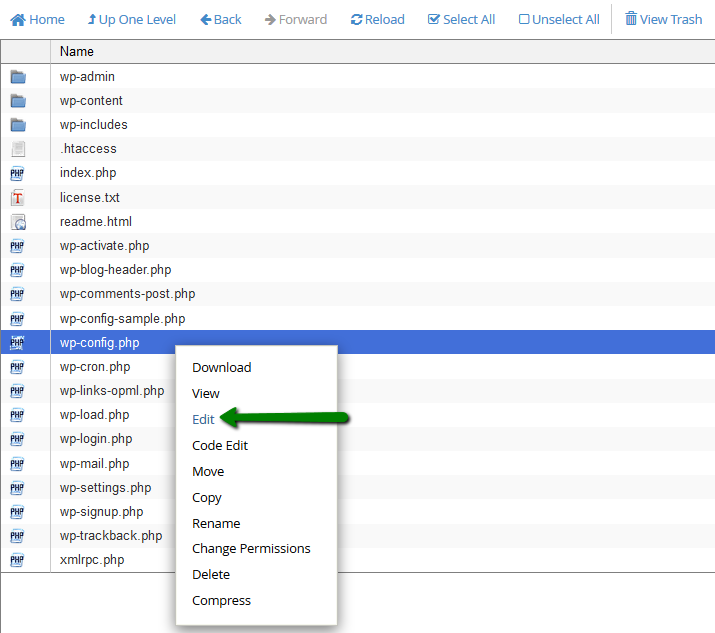
You need to add the following line in the same place as shown in the screenshot:
define('WP_ALLOW_MULTISITE', true);
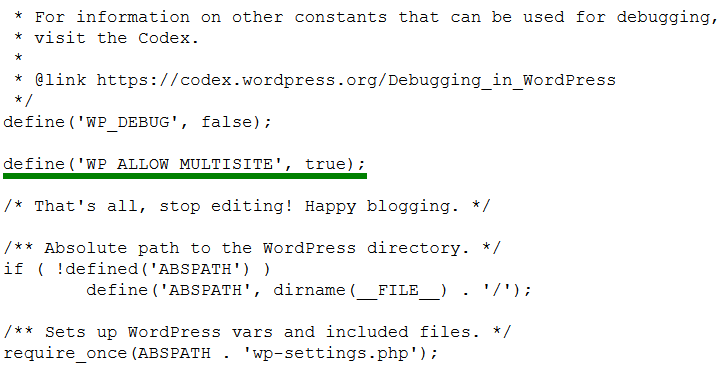
Once done, save the changes.
2. Log in to your Admin Dashboard and check that Network Setup has been added to your Tools menu:
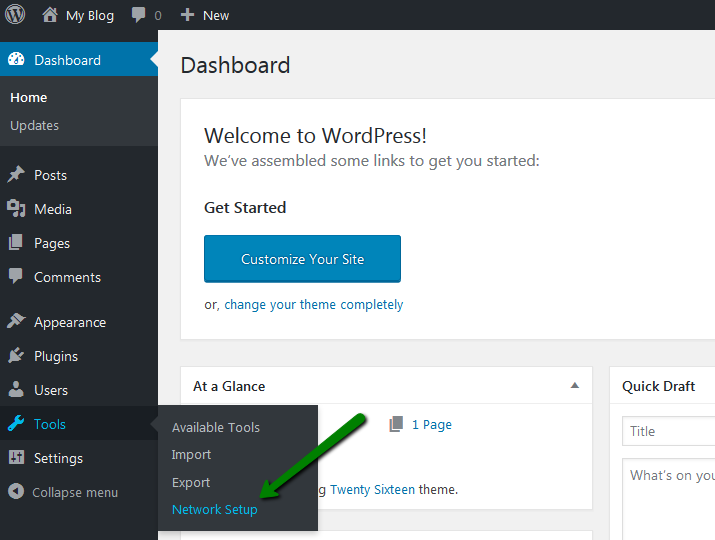
You will see the following:
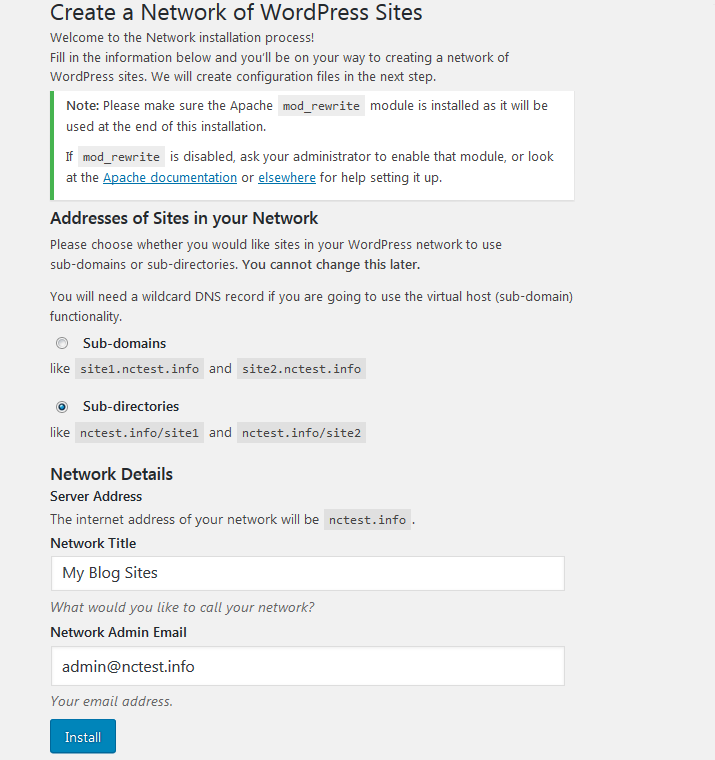
NOTE: Make sure the Apache mod_rewrite module is installed as it will be used at the end of this installation. If mod_rewrite is disabled, ask your administrator to enable that module or check the Apache documentation or elsewhere to set it up.
The mod_rewrite module is enabled by default on our servers, so you may disregard this notification.
3. You need to choose whether you would like your sites to use a subdomain or sub-directories in your WordPress.
The Sub-domains option will get your sites URLs as site1.yourdomain.com, site2.yourdomain.com, etc.
NOTE: You will need to set up a wildcard subdomain first in order to use subdomains. You may find the corresponding tutorial on the wildcard subdomain setup here.
The Sub-directories option will enable you to have sites URLs like yourdomain.com/site1, yourdomain.com/site2, etc. This option doesn't require any additional adjustments.
It is not possible to have both options enabled at the same time. Once you have chosen which is best for you, proceed and click Install.
4. Next, you will see the page called Create a Network of WordPress sites. Enabling network.
In order to complete enabling Multisite, wp-config.php and .htaccess files are to be modified. For this, follow the steps as described on the page (make sure you copy-paste code abstracts precisely):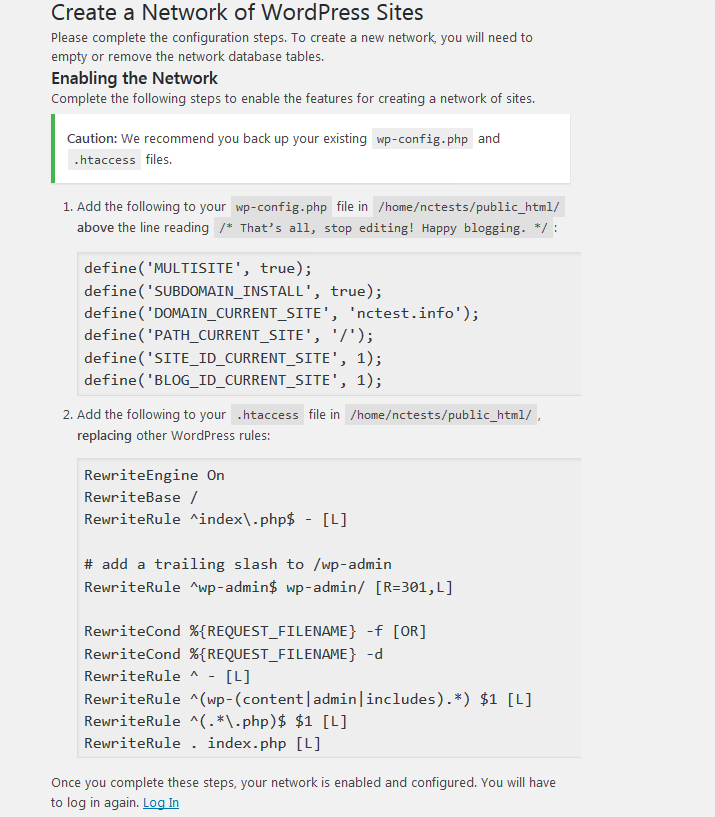
Once both files are edited, your network is enabled and configured.
Click on Log In and re-access your WordPress admin dashboard using the same login details.
5. The last step is the creation of a mu-plugins folder with the plugins activated by default and affecting all the sites in the WPMU installation.
Navigate to File Manager menu and locate the root folder for your WordPress installation. Move to wp-content folder > click the New folder button in the top menu > type mu-plugins in the corresponding field > click Create a New Folder.
Ensure the permissions for the newly created folder are set to 0755: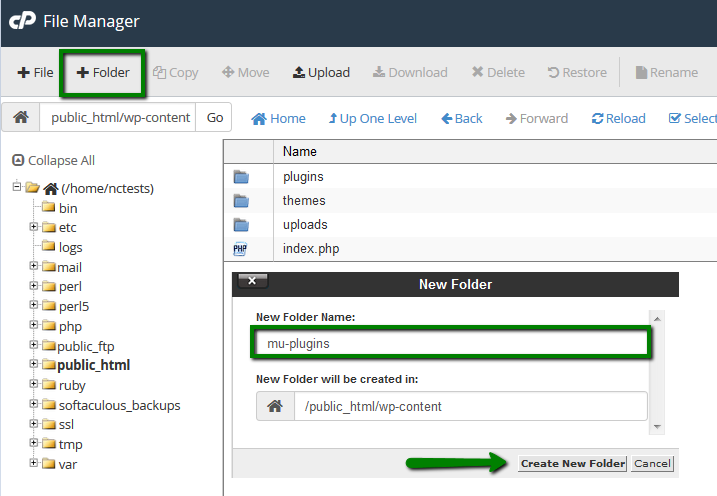
6. Now you can log into your Admin Dashboard again and check if the network is enabled: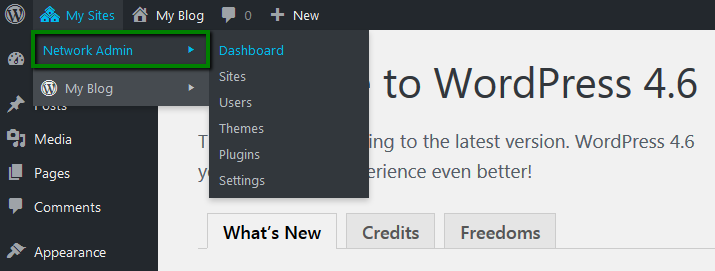
Network Admin is a super admin that has access to the whole Network Management and all other WordPress dashboards.
5. Creating subdomains and subfolders
You will need to create new sites in the WordPress Network via Network Admin.
1. Go to your WordPress admin panel > My Sites > Network Admin > Sites: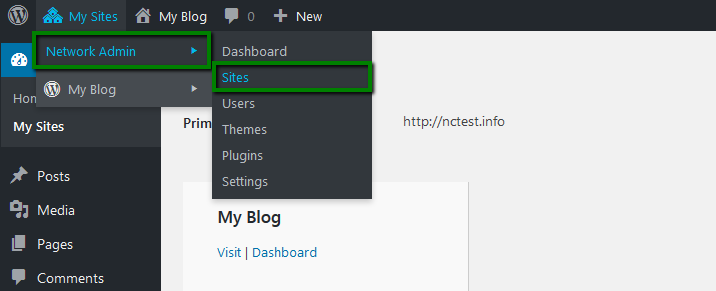
2. Click Add New to create a new site: 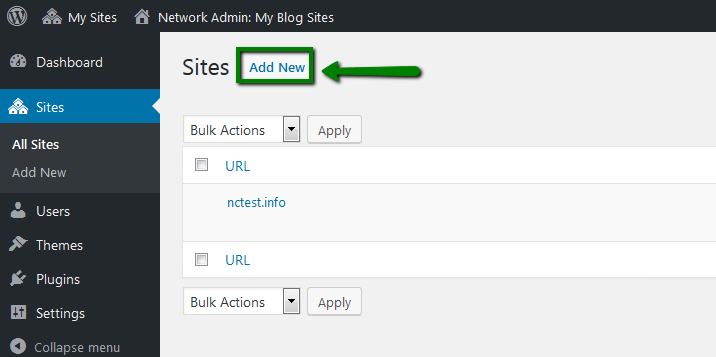
NOTE 1: If you have installed WPMU via Softaculous, you will have the subdirectory option (yourdomain.com/site1) set up by default, so it will be possible to add new WordPress site to the sub-directory as described below.
NOTE 2: The admin email field – if you use the email address already assigned to Super Admin or Admin of the regular WordPress installations inside the network, you will need to access the Admin Dashboard for the new site with the same details.
If you use the new email address, which is not assigned to any user yet and does not exist in the WordPress database, the new user will be created, and the login details will be sent to the specified email address: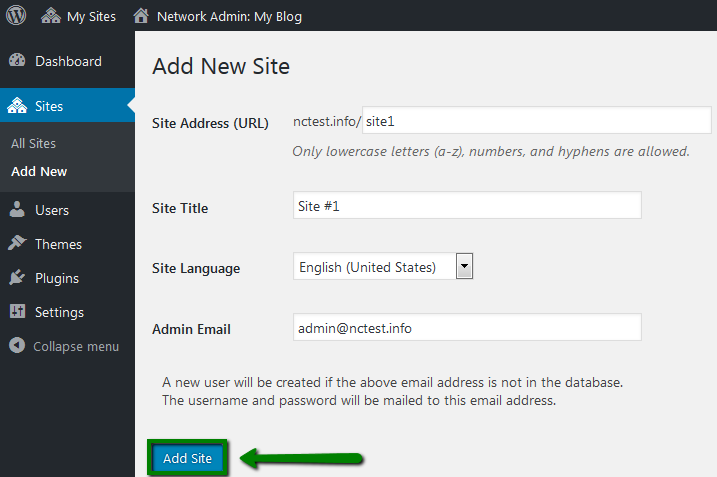
If you would like to install WordPress site to the subdomain, not to the subdirectory, you need to do the following first:
1. Create a wildcard subdomain in Subdomains menu in cPanel:
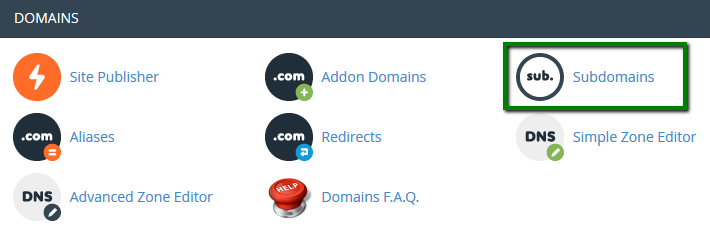
While creating such a subdomain, make sure to point Document Root to the root directory of the multisite installation.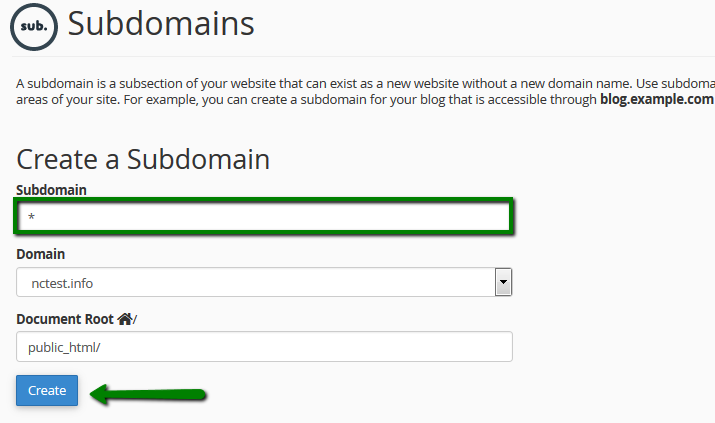
2. Change Subdomain_Install option in the wp-config.php file from false to true and save the changes:
3. Once done, you can access Network Admin Dashboard and install WordPress to the subdomain:
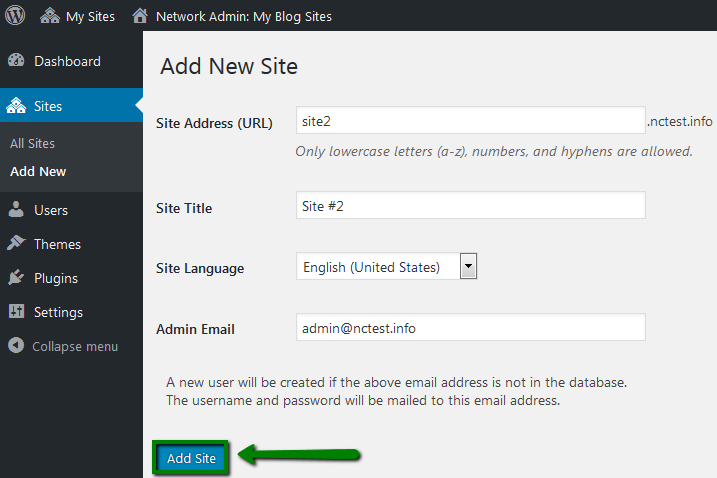
If you switch the Subdomain_Install option back to false, it will be possible to create the subdirectories again.
As a result, you can switch from subdomains to subdirectories depending on the needs.
6. Connecting another domain to WPMU site
NOTE: The domains you want to connect need to be added as parked ones or addons pointed to the root folder of the main domain.
To change the WPMU site URL:
1. In the Network Admin dashboard, go to Sites > All Sites and click Edit under the site you wish to change:
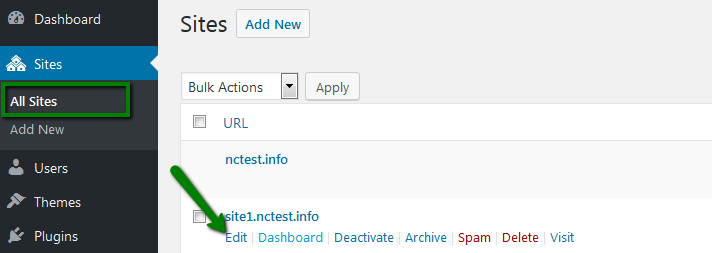
2. Change the Site Address (URL) to your domain's URL and click Save Changes:
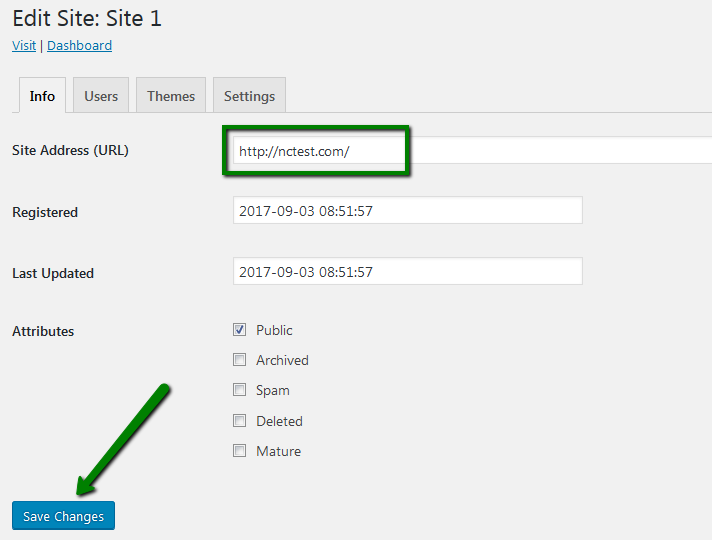
Your domain will show the content of the WPMU site now.
That's it!
Need any help? Contact our HelpDesk
Need help? We're always here for you.