This guide will provide you with a number of steps to be followed to keep your WordPress website safe:
NOTE: Before proceeding with any changes, make sure that you generate a full backup of your website. If you've created your site using Softaculous script installer, feel free to refer to this guide as well (step #5 – Backup software).
1. Introduction
2. Making backups regularly
3. Updating WordPress, themes and plugins to the latest version
4. Using trusted sources
5. Using a secure username and password
6. Changing the database prefix, username and password
7. Setting password protection for important files and folders
8. Using secure FTP (SFTP) and Shell access (SSH)
9. Hiding the WordPress version
10. Limiting the number of failed connections
11. WordPress Security Plugins
12. Account and external security
13. Use 2FA for cPanel
1. Introduction
Nowadays we face a lot of security issues with different content management systems (CMS) and web applications. WordPress is not an exception as it's one of the most popular and powerful blogging content management systems.
There are several reasons for it:
- CMS uses typical files for passwords and settings located in the same directories for each account (wp-config.php, wp-admin/ directory, etc.) so they are very easy to locate and modify after gaining partial access.
- The admin panel (wp-admin) runs under the same domain and uses the same codebase/permission as the rest of the application.
- Admin users can install a plugin/theme, which can then modify any file or change anything in the database (this is related to corrupted, non-official, non-updated, self-modified or fraudulent themes or plugins).
This article provides you with a list of tips and instructions that can improve a security level of your WordPress installation.
2. Making backups regularly
Making regular backups of your WordPress site is the first and the most important step. Before you apply any changes, make sure you back up your entire WordPress installation or databases.
For creating a backup, you can use the Softaculous WordPress Backup option.
It is recommended to create regular backups for your entire cPanel account using Backups tool and creating a full cPanel Backup, you can refer to this guide for more details.
Also, you can back up your WordPress site using CodeGuard, we have a detailed guide here.
3. Updating WordPress, themes and plugins to the latest version
The latest version of WordPress is always available on official WordPress site. The official release is not available from other websites or resources, thus, NEVER update WordPress from third-party resources. Also, you can easily update WordPress from Admin Dashboard directly or via Softaculous using this guide. While maintaining a WordPress site is not rocket science, it’s still a task that requires focus and ongoing attention-something that many site owners do not have to spare. Consider a WordPress maintenance service to help you keep up with various scheduled and urgent tasks such as fixing DNS issues or sorting out plugin compatibility problems.
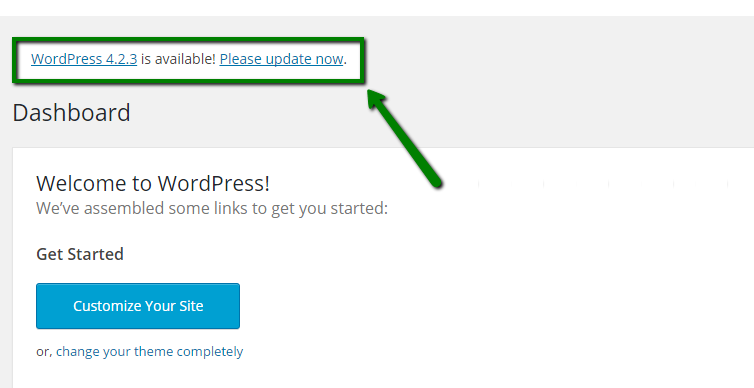
Make sure that your blog's version is up-to-date. WordPress team works on creating patches for fixing security 'holes' and backdoors on a constant basis. That's why it is very important to have the latest version of WordPress.
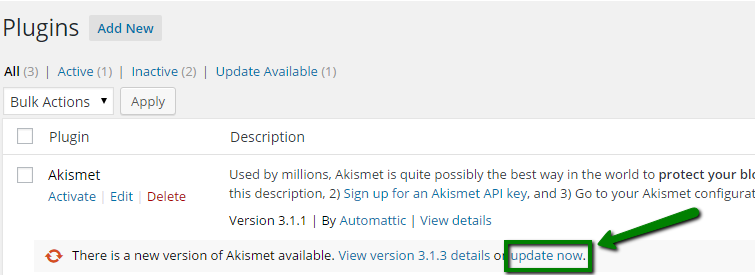
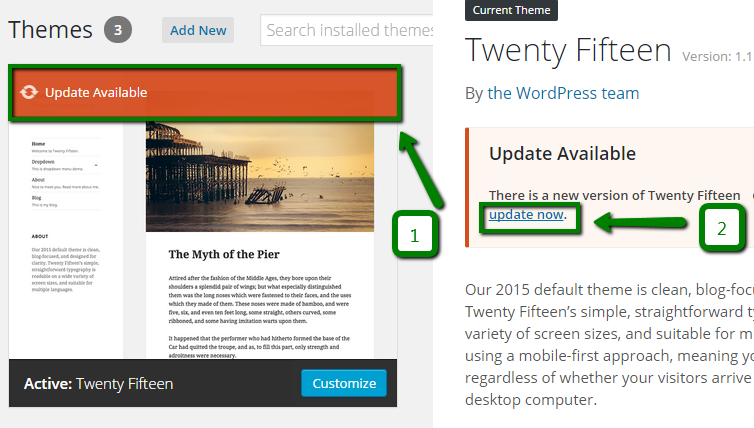
It is strongly recommended to update your plugins and themes to the latest versions too, as a bug in one of these can affect your whole installation. You can update both plugins and themes via Admin Dashboard > choose Plugins or Themes menu and click Update now next to the necessary plugin or theme:
NOTE: It is recommended to create backups of your WordPress files and database before applying any changes.
4. Using trusted sources
Many custom 'free' WordPress themes included base64 encoding, which is often used to hide malicious code. So, with such themes or plugins you can easily upload malware into your account. This is how most of the ‘hackers’ get access to your files and site.
We recommend using content only from the official resource like http://wordpress.org/ as it's the safest place to get themes and plugins.
5. Using a secure username and password
The default WordPress login is 'admin', and most hackers know that. It should be changed to a custom one with a strong password which includes upper/lower keys, numbers and symbols.
Assuming you use Softaculous, you specify the username on the install screen:
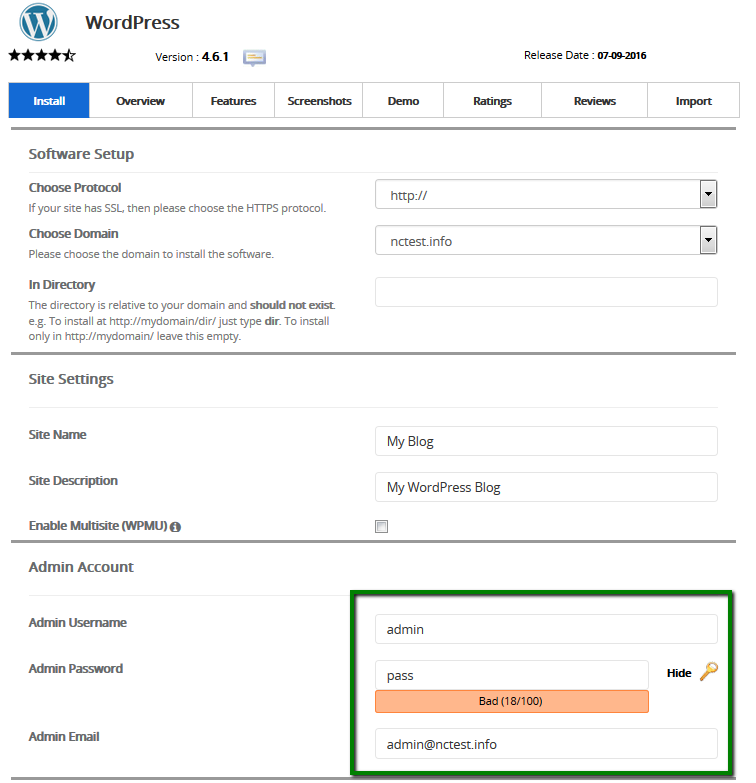
Also, it is not recommended to use passwords or email addresses similar to your accounts from other web resources.
You can change your Admin username or Password via the database, you can find the corresponding instructions here.
6. Changing the database prefix, username and password
6.1 Changing the database prefix
It is highly recommended to change the database prefix as the default table prefix for WordPress is wp_ . SQL Injection attacks are easier with the default table prefix because it is easier to guess. We recommend changing the database prefix to something more secure than wp_.
NOTE: Create a backup of your database before applying any changes.
If you install WordPress using Softaculous, you can set custom Table prefix and Database name during the installation process, in the expanded Advanced Options section:
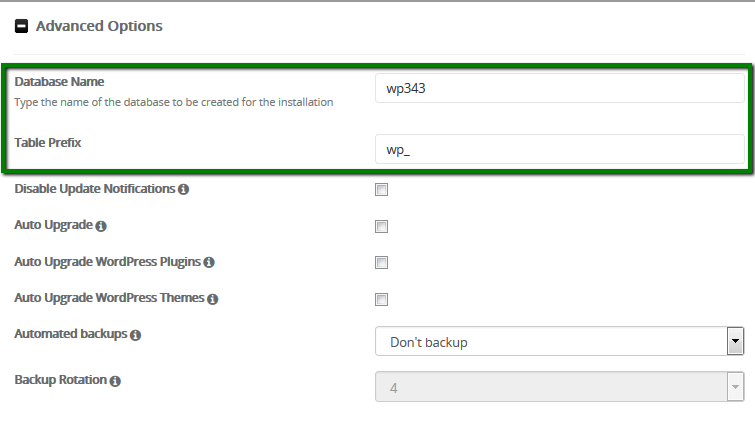
If you have already installed WordPress, you can still change database prefix in two ways: either manually or using a special plugin.
For a manual database prefix change, go to cPanel > phpMyAdmin menu > choose the necessary database from the left side > click on SQL option above:

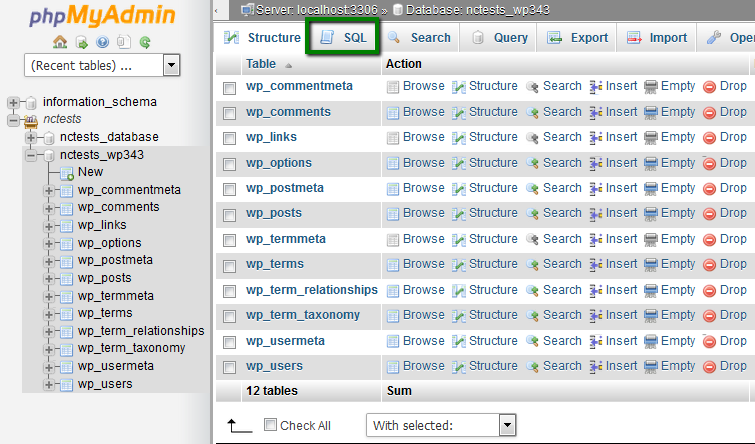
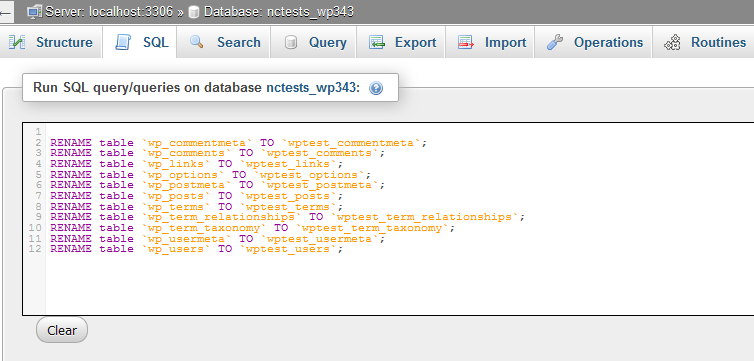
Here you need to run RENAME SQL queries on tables in your WordPress database:
RENAME table `wp_commentmeta` TO `newprefix_commentmeta`;
RENAME table `wp_comments` TO `newprefix_comments`;
RENAME table `wp_links` TO `newprefix_links`;
RENAME table `wp_options` TO `newprefix_options`;
RENAME table `wp_postmeta` TO `newprefix_postmeta`;
RENAME table `wp_posts` TO `newprefix_posts`;
RENAME table `wp_terms` TO `newprefix_terms`;
RENAME table `wp_term_relationships` TO `newprefix_term_relationships`;
RENAME table `wp_term_taxonomy` TO `newprefix_term_taxonomy`;
RENAME table `wp_usermeta` TO `newprefix_usermeta`;
RENAME table `wp_users` TO `newprefix_users`;
|
NOTE: newprefix_ should be replaced with the new database prefix you wish to have instead of wp_.
Hit Go to proceed with the changes:
Once done, you will see the new database prefix has been applied to your WordPress database:
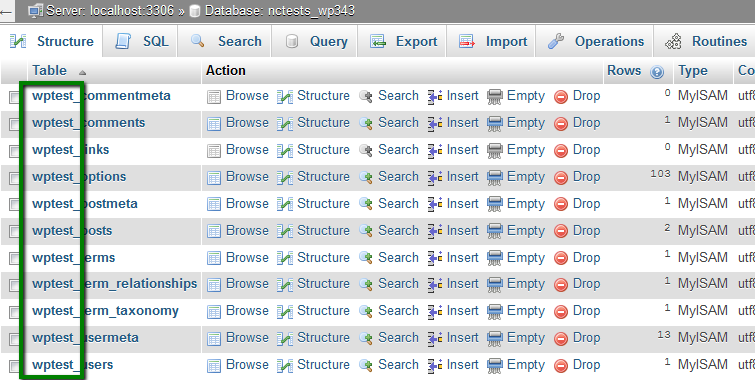
After that you will need to search the options table for any other fields that are using wp_ as a prefix in order to replace them. It is necessary to run the following query in the same way:
SELECT * FROM `newprefix_options` WHERE `option_name` LIKE '%wp_%'
|
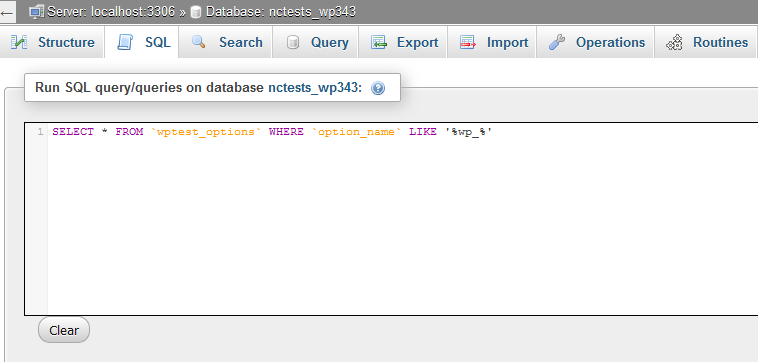
Then click Go and you will get the result as in the screenshot below:
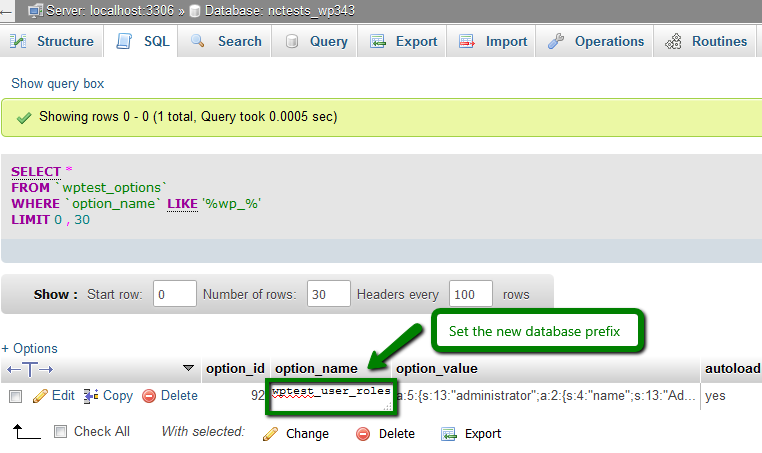
Here you will need to go one by one to change these lines and replace the old database prefix with the new one. Once done, we need to search for usermeta for all fields that are using wp_ as a prefix with the help of this SQL query:
SELECT * FROM `newprefix_usermeta` WHERE `meta_key` LIKE '%wp_%'
|
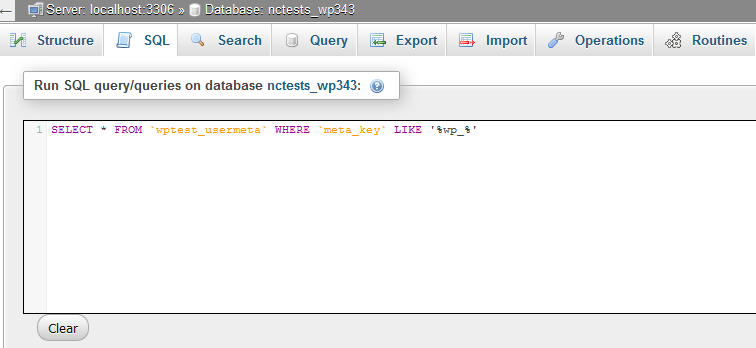
After that click Go and the following results will appear:
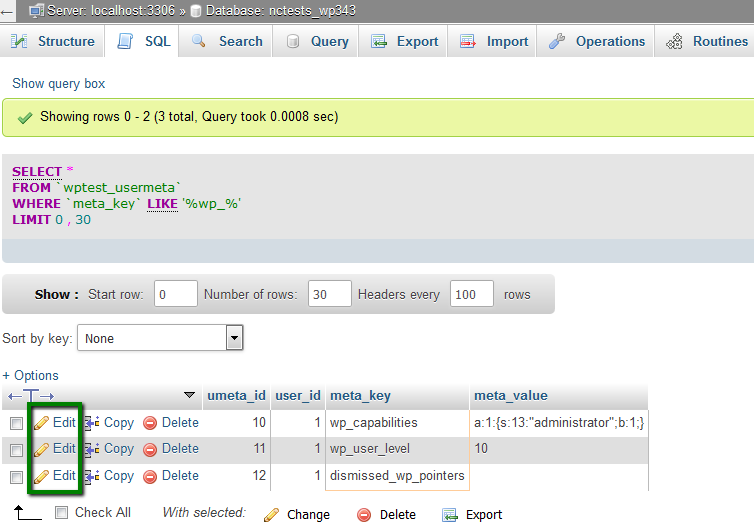
The number of entries may vary depending on how many plugins you are using and such. Here you need to change everything with wp_ to the new prefix as well.
Once done, make sure that you update your wp-config.php file with the new database prefix:
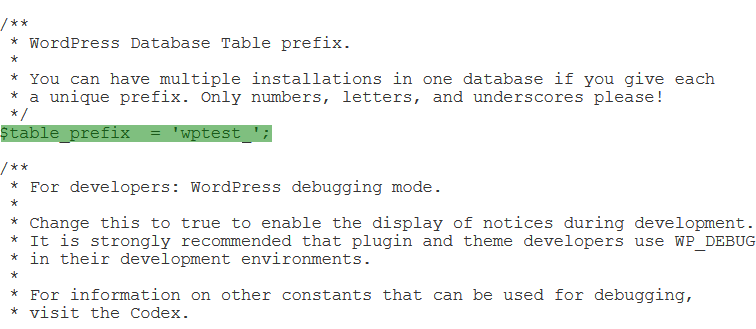
Also, you can change the database prefix using special plugins like Change DB prefix or Change table prefix.
6.2 Changing the database username and password
In order to change the database username or password, log into cPanel and navigate to MySQL Databases menu in Databases section:

In Current users, you will see all created database users in your account. Here you can Change password or Rename the necessary database user by choosing the corresponding option:

For changing the password, click on Change password. In the new window, insert your new password twice and click Change password:
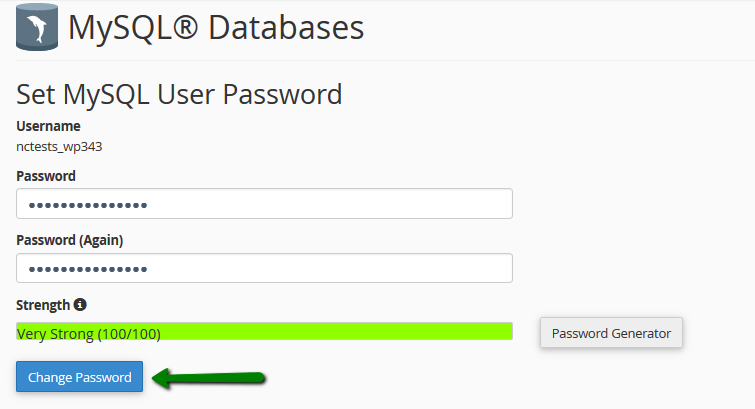
To change the database username, click Rename. In the new window you need to specify the new username you wish to have (this will be the part after cPanelusername_ ) and click Proceed in order to save changes:

Once the database username or password are changed, you need to update your wp-config.php file with the corresponding details:

7. Setting password protection for important files and folders
When hardening WordPress to prevent your site from being hacked, we recommend setting the password protection for system files.
To create the password protection, follow these steps:
Go to cPanel > Files section > Directory Privacy to access a list of your site's folders:
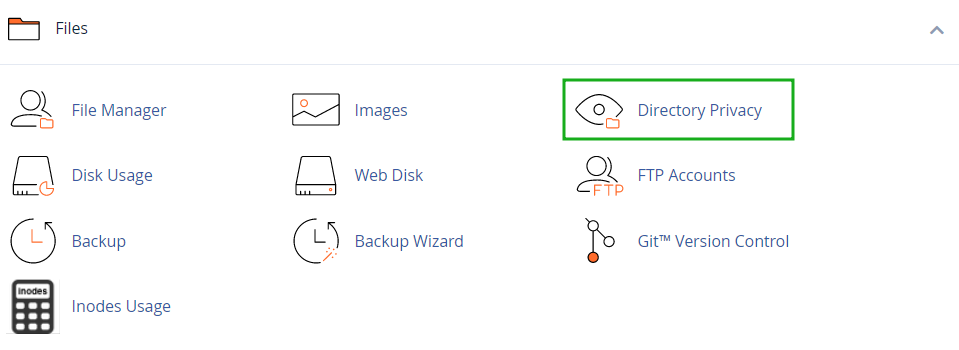
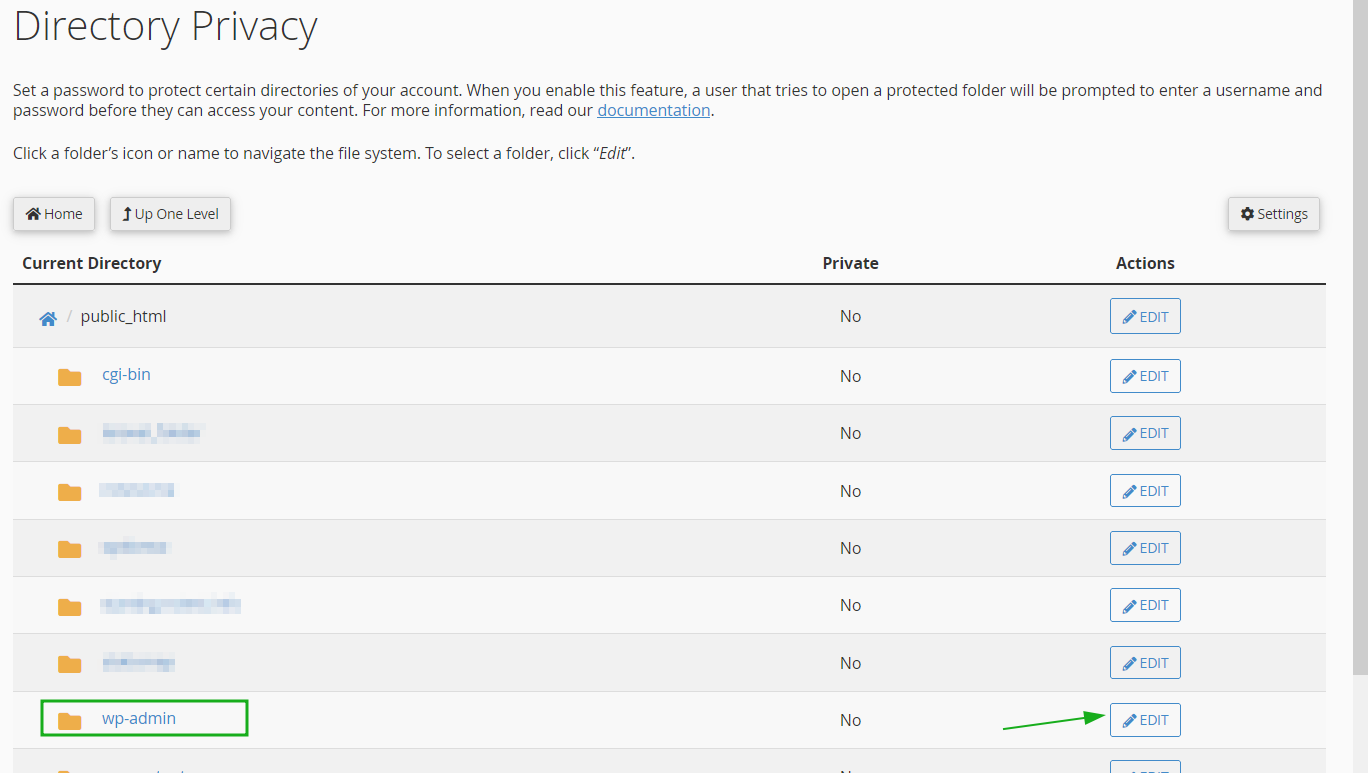
Choose the directory you wish to protect. Click on the Edit button near the folder you wish to protect in the Actions section and you'll navigate to the Security Settings section:
Put a checkmark on Password protect this directory and name your protected directory:
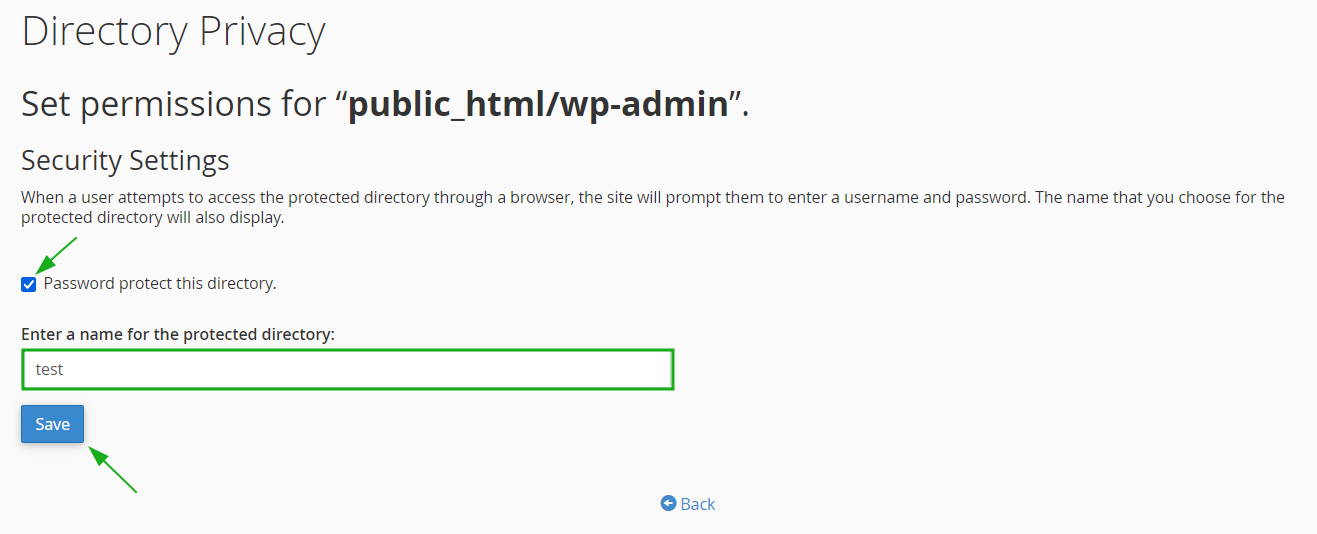
Then Create a User that is authorized to access the directory and save the changes:

You can follow our specially created guide on how to set up password protection in order to get more details.
In addition, you can set up internal protection rules in .htaccess to protect your files and folders as shown here.
NOTE: It is very important to protect the wp-config.php file and wp-admin folder since they are more susceptible to a hacker attack.
8. Using secure FTP (SFTP) and Shell access (SSH)
Uploading files via FTP is a quick way to make a new site up and running or add new files to your account. However, SFTP is more secure, and your passwords are encrypted to help prevent hackers from learning it. You can find a more detailed guide on how to upload your files via FTP or SFTP here.
SCP and SSH are another secure methods of adding or transferring your site’s files.
If you do want to use FTP (or use cPanel details for FTP connection), it’s a good idea to delete any FTP accounts that you’re not using to prevent them from being accessed without your consent. This is a great way to help keep your site and information more secure.
9. Hiding the WordPress version
Another good idea is to remove the generator meta for WordPress. This meta shows the version of your WordPress site. You may open your website and check your source code by pressing CTRL + U on Windows or Option+Command+U on Mac. If the WordPress version is visible for hackers, it’s more easy for them to target the vulnerabilities of the specific version to hack into your website.
In order to hide your WordPress version, navigate your current theme at /wp-content/themes/yourtheme/ and insert the code below into the function.php file:
/* Hide WP version strings from scripts and styles
* @return {string} $src
* @filter script_loader_src
* @filter style_loader_src
*/
function fjarrett_remove_wp_version_strings( $src ) {
global $wp_version;
parse_str(parse_url($src, PHP_URL_QUERY), $query);
if ( !empty($query['ver']) && $query['ver'] === $wp_version ) {
$src = remove_query_arg('ver', $src);
}
return $src;
}
add_filter( 'script_loader_src', 'fjarrett_remove_wp_version_strings' );
add_filter( 'style_loader_src', 'fjarrett_remove_wp_version_strings' );
/* Hide WP version strings from generator meta tag */
function wpmudev_remove_version() {
return '';
}
add_filter('the_generator', 'wpmudev_remove_version');
|
10. Limiting the number of failed connections
It is recommended to limit the number of login attempts to your WordPress Dashboard with the help of Login LockDown plugin. It records the IP addresses of every failed login within a certain time period of time. If more than a certain number of attempts is detected within a short period of time from the same IP range, then the login function is disabled for all requests from that range. This allows preventing brute force password discovery.
11. WordPress Security Plugins
One of the most important steps for making your WordPress site well protected is to use security plugins:
Wordfence Security:

Wordfence Security is a free WordPress security plugin that allows scanning your website looking for malicious code, backdoors or shells that hackers have installed, showing website analytics and traffic in real time, setting up automatic scanning and much more. You can find the description of each option here.
All In One WordPress Security plugin:

All In One WordPress Security plugin is a user-friendly plugin that will bring security of your WordPress site on a new level. It provides with user accounts and login security, database and file system security, brute force login attack prevention, website scanning and much more.
12. Account and external security
Here are the tips and general recommendations that will help you to increase account and external security:
- Keep your local environment updated and clean from viruses.
- Protect your hosting (cPanel account). Here you can find the general tips on how to prevent a hacking attack.
- Use secure passwords and SFTP connection + type for FTP/files upload.
- Change your cPanel password regularly. Try to use strong passwords (with high and low register Aa-Zz and special symbols) and we recommend you to change the passwords for all your email accounts as well.
- Do not store passwords in places where they can be obtained easily (e.g., a passwords.txt file on the desktop is not very secure).
- Update all third-party scripts to their latest versions.
- Always have a backup copy of your entire website and its databases.
The tips provided above do not guarantee 100% security of your WordPress website, however, they drastically decrease chances of getting hacked.
We sincerely hope this article helped you enough in securing your online business and becoming a trouble-free and happy customer.
13. Use 2FA for cPanel
Two Factor-Authentication adds an extra layer of security to your cPanel account in addition to your username and password by requiring access to the phone number associated with your account. Without your smartphone, you cannot log in.
When Two-Factor Authentication is enabled, your account cannot be accessed by anyone unauthorized by you, even if they have stolen your password.
The steps on how to set up 2FA for your cPanel account are described in the corresponding article.
That's it!
Need any help? Contact our HelpDesk


