{"/api/v1/ncpl/currencies/getAll":{"body":[{"Name":"U.S. Dollar","Code":"USD","Symbol":"$","Separator":".","Culture":"en-US"},{"Name":"Euro","Code":"EUR","Symbol":"€","Separator":",","Culture":"en-US"},{"Name":"British Pound","Code":"GBP","Symbol":"£","Separator":".","Culture":"en-US"},{"Name":"Canadian Dollars","Code":"CAD","Symbol":"C$","Separator":".","Culture":"en-US"},{"Name":"Australian Dollars","Code":"AUD","Symbol":"A$","Separator":".","Culture":"en-US"},{"Name":"Indian Rupees","Code":"INR","Symbol":"Rs","Separator":".","Culture":"en-US"},{"Name":"China Yuan RMB","Code":"CNY","Symbol":"¥","Separator":".","Culture":"en-US"}],"status":200,"statusText":"OK"},"/api/v1/ncpl/cart/user/getShoppingCartSummary:\"{\\\"finalTotalOnly\\\":true}\"":{"body":null,"status":200,"statusText":"OK"},"/api/v1/ncpl/usermanagement/uiuser/getHeaderUserInfo:\"{\\\"hideSupportPin\\\":true}\"":{"body":{"__ctxId":"CE49E252104C48B5A32FAB2C30E39525","__isError":true,"__errorType":"Nc.Platform.Abstractions.UnauthorizedException","Http_WWW_Authenticate":"Bearer","StatusCode":"Unauthorized","LogLevel":3,"Message":"","InnerException":null,"HelpLink":null,"Source":"Nc.Security.Middleware"},"status":401,"statusText":"Unauthorized"}}{"/api/v1/ncpl/simplekb/getarticle:\"{\\\"articleId\\\":876,\\\"categoryId\\\":83}\"":{"body":{"Id":876,"FriendlyId":"","ArticleTypeId":0,"Title":"How to transfer a domain from GoDaddy","ArticleName":"How to transfer a domain from GoDaddy","ArticleSummary":null,"PreponedSummary":false,"Approved":true,"Body":"DQoJCTxwPkJlZm9yZSBnZXR0aW5nIGludG8gdGhlIHN0ZXAgYnkgc3RlcCwgbGV04oCZcyBydW4gdGhyb3VnaCBhIGZldyBpbXBvcnRhbnQgbm90ZXMuPC9wPg0KCQk8cD5XaGVuIHlvdSB0cmFuc2ZlciBhIGRvbWFpbiBmcm9tIEdvRGFkZHksIHRoZSBuYW1lc2VydmVycyBhc3NvY2lhdGVkIHdpdGggdGhlIGRvbWFpbiB3aWxsIHN0YXkgdGhlIHNhbWUuIElmIHRoZSBkb21haW4gdXNlcyB5b3VyIG9sZCBSZWdpc3RyYXLigJlzIGRlZmF1bHQgbmFtZXNlcnZlcnMgKGUuZy4sIDxpPm5zWFguZG9tYWluY29udHJvbC5jb208L2k+IGFuZCA8aT5uc1hYLmRvbWFpbmNvbnRyb2wuY29tPC9pPiksIHRoZXnigJlsbCBzdG9wIHJlc3BvbmRpbmcgdG8gZG9tYWluIHF1ZXJpZXMgb25jZSBpdOKAmXMgdHJhbnNmZXJyZWQuIEFzIGEgcmVzdWx0LCB5b3XigJlsbCBleHBlcmllbmNlIHNvbWUgZG93bnRpbWUgdW50aWwgeW91IHN3aXRjaCB5b3VyIGRvbWFpbiB0byBvdXIgRG9tYWluIE5hbWUgU3lzdGVtIChETlMpLjwvcD4NCgkJPHA+DQoJCQkJPGEgaHJlZj0iaHR0cDovL3d3dy5uYW1lY2hlYXAuY29tL3N1cHBvcnQva25vd2xlZGdlYmFzZS9hcnRpY2xlLmFzcHgvNTgyLzgzL2hvdy10by10cmFuc2Zlci1hLWRvbWFpbi1pbnRvLW5hbWVjaGVhcC13aXRob3V0LWEtaHVnZS1kb3dudGltZSI+TGVhcm4gaG93IHRvIHJlZHVjZSBkb3dudGltZSBkdXJpbmcgdHJhbnNmZXJzIGluIHRoaXMgYXJ0aWNsZTwvYT4uPC9wPg0KCQk8cD5PbiB0aGUgb3RoZXIgaGFuZCwgaWYgeW914oCZcmUgdXNpbmcgYSBjdXN0b20gb3IgaG9zdGluZyBETlMsIHRyYW5zZmVycmluZyB5b3VyIGRvbWFpbiB3b27igJl0IGNhdXNlIGRvd250aW1lIGlzc3VlcyDigJQgRE5TIHNlcnZlciBzZXR0aW5ncyBzdGF5IHRoZSBzYW1lIGR1cmluZyB0cmFuc2Zlci4gSWYgeW91IGFyZSBub3Qgc3VyZSB3aGF0IHR5cGUgb2YgRE5TIHlvdSdyZSB1c2luZywgeW91IGNhbiB2aWV3IGl0IDxpPmluIHlvdXIgR29EYWRkeSBhY2NvdW50IC0mZ3Q7IGNsaWNrICJETlMiIG5leHQgdG8geW91ciBkb21haW4gLSZndDsgb3BlbiB0aGUgIk5hbWVzZXJ2ZXJzIiB0YWIgLSZndDsgaXQgd2lsbCBiZSBpbmRpY2F0ZWQgYXQgdGhlIHRvcCBlLmcuICJVc2luZyAuLi4gbmFtZXNlcnZlcnMiPC9pPi48L3A+DQoJCTxiciAvPg0KCQk8cD5Pa2F5LCBsZXTigJlzIGRpdmUgaW4uPC9wPg0KCQk8cD5UcmFuc2ZlcnJpbmcgeW91ciBkb21haW4gaXMgc2ltcGxlOjwvcD4NCgkJPG9sPg0KCQkJCTxsaT4NCgkJCQkJCTxhIGhyZWY9Imh0dHBzOi8vd3d3Lm5hbWVjaGVhcC5jb20vc3VwcG9ydC9rbm93bGVkZ2ViYXNlL2FydGljbGUuYXNweC8yNTUvODMvaG93LWRvLWktdHJhbnNmZXItbXktZXhpc3RpbmctZG9tYWluLXRvLW5hbWVjaGVhcC8iPkNoZWNrIGlmIHlvdXIgZG9tYWluIGlzIGVsaWdpYmxlIGZvciB0cmFuc2Zlci48L2E+DQoJCQkJPC9saT4NCgkJCQk8bGk+UHJlcGFyZSB5b3VyIGRvbWFpbiBmb3IgdHJhbnNmZXIuPC9saT4NCgkJCQk8bGk+U3VibWl0IHRoZSB0cmFuc2ZlciBhdCBOYW1lY2hlYXAuPC9saT4NCgkJPC9vbD4NCgkJPHA+SGVyZSwgd2XigJlsbCBkZXRhaWwgYWxsIHRoYXQgaXQgdGFrZXMgdG8gcHJlcGFyZSB5b3VyIGRvbWFpbiB0byB0cmFuc2ZlciBmcm9tIEdvRGFkZHkuPC9wPg0KCQk8cD5GaXJzdGx5LCB5b3XigJlsbCBuZWVkIHRvIHVubG9jayB0aGUgZG9tYWluIGFuZCBnZXQgYW4gPGEgaHJlZj0iaHR0cDovL3d3dy5uYW1lY2hlYXAuY29tL3N1cHBvcnQva25vd2xlZGdlYmFzZS9hcnRpY2xlLmFzcHgvMjU5Lzgvd2hhdC1pcy1lcHAtY29kZSI+QXV0aCBDb2RlPC9hPiAoaWYgYXBwbGljYWJsZSkgZnJvbSBHb0RhZGR5LiBEb27igJl0IGZvcmdldCB0byBkaXNhYmxlIGFueSBHb0RhZGR5IHByaXZhY3kgcHJvdGVjdGlvbiBwbGFuIHlvdSBtYXkgaGF2ZSBpbiBwbGFjZSBmb3IgeW91ciBkb21haW4uPC9wPg0KCQk8dWw+DQoJCQkJPGxpPg0KCQkJCQkJPGEgaHJlZj0iI1VubG9ja19Hb0RhZGR5X0RvbWFpbiI+VW5sb2NrIEdvRGFkZHkgRG9tYWluPC9hPg0KCQkJCTwvbGk+DQoJCQkJPGxpPg0KCQkJCQkJPGEgaHJlZj0iI09idGFpbl9Hb0RhZGR5X0F1dGhfQ29kZSI+T2J0YWluIEdvRGFkZHkgQXV0aCBDb2RlPC9hPg0KCQkJCTwvbGk+DQoJCQkJPGxpPg0KCQkJCQkJPGEgaHJlZj0iI0Rpc2FibGVfR29EYWRkeV9XaG9pc19Qcml2YWN5X1Byb3RlY3Rpb24iPkRpc2FibGUgR29EYWRkeSBXaG9pcyBQcml2YWN5IFByb3RlY3Rpb24gKElmIEFwcGxpY2FibGUpPC9hPg0KCQkJCTwvbGk+DQoJCQkJPHVsPg0KCQkJCQkJPGxpPg0KCQkJCQkJCQk8YSBocmVmPSIjSG93X3RvX2NhbmNlbF9Eb21haW5fUHJvdGVjdGlvbl93aXRoX0dvRGFkZHkiPkhvdyB0byBjYW5jZWwgRG9tYWluIFByb3RlY3Rpb24gd2l0aCBHb0RhZGR5PC9hPg0KCQkJCQkJPC9saT4NCgkJCQkJCTxsaT4NCgkJCQkJCQkJPGEgaHJlZj0iI0hvd190b190dXJuX29mZl9Eb21haW5zQnlQcm94eV9TZXJ2aWNlX3dpdGhfR29EYWRkeSI+SG93IHRvIHR1cm4gb2ZmIERvbWFpbnMgQnkgUHJveHkgU2VydmljZSB3aXRoIEdvRGFkZHk8L2E+DQoJCQkJCQk8L2xpPg0KCQkJCTwvdWw+DQoJCTwvdWw+DQoJCTxkaXY+DQoJCQkJPGJyIC8+DQoJCTwvZGl2Pg0KCQk8ZGl2Pg0KCQkJCTxiciAvPg0KCQk8L2Rpdj4NCgkJPHA+QWxyZWFkeSBkb25lIGl0PyBMb2cgaW50byB5b3VyIE5hbWVjaGVhcCBhY2NvdW50IGFuZCBjbGljayB0aGUgYmFubmVyIGJlbG93IHRvIGJlZ2luIHRoZSB0cmFuc2Zlci4gVGhlIHBhcnQgPGEgaHJlZj0iI0FjY2VwdF9Hb0RhZGR5X1RyYW5zZmVyIj5BY2NlcHQgR29EYWRkeSBUcmFuc2ZlcjwvYT4gd2lsbCBhbHNvIGNvbWUgaW4gaGFuZHkgdG8gbWFrZSB0aGUgdHJhbnNmZXIgcXVpY2tlci48L3A+DQoJCTxwPg0KCQkJCTxhIGhyZWY9Imh0dHBzOi8vd3d3Lm5hbWVjaGVhcC5jb20vZG9tYWlucy90cmFuc2Zlci90cmFuc2Zlci1mcm9tLWdvZGFkZHkiPg0KCQkJCQkJPGltZyBjbGFzcz0ia2ItaW1hZ2UiIHNyYz0iaHR0cHM6Ly9OYW1lY2hlYXAuc2ltcGxla2IuY29tL1NpdGVDb250ZW50cy8yLTdDMjJENTIzNkE0NTQzRUI4MjdGM0JEODkzNkUxNTNFL21lZGlhL2tiLWNhcmQtdHJhbnNmZXItZ2QucG5nIiBhbHQ9IlRyYW5zZmVyIGEgZG9tYWluIGZyb20gR29EYWRkeSIgLz4NCgkJCQk8L2E+DQoJCTwvcD4NCgkJPGJyIC8+DQoJCTxoMyBpZD0iVW5sb2NrX0dvRGFkZHlfRG9tYWluIj4xLiBVbmxvY2sgR29EYWRkeSBEb21haW48L2gzPg0KCQk8dWw+DQoJCQkJPGxpPkxvZ2luIHRvIHlvdXIgR29EYWRkeSBhY2NvdW50LjwvbGk+DQoJCQkJPGxpPkNsaWNrIG9uIDxiPk15IEFjY291bnQ8L2I+IGFuZCBzZWxlY3QgPGI+RG9tYWluczwvYj4gZnJvbSB0aGUgZHJvcC1kb3duIG1lbnU6wqAgPGJyIC8+PGJyIC8+PGltZyBjbGFzcz0ia2ItaW1hZ2UiIHNyYz0iaHR0cHM6Ly9OYW1lY2hlYXAuc2ltcGxla2IuY29tL1NpdGVDb250ZW50cy8yLTdDMjJENTIzNkE0NTQzRUI4MjdGM0JEODkzNkUxNTNFL21lZGlhL0dvRGFkZHlUcmFuc2ZlcjEucG5nIiAvPjwvbGk+DQoJCQkJPGJyIC8+DQoJCQkJPGJyIC8+DQoJCQkJPGxpPkZpbmQgdGhlIGRvbWFpbiB5b3Ugd2FudCB0byB0cmFuc2ZlciBhbmQgY2xpY2sgPGI+T248L2I+IGluIHRoZSA8Yj5Mb2NrPC9iPiBjb2x1bW4gbmV4dCB0byBpdC4gSXQgd2lsbCBiZSBjaGFuZ2VkIHRvIDxiPk9mZjwvYj4gb25jZSB0aGUgZG9tYWluIGlzIHVubG9ja2VkOiANCjxiciAvPjxiciAvPjxpbWcgY2xhc3M9ImtiLWltYWdlIiBzcmM9Imh0dHBzOi8vTmFtZWNoZWFwLnNpbXBsZWtiLmNvbS9TaXRlQ29udGVudHMvMi03QzIyRDUyMzZBNDU0M0VCODI3RjNCRDg5MzZFMTUzRS9tZWRpYS9Hb0RhZGR5VHJhbnNmZXIyYmV0YS5wbmciIC8+PC9saT4NCgkJCQk8YnIgLz4NCgkJPC91bD4NCgkJPHA+DQoJCQkJPGI+SW1wb3J0YW50OjwvYj4gSWYgeW91IG1ha2UgYW55IGNoYW5nZXMgdG8gdGhlIDxiPlJlZ2lzdHJhbnQgRmlyc3QgYW5kIExhc3QgbmFtZTwvYj4sIDxiPk9yZ2FuaXphdGlvbiBuYW1lPC9iPiBvciA8Yj5FbWFpbCBhZGRyZXNzPC9iPiwgR29EYWRkeSB3aWxsIHB1dCBhIDxiPjYwLWRheSBsb2NrPC9iPiB0aGF0IHdpbGwgcHJldmVudCBvdXRnb2luZyB0cmFuc2ZlcnMuIFVwZGF0ZXMgdG8gYW55IG90aGVyIHBpZWNlIG9mIGNvbnRhY3QgaW5mb3JtYXRpb24gc2hvdWxkIG5vdCB0cmlnZ2VyIHRoaXMgbG9jay48L3A+DQoJCTxwPlNlZSB0aGlzIDxhIGhyZWY9Imh0dHBzOi8vd3d3LmdvZGFkZHkuY29tL2hlbHAvY2hhbmdlLWRvbWFpbi1jb250YWN0LWluZm9ybWF0aW9uLTQxOCI+R29EYWRkeSBhcnRpY2xlPC9hPiBmb3IgbW9yZSBkZXRhaWxzIG9uIHVwZGF0aW5nIGNvbnRhY3QgaW5mb3JtYXRpb24gYXQgR29EYWRkeS48L3A+DQoJCTxwPlRoZSBiZXN0IG9wdGlvbnMgdG8gYXZvaWQgdGhpcyBsb2NrIHdvdWxkIGJlIGVpdGhlciA8YSBocmVmPSJodHRwczovL3d3dy5uYW1lY2hlYXAuY29tL3N1cHBvcnQva25vd2xlZGdlYmFzZS9hcnRpY2xlLmFzcHgvMTA1NjQvMjIwNy9jYW4taS1zZXQtdXAtYXV0b21hdGljLWJpbGxpbmctZm9yLW15LW5hbWVjaGVhcC1zZXJ2aWNlcy8iPnVwZGF0aW5nIHlvdXIgY29udGFjdCBpbmZvIGF0IE5hbWVjaGVhcDwvYT4gYWZ0ZXIgdGhlIHRyYW5zZmVyIGlzIGNvbXBsZXRlZCBvciBjaGFuZ2luZyB0aGUgQWRtaW5pc3RyYXRpdmUgY29udGFjdCBzZXQgYXQgR29EYWRkeS48L3A+DQoJCTxwPlN0aWxsLCBpZiB0aGVyZeKAmXMgYSBuZWVkIHRvIHVwZGF0ZSB0aGUgUmVnaXN0cmFudCBkZXRhaWxzIGF0IEdvRGFkZHkgdXJnZW50bHksIHlvdSBzaG91bGQgYmUgYWJsZSB0byA8YSBocmVmPSJodHRwczovL3VrLmdvZGFkZHkuY29tL2hlbHAvYXBwcm92ZS1teS1yZWdpc3RyYW50LWNvbnRhY3QtdXBkYXRlcy0yNDY1NCI+b3B0IG91dDwvYT4gb2YgdGhlIDYwLWRheSBsb2NrIHZpYSBlbWFpbC4gVGhpcyBvcHRpb24gaXMgYXZhaWxhYmxlIG9ubHkgaWYgRG9tYWluIFByaXZhY3kgaXMgdHVybmVkIG9mZiBiZWZvcmVoYW5kLjwvcD4NCgkJPHA+Rm9yIGNhc2VzIHdoZXJlIHRoZSA2MC1kYXkgbG9jayBoYXMgYWxyZWFkeSBiZWVuIHBsYWNlZCBvbiBhIGRvbWFpbiBuYW1lLCBHb0RhZGR5IHByb3ZpZGVzIGEgc3BlY2lhbCBwcm9jZXNzIHRvIHJlbW92ZSB0aGlzIGxvY2suIENvbnRhY3QgR29EYWRkeSdzIFJldmlldyA2MCBkZXBhcnRtZW50IGF0IDxpPnJldmlldzYwQGdvZGFkZHkuY29tPC9pPiB0byBoYXZlIHRoZW0gcmV2aWV3IHRoZSBjYXNlIGFuZCByZW1vdmUgdGhlIGxvY2ssIGlmIHBvc3NpYmxlLjwvcD4NCgkJPGJyIC8+DQoJCTxiciAvPg0KCQk8aDMgaWQ9Ik9idGFpbl9Hb0RhZGR5X0F1dGhfQ29kZSI+Mi4gT2J0YWluIEdvRGFkZHkgQXV0aCBDb2RlPC9oMz4NCgkJPHVsPg0KCQkJCTxsaT5Mb2dpbiB0byB5b3VyIEdvRGFkZHkgYWNjb3VudC48L2xpPg0KCQkJCTxsaT5DbGljayBvbiA8Yj5NeSBBY2NvdW50PC9iPiBhbmQgc2VsZWN0IDxiPkRvbWFpbnM8L2I+IGZyb20gdGhlIGRyb3AtZG93biBtZW51LjwvbGk+DQoJCQkJPGxpPkNsaWNrIG9uIHRoZSBkb21haW4sIGZvciB3aGljaCB5b3UgbmVlZCBhbiBBdXRoIENvZGUsIHRvIGFjY2VzcyB0aGUgZG9tYWluIHNldHRpbmdzIHBhZ2U6PGJyIC8+PGJyIC8+PGltZyBjbGFzcz0ia2ItaW1hZ2UiIHNyYz0iaHR0cHM6Ly9OYW1lY2hlYXAuc2ltcGxla2IuY29tL1NpdGVDb250ZW50cy8yLTdDMjJENTIzNkE0NTQzRUI4MjdGM0JEODkzNkUxNTNFL21lZGlhL0dvRGFkZHlUcmFuc2ZlcjNiZXRhLnBuZyIgLz48L2xpPg0KCQkJCTxiciAvPg0KCQkJCTxsaT5TY3JvbGwgZG93biB0byB0aGUgPGI+VHJhbnNmZXI8L2I+IHNlY3Rpb24gYW5kIGNsaWNrIG9uIDxiPlRyYW5zZmVyIHRvIEFub3RoZXIgUmVnaXN0cmFyPC9iPjo8YnIgLz48YnIgLz48aW1nIGNsYXNzPSJrYi1pbWFnZSIgc3JjPSJodHRwczovL05hbWVjaGVhcC5zaW1wbGVrYi5jb20vU2l0ZUNvbnRlbnRzLzItN0MyMkQ1MjM2QTQ1NDNFQjgyN0YzQkQ4OTM2RTE1M0UvbWVkaWEvR29EYWRkeVRyYW5zZmVyNC5wbmciIC8+PC9saT4NCgkJCQk8YnIgLz4NCgkJCQk8bGk+Q2xpY2sgPGI+Q29udGludWU8L2I+OiA8YnIgLz48YnIgLz48aW1nIGNsYXNzPSJrYi1pbWFnZSIgc3JjPSJodHRwczovL05hbWVjaGVhcC5zaW1wbGVrYi5jb20vU2l0ZUNvbnRlbnRzLzItN0MyMkQ1MjM2QTQ1NDNFQjgyN0YzQkQ4OTM2RTE1M0UvbWVkaWEvMjAyNC0wNi0yMV8xNS0yMy5wbmciIC8+PGJyIC8+PC9saT4NCgkJCQk8YnIgLz4NCgkJCQk8YnIgLz4NCgkJCQk8bGk+U2VsZWN0IDxiPkNsaWNrIGhlcmUgdG8gc2VlIEF1dGhvcml6YXRpb24gQ29kZTwvYj46PGJyIC8+PGJyIC8+PGltZyBjbGFzcz0ia2ItaW1hZ2UiIHNyYz0iaHR0cHM6Ly9OYW1lY2hlYXAuc2ltcGxla2IuY29tL1NpdGVDb250ZW50cy8yLTdDMjJENTIzNkE0NTQzRUI4MjdGM0JEODkzNkUxNTNFL21lZGlhL0dvRGFkZHlUcmFuc2ZlcjYucG5nIiAvPjwvbGk+DQoJCQkJPGJyIC8+DQoJCTwvdWw+DQoJCTxwPllvdSBjYW4gY29weSB0aGUgY29kZSBkaXJlY3RseSBmcm9tIHRoaXMgYXJlYS4gQWRkaXRpb25hbGx5LCB5b3XigJlsbCByZWNlaXZlIHRoZSBjb2RlIHRvIHlvdXIgPGk+YWRtaW5pc3RyYXRpdmUgZW1haWw8L2k+IGFkZHJlc3MgaW4gY2FzZSB5b3XigJlkIG5lZWQgdG8gdXNlIGl0IGxhdGVyLjwvcD4NCgkJPGJyIC8+DQoJCTxiciAvPg0KCQk8aDMgaWQ9IkRpc2FibGVfR29EYWRkeV9XaG9pc19Qcml2YWN5X1Byb3RlY3Rpb24iPjMuIERpc2FibGUgR29EYWRkeSBXaG9pcyBQcml2YWN5IFByb3RlY3Rpb24gKElmIEFwcGxpY2FibGUpPC9oMz4NCgkJPHA+V2hlbiBHb0RhZGR5IHByaXZhY3kgcHJvdGVjdGlvbiBpcyBlbmFibGVkLCBpdCBpcyBhZ2FpbnN0IHRoZWlyIHBvbGljeSB0byBhbGxvdyBkb21haW4gdHJhbnNmZXJzLiBBbnkgZG9tYWluIHRyYW5zZmVyIHJlcXVlc3RzIHdpbGwgYmUgZGVjbGluZWQgd2hpbGUgUHJpdmFjeSBQcm90ZWN0aW9uIGlzIGFjdGl2ZS4gWW91IHdpbGwgbmVlZCB0byBkaXNhYmxlIGl0IGJlZm9yZSBzdWJtaXR0aW5nIHRoZSB0cmFuc2Zlci48L3A+DQoJCTxwPg0KCQkJCTxiPk5PVEU8L2I+OiBQcml2YXRlIFJlZ2lzdHJhdGlvbiBjYW5jZWxsYXRpb25zIGFyZSBpcnJldmVyc2libGUuIFRoaXMgbWVhbnMgdGhhdCBvbmNlIGNhbmNlbGVkLCBpdCBjYW4ndCBiZSBlbmFibGVkIGJhY2sgYW5kLCBpZiB5b3UgZGVjaWRlIHRvIHN0YXkgd2l0aCBHb0RhZGR5LCB0aGUgcHJpdmF0ZSByZWdpc3RyYXRpb24gbmVlZHMgdG8gYmUgcHVyY2hhc2VkIGFnYWluLjwvcD4NCgkJPGJyIC8+DQoJCTxoMyBpZD0iSG93X3RvX2NhbmNlbF9Eb21haW5fUHJvdGVjdGlvbl93aXRoX0dvRGFkZHkiPkhvdyB0byBjYW5jZWwgRG9tYWluIFByb3RlY3Rpb24gd2l0aCBHb0RhZGR5PC9oMz4NCgkJPHA+VGhpcyBzdGVwIGlzIHJlcXVpcmVkIGlmIHlvdSBoYXZlIGEgPGI+cGFpZDwvYj4gRG9tYWluIFByb3RlY3Rpb24gcGxhbiB3aXRoIEdvRGFkZHkgKDxiPkZ1bGwgRG9tYWluIFByaXZhY3kgJmFtcDsgUHJvdGVjdGlvbjwvYj4gb3IgPGI+VWx0aW1hdGUgRG9tYWluIFByb3RlY3Rpb24gJmFtcDsgU2VjdXJpdHk8L2I+KS4gSWYgeW91IGRvIG5vdCBoYXZlIGFueSBwYWlkIG9uZXMsIHNraXAgdGhpcyBzdGVwIGFuZCBwcm9jZWVkIHdpdGggPGEgaHJlZj0iI0hvd190b190dXJuX29mZl9Eb21haW5zQnlQcm94eV9TZXJ2aWNlX3dpdGhfR29EYWRkeSI+SG93IHRvIHR1cm4gb2ZmIERvbWFpbnMgQnkgUHJveHkgU2VydmljZSB3aXRoIEdvRGFkZHk8L2E+IGJlbG93LjwvcD4NCgkJPHVsPg0KCQkJCTxsaT5Mb2dpbiB0byB5b3VyIEdvRGFkZHkgYWNjb3VudC48L2xpPg0KCQkJCTxsaT5DbGljayBvbiA8Yj5NeSBBY2NvdW50PC9iPiBhbmQgc2VsZWN0IDxiPkRvbWFpbnM8L2I+IGZyb20gdGhlIGRyb3AtZG93biBtZW51LjwvbGk+DQoJCQkJPGxpPkNoZWNrIHRoZSBib3ggbmV4dCB0byB0aGUgZG9tYWluKHMpIGluIHF1ZXN0aW9uLjwvbGk+DQoJCQkJPGxpPlNlbGVjdCA8Yj5Qcm90ZWN0aW9uIFBsYW5zPC9iPiBmcm9tIHRoZSBhY3Rpb24gYmFyLCB0aGVuIGNsaWNrIDxiPkRvd25ncmFkZSBQcm90ZWN0aW9uIFBsYW5zPC9iPjo8YnIgLz48YnIgLz48aW1nIGNsYXNzPSJrYi1pbWFnZSIgc3JjPSJodHRwczovL05hbWVjaGVhcC5zaW1wbGVrYi5jb20vU2l0ZUNvbnRlbnRzLzItN0MyMkQ1MjM2QTQ1NDNFQjgyN0YzQkQ4OTM2RTE1M0UvbWVkaWEvR29EYWRkeVRyYW5zZmVyN2JldGEucG5nIiAvPjwvbGk+DQoJCQkJPGJyIC8+DQoJCQkJPGxpPkNob29zZSB0aGUgPGI+QmFzaWMgUHJpdmFjeSBQcm90ZWN0aW9uPC9iPiBwbGFuLjwvbGk+DQoJCQkJPGxpPlNlbGVjdCA8Yj5Db25maXJtIERvd25ncmFkZTwvYj4gYW5kIHRoZW4gPGI+Q29udGludWUgJmFtcDsgVmVyaWZ5PC9iPi4gSWYgeW91IGhhdmUgdHdvLXN0ZXAgdmVyaWZpY2F0aW9uIGVuYWJsZWQgZm9yIHlvdXIgR29EYWRkeSBhY2NvdW50LCB5b3Ugd2lsbCBuZWVkIHRvIGVudGVyIHRoZSBjb2RlIGZyb20gU01TIG9yIHlvdXIgYXV0aGVudGljYXRvciBhcHAuIE90aGVyd2lzZSwgZW50ZXIgdGhlIG9uZS10aW1lIHBhc3N3b3JkIHNlbnQgZnJvbSBHb0RhZGR5IHRvIHlvdXIgcmVnaXN0cmFudCBlbWFpbCBhZGRyZXNzLjwvbGk+DQoJCQkJPGxpPkNob29zZSA8Yj5WZXJpZnk8L2I+IHRvIGZpbmlzaCBkb3duZ3JhZGluZyB5b3VyIGRvbWFpbiBwcm90ZWN0aW9uLjwvbGk+DQoJCTwvdWw+DQoJCTxwPllvdSdsbCBzZWUgYSA8Yj5TdWNjZXNzPC9iPiBjb25maXJtYXRpb24gb25jZSB0aGUgY2hhbmdlcyBhcmUgc2F2ZWQuPC9wPg0KCQk8YnIgLz4NCgkJPGgzIGlkPSJIb3dfdG9fdHVybl9vZmZfRG9tYWluc0J5UHJveHlfU2VydmljZV93aXRoX0dvRGFkZHkiPkhvdyB0byB0dXJuIG9mZiBEb21haW5zIEJ5IFByb3h5IFNlcnZpY2Ugd2l0aCBHb0RhZGR5PC9oMz4NCgkJPHA+UGxlYXNlIHByb2NlZWQgd2l0aCB0aGlzIHN0ZXAgaWYgeW91IGRvIG5vdCBoYXZlIGFueSBwYWlkIERvbWFpbiBQcm90ZWN0aW9uIHBsYW5zIG9yIGlmIGl04oCZcyBiZWVuIGRvd25ncmFkZWQgYWxyZWFkeS48L3A+DQoJCTx1bD4NCgkJCQk8bGk+U2lnbiBpbiB0byB5b3VyIEdvRGFkZHkgYWNjb3VudC48L2xpPg0KCQkJCTxsaT5DbGljayBvbiA8Yj5NeSBBY2NvdW50PC9iPiBhbmQgc2VsZWN0IDxiPkRvbWFpbnM8L2I+IGZyb20gdGhlIGRyb3AtZG93biBtZW51LjwvbGk+DQoJCQkJPGxpPkNsaWNrIG9uIHlvdXIgZG9tYWluIG5hbWUgZnJvbSB0aGUgbGlzdCB0byBhY2Nlc3MgdGhlIGRvbWFpbiBzZXR0aW5ncyBwYWdlLjwvbGk+DQoJCQkJPGxpPkluIHRoZSA8Yj5PdmVydmlldzwvYj4gdGFiLCBsb2NhdGUgPGI+RG9tYWluIFByaXZhY3k8L2I+IGFuZCBjbGljayBvbiA8Yj5DaGFuZ2U8L2I+OjxiciAvPjxiciAvPjxpbWcgY2xhc3M9ImtiLWltYWdlIiBzcmM9Imh0dHBzOi8vTmFtZWNoZWFwLnNpbXBsZWtiLmNvbS9TaXRlQ29udGVudHMvMi03QzIyRDUyMzZBNDU0M0VCODI3RjNCRDg5MzZFMTUzRS9tZWRpYS9Eb21haW5Qcml2YWN5R0QucG5nIiAvPjwvbGk+DQoJCQkJPGJyIC8+DQoJCQkJPGxpPkNob29zZSA8Yj5PZmY8L2I+IGFuZCBjbGljayBvbiA8Yj5TYXZlPC9iPiBidXR0b24uPC9saT4NCgkJPC91bD4NCgkJPHA+WW91J2xsIHNlZSBhIDxiPlN1Y2Nlc3M8L2I+IGNvbmZpcm1hdGlvbiBvbmNlIHRoZSBjaGFuZ2VzIGFyZSBzYXZlZC48L3A+DQoJCTxwPk9uY2UgdGhlIGRvbWFpbiBuYW1lIGlzIHVubG9ja2VkIGFuZCB5b3UgaGF2ZSByZWNlaXZlZCB5b3VyIEF1dGggQ29kZSwgeW91IG1heSBpbml0aWF0ZSB0aGUgdHJhbnNmZXIgdG8gTmFtZWNoZWFwLiBQbGVhc2UgPGEgaHJlZj0iaHR0cHM6Ly93d3cubmFtZWNoZWFwLmNvbS9zdXBwb3J0L2tub3dsZWRnZWJhc2UvYXJ0aWNsZS5hc3B4LzI1NS84My9ob3ctZG8taS10cmFuc2Zlci1teS1leGlzdGluZy1kb21haW4tdG8tbmFtZWNoZWFwLyI+cmVmZXIgdG8gdGhpcyBhcnRpY2xlPC9hPiBmb3IgbW9yZSBpbmZvcm1hdGlvbiBvbiBob3cgdG8gc3VibWl0IHRoZSB0cmFuc2ZlciB0byB1cywgYW5kIGFueSBvdGhlciBzdGVwcyB0aGF0IG1heSBhcHBseSB0byB5b3UuPC9wPg0KCQk8YnIgLz4NCgkJPGJyIC8+DQoJCTxoMyBpZD0iQWNjZXB0X0dvRGFkZHlfVHJhbnNmZXIiPjQuIEFjY2VwdCBHb0RhZGR5IFRyYW5zZmVyPC9oMz4NCgkJPHA+T25jZSB0aGUgdHJhbnNmZXIgcmVxdWVzdCBoYXMgYmVlbiBwbGFjZWQgYW5kIHRoZSBwcm9jZXNzIGhhcyBiZWVuIGluaXRpYXRlZCBhdCB0aGUgcmVnaXN0cnkgbGV2ZWwgKHVzdWFsbHkgd2l0aGluIDIwIG1pbnV0ZXMpLCB0aGUgdHJhbnNmZXIgYmVnaW5zLiBJdCB0YWtlcyB1cCB0byA1LTcgZGF5cyBmb3IgbW9zdCBUTERzLiBPcHRpb25hbGx5LCB5b3UgY2FuIDxiPmFjY2VwdCB0aGUgdHJhbnNmZXI8L2I+IG9uIEdvRGFkZHkncyBzaWRlIHRvIHNwZWVkIHVwIHRoZSBwcm9jZXNzLiBIZXJl4oCZcyBob3c6PC9wPg0KCQk8dWw+DQoJCQkJPGxpPkJlaW5nIHNpZ25lZCBpbiB0byB5b3VyIEdvRGFkZHkgYWNjb3VudCwgY2xpY2sgb24gPGI+TXkgQWNjb3VudDwvYj4gYW5kIHNlbGVjdCA8Yj5Eb21haW5zPC9iPiBmcm9tIHRoZSBkcm9wLWRvd24gbWVudS48L2xpPg0KCQkJCTxsaT5PcGVuIHRoZSA8Yj5UcmFuc2ZlcjwvYj4gYXJlYSBvbiB5b3VyIGxlZnQ6PGJyIC8+PGJyIC8+PGltZyBjbGFzcz0ia2ItaW1hZ2UiIHNyYz0iaHR0cHM6Ly9OYW1lY2hlYXAuc2ltcGxla2IuY29tL1NpdGVDb250ZW50cy8yLTdDMjJENTIzNkE0NTQzRUI4MjdGM0JEODkzNkUxNTNFL21lZGlhL0dvRGFkZHlUcmFuc2ZlcjliZXRhLnBuZyIgLz48L2xpPg0KCQkJCTxiciAvPg0KCQkJCTxiciAvPg0KCQkJCTxsaT5DbGljayBvbiA8Yj5UcmFuc2ZlcnMgT3V0PC9iPiBhbmQgc2VsZWN0IHRoZSBkb21haW4gbmFtZShzKSB5b3UgYXJlIHRyYW5zZmVycmluZyBvdXQgb2YgR29EYWRkeTo8YnIgLz48YnIgLz48aW1nIGNsYXNzPSJrYi1pbWFnZSIgc3JjPSJodHRwczovL05hbWVjaGVhcC5zaW1wbGVrYi5jb20vU2l0ZUNvbnRlbnRzLzItN0MyMkQ1MjM2QTQ1NDNFQjgyN0YzQkQ4OTM2RTE1M0UvbWVkaWEvR29EYWRkeVRyYW5zZmVyMTAucG5nIiAvPjwvbGk+DQoJCQkJPGJyIC8+DQoJCQkJPGJyIC8+DQoJCQkJPGxpPlNlbGVjdCA8Yj5BcHByb3ZlIFRyYW5zZmVyPC9iPiBhbmQgY2xpY2sgPGI+T0s8L2I+LiBUaGUgcmVxdWVzdCB3aWxsIGJlIHByb2Nlc3NlZCB3aXRoaW4gMTUgbWludXRlcy48L2xpPg0KCQk8L3VsPg0KCQk8YnIgLz4NCgkJPHA+QW5kIHRoYXTigJlzIGl0ISBXZSBob3BlIHRoaXMgZ3VpZGUgd2FzIHVzZWZ1bC48L3A+DQo=","NewTillDate":null,"FeaturedTillDate":null,"ModifiedDateTime":"2024-06-25T11:15:43.0000000","LiveDateTime":"1754-02-02T00:00:00.0000000","CreatedDateTime":"2010-05-20T20:12:31.0000000","ApprovalDatetime":"2010-05-21T12:44:45.0000000","RequestCount":235451,"MarkedAsNew":false,"MarkedAsFeatured":false,"RatingValue":3,"CategoryPaths":[{"__type":"Nc:SimpleKB:Abstractions:Dtos:CategoryPathDto","Level":1,"CategoryId":2209,"CategoryName":"Domain Transfers"},{"__type":"Nc:SimpleKB:Abstractions:Dtos:CategoryPathDto","Level":2,"CategoryId":83,"CategoryName":"Transfer to Namecheap"}],"AssociatedCategories":[{"CategoryId":83,"CategoryName":"Transfer to Namecheap","CategoryDisplayName":"Domain TransfersTransfer to Namecheap"}],"AssociatedTags":[{"TagId":871,"Tag":"transfer-howto"}],"RelatedArticles":[{"ArticleId":255,"PreferedCategoryId":83,"ArticleTypeId":0,"ArticleName":"How do I transfer my existing domain to Namecheap?","ArticleTypeName":null,"Title":"How do I transfer my existing domain to Namecheap?","LiveDateTime":null,"ModifiedDateTime":"09/23/2024","MarkedAsNew":false,"MarkedAsFeatured":false},{"ArticleId":582,"PreferedCategoryId":83,"ArticleTypeId":3,"ArticleName":"How do I transfer a domain to Namecheap with minimal downtime?","ArticleTypeName":"How_To","Title":"How do I transfer a domain to Namecheap with minimal downtime?","LiveDateTime":null,"ModifiedDateTime":"01/28/2025","MarkedAsNew":false,"MarkedAsFeatured":false},{"ArticleId":9301,"PreferedCategoryId":83,"ArticleTypeId":3,"ArticleName":"How can I transfer an expired domain from GoDaddy?","ArticleTypeName":"How_To","Title":"How can I transfer an expired domain from GoDaddy?","LiveDateTime":null,"ModifiedDateTime":"10/06/2020","MarkedAsNew":false,"MarkedAsFeatured":false}],"AssociatedMedias":[],"PreferredCategoryId":0,"RootParentCategoryName":"","RootParentCategoryId":0},"status":200,"statusText":"OK"},"/api/v1/ncpl/simplekb/getcategorybycategoryid:\"{\\\"categoryId\\\":83}\"":{"body":{"__type":"Nc:SimpleKB:Abstractions:Dtos:CategoryDto","ParentCategoryId":2209,"Parent_Category_Name":"Domain Transfers","FriendlyId":null,"ApprovedYN":true,"TreatAsTopicYN":false,"CreatedDateTime":"05/20/2010 19:02:50","CurrentCategoryPaths":[{"__type":"Nc:SimpleKB:Abstractions:Dtos:CategoryPathDto","Level":1,"CategoryId":2209,"CategoryName":"Domain Transfers"},{"__type":"Nc:SimpleKB:Abstractions:Dtos:CategoryPathDto","Level":2,"CategoryId":83,"CategoryName":"Transfer to Namecheap"}],"RelatedCategories":[],"AssociatedArticles":[{"ArticleId":10630,"Title":"How to bulk transfer domains in and out of Namecheap","ArticleName":"How to bulk transfer domains in and out of Namecheap","LiveDateTime":"02/02/1754 00:00:00","NewTillDate":null,"FeaturedTillDate":null,"ModifiedDateTime":"04/23/2025"},{"ArticleId":9175,"Title":"How to Transfer a Domain","ArticleName":"How to Transfer a Domain","LiveDateTime":"02/02/1754 00:00:00","NewTillDate":null,"FeaturedTillDate":null,"ModifiedDateTime":"06/11/2024"},{"ArticleId":9798,"Title":"How do I verify that my domain is eligible for transfer?","ArticleName":"How do I verify that my domain is eligible for transfer?","LiveDateTime":"02/02/1754 00:00:00","NewTillDate":null,"FeaturedTillDate":null,"ModifiedDateTime":"02/06/2025"},{"ArticleId":580,"Title":"Transfer Statuses","ArticleName":"Transfer Statuses","LiveDateTime":"02/02/1754 00:00:00","NewTillDate":null,"FeaturedTillDate":null,"ModifiedDateTime":"06/27/2019"},{"ArticleId":582,"Title":"How do I transfer a domain to Namecheap with minimal downtime?","ArticleName":"How do I transfer a domain to Namecheap with minimal downtime?","LiveDateTime":"02/02/1754 00:00:00","NewTillDate":null,"FeaturedTillDate":null,"ModifiedDateTime":"01/28/2025"},{"ArticleId":9574,"Title":"How to prevent domain transfer failure","ArticleName":"How to prevent domain transfer failure","LiveDateTime":"02/02/1754 00:00:00","NewTillDate":null,"FeaturedTillDate":null,"ModifiedDateTime":"06/16/2020"},{"ArticleId":9176,"Title":"Transfer Tips During Promotions","ArticleName":"Transfer Tips During Promotions","LiveDateTime":"02/02/1754 00:00:00","NewTillDate":null,"FeaturedTillDate":null,"ModifiedDateTime":"11/29/2021"},{"ArticleId":263,"Title":"If I transfer a domain to Namecheap, will it be renewed for another year?","ArticleName":"If I transfer a domain to Namecheap, will it be renewed for another year?","LiveDateTime":"02/02/1754 00:00:00","NewTillDate":null,"FeaturedTillDate":null,"ModifiedDateTime":"06/02/2018"},{"ArticleId":266,"Title":"Can I transfer an expired domain to Namecheap?","ArticleName":"Can I transfer an expired domain to Namecheap?","LiveDateTime":"02/02/1754 00:00:00","NewTillDate":null,"FeaturedTillDate":null,"ModifiedDateTime":"05/26/2018"},{"ArticleId":34,"Title":"I paid for a transfer, but the transfer was unsuccessful. Can I get a refund?","ArticleName":"I paid for a transfer, but the transfer was unsuccessful. Can I get a refund?","LiveDateTime":"02/02/1754 00:00:00","NewTillDate":null,"FeaturedTillDate":null,"ModifiedDateTime":"07/19/2024"},{"ArticleId":262,"Title":"If I transfer my domain to Namecheap, will I lose the remaining time I have with my current registrar?","ArticleName":"If I transfer my domain to Namecheap, will I lose the remaining time I have with my current registrar?","LiveDateTime":"02/02/1754 00:00:00","NewTillDate":null,"FeaturedTillDate":null,"ModifiedDateTime":"05/09/2020"},{"ArticleId":270,"Title":"What does “Awaiting release from previous registrar” transfer status mean?","ArticleName":"What does “Awaiting release from previous registrar” transfer status mean?","LiveDateTime":"02/02/1754 00:00:00","NewTillDate":null,"FeaturedTillDate":null,"ModifiedDateTime":"11/12/2019"},{"ArticleId":275,"Title":"What does “Awaiting auth code” transfer status mean?","ArticleName":"What does “Awaiting auth code” transfer status mean?","LiveDateTime":"02/02/1754 00:00:00","NewTillDate":null,"FeaturedTillDate":null,"ModifiedDateTime":"01/04/2019"},{"ArticleId":9251,"Title":"How do I cancel a pending domain transfer?","ArticleName":"How do I cancel a pending domain transfer?","LiveDateTime":"02/02/1754 00:00:00","NewTillDate":null,"FeaturedTillDate":null,"ModifiedDateTime":"02/06/2025"},{"ArticleId":257,"Title":"Will the nameservers associated with my domain be transferred over?","ArticleName":"Will the nameservers associated with my domain be transferred over?","LiveDateTime":"02/02/1754 00:00:00","NewTillDate":null,"FeaturedTillDate":null,"ModifiedDateTime":"12/22/2020"},{"ArticleId":9888,"Title":"How to transfer a domain from Domain.com","ArticleName":"How to transfer a domain from Domain.com","LiveDateTime":"02/02/1754 00:00:00","NewTillDate":null,"FeaturedTillDate":null,"ModifiedDateTime":"01/04/2019"},{"ArticleId":9889,"Title":"How to transfer a domain from Ipage","ArticleName":"How to transfer a domain from Ipage","LiveDateTime":"02/02/1754 00:00:00","NewTillDate":null,"FeaturedTillDate":null,"ModifiedDateTime":"01/04/2019"},{"ArticleId":9911,"Title":"How to transfer a domain from Enom","ArticleName":"How to transfer a domain from Enom","LiveDateTime":"02/02/1754 00:00:00","NewTillDate":null,"FeaturedTillDate":null,"ModifiedDateTime":"01/04/2019"},{"ArticleId":9912,"Title":"How to transfer a domain from HostGator","ArticleName":"How to transfer a domain from HostGator","LiveDateTime":"02/02/1754 00:00:00","NewTillDate":null,"FeaturedTillDate":null,"ModifiedDateTime":"02/06/2025"},{"ArticleId":255,"Title":"How do I transfer my existing domain to Namecheap?","ArticleName":"How do I transfer my existing domain to Namecheap?","LiveDateTime":"02/02/1754 00:00:00","NewTillDate":null,"FeaturedTillDate":null,"ModifiedDateTime":"09/23/2024"},{"ArticleId":9301,"Title":"How can I transfer an expired domain from GoDaddy?","ArticleName":"How can I transfer an expired domain from GoDaddy?","LiveDateTime":"02/02/1754 00:00:00","NewTillDate":null,"FeaturedTillDate":null,"ModifiedDateTime":"10/06/2020"},{"ArticleId":876,"Title":"How to transfer a domain from GoDaddy","ArticleName":"How to transfer a domain from GoDaddy","LiveDateTime":"02/02/1754 00:00:00","NewTillDate":null,"FeaturedTillDate":null,"ModifiedDateTime":"06/25/2024"},{"ArticleId":878,"Title":"How to transfer a domain from 1&1 (1and1.com)","ArticleName":"How to transfer a domain from 1&1 (1and1.com)","LiveDateTime":"02/02/1754 00:00:00","NewTillDate":null,"FeaturedTillDate":null,"ModifiedDateTime":"07/16/2019"},{"ArticleId":1398,"Title":"How to transfer a domain from Wild West Domains","ArticleName":"How to transfer a domain from Wild West Domains","LiveDateTime":"02/02/1754 00:00:00","NewTillDate":null,"FeaturedTillDate":null,"ModifiedDateTime":"01/04/2019"},{"ArticleId":881,"Title":"How to transfer a domain from Name.com","ArticleName":"How to transfer a domain from Name.com","LiveDateTime":"02/02/1754 00:00:00","NewTillDate":null,"FeaturedTillDate":null,"ModifiedDateTime":"09/17/2018"},{"ArticleId":1400,"Title":"How to transfer a domain from Internet.bs","ArticleName":"How to transfer a domain from Internet.bs","LiveDateTime":"02/02/1754 00:00:00","NewTillDate":null,"FeaturedTillDate":null,"ModifiedDateTime":"05/12/2021"},{"ArticleId":1399,"Title":"How to transfer a domain from Hover","ArticleName":"How to transfer a domain from Hover","LiveDateTime":"02/02/1754 00:00:00","NewTillDate":null,"FeaturedTillDate":null,"ModifiedDateTime":"05/12/2021"},{"ArticleId":884,"Title":"How to transfer a domain from directNIC","ArticleName":"How to transfer a domain from directNIC","LiveDateTime":"02/02/1754 00:00:00","NewTillDate":null,"FeaturedTillDate":null,"ModifiedDateTime":"01/04/2019"},{"ArticleId":880,"Title":"How to transfer a domain from Melbourne IT","ArticleName":"How to transfer a domain from Melbourne IT","LiveDateTime":"02/02/1754 00:00:00","NewTillDate":null,"FeaturedTillDate":null,"ModifiedDateTime":"01/04/2019"},{"ArticleId":1402,"Title":"How to transfer a domain from Fast Domain","ArticleName":"How to transfer a domain from Fast Domain","LiveDateTime":"02/02/1754 00:00:00","NewTillDate":null,"FeaturedTillDate":null,"ModifiedDateTime":"05/12/2021"},{"ArticleId":877,"Title":"How to transfer a domain from Network Solutions","ArticleName":"How to transfer a domain from Network Solutions","LiveDateTime":"02/02/1754 00:00:00","NewTillDate":null,"FeaturedTillDate":null,"ModifiedDateTime":"12/09/2023"},{"ArticleId":879,"Title":"How to transfer a domain from Tucows","ArticleName":"How to transfer a domain from Tucows","LiveDateTime":"02/02/1754 00:00:00","NewTillDate":null,"FeaturedTillDate":null,"ModifiedDateTime":"01/04/2019"},{"ArticleId":1207,"Title":"How to transfer a domain from Bluehost","ArticleName":"How to transfer a domain from Bluehost","LiveDateTime":"02/02/1754 00:00:00","NewTillDate":null,"FeaturedTillDate":null,"ModifiedDateTime":"03/27/2024"},{"ArticleId":9298,"Title":"How to transfer a domain from Google Apps","ArticleName":"How to transfer a domain from Google Apps","LiveDateTime":"02/02/1754 00:00:00","NewTillDate":null,"FeaturedTillDate":null,"ModifiedDateTime":"06/03/2018"},{"ArticleId":10629,"Title":"How to transfer a domain from Google Domains","ArticleName":"How to transfer a domain from Google Domains","LiveDateTime":"02/02/1754 00:00:00","NewTillDate":null,"FeaturedTillDate":null,"ModifiedDateTime":"08/21/2023"},{"ArticleId":9799,"Title":"Transfer of .ES / .COM.ES / .ORG.ES / .NOM.ES to Namecheap","ArticleName":"Transfer of .ES / .COM.ES / .ORG.ES / .NOM.ES to Namecheap","LiveDateTime":"02/02/1754 00:00:00","NewTillDate":null,"FeaturedTillDate":null,"ModifiedDateTime":"02/11/2025"}],"AssociatedTags":[],"CategoryId":83,"CategoryName":"Transfer to Namecheap"},"status":200,"statusText":"OK"},"/api/v1/ncpl/simplekb/getcategories:\"{\\\"parentCategoryId\\\":0,\\\"getTree\\\":true}\"":{"body":[{"__type":"Nc:SimpleKB:Abstractions:Dtos:CategoryItemDto","ParentCategoryId":93,"TreatAsTopicYN":false,"Description":"","ImageUrl":"","ShortDesc":"","CategoryId":2216,"CategoryName":"Spam Protection"},{"__type":"Nc:SimpleKB:Abstractions:Dtos:CategoryItemDto","ParentCategoryId":14,"TreatAsTopicYN":false,"Description":"","ImageUrl":"","ShortDesc":"","CategoryId":2217,"CategoryName":"Renewal"},{"__type":"Nc:SimpleKB:Abstractions:Dtos:CategoryItemDto","ParentCategoryId":14,"TreatAsTopicYN":false,"Description":"","ImageUrl":"","ShortDesc":"","CategoryId":2218,"CategoryName":"cPanel SSL Plugin"},{"__type":"Nc:SimpleKB:Abstractions:Dtos:CategoryItemDto","ParentCategoryId":12,"TreatAsTopicYN":false,"Description":"","ImageUrl":"","ShortDesc":"","CategoryId":2219,"CategoryName":"PHP Configuration"},{"__type":"Nc:SimpleKB:Abstractions:Dtos:CategoryItemDto","ParentCategoryId":14,"TreatAsTopicYN":false,"Description":"","ImageUrl":"","ShortDesc":"","CategoryId":2221,"CategoryName":"Multi-Domain SSL Certificates"},{"__type":"Nc:SimpleKB:Abstractions:Dtos:CategoryItemDto","ParentCategoryId":14,"TreatAsTopicYN":false,"Description":"","ImageUrl":"","ShortDesc":"","CategoryId":2222,"CategoryName":"Cancellation"},{"__type":"Nc:SimpleKB:Abstractions:Dtos:CategoryItemDto","ParentCategoryId":14,"TreatAsTopicYN":false,"Description":"","ImageUrl":"","ShortDesc":"","CategoryId":2223,"CategoryName":"Browser errors"},{"__type":"Nc:SimpleKB:Abstractions:Dtos:CategoryItemDto","ParentCategoryId":14,"TreatAsTopicYN":false,"Description":"","ImageUrl":"","ShortDesc":"","CategoryId":2224,"CategoryName":"Site Seal, Logo"},{"__type":"Nc:SimpleKB:Abstractions:Dtos:CategoryItemDto","ParentCategoryId":12,"TreatAsTopicYN":false,"Description":"","ImageUrl":"","ShortDesc":"","CategoryId":2225,"CategoryName":"SEO"},{"__type":"Nc:SimpleKB:Abstractions:Dtos:CategoryItemDto","ParentCategoryId":93,"TreatAsTopicYN":false,"Description":"","ImageUrl":"","ShortDesc":"","CategoryId":2226,"CategoryName":"Email Migration"},{"__type":"Nc:SimpleKB:Abstractions:Dtos:CategoryItemDto","ParentCategoryId":2211,"TreatAsTopicYN":false,"Description":"","ImageUrl":"","ShortDesc":"","CategoryId":2227,"CategoryName":"SSL Resellers"},{"__type":"Nc:SimpleKB:Abstractions:Dtos:CategoryItemDto","ParentCategoryId":0,"TreatAsTopicYN":true,"Description":"","ImageUrl":"/assets/img/pictograms/150/cloud-red.png","ShortDesc":"","CategoryId":2228,"CategoryName":"Apps","SubCategories":[{"__type":"Nc:SimpleKB:Abstractions:Dtos:CategoryItemDto","ParentCategoryId":2228,"TreatAsTopicYN":false,"Description":"","ImageUrl":"","ShortDesc":"","CategoryId":2251,"CategoryName":"Supersonic CDN"},{"__type":"Nc:SimpleKB:Abstractions:Dtos:CategoryItemDto","ParentCategoryId":2228,"TreatAsTopicYN":false,"Description":"","ImageUrl":"","ShortDesc":"","CategoryId":2298,"CategoryName":"Site Maker"},{"__type":"Nc:SimpleKB:Abstractions:Dtos:CategoryItemDto","ParentCategoryId":2228,"TreatAsTopicYN":false,"Description":"","ImageUrl":"","ShortDesc":"","CategoryId":177,"CategoryName":"Google Workspace (formerly G Suite)"}]},{"__type":"Nc:SimpleKB:Abstractions:Dtos:CategoryItemDto","ParentCategoryId":2211,"TreatAsTopicYN":false,"Description":"","ImageUrl":"","ShortDesc":"","CategoryId":2229,"CategoryName":"Hosting Resellers"},{"__type":"Nc:SimpleKB:Abstractions:Dtos:CategoryItemDto","ParentCategoryId":34,"TreatAsTopicYN":false,"Description":"","ImageUrl":"","ShortDesc":"","CategoryId":2232,"CategoryName":"DNSSEC"},{"__type":"Nc:SimpleKB:Abstractions:Dtos:CategoryItemDto","ParentCategoryId":34,"TreatAsTopicYN":false,"Description":"","ImageUrl":"","ShortDesc":"","CategoryId":2234,"CategoryName":"Google Workspace (formerly G Suite)"},{"__type":"Nc:SimpleKB:Abstractions:Dtos:CategoryItemDto","ParentCategoryId":34,"TreatAsTopicYN":false,"Description":"","ImageUrl":"","ShortDesc":"","CategoryId":2237,"CategoryName":"Host records setup"},{"__type":"Nc:SimpleKB:Abstractions:Dtos:CategoryItemDto","ParentCategoryId":14,"TreatAsTopicYN":false,"Description":"","ImageUrl":"","ShortDesc":"","CategoryId":2238,"CategoryName":"SSL installation errors"},{"__type":"Nc:SimpleKB:Abstractions:Dtos:CategoryItemDto","ParentCategoryId":0,"TreatAsTopicYN":false,"Description":"","ImageUrl":"/assets/img/pictograms/150/easywp-red.png","ShortDesc":"","CategoryId":2239,"CategoryName":"EasyWP","SubCategories":[{"__type":"Nc:SimpleKB:Abstractions:Dtos:CategoryItemDto","ParentCategoryId":2239,"TreatAsTopicYN":false,"Description":"","ImageUrl":"","ShortDesc":"","CategoryId":2280,"CategoryName":"Getting Started"},{"__type":"Nc:SimpleKB:Abstractions:Dtos:CategoryItemDto","ParentCategoryId":2239,"TreatAsTopicYN":false,"Description":"","ImageUrl":"","ShortDesc":"","CategoryId":2279,"CategoryName":"General Information"},{"__type":"Nc:SimpleKB:Abstractions:Dtos:CategoryItemDto","ParentCategoryId":2239,"TreatAsTopicYN":false,"Description":"","ImageUrl":"","ShortDesc":"","CategoryId":2281,"CategoryName":"WordPress Migration"},{"__type":"Nc:SimpleKB:Abstractions:Dtos:CategoryItemDto","ParentCategoryId":2239,"TreatAsTopicYN":false,"Description":"","ImageUrl":"","ShortDesc":"","CategoryId":2282,"CategoryName":"Plugins and Themes"},{"__type":"Nc:SimpleKB:Abstractions:Dtos:CategoryItemDto","ParentCategoryId":2239,"TreatAsTopicYN":false,"Description":"","ImageUrl":"","ShortDesc":"","CategoryId":2284,"CategoryName":"WordPress Management"},{"__type":"Nc:SimpleKB:Abstractions:Dtos:CategoryItemDto","ParentCategoryId":2239,"TreatAsTopicYN":false,"Description":"","ImageUrl":"","ShortDesc":"","CategoryId":2285,"CategoryName":"SFTP and Database access"},{"__type":"Nc:SimpleKB:Abstractions:Dtos:CategoryItemDto","ParentCategoryId":2239,"TreatAsTopicYN":false,"Description":"","ImageUrl":"","ShortDesc":"","CategoryId":2286,"CategoryName":"Domains questions"},{"__type":"Nc:SimpleKB:Abstractions:Dtos:CategoryItemDto","ParentCategoryId":2239,"TreatAsTopicYN":false,"Description":"","ImageUrl":"","ShortDesc":"","CategoryId":2288,"CategoryName":"Billing questions"},{"__type":"Nc:SimpleKB:Abstractions:Dtos:CategoryItemDto","ParentCategoryId":2239,"TreatAsTopicYN":false,"Description":"","ImageUrl":"","ShortDesc":"","CategoryId":2287,"CategoryName":"SSL questions"}]},{"__type":"Nc:SimpleKB:Abstractions:Dtos:CategoryItemDto","ParentCategoryId":2228,"TreatAsTopicYN":false,"Description":"","ImageUrl":"","ShortDesc":"","CategoryId":2251,"CategoryName":"Supersonic CDN"},{"__type":"Nc:SimpleKB:Abstractions:Dtos:CategoryItemDto","ParentCategoryId":12,"TreatAsTopicYN":false,"Description":"","ImageUrl":"","ShortDesc":"","CategoryId":2252,"CategoryName":"InterWorx questions"},{"__type":"Nc:SimpleKB:Abstractions:Dtos:CategoryItemDto","ParentCategoryId":2253,"TreatAsTopicYN":false,"Description":"","ImageUrl":"","ShortDesc":"","CategoryId":2254,"CategoryName":"Domains How-To"},{"__type":"Nc:SimpleKB:Abstractions:Dtos:CategoryItemDto","ParentCategoryId":2253,"TreatAsTopicYN":false,"Description":"","ImageUrl":"","ShortDesc":"","CategoryId":2255,"CategoryName":"Hosting How-To"},{"__type":"Nc:SimpleKB:Abstractions:Dtos:CategoryItemDto","ParentCategoryId":2253,"TreatAsTopicYN":false,"Description":"","ImageUrl":"","ShortDesc":"","CategoryId":2257,"CategoryName":"Sales & Payments How-To"},{"__type":"Nc:SimpleKB:Abstractions:Dtos:CategoryItemDto","ParentCategoryId":2253,"TreatAsTopicYN":false,"Description":"","ImageUrl":"","ShortDesc":"","CategoryId":2258,"CategoryName":"cPanel Email How-To"},{"__type":"Nc:SimpleKB:Abstractions:Dtos:CategoryItemDto","ParentCategoryId":93,"TreatAsTopicYN":false,"Description":"","ImageUrl":"","ShortDesc":"","CategoryId":2260,"CategoryName":"Private Email Contacts and Calendars Setup"},{"__type":"Nc:SimpleKB:Abstractions:Dtos:CategoryItemDto","ParentCategoryId":2253,"TreatAsTopicYN":false,"Description":"","ImageUrl":"","ShortDesc":"","CategoryId":2262,"CategoryName":"EasyWP How-To"},{"__type":"Nc:SimpleKB:Abstractions:Dtos:CategoryItemDto","ParentCategoryId":0,"TreatAsTopicYN":false,"Description":"","ImageUrl":"https://download.namecheap.com/assets/img/domainvault-red@2x.png","ShortDesc":"","CategoryId":2289,"CategoryName":"Domain Vault","SubCategories":[]},{"__type":"Nc:SimpleKB:Abstractions:Dtos:CategoryItemDto","ParentCategoryId":14,"TreatAsTopicYN":false,"Description":"","ImageUrl":"","ShortDesc":"","CategoryId":2290,"CategoryName":"CSR code"},{"__type":"Nc:SimpleKB:Abstractions:Dtos:CategoryItemDto","ParentCategoryId":12,"TreatAsTopicYN":false,"Description":"","ImageUrl":"","ShortDesc":"","CategoryId":2291,"CategoryName":"Webuzo questions"},{"__type":"Nc:SimpleKB:Abstractions:Dtos:CategoryItemDto","ParentCategoryId":2265,"TreatAsTopicYN":false,"Description":"","ImageUrl":"","ShortDesc":"","CategoryId":2292,"CategoryName":"Browser Extensions"},{"__type":"Nc:SimpleKB:Abstractions:Dtos:CategoryItemDto","ParentCategoryId":14,"TreatAsTopicYN":false,"Description":"","ImageUrl":"","ShortDesc":"","CategoryId":2293,"CategoryName":"Automated SSL management"},{"__type":"Nc:SimpleKB:Abstractions:Dtos:CategoryItemDto","ParentCategoryId":2228,"TreatAsTopicYN":false,"Description":"","ImageUrl":"","ShortDesc":"","CategoryId":2298,"CategoryName":"Site Maker"},{"__type":"Nc:SimpleKB:Abstractions:Dtos:CategoryItemDto","ParentCategoryId":12,"TreatAsTopicYN":false,"Description":"","ImageUrl":"","ShortDesc":"","CategoryId":27,"CategoryName":"Getting Started"},{"__type":"Nc:SimpleKB:Abstractions:Dtos:CategoryItemDto","ParentCategoryId":0,"TreatAsTopicYN":false,"Description":"","ImageUrl":"/assets/img/pictograms/150/support-red.png","ShortDesc":"","CategoryId":5,"CategoryName":"General & Support","SubCategories":[]},{"__type":"Nc:SimpleKB:Abstractions:Dtos:CategoryItemDto","ParentCategoryId":2200,"TreatAsTopicYN":false,"Description":"","ImageUrl":"","ShortDesc":"","CategoryId":7,"CategoryName":"Billing FAQ"},{"__type":"Nc:SimpleKB:Abstractions:Dtos:CategoryItemDto","ParentCategoryId":2209,"TreatAsTopicYN":false,"Description":"","ImageUrl":"","ShortDesc":"","CategoryId":8,"CategoryName":"Transfer Information"},{"__type":"Nc:SimpleKB:Abstractions:Dtos:CategoryItemDto","ParentCategoryId":12,"TreatAsTopicYN":false,"Description":"","ImageUrl":"","ShortDesc":"","CategoryId":22,"CategoryName":"Hosting Information"},{"__type":"Nc:SimpleKB:Abstractions:Dtos:CategoryItemDto","ParentCategoryId":14,"TreatAsTopicYN":false,"Description":"","ImageUrl":"","ShortDesc":"","CategoryId":38,"CategoryName":"SSL General"},{"__type":"Nc:SimpleKB:Abstractions:Dtos:CategoryItemDto","ParentCategoryId":9,"TreatAsTopicYN":false,"Description":"","ImageUrl":"","ShortDesc":"","CategoryId":45,"CategoryName":"Account Security"},{"__type":"Nc:SimpleKB:Abstractions:Dtos:CategoryItemDto","ParentCategoryId":34,"TreatAsTopicYN":false,"Description":"","ImageUrl":"","ShortDesc":"","CategoryId":46,"CategoryName":"Domain Management"},{"__type":"Nc:SimpleKB:Abstractions:Dtos:CategoryItemDto","ParentCategoryId":2211,"TreatAsTopicYN":false,"Description":"","ImageUrl":"","ShortDesc":"","CategoryId":63,"CategoryName":"Namecheap API"},{"__type":"Nc:SimpleKB:Abstractions:Dtos:CategoryItemDto","ParentCategoryId":2228,"TreatAsTopicYN":false,"Description":"","ImageUrl":"","ShortDesc":"","CategoryId":177,"CategoryName":"Google Workspace (formerly G Suite)"},{"__type":"Nc:SimpleKB:Abstractions:Dtos:CategoryItemDto","ParentCategoryId":93,"TreatAsTopicYN":false,"Description":"","ImageUrl":"","ShortDesc":"","CategoryId":2179,"CategoryName":"Private Email: General Information"},{"__type":"Nc:SimpleKB:Abstractions:Dtos:CategoryItemDto","ParentCategoryId":2265,"TreatAsTopicYN":false,"Description":"","ImageUrl":"","ShortDesc":"","CategoryId":2274,"CategoryName":"General"},{"__type":"Nc:SimpleKB:Abstractions:Dtos:CategoryItemDto","ParentCategoryId":2239,"TreatAsTopicYN":false,"Description":"","ImageUrl":"","ShortDesc":"","CategoryId":2280,"CategoryName":"Getting Started"},{"__type":"Nc:SimpleKB:Abstractions:Dtos:CategoryItemDto","ParentCategoryId":2239,"TreatAsTopicYN":false,"Description":"","ImageUrl":"","ShortDesc":"","CategoryId":2279,"CategoryName":"General Information"},{"__type":"Nc:SimpleKB:Abstractions:Dtos:CategoryItemDto","ParentCategoryId":93,"TreatAsTopicYN":false,"Description":"","ImageUrl":"","ShortDesc":"","CategoryId":2215,"CategoryName":"Private Email: Mailbox Management"},{"__type":"Nc:SimpleKB:Abstractions:Dtos:CategoryItemDto","ParentCategoryId":2211,"TreatAsTopicYN":false,"Description":"","ImageUrl":"","ShortDesc":"","CategoryId":2196,"CategoryName":"WHMCS module for SSL"},{"__type":"Nc:SimpleKB:Abstractions:Dtos:CategoryItemDto","ParentCategoryId":0,"TreatAsTopicYN":false,"Description":"","ImageUrl":"/assets/img/pictograms/150/savings-red.png","ShortDesc":"","CategoryId":2200,"CategoryName":"Checkout & Billing","SubCategories":[{"__type":"Nc:SimpleKB:Abstractions:Dtos:CategoryItemDto","ParentCategoryId":2200,"TreatAsTopicYN":false,"Description":"","ImageUrl":"","ShortDesc":"","CategoryId":7,"CategoryName":"Billing FAQ"},{"__type":"Nc:SimpleKB:Abstractions:Dtos:CategoryItemDto","ParentCategoryId":2200,"TreatAsTopicYN":false,"Description":"","ImageUrl":"","ShortDesc":"","CategoryId":2201,"CategoryName":"Domains Billing"},{"__type":"Nc:SimpleKB:Abstractions:Dtos:CategoryItemDto","ParentCategoryId":2200,"TreatAsTopicYN":false,"Description":"","ImageUrl":"","ShortDesc":"","CategoryId":21,"CategoryName":"Hosting Billing"},{"__type":"Nc:SimpleKB:Abstractions:Dtos:CategoryItemDto","ParentCategoryId":2200,"TreatAsTopicYN":false,"Description":"","ImageUrl":"","ShortDesc":"","CategoryId":71,"CategoryName":"SSL Certificates Billing"},{"__type":"Nc:SimpleKB:Abstractions:Dtos:CategoryItemDto","ParentCategoryId":2200,"TreatAsTopicYN":false,"Description":"","ImageUrl":"","ShortDesc":"","CategoryId":2177,"CategoryName":"Private Email"}]},{"__type":"Nc:SimpleKB:Abstractions:Dtos:CategoryItemDto","ParentCategoryId":2200,"TreatAsTopicYN":false,"Description":"","ImageUrl":"","ShortDesc":"","CategoryId":2201,"CategoryName":"Domains Billing"},{"__type":"Nc:SimpleKB:Abstractions:Dtos:CategoryItemDto","ParentCategoryId":14,"TreatAsTopicYN":false,"Description":"","ImageUrl":"","ShortDesc":"","CategoryId":67,"CategoryName":"Activation"},{"__type":"Nc:SimpleKB:Abstractions:Dtos:CategoryItemDto","ParentCategoryId":2209,"TreatAsTopicYN":false,"Description":"","ImageUrl":"","ShortDesc":"","CategoryId":83,"CategoryName":"Transfer to Namecheap"},{"__type":"Nc:SimpleKB:Abstractions:Dtos:CategoryItemDto","ParentCategoryId":9,"TreatAsTopicYN":false,"Description":"","ImageUrl":"","ShortDesc":"","CategoryId":43,"CategoryName":"Profile Management"},{"__type":"Nc:SimpleKB:Abstractions:Dtos:CategoryItemDto","ParentCategoryId":34,"TreatAsTopicYN":false,"Description":"","ImageUrl":"","ShortDesc":"","CategoryId":10,"CategoryName":"DNS Questions"},{"__type":"Nc:SimpleKB:Abstractions:Dtos:CategoryItemDto","ParentCategoryId":12,"TreatAsTopicYN":false,"Description":"","ImageUrl":"","ShortDesc":"","CategoryId":29,"CategoryName":"cPanel questions"},{"__type":"Nc:SimpleKB:Abstractions:Dtos:CategoryItemDto","ParentCategoryId":2200,"TreatAsTopicYN":false,"Description":"","ImageUrl":"","ShortDesc":"","CategoryId":21,"CategoryName":"Hosting Billing"},{"__type":"Nc:SimpleKB:Abstractions:Dtos:CategoryItemDto","ParentCategoryId":34,"TreatAsTopicYN":false,"Description":"","ImageUrl":"","ShortDesc":"","CategoryId":11,"CategoryName":"Dynamic DNS"},{"__type":"Nc:SimpleKB:Abstractions:Dtos:CategoryItemDto","ParentCategoryId":9,"TreatAsTopicYN":false,"Description":"","ImageUrl":"","ShortDesc":"","CategoryId":44,"CategoryName":"Account Access"},{"__type":"Nc:SimpleKB:Abstractions:Dtos:CategoryItemDto","ParentCategoryId":2209,"TreatAsTopicYN":false,"Description":"","ImageUrl":"","ShortDesc":"","CategoryId":84,"CategoryName":"Transfer to another provider"},{"__type":"Nc:SimpleKB:Abstractions:Dtos:CategoryItemDto","ParentCategoryId":14,"TreatAsTopicYN":false,"Description":"","ImageUrl":"","ShortDesc":"","CategoryId":68,"CategoryName":"Validation"},{"__type":"Nc:SimpleKB:Abstractions:Dtos:CategoryItemDto","ParentCategoryId":12,"TreatAsTopicYN":false,"Description":"","ImageUrl":"","ShortDesc":"","CategoryId":2182,"CategoryName":"cPanel: Software Management"},{"__type":"Nc:SimpleKB:Abstractions:Dtos:CategoryItemDto","ParentCategoryId":93,"TreatAsTopicYN":false,"Description":"","ImageUrl":"","ShortDesc":"","CategoryId":2214,"CategoryName":"Email Forwarding"},{"__type":"Nc:SimpleKB:Abstractions:Dtos:CategoryItemDto","ParentCategoryId":2265,"TreatAsTopicYN":false,"Description":"","ImageUrl":"","ShortDesc":"","CategoryId":2270,"CategoryName":"Routers"},{"__type":"Nc:SimpleKB:Abstractions:Dtos:CategoryItemDto","ParentCategoryId":2239,"TreatAsTopicYN":false,"Description":"","ImageUrl":"","ShortDesc":"","CategoryId":2281,"CategoryName":"WordPress Migration"},{"__type":"Nc:SimpleKB:Abstractions:Dtos:CategoryItemDto","ParentCategoryId":2239,"TreatAsTopicYN":false,"Description":"","ImageUrl":"","ShortDesc":"","CategoryId":2282,"CategoryName":"Plugins and Themes"},{"__type":"Nc:SimpleKB:Abstractions:Dtos:CategoryItemDto","ParentCategoryId":2265,"TreatAsTopicYN":false,"Description":"","ImageUrl":"","ShortDesc":"","CategoryId":2272,"CategoryName":"TV"},{"__type":"Nc:SimpleKB:Abstractions:Dtos:CategoryItemDto","ParentCategoryId":12,"TreatAsTopicYN":false,"Description":"","ImageUrl":"","ShortDesc":"","CategoryId":2187,"CategoryName":"cPanel: WordPress"},{"__type":"Nc:SimpleKB:Abstractions:Dtos:CategoryItemDto","ParentCategoryId":2209,"TreatAsTopicYN":false,"Description":"","ImageUrl":"","ShortDesc":"","CategoryId":219,"CategoryName":"Canceled Transfers"},{"__type":"Nc:SimpleKB:Abstractions:Dtos:CategoryItemDto","ParentCategoryId":2200,"TreatAsTopicYN":false,"Description":"","ImageUrl":"","ShortDesc":"","CategoryId":71,"CategoryName":"SSL Certificates Billing"},{"__type":"Nc:SimpleKB:Abstractions:Dtos:CategoryItemDto","ParentCategoryId":93,"TreatAsTopicYN":false,"Description":"","ImageUrl":"","ShortDesc":"","CategoryId":2176,"CategoryName":"Private Email: DNS Settings"},{"__type":"Nc:SimpleKB:Abstractions:Dtos:CategoryItemDto","ParentCategoryId":14,"TreatAsTopicYN":false,"Description":"","ImageUrl":"","ShortDesc":"","CategoryId":69,"CategoryName":"Installation"},{"__type":"Nc:SimpleKB:Abstractions:Dtos:CategoryItemDto","ParentCategoryId":0,"TreatAsTopicYN":false,"Description":"","ImageUrl":"/assets/img/pictograms/150/reseller-red.png","ShortDesc":"","CategoryId":34,"CategoryName":"Domains","SubCategories":[{"__type":"Nc:SimpleKB:Abstractions:Dtos:CategoryItemDto","ParentCategoryId":34,"TreatAsTopicYN":false,"Description":"","ImageUrl":"","ShortDesc":"","CategoryId":2232,"CategoryName":"DNSSEC"},{"__type":"Nc:SimpleKB:Abstractions:Dtos:CategoryItemDto","ParentCategoryId":34,"TreatAsTopicYN":false,"Description":"","ImageUrl":"","ShortDesc":"","CategoryId":2234,"CategoryName":"Google Workspace (formerly G Suite)"},{"__type":"Nc:SimpleKB:Abstractions:Dtos:CategoryItemDto","ParentCategoryId":34,"TreatAsTopicYN":false,"Description":"","ImageUrl":"","ShortDesc":"","CategoryId":2237,"CategoryName":"Host records setup"},{"__type":"Nc:SimpleKB:Abstractions:Dtos:CategoryItemDto","ParentCategoryId":34,"TreatAsTopicYN":false,"Description":"","ImageUrl":"","ShortDesc":"","CategoryId":46,"CategoryName":"Domain Management"},{"__type":"Nc:SimpleKB:Abstractions:Dtos:CategoryItemDto","ParentCategoryId":34,"TreatAsTopicYN":false,"Description":"","ImageUrl":"","ShortDesc":"","CategoryId":10,"CategoryName":"DNS Questions"},{"__type":"Nc:SimpleKB:Abstractions:Dtos:CategoryItemDto","ParentCategoryId":34,"TreatAsTopicYN":false,"Description":"","ImageUrl":"","ShortDesc":"","CategoryId":11,"CategoryName":"Dynamic DNS"},{"__type":"Nc:SimpleKB:Abstractions:Dtos:CategoryItemDto","ParentCategoryId":34,"TreatAsTopicYN":false,"Description":"","ImageUrl":"","ShortDesc":"","CategoryId":35,"CategoryName":"Registrations"},{"__type":"Nc:SimpleKB:Abstractions:Dtos:CategoryItemDto","ParentCategoryId":34,"TreatAsTopicYN":false,"Description":"","ImageUrl":"","ShortDesc":"","CategoryId":2207,"CategoryName":"Renewal questions"},{"__type":"Nc:SimpleKB:Abstractions:Dtos:CategoryItemDto","ParentCategoryId":34,"TreatAsTopicYN":false,"Description":"","ImageUrl":"","ShortDesc":"","CategoryId":36,"CategoryName":"Domains with extended attributes"},{"__type":"Nc:SimpleKB:Abstractions:Dtos:CategoryItemDto","ParentCategoryId":34,"TreatAsTopicYN":false,"Description":"","ImageUrl":"","ShortDesc":"","CategoryId":51,"CategoryName":"FreeDNS"},{"__type":"Nc:SimpleKB:Abstractions:Dtos:CategoryItemDto","ParentCategoryId":34,"TreatAsTopicYN":false,"Description":"","ImageUrl":"","ShortDesc":"","CategoryId":15,"CategoryName":"Namecheap Market"},{"__type":"Nc:SimpleKB:Abstractions:Dtos:CategoryItemDto","ParentCategoryId":34,"TreatAsTopicYN":false,"Description":"","ImageUrl":"","ShortDesc":"","CategoryId":2208,"CategoryName":"3rd Party Services Setup"},{"__type":"Nc:SimpleKB:Abstractions:Dtos:CategoryItemDto","ParentCategoryId":34,"TreatAsTopicYN":false,"Description":"","ImageUrl":"","ShortDesc":"","CategoryId":2278,"CategoryName":"Handshake TLDs"}]},{"__type":"Nc:SimpleKB:Abstractions:Dtos:CategoryItemDto","ParentCategoryId":34,"TreatAsTopicYN":false,"Description":"","ImageUrl":"","ShortDesc":"","CategoryId":35,"CategoryName":"Registrations"},{"__type":"Nc:SimpleKB:Abstractions:Dtos:CategoryItemDto","ParentCategoryId":14,"TreatAsTopicYN":false,"Description":"","ImageUrl":"","ShortDesc":"","CategoryId":70,"CategoryName":"Reissuance"},{"__type":"Nc:SimpleKB:Abstractions:Dtos:CategoryItemDto","ParentCategoryId":0,"TreatAsTopicYN":false,"Description":"","ImageUrl":"/assets/img/pictograms/150/protection-red.png","ShortDesc":"","CategoryId":37,"CategoryName":"Domain Privacy Protection","SubCategories":[]},{"__type":"Nc:SimpleKB:Abstractions:Dtos:CategoryItemDto","ParentCategoryId":2200,"TreatAsTopicYN":false,"Description":"","ImageUrl":"","ShortDesc":"","CategoryId":2177,"CategoryName":"Private Email"},{"__type":"Nc:SimpleKB:Abstractions:Dtos:CategoryItemDto","ParentCategoryId":93,"TreatAsTopicYN":false,"Description":"","ImageUrl":"","ShortDesc":"","CategoryId":2178,"CategoryName":"Private Email: Webmail Features"},{"__type":"Nc:SimpleKB:Abstractions:Dtos:CategoryItemDto","ParentCategoryId":34,"TreatAsTopicYN":false,"Description":"","ImageUrl":"","ShortDesc":"","CategoryId":2207,"CategoryName":"Renewal questions"},{"__type":"Nc:SimpleKB:Abstractions:Dtos:CategoryItemDto","ParentCategoryId":12,"TreatAsTopicYN":false,"Description":"","ImageUrl":"","ShortDesc":"","CategoryId":2210,"CategoryName":"cPanel Add-ons"},{"__type":"Nc:SimpleKB:Abstractions:Dtos:CategoryItemDto","ParentCategoryId":2265,"TreatAsTopicYN":false,"Description":"","ImageUrl":"","ShortDesc":"","CategoryId":2273,"CategoryName":"Gaming Consoles"},{"__type":"Nc:SimpleKB:Abstractions:Dtos:CategoryItemDto","ParentCategoryId":2239,"TreatAsTopicYN":false,"Description":"","ImageUrl":"","ShortDesc":"","CategoryId":2284,"CategoryName":"WordPress Management"},{"__type":"Nc:SimpleKB:Abstractions:Dtos:CategoryItemDto","ParentCategoryId":2239,"TreatAsTopicYN":false,"Description":"","ImageUrl":"","ShortDesc":"","CategoryId":2285,"CategoryName":"SFTP and Database access"},{"__type":"Nc:SimpleKB:Abstractions:Dtos:CategoryItemDto","ParentCategoryId":2265,"TreatAsTopicYN":false,"Description":"","ImageUrl":"","ShortDesc":"","CategoryId":2268,"CategoryName":"macOS"},{"__type":"Nc:SimpleKB:Abstractions:Dtos:CategoryItemDto","ParentCategoryId":93,"TreatAsTopicYN":false,"Description":"","ImageUrl":"","ShortDesc":"","CategoryId":2175,"CategoryName":"Private Email: Client Setup"},{"__type":"Nc:SimpleKB:Abstractions:Dtos:CategoryItemDto","ParentCategoryId":0,"TreatAsTopicYN":false,"Description":"","ImageUrl":"/assets/img/pictograms/150/status-red.png","ShortDesc":"","CategoryId":2209,"CategoryName":"Domain Transfers","SubCategories":[{"__type":"Nc:SimpleKB:Abstractions:Dtos:CategoryItemDto","ParentCategoryId":2209,"TreatAsTopicYN":false,"Description":"","ImageUrl":"","ShortDesc":"","CategoryId":8,"CategoryName":"Transfer Information"},{"__type":"Nc:SimpleKB:Abstractions:Dtos:CategoryItemDto","ParentCategoryId":2209,"TreatAsTopicYN":false,"Description":"","ImageUrl":"","ShortDesc":"","CategoryId":83,"CategoryName":"Transfer to Namecheap"},{"__type":"Nc:SimpleKB:Abstractions:Dtos:CategoryItemDto","ParentCategoryId":2209,"TreatAsTopicYN":false,"Description":"","ImageUrl":"","ShortDesc":"","CategoryId":84,"CategoryName":"Transfer to another provider"},{"__type":"Nc:SimpleKB:Abstractions:Dtos:CategoryItemDto","ParentCategoryId":2209,"TreatAsTopicYN":false,"Description":"","ImageUrl":"","ShortDesc":"","CategoryId":219,"CategoryName":"Canceled Transfers"}]},{"__type":"Nc:SimpleKB:Abstractions:Dtos:CategoryItemDto","ParentCategoryId":12,"TreatAsTopicYN":false,"Description":"","ImageUrl":"","ShortDesc":"","CategoryId":48,"CategoryName":"VPS"},{"__type":"Nc:SimpleKB:Abstractions:Dtos:CategoryItemDto","ParentCategoryId":34,"TreatAsTopicYN":false,"Description":"","ImageUrl":"","ShortDesc":"","CategoryId":36,"CategoryName":"Domains with extended attributes"},{"__type":"Nc:SimpleKB:Abstractions:Dtos:CategoryItemDto","ParentCategoryId":0,"TreatAsTopicYN":true,"Description":"","ImageUrl":"/assets/img/pictograms/150/server-red.png","ShortDesc":"","CategoryId":12,"CategoryName":"Hosting","SubCategories":[{"__type":"Nc:SimpleKB:Abstractions:Dtos:CategoryItemDto","ParentCategoryId":12,"TreatAsTopicYN":false,"Description":"","ImageUrl":"","ShortDesc":"","CategoryId":2219,"CategoryName":"PHP Configuration"},{"__type":"Nc:SimpleKB:Abstractions:Dtos:CategoryItemDto","ParentCategoryId":12,"TreatAsTopicYN":false,"Description":"","ImageUrl":"","ShortDesc":"","CategoryId":2225,"CategoryName":"SEO"},{"__type":"Nc:SimpleKB:Abstractions:Dtos:CategoryItemDto","ParentCategoryId":12,"TreatAsTopicYN":false,"Description":"","ImageUrl":"","ShortDesc":"","CategoryId":2252,"CategoryName":"InterWorx questions"},{"__type":"Nc:SimpleKB:Abstractions:Dtos:CategoryItemDto","ParentCategoryId":12,"TreatAsTopicYN":false,"Description":"","ImageUrl":"","ShortDesc":"","CategoryId":2291,"CategoryName":"Webuzo questions"},{"__type":"Nc:SimpleKB:Abstractions:Dtos:CategoryItemDto","ParentCategoryId":12,"TreatAsTopicYN":false,"Description":"","ImageUrl":"","ShortDesc":"","CategoryId":27,"CategoryName":"Getting Started"},{"__type":"Nc:SimpleKB:Abstractions:Dtos:CategoryItemDto","ParentCategoryId":12,"TreatAsTopicYN":false,"Description":"","ImageUrl":"","ShortDesc":"","CategoryId":22,"CategoryName":"Hosting Information"},{"__type":"Nc:SimpleKB:Abstractions:Dtos:CategoryItemDto","ParentCategoryId":12,"TreatAsTopicYN":false,"Description":"","ImageUrl":"","ShortDesc":"","CategoryId":29,"CategoryName":"cPanel questions"},{"__type":"Nc:SimpleKB:Abstractions:Dtos:CategoryItemDto","ParentCategoryId":12,"TreatAsTopicYN":false,"Description":"","ImageUrl":"","ShortDesc":"","CategoryId":2182,"CategoryName":"cPanel: Software Management"},{"__type":"Nc:SimpleKB:Abstractions:Dtos:CategoryItemDto","ParentCategoryId":12,"TreatAsTopicYN":false,"Description":"","ImageUrl":"","ShortDesc":"","CategoryId":2187,"CategoryName":"cPanel: WordPress"},{"__type":"Nc:SimpleKB:Abstractions:Dtos:CategoryItemDto","ParentCategoryId":12,"TreatAsTopicYN":false,"Description":"","ImageUrl":"","ShortDesc":"","CategoryId":2210,"CategoryName":"cPanel Add-ons"},{"__type":"Nc:SimpleKB:Abstractions:Dtos:CategoryItemDto","ParentCategoryId":12,"TreatAsTopicYN":false,"Description":"","ImageUrl":"","ShortDesc":"","CategoryId":48,"CategoryName":"VPS"},{"__type":"Nc:SimpleKB:Abstractions:Dtos:CategoryItemDto","ParentCategoryId":12,"TreatAsTopicYN":false,"Description":"","ImageUrl":"","ShortDesc":"","CategoryId":2188,"CategoryName":"Dedicated Server"},{"__type":"Nc:SimpleKB:Abstractions:Dtos:CategoryItemDto","ParentCategoryId":12,"TreatAsTopicYN":false,"Description":"","ImageUrl":"","ShortDesc":"","CategoryId":30,"CategoryName":"WHM questions"},{"__type":"Nc:SimpleKB:Abstractions:Dtos:CategoryItemDto","ParentCategoryId":12,"TreatAsTopicYN":false,"Description":"","ImageUrl":"","ShortDesc":"","CategoryId":32,"CategoryName":"DNS settings"},{"__type":"Nc:SimpleKB:Abstractions:Dtos:CategoryItemDto","ParentCategoryId":12,"TreatAsTopicYN":false,"Description":"","ImageUrl":"","ShortDesc":"","CategoryId":103,"CategoryName":"LVE (CloudLinux)"},{"__type":"Nc:SimpleKB:Abstractions:Dtos:CategoryItemDto","ParentCategoryId":12,"TreatAsTopicYN":false,"Description":"","ImageUrl":"","ShortDesc":"","CategoryId":89,"CategoryName":"SSH Access"},{"__type":"Nc:SimpleKB:Abstractions:Dtos:CategoryItemDto","ParentCategoryId":12,"TreatAsTopicYN":false,"Description":"","ImageUrl":"","ShortDesc":"","CategoryId":205,"CategoryName":"FTP questions"},{"__type":"Nc:SimpleKB:Abstractions:Dtos:CategoryItemDto","ParentCategoryId":12,"TreatAsTopicYN":false,"Description":"","ImageUrl":"","ShortDesc":"","CategoryId":2180,"CategoryName":"MySQL questions"},{"__type":"Nc:SimpleKB:Abstractions:Dtos:CategoryItemDto","ParentCategoryId":12,"TreatAsTopicYN":false,"Description":"","ImageUrl":"","ShortDesc":"","CategoryId":2199,"CategoryName":"Hosting Migration"},{"__type":"Nc:SimpleKB:Abstractions:Dtos:CategoryItemDto","ParentCategoryId":12,"TreatAsTopicYN":false,"Description":"","ImageUrl":"","ShortDesc":"","CategoryId":2194,"CategoryName":"Tips & Tricks"},{"__type":"Nc:SimpleKB:Abstractions:Dtos:CategoryItemDto","ParentCategoryId":12,"TreatAsTopicYN":false,"Description":"","ImageUrl":"","ShortDesc":"","CategoryId":239,"CategoryName":"WHMCS"},{"__type":"Nc:SimpleKB:Abstractions:Dtos:CategoryItemDto","ParentCategoryId":12,"TreatAsTopicYN":false,"Description":"","ImageUrl":"","ShortDesc":"","CategoryId":33,"CategoryName":"SSL Installation"}]},{"__type":"Nc:SimpleKB:Abstractions:Dtos:CategoryItemDto","ParentCategoryId":93,"TreatAsTopicYN":false,"Description":"","ImageUrl":"","ShortDesc":"","CategoryId":2171,"CategoryName":"Private Email: Active Sync (Exchange) Setup"},{"__type":"Nc:SimpleKB:Abstractions:Dtos:CategoryItemDto","ParentCategoryId":12,"TreatAsTopicYN":false,"Description":"","ImageUrl":"","ShortDesc":"","CategoryId":2188,"CategoryName":"Dedicated Server"},{"__type":"Nc:SimpleKB:Abstractions:Dtos:CategoryItemDto","ParentCategoryId":2265,"TreatAsTopicYN":false,"Description":"","ImageUrl":"","ShortDesc":"","CategoryId":2269,"CategoryName":"iOS"},{"__type":"Nc:SimpleKB:Abstractions:Dtos:CategoryItemDto","ParentCategoryId":2239,"TreatAsTopicYN":false,"Description":"","ImageUrl":"","ShortDesc":"","CategoryId":2286,"CategoryName":"Domains questions"},{"__type":"Nc:SimpleKB:Abstractions:Dtos:CategoryItemDto","ParentCategoryId":2239,"TreatAsTopicYN":false,"Description":"","ImageUrl":"","ShortDesc":"","CategoryId":2288,"CategoryName":"Billing questions"},{"__type":"Nc:SimpleKB:Abstractions:Dtos:CategoryItemDto","ParentCategoryId":2265,"TreatAsTopicYN":false,"Description":"","ImageUrl":"","ShortDesc":"","CategoryId":2271,"CategoryName":"Linux"},{"__type":"Nc:SimpleKB:Abstractions:Dtos:CategoryItemDto","ParentCategoryId":12,"TreatAsTopicYN":false,"Description":"","ImageUrl":"","ShortDesc":"","CategoryId":30,"CategoryName":"WHM questions"},{"__type":"Nc:SimpleKB:Abstractions:Dtos:CategoryItemDto","ParentCategoryId":93,"TreatAsTopicYN":false,"Description":"","ImageUrl":"","ShortDesc":"","CategoryId":31,"CategoryName":"cPanel Email FAQs"},{"__type":"Nc:SimpleKB:Abstractions:Dtos:CategoryItemDto","ParentCategoryId":34,"TreatAsTopicYN":false,"Description":"","ImageUrl":"","ShortDesc":"","CategoryId":51,"CategoryName":"FreeDNS"},{"__type":"Nc:SimpleKB:Abstractions:Dtos:CategoryItemDto","ParentCategoryId":0,"TreatAsTopicYN":false,"Description":"","ImageUrl":"/assets/img/pictograms/150/email-red.png","ShortDesc":"","CategoryId":93,"CategoryName":"Email service","SubCategories":[{"__type":"Nc:SimpleKB:Abstractions:Dtos:CategoryItemDto","ParentCategoryId":93,"TreatAsTopicYN":false,"Description":"","ImageUrl":"","ShortDesc":"","CategoryId":2216,"CategoryName":"Spam Protection"},{"__type":"Nc:SimpleKB:Abstractions:Dtos:CategoryItemDto","ParentCategoryId":93,"TreatAsTopicYN":false,"Description":"","ImageUrl":"","ShortDesc":"","CategoryId":2226,"CategoryName":"Email Migration"},{"__type":"Nc:SimpleKB:Abstractions:Dtos:CategoryItemDto","ParentCategoryId":93,"TreatAsTopicYN":false,"Description":"","ImageUrl":"","ShortDesc":"","CategoryId":2260,"CategoryName":"Private Email Contacts and Calendars Setup"},{"__type":"Nc:SimpleKB:Abstractions:Dtos:CategoryItemDto","ParentCategoryId":93,"TreatAsTopicYN":false,"Description":"","ImageUrl":"","ShortDesc":"","CategoryId":2179,"CategoryName":"Private Email: General Information"},{"__type":"Nc:SimpleKB:Abstractions:Dtos:CategoryItemDto","ParentCategoryId":93,"TreatAsTopicYN":false,"Description":"","ImageUrl":"","ShortDesc":"","CategoryId":2215,"CategoryName":"Private Email: Mailbox Management"},{"__type":"Nc:SimpleKB:Abstractions:Dtos:CategoryItemDto","ParentCategoryId":93,"TreatAsTopicYN":false,"Description":"","ImageUrl":"","ShortDesc":"","CategoryId":2214,"CategoryName":"Email Forwarding"},{"__type":"Nc:SimpleKB:Abstractions:Dtos:CategoryItemDto","ParentCategoryId":93,"TreatAsTopicYN":false,"Description":"","ImageUrl":"","ShortDesc":"","CategoryId":2176,"CategoryName":"Private Email: DNS Settings"},{"__type":"Nc:SimpleKB:Abstractions:Dtos:CategoryItemDto","ParentCategoryId":93,"TreatAsTopicYN":false,"Description":"","ImageUrl":"","ShortDesc":"","CategoryId":2178,"CategoryName":"Private Email: Webmail Features"},{"__type":"Nc:SimpleKB:Abstractions:Dtos:CategoryItemDto","ParentCategoryId":93,"TreatAsTopicYN":false,"Description":"","ImageUrl":"","ShortDesc":"","CategoryId":2175,"CategoryName":"Private Email: Client Setup"},{"__type":"Nc:SimpleKB:Abstractions:Dtos:CategoryItemDto","ParentCategoryId":93,"TreatAsTopicYN":false,"Description":"","ImageUrl":"","ShortDesc":"","CategoryId":2171,"CategoryName":"Private Email: Active Sync (Exchange) Setup"},{"__type":"Nc:SimpleKB:Abstractions:Dtos:CategoryItemDto","ParentCategoryId":93,"TreatAsTopicYN":false,"Description":"","ImageUrl":"","ShortDesc":"","CategoryId":31,"CategoryName":"cPanel Email FAQs"},{"__type":"Nc:SimpleKB:Abstractions:Dtos:CategoryItemDto","ParentCategoryId":93,"TreatAsTopicYN":false,"Description":"","ImageUrl":"","ShortDesc":"","CategoryId":2186,"CategoryName":"cPanel Email: Client Setup"},{"__type":"Nc:SimpleKB:Abstractions:Dtos:CategoryItemDto","ParentCategoryId":93,"TreatAsTopicYN":false,"Description":"","ImageUrl":"","ShortDesc":"","CategoryId":2204,"CategoryName":"Private Email: Video Overview"}]},{"__type":"Nc:SimpleKB:Abstractions:Dtos:CategoryItemDto","ParentCategoryId":12,"TreatAsTopicYN":false,"Description":"","ImageUrl":"","ShortDesc":"","CategoryId":32,"CategoryName":"DNS settings"},{"__type":"Nc:SimpleKB:Abstractions:Dtos:CategoryItemDto","ParentCategoryId":34,"TreatAsTopicYN":false,"Description":"","ImageUrl":"","ShortDesc":"","CategoryId":15,"CategoryName":"Namecheap Market"},{"__type":"Nc:SimpleKB:Abstractions:Dtos:CategoryItemDto","ParentCategoryId":93,"TreatAsTopicYN":false,"Description":"","ImageUrl":"","ShortDesc":"","CategoryId":2186,"CategoryName":"cPanel Email: Client Setup"},{"__type":"Nc:SimpleKB:Abstractions:Dtos:CategoryItemDto","ParentCategoryId":2265,"TreatAsTopicYN":false,"Description":"","ImageUrl":"","ShortDesc":"","CategoryId":2266,"CategoryName":"Windows"},{"__type":"Nc:SimpleKB:Abstractions:Dtos:CategoryItemDto","ParentCategoryId":2239,"TreatAsTopicYN":false,"Description":"","ImageUrl":"","ShortDesc":"","CategoryId":2287,"CategoryName":"SSL questions"},{"__type":"Nc:SimpleKB:Abstractions:Dtos:CategoryItemDto","ParentCategoryId":2265,"TreatAsTopicYN":false,"Description":"","ImageUrl":"","ShortDesc":"","CategoryId":2267,"CategoryName":"Android"},{"__type":"Nc:SimpleKB:Abstractions:Dtos:CategoryItemDto","ParentCategoryId":34,"TreatAsTopicYN":false,"Description":"","ImageUrl":"","ShortDesc":"","CategoryId":2208,"CategoryName":"3rd Party Services Setup"},{"__type":"Nc:SimpleKB:Abstractions:Dtos:CategoryItemDto","ParentCategoryId":93,"TreatAsTopicYN":false,"Description":"","ImageUrl":"","ShortDesc":"","CategoryId":2204,"CategoryName":"Private Email: Video Overview"},{"__type":"Nc:SimpleKB:Abstractions:Dtos:CategoryItemDto","ParentCategoryId":0,"TreatAsTopicYN":false,"Description":"","ImageUrl":"/assets/img/pictograms/150/security-red.png","ShortDesc":"","CategoryId":14,"CategoryName":"SSL Certificates","SubCategories":[{"__type":"Nc:SimpleKB:Abstractions:Dtos:CategoryItemDto","ParentCategoryId":14,"TreatAsTopicYN":false,"Description":"","ImageUrl":"","ShortDesc":"","CategoryId":2217,"CategoryName":"Renewal"},{"__type":"Nc:SimpleKB:Abstractions:Dtos:CategoryItemDto","ParentCategoryId":14,"TreatAsTopicYN":false,"Description":"","ImageUrl":"","ShortDesc":"","CategoryId":2218,"CategoryName":"cPanel SSL Plugin"},{"__type":"Nc:SimpleKB:Abstractions:Dtos:CategoryItemDto","ParentCategoryId":14,"TreatAsTopicYN":false,"Description":"","ImageUrl":"","ShortDesc":"","CategoryId":2221,"CategoryName":"Multi-Domain SSL Certificates"},{"__type":"Nc:SimpleKB:Abstractions:Dtos:CategoryItemDto","ParentCategoryId":14,"TreatAsTopicYN":false,"Description":"","ImageUrl":"","ShortDesc":"","CategoryId":2222,"CategoryName":"Cancellation"},{"__type":"Nc:SimpleKB:Abstractions:Dtos:CategoryItemDto","ParentCategoryId":14,"TreatAsTopicYN":false,"Description":"","ImageUrl":"","ShortDesc":"","CategoryId":2223,"CategoryName":"Browser errors"},{"__type":"Nc:SimpleKB:Abstractions:Dtos:CategoryItemDto","ParentCategoryId":14,"TreatAsTopicYN":false,"Description":"","ImageUrl":"","ShortDesc":"","CategoryId":2224,"CategoryName":"Site Seal, Logo"},{"__type":"Nc:SimpleKB:Abstractions:Dtos:CategoryItemDto","ParentCategoryId":14,"TreatAsTopicYN":false,"Description":"","ImageUrl":"","ShortDesc":"","CategoryId":2238,"CategoryName":"SSL installation errors"},{"__type":"Nc:SimpleKB:Abstractions:Dtos:CategoryItemDto","ParentCategoryId":14,"TreatAsTopicYN":false,"Description":"","ImageUrl":"","ShortDesc":"","CategoryId":2290,"CategoryName":"CSR code"},{"__type":"Nc:SimpleKB:Abstractions:Dtos:CategoryItemDto","ParentCategoryId":14,"TreatAsTopicYN":false,"Description":"","ImageUrl":"","ShortDesc":"","CategoryId":2293,"CategoryName":"Automated SSL management"},{"__type":"Nc:SimpleKB:Abstractions:Dtos:CategoryItemDto","ParentCategoryId":14,"TreatAsTopicYN":false,"Description":"","ImageUrl":"","ShortDesc":"","CategoryId":38,"CategoryName":"SSL General"},{"__type":"Nc:SimpleKB:Abstractions:Dtos:CategoryItemDto","ParentCategoryId":14,"TreatAsTopicYN":false,"Description":"","ImageUrl":"","ShortDesc":"","CategoryId":67,"CategoryName":"Activation"},{"__type":"Nc:SimpleKB:Abstractions:Dtos:CategoryItemDto","ParentCategoryId":14,"TreatAsTopicYN":false,"Description":"","ImageUrl":"","ShortDesc":"","CategoryId":68,"CategoryName":"Validation"},{"__type":"Nc:SimpleKB:Abstractions:Dtos:CategoryItemDto","ParentCategoryId":14,"TreatAsTopicYN":false,"Description":"","ImageUrl":"","ShortDesc":"","CategoryId":69,"CategoryName":"Installation"},{"__type":"Nc:SimpleKB:Abstractions:Dtos:CategoryItemDto","ParentCategoryId":14,"TreatAsTopicYN":false,"Description":"","ImageUrl":"","ShortDesc":"","CategoryId":70,"CategoryName":"Reissuance"}]},{"__type":"Nc:SimpleKB:Abstractions:Dtos:CategoryItemDto","ParentCategoryId":0,"TreatAsTopicYN":true,"Description":"","ImageUrl":"/assets/img/pictograms/150/performance-red.png","ShortDesc":"","CategoryId":9,"CategoryName":"My Account","SubCategories":[{"__type":"Nc:SimpleKB:Abstractions:Dtos:CategoryItemDto","ParentCategoryId":9,"TreatAsTopicYN":false,"Description":"","ImageUrl":"","ShortDesc":"","CategoryId":45,"CategoryName":"Account Security"},{"__type":"Nc:SimpleKB:Abstractions:Dtos:CategoryItemDto","ParentCategoryId":9,"TreatAsTopicYN":false,"Description":"","ImageUrl":"","ShortDesc":"","CategoryId":43,"CategoryName":"Profile Management"},{"__type":"Nc:SimpleKB:Abstractions:Dtos:CategoryItemDto","ParentCategoryId":9,"TreatAsTopicYN":false,"Description":"","ImageUrl":"","ShortDesc":"","CategoryId":44,"CategoryName":"Account Access"}]},{"__type":"Nc:SimpleKB:Abstractions:Dtos:CategoryItemDto","ParentCategoryId":34,"TreatAsTopicYN":false,"Description":"","ImageUrl":"","ShortDesc":"","CategoryId":2278,"CategoryName":"Handshake TLDs"},{"__type":"Nc:SimpleKB:Abstractions:Dtos:CategoryItemDto","ParentCategoryId":12,"TreatAsTopicYN":false,"Description":"","ImageUrl":"","ShortDesc":"","CategoryId":103,"CategoryName":"LVE (CloudLinux)"},{"__type":"Nc:SimpleKB:Abstractions:Dtos:CategoryItemDto","ParentCategoryId":0,"TreatAsTopicYN":false,"Description":"","ImageUrl":"/assets/img/pictograms/150/affiliates-red.png","ShortDesc":"","CategoryId":55,"CategoryName":"Affiliates","SubCategories":[]},{"__type":"Nc:SimpleKB:Abstractions:Dtos:CategoryItemDto","ParentCategoryId":12,"TreatAsTopicYN":false,"Description":"","ImageUrl":"","ShortDesc":"","CategoryId":89,"CategoryName":"SSH Access"},{"__type":"Nc:SimpleKB:Abstractions:Dtos:CategoryItemDto","ParentCategoryId":0,"TreatAsTopicYN":false,"Description":"","ImageUrl":"/assets/img/pictograms/150/tools-red.png","ShortDesc":"","CategoryId":2211,"CategoryName":"API & Resellers","SubCategories":[{"__type":"Nc:SimpleKB:Abstractions:Dtos:CategoryItemDto","ParentCategoryId":2211,"TreatAsTopicYN":false,"Description":"","ImageUrl":"","ShortDesc":"","CategoryId":2227,"CategoryName":"SSL Resellers"},{"__type":"Nc:SimpleKB:Abstractions:Dtos:CategoryItemDto","ParentCategoryId":2211,"TreatAsTopicYN":false,"Description":"","ImageUrl":"","ShortDesc":"","CategoryId":2229,"CategoryName":"Hosting Resellers"},{"__type":"Nc:SimpleKB:Abstractions:Dtos:CategoryItemDto","ParentCategoryId":2211,"TreatAsTopicYN":false,"Description":"","ImageUrl":"","ShortDesc":"","CategoryId":63,"CategoryName":"Namecheap API"},{"__type":"Nc:SimpleKB:Abstractions:Dtos:CategoryItemDto","ParentCategoryId":2211,"TreatAsTopicYN":false,"Description":"","ImageUrl":"","ShortDesc":"","CategoryId":2196,"CategoryName":"WHMCS module for SSL"}]},{"__type":"Nc:SimpleKB:Abstractions:Dtos:CategoryItemDto","ParentCategoryId":0,"TreatAsTopicYN":false,"Description":"","ImageUrl":"/assets/img/pictograms/150/timer-red.png","ShortDesc":"","CategoryId":2212,"CategoryName":"Legacy Products","SubCategories":[]},{"__type":"Nc:SimpleKB:Abstractions:Dtos:CategoryItemDto","ParentCategoryId":12,"TreatAsTopicYN":false,"Description":"","ImageUrl":"","ShortDesc":"","CategoryId":205,"CategoryName":"FTP questions"},{"__type":"Nc:SimpleKB:Abstractions:Dtos:CategoryItemDto","ParentCategoryId":12,"TreatAsTopicYN":false,"Description":"","ImageUrl":"","ShortDesc":"","CategoryId":2180,"CategoryName":"MySQL questions"},{"__type":"Nc:SimpleKB:Abstractions:Dtos:CategoryItemDto","ParentCategoryId":12,"TreatAsTopicYN":false,"Description":"","ImageUrl":"","ShortDesc":"","CategoryId":2199,"CategoryName":"Hosting Migration"},{"__type":"Nc:SimpleKB:Abstractions:Dtos:CategoryItemDto","ParentCategoryId":0,"TreatAsTopicYN":false,"Description":"","ImageUrl":"/assets/img/pictograms/150/premiumdns-red.png","ShortDesc":"","CategoryId":2231,"CategoryName":"PremiumDNS","SubCategories":[]},{"__type":"Nc:SimpleKB:Abstractions:Dtos:CategoryItemDto","ParentCategoryId":12,"TreatAsTopicYN":false,"Description":"","ImageUrl":"","ShortDesc":"","CategoryId":2194,"CategoryName":"Tips & Tricks"},{"__type":"Nc:SimpleKB:Abstractions:Dtos:CategoryItemDto","ParentCategoryId":0,"TreatAsTopicYN":false,"Description":"","ImageUrl":"https://static.nc-img.com/live-resource/icons/knowledgebase/fastVPN_icon-150px.png","ShortDesc":"","CategoryId":2265,"CategoryName":"FastVPN","SubCategories":[{"__type":"Nc:SimpleKB:Abstractions:Dtos:CategoryItemDto","ParentCategoryId":2265,"TreatAsTopicYN":false,"Description":"","ImageUrl":"","ShortDesc":"","CategoryId":2292,"CategoryName":"Browser Extensions"},{"__type":"Nc:SimpleKB:Abstractions:Dtos:CategoryItemDto","ParentCategoryId":2265,"TreatAsTopicYN":false,"Description":"","ImageUrl":"","ShortDesc":"","CategoryId":2274,"CategoryName":"General"},{"__type":"Nc:SimpleKB:Abstractions:Dtos:CategoryItemDto","ParentCategoryId":2265,"TreatAsTopicYN":false,"Description":"","ImageUrl":"","ShortDesc":"","CategoryId":2270,"CategoryName":"Routers"},{"__type":"Nc:SimpleKB:Abstractions:Dtos:CategoryItemDto","ParentCategoryId":2265,"TreatAsTopicYN":false,"Description":"","ImageUrl":"","ShortDesc":"","CategoryId":2272,"CategoryName":"TV"},{"__type":"Nc:SimpleKB:Abstractions:Dtos:CategoryItemDto","ParentCategoryId":2265,"TreatAsTopicYN":false,"Description":"","ImageUrl":"","ShortDesc":"","CategoryId":2273,"CategoryName":"Gaming Consoles"},{"__type":"Nc:SimpleKB:Abstractions:Dtos:CategoryItemDto","ParentCategoryId":2265,"TreatAsTopicYN":false,"Description":"","ImageUrl":"","ShortDesc":"","CategoryId":2268,"CategoryName":"macOS"},{"__type":"Nc:SimpleKB:Abstractions:Dtos:CategoryItemDto","ParentCategoryId":2265,"TreatAsTopicYN":false,"Description":"","ImageUrl":"","ShortDesc":"","CategoryId":2269,"CategoryName":"iOS"},{"__type":"Nc:SimpleKB:Abstractions:Dtos:CategoryItemDto","ParentCategoryId":2265,"TreatAsTopicYN":false,"Description":"","ImageUrl":"","ShortDesc":"","CategoryId":2271,"CategoryName":"Linux"},{"__type":"Nc:SimpleKB:Abstractions:Dtos:CategoryItemDto","ParentCategoryId":2265,"TreatAsTopicYN":false,"Description":"","ImageUrl":"","ShortDesc":"","CategoryId":2266,"CategoryName":"Windows"},{"__type":"Nc:SimpleKB:Abstractions:Dtos:CategoryItemDto","ParentCategoryId":2265,"TreatAsTopicYN":false,"Description":"","ImageUrl":"","ShortDesc":"","CategoryId":2267,"CategoryName":"Android"}]},{"__type":"Nc:SimpleKB:Abstractions:Dtos:CategoryItemDto","ParentCategoryId":12,"TreatAsTopicYN":false,"Description":"","ImageUrl":"","ShortDesc":"","CategoryId":239,"CategoryName":"WHMCS"},{"__type":"Nc:SimpleKB:Abstractions:Dtos:CategoryItemDto","ParentCategoryId":12,"TreatAsTopicYN":false,"Description":"","ImageUrl":"","ShortDesc":"","CategoryId":33,"CategoryName":"SSL Installation"}],"status":200,"statusText":"OK"}}Before getting into the step by step, let’s run through a few important notes.
When you transfer a domain from GoDaddy, the nameservers associated with the domain will stay the same. If the domain uses your old Registrar’s default nameservers (e.g., nsXX.domaincontrol.com and nsXX.domaincontrol.com), they’ll stop responding to domain queries once it’s transferred. As a result, you’ll experience some downtime until you switch your domain to our Domain Name System (DNS).
Learn how to reduce downtime during transfers in this article.
On the other hand, if you’re using a custom or hosting DNS, transferring your domain won’t cause downtime issues — DNS server settings stay the same during transfer. If you are not sure what type of DNS you're using, you can view it in your GoDaddy account -> click "DNS" next to your domain -> open the "Nameservers" tab -> it will be indicated at the top e.g. "Using ... nameservers".
Okay, let’s dive in.
Transferring your domain is simple:
Here, we’ll detail all that it takes to prepare your domain to transfer from GoDaddy.
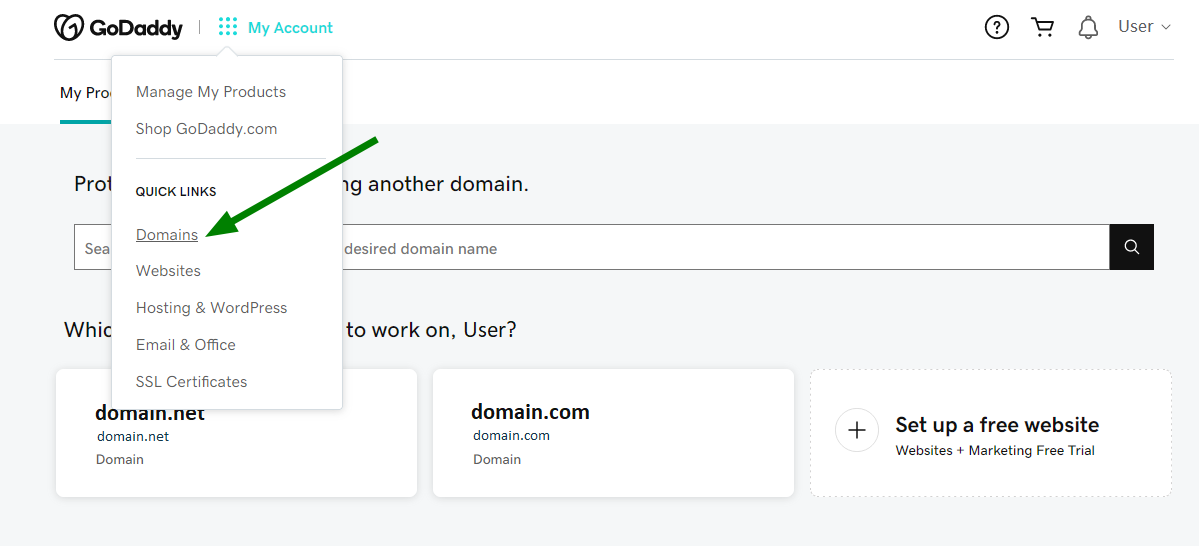
Firstly, you’ll need to unlock the domain and get an Auth Code (if applicable) from GoDaddy. Don’t forget to disable any GoDaddy privacy protection plan you may have in place for your domain.
Already done it? Log into your Namecheap account and click the banner below to begin the transfer. The part Accept GoDaddy Transfer will also come in handy to make the transfer quicker.

Important: If you make any changes to the Registrant First and Last name, Organization name or Email address, GoDaddy will put a 60-day lock that will prevent outgoing transfers. Updates to any other piece of contact information should not trigger this lock.
See this GoDaddy article for more details on updating contact information at GoDaddy.
The best options to avoid this lock would be either updating your contact info at Namecheap after the transfer is completed or changing the Administrative contact set at GoDaddy.
Still, if there’s a need to update the Registrant details at GoDaddy urgently, you should be able to opt out of the 60-day lock via email. This option is available only if Domain Privacy is turned off beforehand.
For cases where the 60-day lock has already been placed on a domain name, GoDaddy provides a special process to remove this lock. Contact GoDaddy's Review 60 department at review60@godaddy.com to have them review the case and remove the lock, if possible.

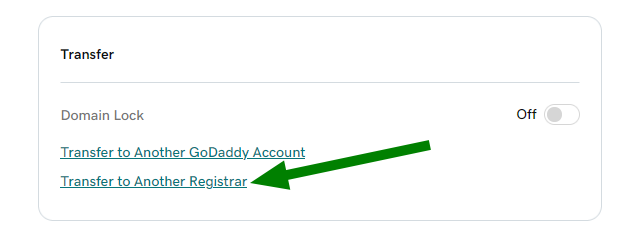

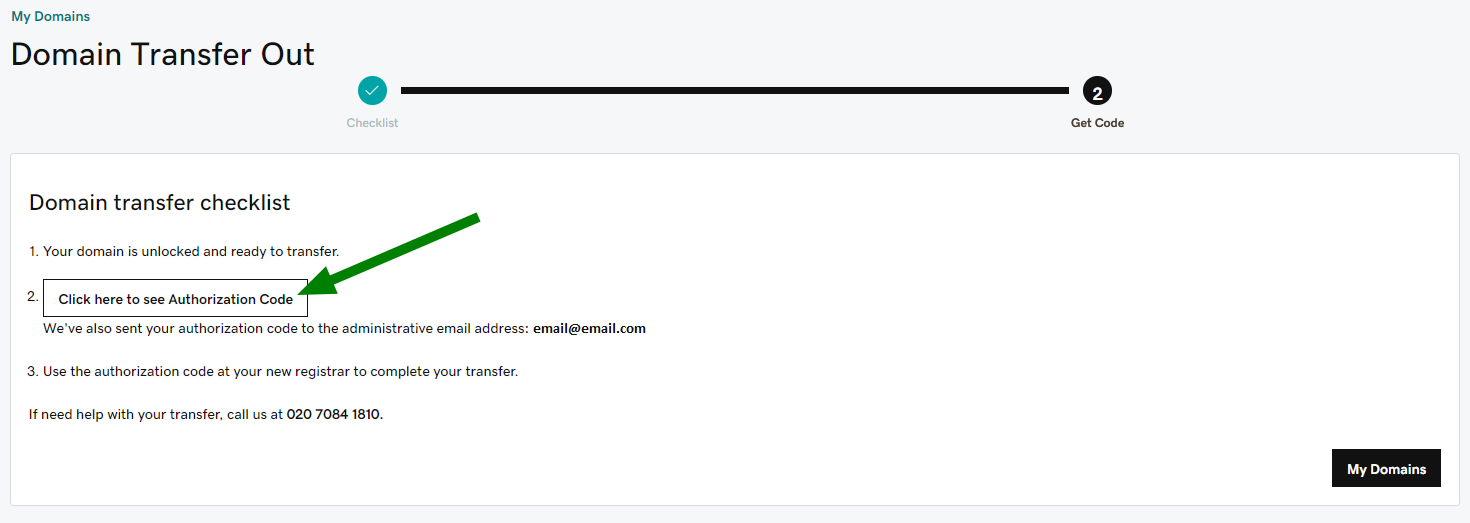
You can copy the code directly from this area. Additionally, you’ll receive the code to your administrative email address in case you’d need to use it later.
When GoDaddy privacy protection is enabled, it is against their policy to allow domain transfers. Any domain transfer requests will be declined while Privacy Protection is active. You will need to disable it before submitting the transfer.
NOTE: Private Registration cancellations are irreversible. This means that once canceled, it can't be enabled back and, if you decide to stay with GoDaddy, the private registration needs to be purchased again.
This step is required if you have a paid Domain Protection plan with GoDaddy (Full Domain Privacy & Protection or Ultimate Domain Protection & Security). If you do not have any paid ones, skip this step and proceed with How to turn off Domains By Proxy Service with GoDaddy below.
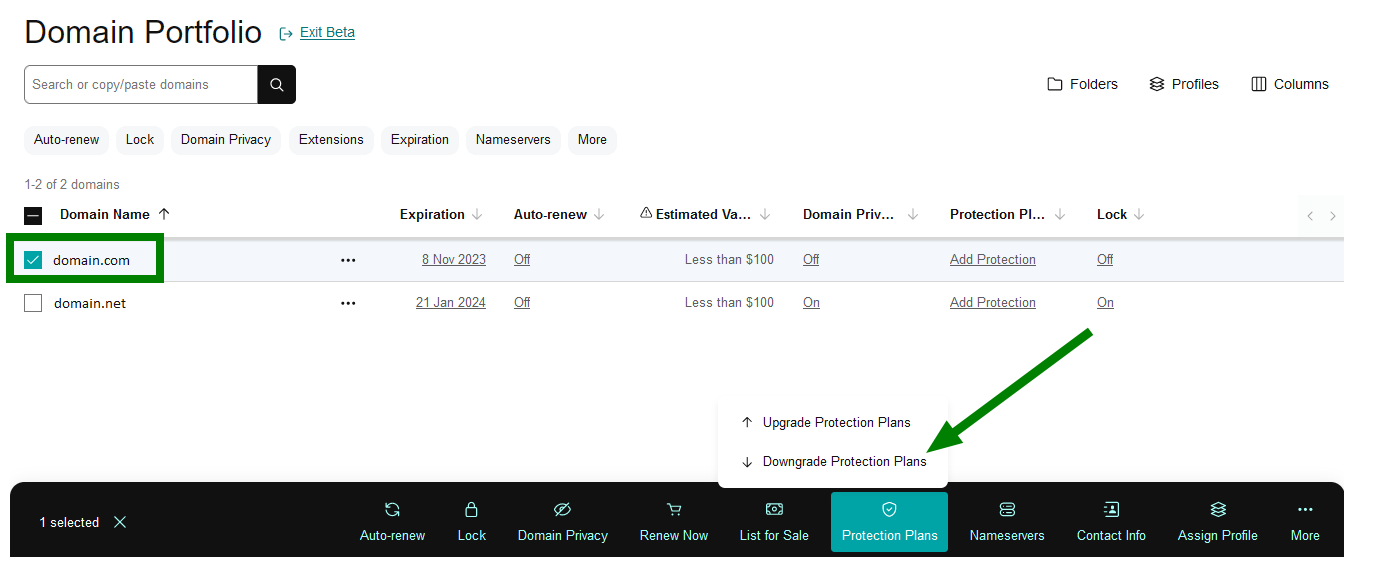
You'll see a Success confirmation once the changes are saved.
Please proceed with this step if you do not have any paid Domain Protection plans or if it’s been downgraded already.

You'll see a Success confirmation once the changes are saved.
Once the domain name is unlocked and you have received your Auth Code, you may initiate the transfer to Namecheap. Please refer to this article for more information on how to submit the transfer to us, and any other steps that may apply to you.
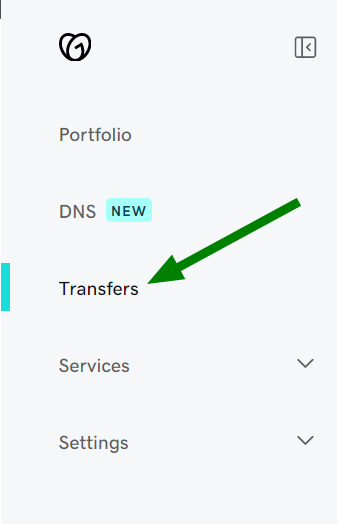
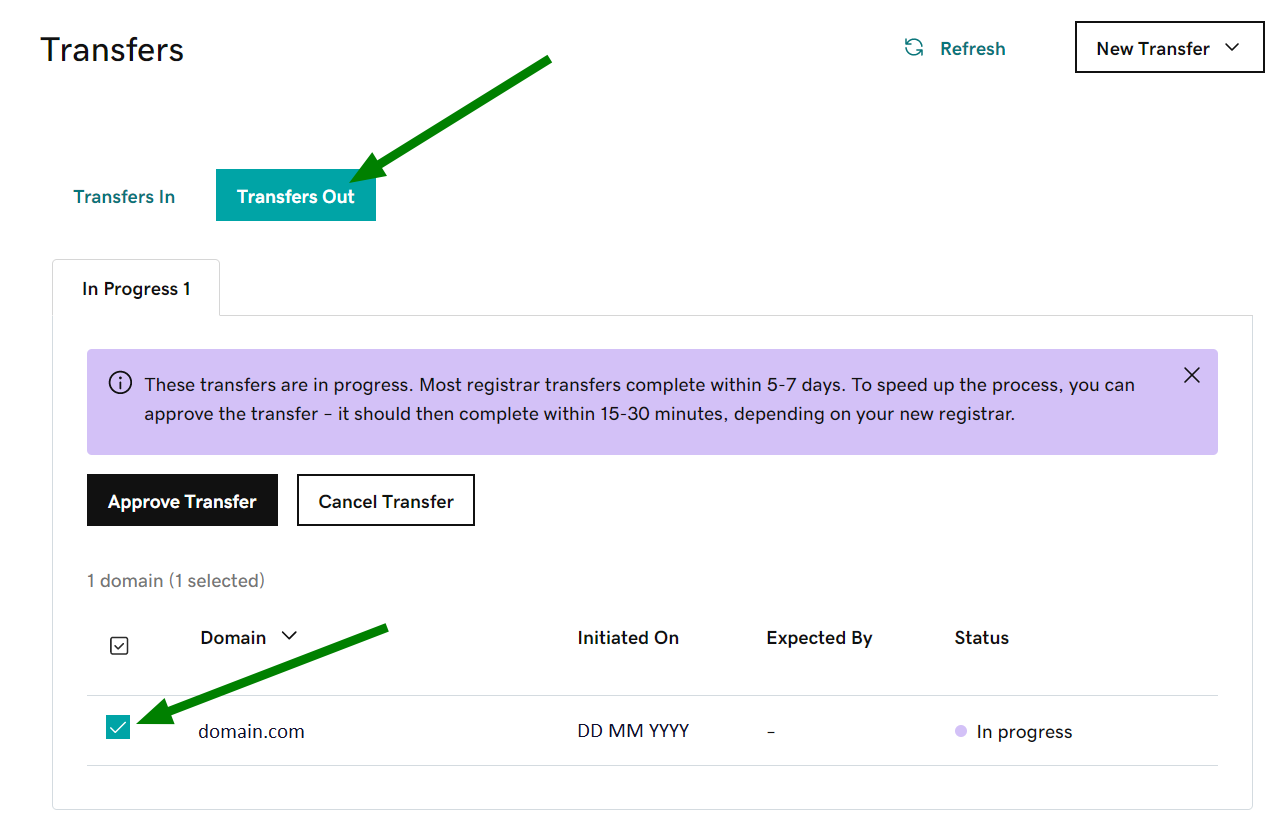
Once the transfer request has been placed and the process has been initiated at the registry level (usually within 20 minutes), the transfer begins. It takes up to 5-7 days for most TLDs. Optionally, you can accept the transfer on GoDaddy's side to speed up the process. Here’s how:
And that’s it! We hope this guide was useful.
{}Need help? We're always here for you.
{}