You are welcome to follow this guide on how to set up a URL redirect:
Understanding URL Redirects
URL redirects, also known as URL forwarding, allow you to redirect your domain visitors to a different URL, whether a new domain or another website.
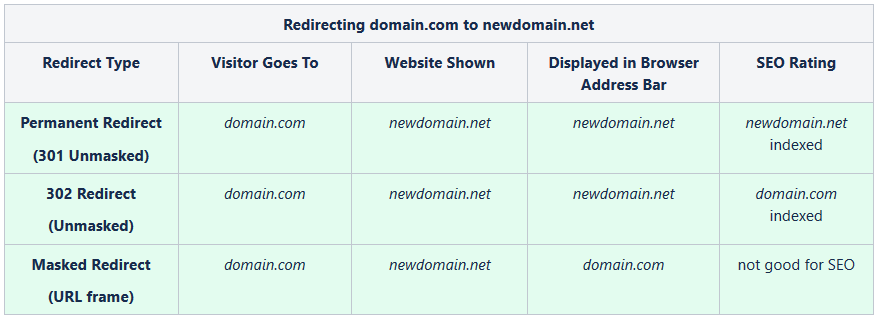
You have the option to configure three types of redirects:
-
301 (Permanent)
-
302 (Unmasked)
-
Masked (URL Frame).
Once correctly configured, the redirect usually takes around 30 minutes to start working.
NOTE: Redirecting with a secure connection (HTTPS) is only possible to a different destination domain
(e.g. http://www.domain.tld to https://www.anotherdomain.tld). If you need this type of redirect (HTTP >> HTTPS) or vice versa (HTTPS >> HTTP) within the same domain name
(http://domain.tld to
https://domain.tld)
, it must be set up via the
.htaccess file
or
Namecheap SSL plugin
in cPanel, provided an
SSL certificate is installed
.
Please note that redirecting from https://domain1.tld to https://domain2.tld will also require both domains to have SSL certificates installed.
NOTE:
TLD (Top Level Domain) refers to your domain extension (.COM, .NET, etc.)
There are two ways to configure URL redirect:
-
Use the Domain tab. This method is suitable for a quick setup of URL redirect only.
-
Use the Advanced DNS tab. This option allows you to add host records and a URL redirect.
Choose the method that best meets your needs.
Redirecting a URL in the Domain Tab
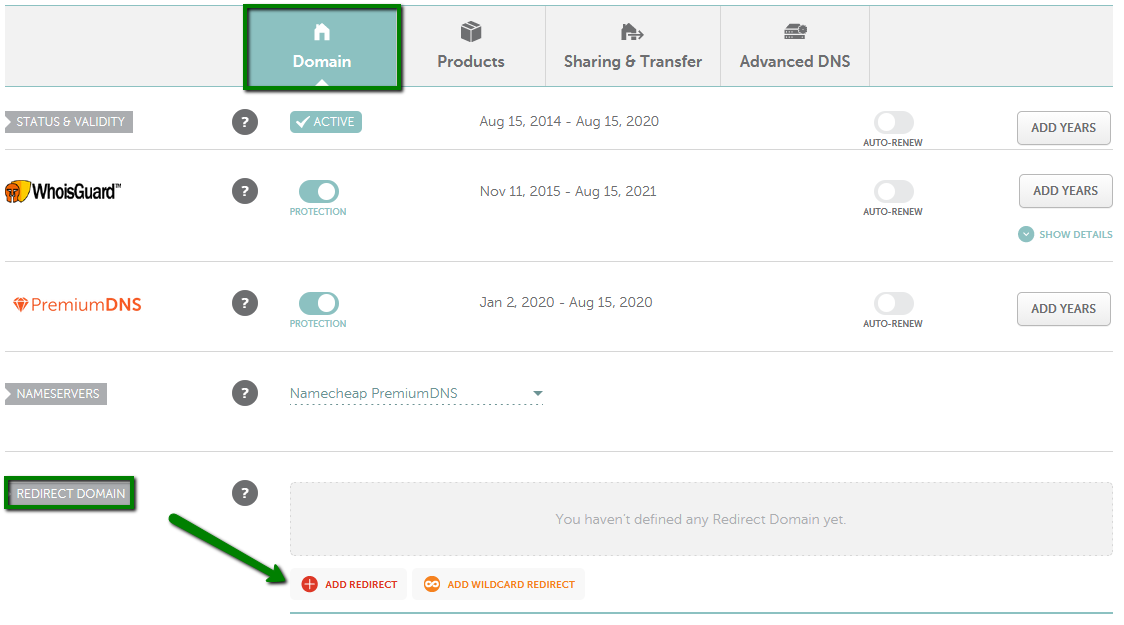
1. After clicking on the Manage button, find the Redirect Domain section and click on Add Redirect:
NOTE: If you want to create a wildcard record to match requests for non-existent subdomains, click on Add Wildcard redirect.
2. Enter your domain (e.g. yourdomain.tld / domain.com / newdomain.info) in the Source URL field. In the Destination URL field, enter the link to which you want to forward your domain. If you want to redirect yourdomain.tld and www.yourdomain.tld, add a record for www accordingly.
Save the changes using the green checkmarks on the right or the Save All Changes button:
3. Switch to the
Advanced DNS tab and check for any
conflicting records (
A,
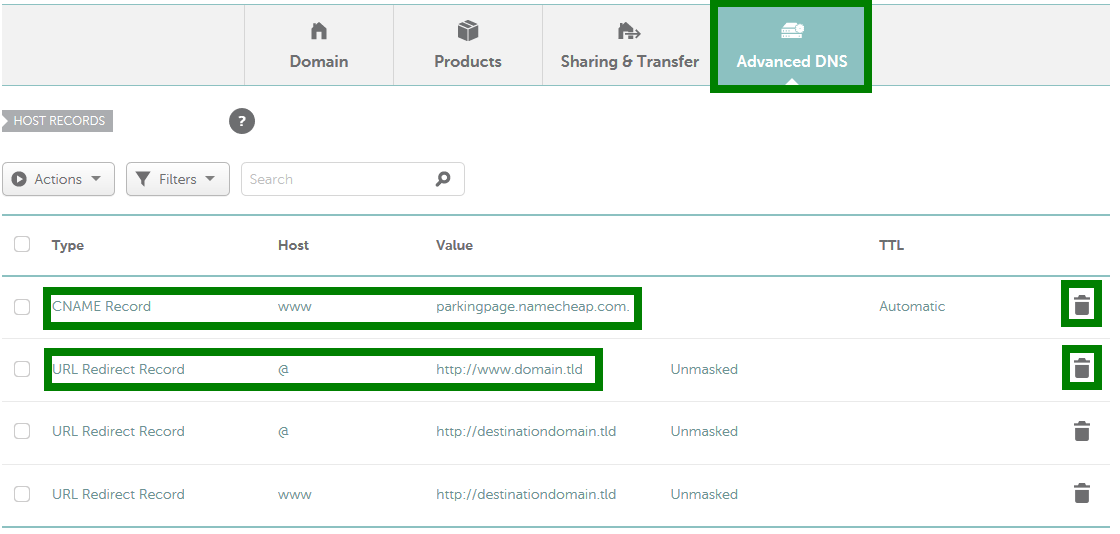
CNAME, ALIAS, URL redirect records with different values set for the same host).
Remove these conflicting records to ensure proper domain functionality:

NOTE: The Host field uses the @ symbol to represent your root domain (domain.tld).
That's it! The redirect should start working within 30 minutes.
Redirecting a URL in the Advanced DNS Tab
To set up a URL redirect using the Advanced DNS tab, follow these steps:
1. After clicking on the
Manage button, navigate to the
Advanced DNS tab and locate the
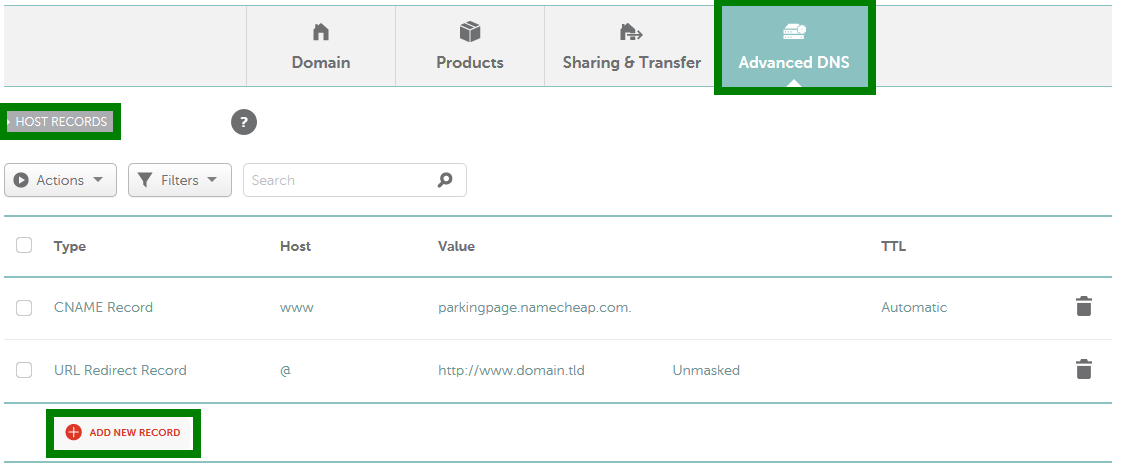
Host records section. Then click on the
Add New Record button. If you are not able to edit host records for your domain, it may be related to the case described in the article on
third-party nameservers.

2. From the drop-down menu for
Type, select
URL Redirect Record. Enter the host you want to forward in the
Host line (
@ for your root domain, i.e., domain.com, www for www.domain.com, * for a wildcard record). In the
Value line, enter the
destination URL:

If needed, you can change the Redirect Type from Unmasked to Masked or Permanent (301) using the drop-down menu:

3. Save the changes:

For more information on the
hosts you can use, refer to the article,
How do I create a subdomain for my domain?4. Check for any conflicting records (
A,
CNAME, ALIAS, URL Redirect records with different values set for the same host) for your domain. If any conflicting records exist,
remove them as shown:
Please note that it generally takes up to
30 minutes for the changes to be accepted globally.
NOTE: When a URL redirect is set for your domain, an
additional A record will be in the domain zone file that points your domain name to our
internal forwarding server. This A record is not visible in the Advanced DNS section and will be removed once the URL redirect record is deleted.
If you have any questions, feel free to contact our
Support Team.


