You may access your website files via the FileZilla SFTP client or another one of your choosing.
NOTE: we highly recommend creating a backup in the EasyWP dashboard before any changes to avoid data loss.
Connect to your server using the following steps:
Open your SFTP client and connect to your server using the provided credentials (hostname, username, password, and port). If you choose FileZilla, please check this guide on how to do it.
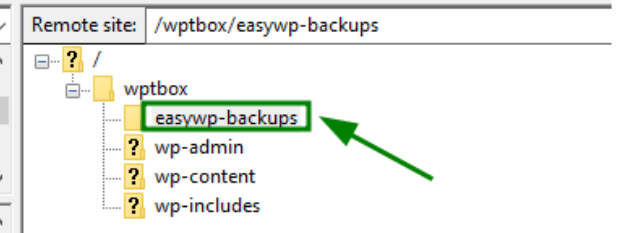
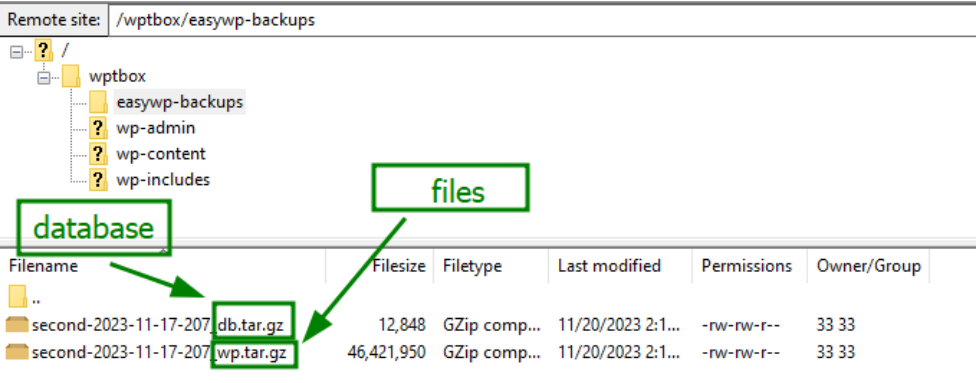
Navigate to your website directory (/wptbox). Once connected, go to the directory where your backup files of the website are hosted: /wptbox/easywp-backups
Here you will find the recent backup files with the corresponding filename and date. Please pay attention that you will have 2 files: filename-date_??_db.tar.gz - database; filename-date-??_wp.tar.gz - files.
Some SFTP clients allow you to extract files directly on the server. Right-click on the tar.gz file and look for an option like "Extract" or "Uncompress". This varies depending on your SFTP client. As an alternative, you may use the FileManager plugin to extract the files.
NOTE: Please make sure to extract the backup files in the /wptbox directory and replace the current files with the new ones.
It is recommended to save the current wp-config.php file on your local computer as it may be useful in the next stages of the restoration.
If your SFTP client doesn't have the feature to extract backup files, you may need to do it on your local machine using different tools depending on your OS. We provide you with instructions for: Windows MacOS Linux
Download the backup file on your PC by right-clicking on the backup file and pressing ‘Download’.
Find the downloaded file on your local machine to extract.
Right-click the backup file and select "7-Zip" from the Context Menu (hover over the "7-Zip" option in the context menu that appears after right-clicking).
Choose "Extract Here" if you want to extract the contents in the same location as the backup file or "Extract to [Folder Name]" to extract the contents to a specific folder.
7-Zip will extract the contents of the backup file to the specified location.
As an alternative, you may try using the WinRAR tool:
Download the backup file on your PC by right-clicking on the backup file and pressing ‘Download’.
Find the downloaded file on your local machine to extract.
Create a new folder where you want to extract the contents of the backup file. This folder will contain the restored WordPress files.
Extract the .tar.gz archive by right-clicking on the .tar.gz backup file. Then choose the "Extract to [Folder Name]" option to extract the contents into the newly created folder.
WinRAR will extract the contents of the backup file to the specified location.
You should have successfully extracted the contents of your backup file using either WinRAR following these steps. If you encounter any issues, make sure that the backup file is not corrupted.
Download the backup file on your PC by right-clicking on the backup file and pressing ‘Download’.
Place the backup file in a directory on your Linux machine where you want to restore the WordPress site.
Navigate to the Directory:
Open a terminal window.
Use the cd command to navigate to the directory where your backup file is located: cd /path/to/backup/directory
Use the following command to extract the contents of the .tar.gz backup file: tar -xzf backupfile.tar.gz (NOTE: replace backupfile.tar.gz with the actual name of your backup file)
This command will extract the files into the current directory.
Confirm that the extracted files include the WordPress directories such as wp-admin, wp-includes, and wp-content.
After restoring content, there is a need to replace your existing WordPress core files with the files from the extracted backup. Be cautious not to overwrite your wp-config.php file, as it contains your database connection information.
To proceed with the file replacement, complete the following steps:
Navigate to the root directory of the website via FileZilla: /wptbox.
Remove old files and folders except of wp-config.php file.
Upload new WordPress files:
In the left panel, select the files and folders you want to upload (typically, this would be the new WordPress files you want to replace);
Right-click on the selected files and choose "Upload" from the context menu. FileZilla will transfer the files to the corresponding directory on your server.
Confirm file replacement: if FileZilla prompts you to confirm the replacement of existing files, choose the appropriate option. This will typically be "Overwrite" or "Overwrite if newer".
Wait for the transfer to complete. You can check the progress in the lower part of the FileZilla window.
Clear the website cache and verify changes: once the transfer is completed, go to your WordPress site in a web browser and verify that the changes have taken effect. Check if the site functions as expected with the updated files.