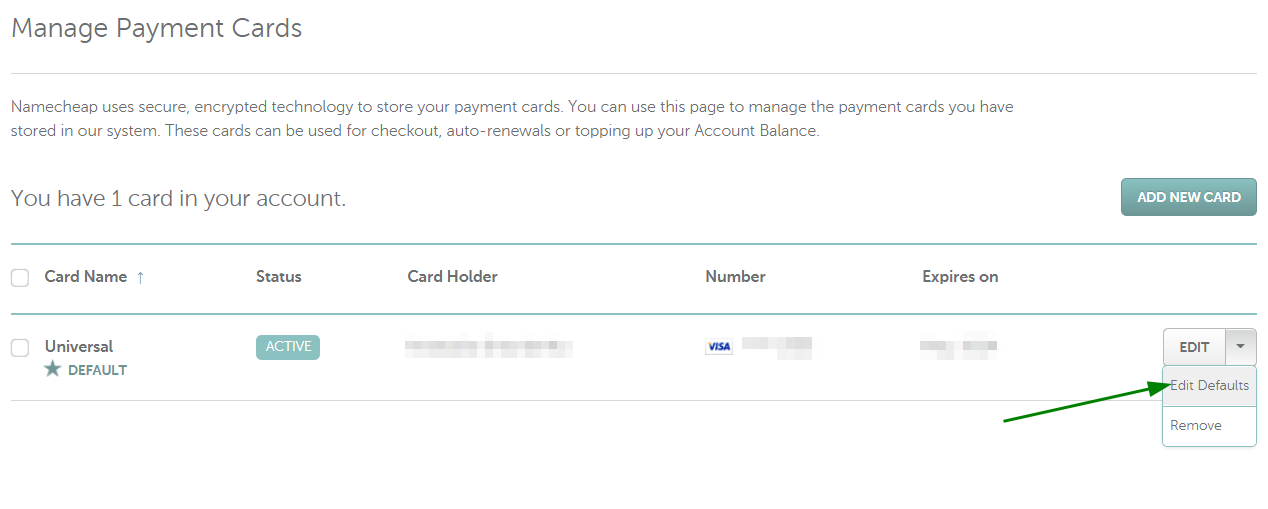
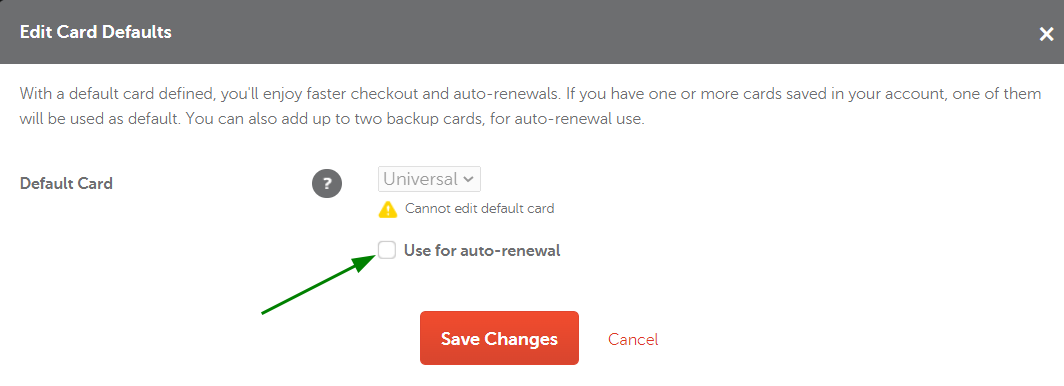
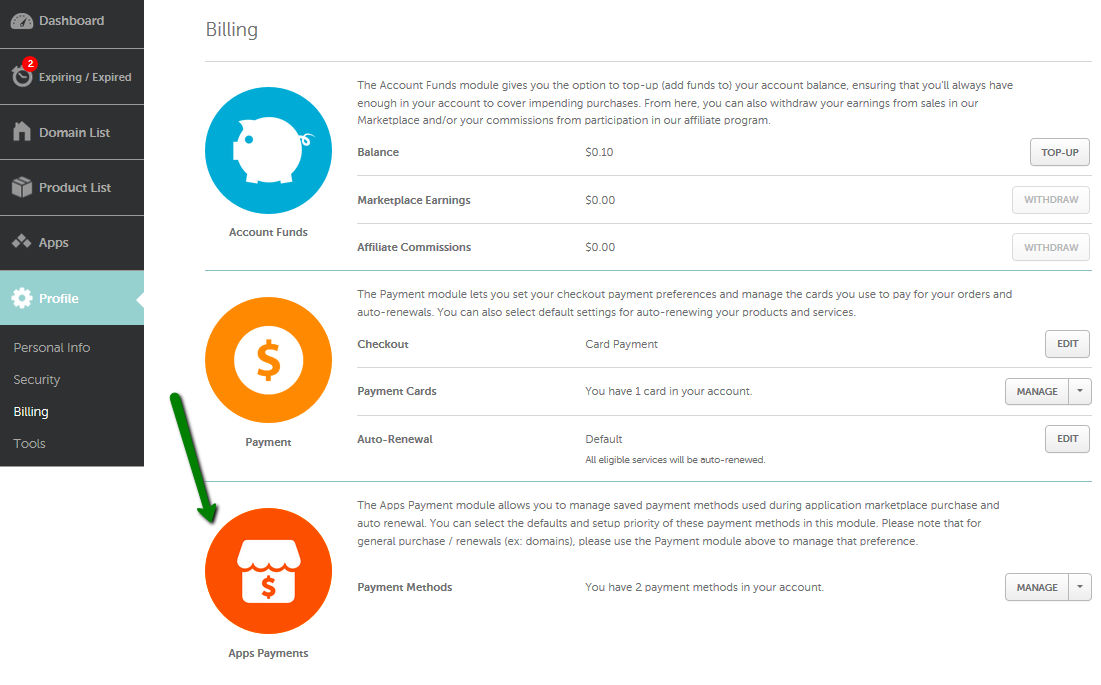
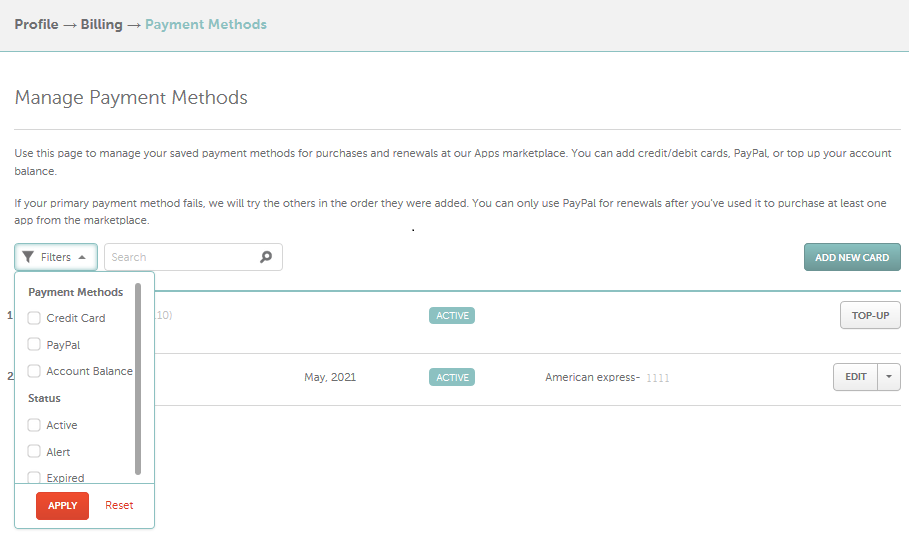
{"/api/v1/ncpl/currencies/getAll":{"body":[{"Name":"U.S. Dollar","Code":"USD","Symbol":"$","Separator":".","Culture":"en-US"},{"Name":"Euro","Code":"EUR","Symbol":"€","Separator":",","Culture":"en-US"},{"Name":"British Pound","Code":"GBP","Symbol":"£","Separator":".","Culture":"en-US"},{"Name":"Canadian Dollars","Code":"CAD","Symbol":"C$","Separator":".","Culture":"en-US"},{"Name":"Australian Dollars","Code":"AUD","Symbol":"A$","Separator":".","Culture":"en-US"},{"Name":"Indian Rupees","Code":"INR","Symbol":"Rs","Separator":".","Culture":"en-US"},{"Name":"China Yuan RMB","Code":"CNY","Symbol":"¥","Separator":".","Culture":"en-US"}],"status":200,"statusText":"OK"},"/api/v1/ncpl/usermanagement/uiuser/getHeaderUserInfo:\"{\\\"hideSupportPin\\\":true}\"":{"body":{"__ctxId":"F408529EA08443C690B321364C208CB4","__isError":true,"__errorType":"Nc.Platform.Abstractions.UnauthorizedException","Http_WWW_Authenticate":"Bearer","StatusCode":"Unauthorized","LogLevel":3,"Message":"","InnerException":null,"HelpLink":null,"Source":"Nc.Security.Middleware"},"status":401,"statusText":"Unauthorized"},"/api/v1/ncpl/cart/user/getShoppingCartSummary:\"{\\\"finalTotalOnly\\\":true}\"":{"body":null,"status":200,"statusText":"OK"}}{"/api/v1/ncpl/simplekb/getarticle:\"{\\\"articleId\\\":10564,\\\"categoryId\\\":2207}\"":{"body":{"Id":10564,"FriendlyId":"","ArticleTypeId":0,"Title":"Can I set up automatic billing for my Namecheap services?","ArticleName":"Can I set up automatic billing for my Namecheap services?","ArticleSummary":null,"PreponedSummary":false,"Approved":true,"Body":"WWVzISBUbyB1c2UgdGhlIDxiPkF1dG8tUmVuZXc8L2I+IGZlYXR1cmUsIGZvbGxvdyB0aGVzZSBzdGVwczo8YnIgLz48ZGl2PjxiciAvPjwvZGl2PjxkaXY+MS4gPGEgaHJlZj0iaHR0cHM6Ly93d3cubmFtZWNoZWFwLmNvbS9zdXBwb3J0L2tub3dsZWRnZWJhc2UvYXJ0aWNsZS5hc3B4LzIzMi83L2hvdy1jYW4taS1hZGQtZnVuZHMtdG8tbXktbmFtZWNoZWFwLWFjY291bnQvIj5EZXBvc2l0PC9hPiB0aGUgYW1vdW50IG5lY2Vzc2FyeSBmb3IgdGhlIHNlcnZpY2UgcmVuZXdhbCBvciA8YSBocmVmPSJodHRwczovL3d3dy5uYW1lY2hlYXAuY29tL3N1cHBvcnQva25vd2xlZGdlYmFzZS9hcnRpY2xlLmFzcHgvMzY5LzcvaG93LXRvLWFkZC1hLWNhcmQtdG8tbXktYWNjb3VudC1hbmQtZW5hYmxlLWF1dG9yZW5ld2FsLyI+YWRkIGEgY2FyZDwvYT4gdG8geW91ciBhY2NvdW50IGFuZCBlbmFibGUgYXV0by1yZW5ld2FsIGZvciBpdC48L2Rpdj48ZGl2PjxiciAvPjwvZGl2PjxkaXY+PGk+UGxlYXNlIG5vdGUgdGhhdCBmb3IgYXV0b21hdGljIGJpbGxpbmcsIG9ubHkgY3JlZGl0IG9yIGRlYml0IGNhcmRzLCBhcyB3ZWxsIGFzIGFjY291bnQgZnVuZHMsIGNhbiBiZSB1c2VkLiBPdGhlciBwYXltZW50IG1ldGhvZHMsIHN1Y2ggYXMgUGF5UGFsLCBhcmUgbm90IGN1cnJlbnRseSBzdXBwb3J0ZWQgZm9yIHJlY3VycmluZyBwYXltZW50cywgdW5sZXNzIGl0IGlzIGEgcmVuZXdhbCBmb3Igb3VyIEFwcHMgb3IgdGhlIHNlcnZpY2VzIHB1cmNoYXNlZCBhbG9uZyB3aXRoIHRoZSBBcHBzLiBFbnN1cmUgdGhhdCB5b3VyIGNyZWRpdCBvciBkZWJpdCBjYXJkIGluZm9ybWF0aW9uIGlzIHVwIHRvIGRhdGUgdG8gYXZvaWQgYW55IGludGVycnVwdGlvbnMgaW4geW91ciBzZXJ2aWNlcy48L2k+PC9kaXY+PGRpdj48YnIgLz48L2Rpdj48ZGl2PjIuIE5leHQsIHR1cm4gb24gYXV0by1yZW5ld2FsIGZvciB5b3VyIGNob3NlbiBOYW1lY2hlYXAgc2VydmljZS4gPGJyIC8+PC9kaXY+PGRpdj48YnIgLz48L2Rpdj48ZGl2PiBZb3VyIHBheW1lbnQgY2FyZCBjYW4gYmUgc2V0IHVwIGluIGRpZmZlcmVudCB3YXlzLCBkZXBlbmRpbmcgb24gdGhlIHNlcnZpY2VzIHlvdeKAmWQgbGlrZSB0byByZW5ldy4gPGJyIC8+PC9kaXY+PGRpdj48YnIgLz48L2Rpdj48ZGl2PiBQbGVhc2UgcmVmZXIgdG8gdGhlIGZvbGxvd2luZyBpbnN0cnVjdGlvbnM6PGJyIC8+PGJyIC8+PC9kaXY+PHVsPjxsaT48cD48YSBocmVmPSIjSG93IHRvIHNldCB1cCB5b3VyIGNhcmQgZm9yIHJlY3VycmluZyBwYXltZW50cyAoYWxsIHNlcnZpY2VzIGV4Y2VwdCBBcHBzKSI+SG93IHRvIHNldCB1cCB5b3VyIGNhcmQgZm9yIHJlY3VycmluZyBwYXltZW50cyAoYWxsIHNlcnZpY2VzIGV4Y2VwdCBBcHBzKTwvYT48L3A+PC9saT48bGk+PHA+PGEgaHJlZj0iI0hvdyB0byBzZXQgdXAgeW91ciBjYXJkIGZvciBBcHBzIGF1dG8tcmVuZXdhbCBvbmx5Ij5Ib3cgdG8gc2V0IHVwIHlvdXIgY2FyZCBmb3IgQXBwcyBhdXRvLXJlbmV3YWwgb25seTwvYT48YnIgLz48L3A+PC9saT48L3VsPjxkaXY+PGI+Tk9URTwvYj46IElmIHlvdSBjaG9vc2Ugbm90IHRvIHNldCB1cCBhdXRvbWF0aWMgYmlsbGluZyBvciB0dXJuIG9mZiBhdXRvLXJlbmV3YWwsIGJlIGF3YXJlIHRoYXQgeW91ciBzZXJ2aWNlcyB3aWxsIG5vdCByZW5ldyBhdXRvbWF0aWNhbGx5IHdoZW4gdGhleSBleHBpcmUuIFRoaXMgbWVhbnMgdGhhdCB5b3Ugd2lsbCBuZWVkIHRvIG1hbnVhbGx5IHJlbmV3IHlvdXIgZG9tYWluLCBob3N0aW5nLCBvciBvdGhlciBzZXJ2aWNlcyBiZWZvcmUgdGhlIGV4cGlyYXRpb24gZGF0ZSB0byBhdm9pZCBhbnkgaW50ZXJydXB0aW9ucy4gSWYgeW91IGZvcmdldCB0byByZW5ldyBpbiB0aW1lLCB5b3UgbWF5IHJpc2sgbG9zaW5nIGFjY2VzcyB0byB5b3VyIHNlcnZpY2VzIG9yIGRvbWFpbiwgc28gaXTigJlzIGltcG9ydGFudCB0byBrZWVwIHRyYWNrIG9mIHJlbmV3YWwgZGF0ZXMuPC9kaXY+PGRpdj48YnIgLz48L2Rpdj5UaGUgaW5zdHJ1Y3Rpb25zIG9uIGhvdyB0byB0dXJuIG9uIHRoZSA8Yj5BdXRvLVJlbmV3PC9iPiBvcHRpb24gZm9yIGRpZmZlcmVudCB0eXBlcyBvZiBzZXJ2aWNlcyBjYW4gYmUgZm91bmQgYmVsb3c6PGJyIC8+PGJyIC8+PHVsPjxsaT48cD48YSBocmVmPSIjRW5hYmxpbmcgQXV0by1SZW5ld2FsIGZvciBmdXR1cmUgc2VydmljZXMiPkVuYWJsaW5nIEF1dG8tUmVuZXdhbCBmb3IgZnV0dXJlIHNlcnZpY2VzPC9hPjwvcD48L2xpPjxsaT48cD48YSBocmVmPSIjSG9zdGluZyBwYWNrYWdlcyI+SG9zdGluZyBwYWNrYWdlczwvYT48L3A+PC9saT48bGk+PHA+PGEgaHJlZj0iI0RvbWFpbnMgYW5kIERvbWFpbiBQcml2YWN5IHN1YnNjcmlwdGlvbnMiPkRvbWFpbnMgYW5kIERvbWFpbiBQcml2YWN5IHN1YnNjcmlwdGlvbnM8L2E+PC9wPjwvbGk+PGxpPjxwPjxhIGhyZWY9IiNQcml2YXRlIEVtYWlsIHN1YnNjcmlwdGlvbnMiPlByaXZhdGUgRW1haWwgc3Vic2NyaXB0aW9uczwvYT48L3A+PC9saT48bGk+PHA+PGEgaHJlZj0iI0FwcHMiPkFwcHM8L2E+wqA8L3A+PC9saT48L3VsPjxiPk5PVEU8L2I+OiBwcm9tbyBjb2RlcyBhcmUgbm90IGFwcGxpZWQgYXV0b21hdGljYWxseSBkdXJpbmcgYXV0by1yZW5ld2Fscy4NCjxiciAvPjxiciAvPjxkaXY+WW91IGNhbiBhbHNvIHVzZSBvdXIgdmlkZW8gdHV0b3JpYWwgb24gaG93IHRvIHR1cm4gdGhlIGF1dG8tcmVuZXdhbCBmZWF0dXJlICJPbiIvIk9mZiI6IDxiciAvPjwvZGl2PjxkaXY+PGJyIC8+PGlmcmFtZSBzcmM9Ii8vd3d3LnlvdXR1YmUtbm9jb29raWUuY29tL2VtYmVkL0c5aXVsbDJ2T1BnP2ZlYXR1cmU9cGxheWVyX2RldGFpbHBhZ2UiIGFsbG93ZnVsbHNjcmVlbj0iIiB3aWR0aD0iNjQwIiBoZWlnaHQ9IjM2MCIgZnJhbWVib3JkZXI9IjAiPjwvaWZyYW1lPjwvZGl2PjxkaXY+PGJyIC8+PC9kaXY+PHA+PGEgbmFtZT0iSG93IHRvIHNldCB1cCB5b3VyIGNhcmQgZm9yIHJlY3VycmluZyBwYXltZW50cyAoYWxsIHNlcnZpY2VzIGV4Y2VwdCBBcHBzKSI+PGI+SG93IHRvIHNldCB1cCB5b3VyIGNhcmQgZm9yIHJlY3VycmluZyBwYXltZW50cyAoYWxsIHNlcnZpY2VzIGV4Y2VwdCBBcHBzKTwvYj48L2E+PC9wPjxkaXY+SGVyZSdzIHRoZSBob3ctdG8gdmlkZW8gb24gaG93IHRvIGFkZCBhIGNyZWRpdCBjYXJkIHRvIHlvdXIgYWNjb3VudCBhbmQgdGhlbiBob3cgdG8gc2V0IGl0IHVwIGZvciBhdXRvLXJlbmV3YWwgZm9yIGFsbCB5b3VyIHNlcnZpY2VzOjwvZGl2PjxkaXY+PGJyIC8+PC9kaXY+PGRpdj48aWZyYW1lIHNyYz0iLy93d3cueW91dHViZS1ub2Nvb2tpZS5jb20vZW1iZWQvbFhEWGRXZC1aVDA/ZmVhdHVyZT1wbGF5ZXJfZGV0YWlscGFnZSIgYWxsb3dmdWxsc2NyZWVuPSIiIHdpZHRoPSI2NDAiIGhlaWdodD0iMzYwIiBmcmFtZWJvcmRlcj0iMCI+PC9pZnJhbWU+PC9kaXY+PGRpdj48YnIgLz48L2Rpdj4NClRvIHN0YXJ0IHVzaW5nIHlvdXIgY2FyZCBmb3IgYXV0by1yZW5ld2FsLCBwbGVhc2UgZm9sbG93IHRoZXNlIGluc3RydWN0aW9uczo8YnIgLz48YnIgLz4xLiBHbyB0byA8Yj5Qcm9maWxlICZndDsmZ3Q7IEJpbGxpbmcgJmd0OyZndDsgUGF5bWVudHMgQ2FyZHMgJmd0OyZndDsgTWFuYWdlPC9iPiBvciB2aXNpdCB0aGlzIDxhIGhyZWY9Imh0dHBzOi8vYXAud3d3Lm5hbWVjaGVhcC5jb20vcHJvZmlsZS9iaWxsaW5nL1BheW1lbnRDYXJkcyI+ZGlyZWN0IGxpbms8L2E+LjxiciAvPjxiciAvPjIuIENsaWNrIG9uIHRoZSBhcnJvdyBuZXh0IHRvIHRoZSA8Yj5FZGl0PC9iPiBidXR0b24gYW5kIGNob29zZSA8Yj5FZGl0IERlZmF1bHRzPC9iPjo8YnIgLz48ZGl2PjxiciAvPjwvZGl2PjxkaXY+PGJyIC8+PC9kaXY+PGltZyBjbGFzcz0ia2ItaW1hZ2UiIHNyYz0iaHR0cHM6Ly9OYW1lY2hlYXAuc2ltcGxla2IuY29tL1NpdGVDb250ZW50cy8yLTdDMjJENTIzNkE0NTQzRUI4MjdGM0JEODkzNkUxNTNFL21lZGlhL0F1dG9yZW5ld0FydGljbGUxLnBuZyIgLz48YnIgLz48YnIgLz48YnIgLz4zLiBUaWNrIHRoZSA8Yj5Vc2UgZm9yIGF1dG8tcmVuZXdhbDwvYj4gYm94IGFuZCBjbGljayBvbiA8Yj5TYXZlIENoYW5nZXM8L2I+OyBvdGhlcndpc2UsIHRoZSBhdXRvLXJlbmV3YWwgd2lsbCBub3QgaGFwcGVuOiA8YnIgLz48ZGl2PjxiciAvPjwvZGl2PjxiciAvPjxpbWcgY2xhc3M9ImtiLWltYWdlIiBzcmM9Imh0dHBzOi8vTmFtZWNoZWFwLnNpbXBsZWtiLmNvbS9TaXRlQ29udGVudHMvMi03QzIyRDUyMzZBNDU0M0VCODI3RjNCRDg5MzZFMTUzRS9tZWRpYS9BdXRvcmVuZXdBcnRpY2xlMi5wbmciIC8+PGJyIC8+PGJyIC8+DQpGb3IgYXV0by1yZW5ld2Fscywgd2UnbGwgYXR0ZW1wdCB0byBjaGFyZ2UgeW91ciBOYW1lY2hlYXAgYWNjb3VudCBiYWxhbmNlIGZpcnN0LiBJZiB0aGVyZSBhcmUgaW5zdWZmaWNpZW50IGZ1bmRzIGluIHlvdXIgYWNjb3VudCwgdGhlbiB3ZSdsbCB0cnkgdG8gdXNlIHlvdXIgY2FyZHMgbmV4dCDigJMgZmlyc3QsIHRoZSBkZWZhdWx0IGNhcmQsIHRoZW4gYW55IGFsdGVybmF0aXZlIGNhcmRzLCBpbiB0aGUgb3JkZXIgeW91IHNwZWNpZmllZC48YnIgLz48YnIgLz5DdXJyZW50bHksIDxiPnlvdSBjYW5ub3QgdXNlIFBheVBhbDwvYj4gdG8gcGF5IDxiPmZvciBhdXRvbWF0aWMgcmVuZXdhbHM8L2I+IG9mIHlvdXIgc2VydmljZXMsIHVubGVzcyBpdCBpcyBhIHJlbmV3YWwgZm9yIG91ciBBcHBzIG9yIHRoZSBzZXJ2aWNlcyBwdXJjaGFzZWQgYWxvbmcgd2l0aCB0aGUgQXBwcyBpbiB0aGUgc2FtZSBvcmRlci48YnIgLz48YnIgLz48Yj5OT1RFPC9iPjogQXV0by1yZW5ld2FsIHdvbuKAmXQgaGFwcGVuIGlmIHN1ZmZpY2llbnQgZnVuZHMgYXJlIHVuYXZhaWxhYmxlIHZpYSBvbmUgb2YgdGhlc2UgcGF5bWVudCBtZXRob2RzIHdoZW4gdGhlIHByb2R1Y3Qgb3Igc2VydmljZSBleHBpcmVzLiBBbnkgc2V0dGluZyBjaGFuZ2VzIHlvdSBtYWtlIGhlcmUgd2lsbCBiZSByZWZsZWN0ZWQgbmV4dCB0aW1lIHlvdSBjaGVjayBvdXQuPGJyIC8+DQoNCsKgwqDCoMKgwqAgwqANCg0KPHA+PGEgbmFtZT0iSG93IHRvIHNldCB1cCB5b3VyIGNhcmQgZm9yIEFwcHMgYXV0by1yZW5ld2FsIG9ubHkiPjxiPkhvdyB0byBzZXQgdXAgeW91ciBjYXJkIGZvciBBcHBzIGF1dG8tcmVuZXdhbCBvbmx5PC9iPjwvYT48L3A+PGJyIC8+DQoNClRoZSA8Yj5BcHBzIFBheW1lbnRzPC9iPiBzZWN0aW9uIGFsbG93cyBtYW5hZ2luZyBzYXZlZCBwYXltZW50IG1ldGhvZHMgdXNlZCBkdXJpbmcgQXBwcyBNYXJrZXRwbGFjZSBwdXJjaGFzZS9hdXRvLXJlbmV3YWwuPGJyIC8+PGJyIC8+PGRpdj5HbyB0byAgPGI+UHJvZmlsZSAmZ3Q7Jmd0OyBCaWxsaW5nICZndDsmZ3Q7IEFwcHMgUGF5bWVudHM8L2I+IHRvIGFkZCBjcmVkaXQvZGViaXQgY2FyZHMsIFBheVBhbCwgb3IgdG9wIHVwIHlvdXIgYWNjb3VudCBiYWxhbmNlLjwvZGl2PjxkaXY+PGJyIC8+PC9kaXY+PGJyIC8+PGltZyBjbGFzcz0ia2ItaW1hZ2UiIHNyYz0iaHR0cHM6Ly9OYW1lY2hlYXAuc2ltcGxla2IuY29tL1NpdGVDb250ZW50cy8yLTdDMjJENTIzNkE0NTQzRUI4MjdGM0JEODkzNkUxNTNFL21lZGlhL0F1dG9yZW5ld0FydGljbGUzLnBuZyIgLz48YnIgLz48YnIgLz48ZGl2PkhlcmUgeW91IGNhbiBzZXQgZmlsdGVycyBieSBwYXltZW50IG1ldGhvZCBvciBzdGF0dXMsIGFkZCBhIG5ldyBjYXJkLCB0b3AgdXAgeW91ciBiYWxhbmNlIG9yIGVkaXQgeW91ciBzYXZlZCBwYXltZW50IG1ldGhvZHM6PC9kaXY+PGRpdj48YnIgLz48L2Rpdj48YnIgLz48ZGl2PjxpbWcgY2xhc3M9ImtiLWltYWdlIiBzcmM9Imh0dHBzOi8vTmFtZWNoZWFwLnNpbXBsZWtiLmNvbS9TaXRlQ29udGVudHMvMi03QzIyRDUyMzZBNDU0M0VCODI3RjNCRDg5MzZFMTUzRS9tZWRpYS9BdXRvcmVuZXdBcnRpY2xlNC5wbmciIC8+PC9kaXY+PGJyIC8+PGJyIC8+PGRpdj5UaGUgZGVmYXVsdCBwYXltZW50IG1ldGhvZCB3aWxsIGJlIGRpc3BsYXllZCB3aXRoIHRoZSBzdGFyIGljb246PC9kaXY+PGRpdj48YnIgLz48L2Rpdj48YnIgLz48ZGl2PjxpbWcgY2xhc3M9ImtiLWltYWdlIiBzcmM9Imh0dHBzOi8vTmFtZWNoZWFwLnNpbXBsZWtiLmNvbS9TaXRlQ29udGVudHMvMi03QzIyRDUyMzZBNDU0M0VCODI3RjNCRDg5MzZFMTUzRS9tZWRpYS9BdXRvcmVuZXdBcnRpY2xlNS5wbmciIC8+PC9kaXY+PGJyIC8+PGJyIC8+PGRpdj5UaGUgPGI+RWRpdDwvYj4gYnV0dG9uIGFsbG93cyBjaGFuZ2luZyB0aGUgZGVmYXVsdCBBcHBzIHBheW1lbnQgbWV0aG9kIG9yIHJlbW92aW5nIHRoZSBjaG9zZW4gb25lOjwvZGl2PjxkaXY+PGJyIC8+PC9kaXY+PGJyIC8+PGRpdj48aW1nIGNsYXNzPSJrYi1pbWFnZSIgc3JjPSJodHRwczovL05hbWVjaGVhcC5zaW1wbGVrYi5jb20vU2l0ZUNvbnRlbnRzLzItN0MyMkQ1MjM2QTQ1NDNFQjgyN0YzQkQ4OTM2RTE1M0UvbWVkaWEvQXV0b3JlbmV3QXJ0aWNsZTYucG5nIiAvPjwvZGl2PjxiciAvPjxiciAvPjxkaXY+SXQncyBwb3NzaWJsZSB0byBuYXZpZ2F0ZSBiZXR3ZWVuIHRoZSBwYXltZW50IG1ldGhvZHMgYW5kIGNoYW5nZSB0aGVpciBvcmRlciB1c2luZyB0aGUgZHJhZy1hbmQtZHJvcCBmdW5jdGlvbmFsaXR5OjwvZGl2PjxkaXY+PGJyIC8+PC9kaXY+PGJyIC8+PGRpdj48aW1nIGNsYXNzPSJrYi1pbWFnZSIgc3JjPSJodHRwczovL05hbWVjaGVhcC5zaW1wbGVrYi5jb20vU2l0ZUNvbnRlbnRzLzItN0MyMkQ1MjM2QTQ1NDNFQjgyN0YzQkQ4OTM2RTE1M0UvbWVkaWEvQXV0b3JlbmV3QXJ0aWNsZTcucG5nIiAvPjwvZGl2PjxiciAvPjxiciAvPklmIHlvdXIgcHJpbWFyeSBwYXltZW50IG1ldGhvZCB1c2VkIGZvciBhdXRvLXJlbmV3YWwgZmFpbHMsIHRoZSBzeXN0ZW0gd2lsbCB0cnkgdGhlIG90aGVycyBpbiB0aGUgb3JkZXIgc3BlY2lmaWVkIGluIHRoaXMgb3B0aW9uLjxiciAvPjxiciAvPjxiPk5PVEU8L2I+OiBZb3UgY2FuIG9ubHkgdXNlIFBheVBhbCBmb3IgcmVuZXdhbHMgYWZ0ZXIgeW91J3ZlIHVzZWQgaXQgdG8gcHVyY2hhc2UgYXQgbGVhc3Qgb25lIGFwcCBmcm9tIG91ciA8YSBocmVmPSJodHRwczovL3d3dy5uYW1lY2hlYXAuY29tL2FwcHMvIj5NYXJrZXRwbGFjZTwvYT4uDQoNCsKgwqDCoMKgwqAgwqA8YnIgLz48cD48YSBuYW1lPSJFbmFibGluZyBBdXRvLVJlbmV3YWwgZm9yIGZ1dHVyZSBzZXJ2aWNlcyI+PGI+RW5hYmxpbmcgQXV0by1SZW5ld2FsIGZvciBmdXR1cmUgc2VydmljZXM8L2I+PC9hPjwvcD48YnIgLz5UaGlzIG9wdGlvbiBhbGxvd3MgZW5hYmxpbmcgYXV0by1yZW5ld2FsIGF1dG9tYXRpY2FsbHkgZm9yIHlvdXIgPGI+ZnV0dXJlIHNlcnZpY2VzPC9iPiBhdCB0aGUgY2hlY2tvdXQuDQoNCg0KPGJyIC8+PGJyIC8+PGI+Tk9URTwvYj46IEF1dG8tcmVuZXdhbCB3aWxsIE5PVCBiZSBlbmFibGVkIGZvciBjdXJyZW50IHNlcnZpY2VzIG9uY2UgdGhpcyBvcHRpb24gaXMgc2VsZWN0ZWQuPGJyIC8+PGJyIC8+VG8gY29uZmlndXJlIGF1dG8tcmVuZXdhbCA8Yj5mb3IgYWxsIHlvdXIgc2VydmljZXMgKG9yIGEgcGFydGljdWxhciB0eXBlIG9mIHNlcnZpY2VzKSBieSBkZWZhdWx0IGZvciBmdXR1cmUgcHVyY2hhc2VzPC9iPiwgZm9sbG93IHRoZSBzdGVwcyBiZWxvdzo8YnIgLz48YnIgLz4xLiBHbyB0byA8Yj5BY2NvdW50ICZndDsmZ3Q7IFByb2ZpbGUgJmd0OyZndDsgQmlsbGluZzwvYj4gb3IgdmlzaXQgdGhpcyA8YSBocmVmPSJodHRwczovL2FwLnd3dy5uYW1lY2hlYXAuY29tL1Byb2ZpbGUvQmlsbGluZyI+ZGlyZWN0IGxpbms8L2E+LjxiciAvPjxiciAvPjxkaXY+Mi4gQ2xpY2sgb24gdGhlIDxiPkVkaXQ8L2I+IGJ1dHRvbiBvbiB0aGUgcmlnaHQgb2YgPGI+QXV0by1SZW5ld2FsPC9iPjo8L2Rpdj48ZGl2PjxiciAvPjwvZGl2PjxiciAvPjxkaXY+PGltZyBjbGFzcz0ia2ItaW1hZ2UiIHNyYz0iaHR0cHM6Ly9OYW1lY2hlYXAuc2ltcGxla2IuY29tL1NpdGVDb250ZW50cy8yLTdDMjJENTIzNkE0NTQzRUI4MjdGM0JEODkzNkUxNTNFL21lZGlhL0F1dG9yZW5ld0FydGljbGU4LnBuZyIgLz48L2Rpdj48YnIgLz48ZGl2PjMuICBNYWtlIHN1cmUgdG8gZW5hYmxlIGF1dG8tcmVuZXdhbCBmb3IgYW55IGRlc2lyZWQgc2VydmljZXMgaW4gdGhlIGxpc3QgYW5kIGNsaWNrIDxiPlNhdmUgQ2hhbmdlczwvYj46PC9kaXY+PGRpdj48YnIgLz48L2Rpdj48YnIgLz48aW1nIGNsYXNzPSJrYi1pbWFnZSIgc3JjPSJodHRwczovL05hbWVjaGVhcC5zaW1wbGVrYi5jb20vU2l0ZUNvbnRlbnRzLzItN0MyMkQ1MjM2QTQ1NDNFQjgyN0YzQkQ4OTM2RTE1M0UvbWVkaWEvQXV0b3JlbmV3QXJ0aWNsZTkucG5nIiAvPjxiciAvPg0KDQoNCg0KwqDCoMKgwqDCoCDCoDxiciAvPjxwPjxhIG5hbWU9Ikhvc3RpbmcgcGFja2FnZXMiPjxiPkhvc3RpbmcgcGFja2FnZXM8L2I+PC9hPjwvcD48YnIgLz5UbyBlbmFibGUgdGhlIHJlY3VycmluZyBiaWxsaW5nIG9wdGlvbiBmb3IgeW91ciBob3N0aW5nIGFjY291bnRzLCBmb2xsb3cgdGhlIHN0ZXBzIGJlbG93OjxiciAvPjxiciAvPjEuIFNpZ24gaW50byB5b3VyIDxiPk5hbWVjaGVhcCBhY2NvdW50PC9iPi48YnIgLz48YnIgLz48ZGl2PjIuIEdvIHRvIHlvdXIgPGEgaHJlZj0iaHR0cHM6Ly9hcC53d3cubmFtZWNoZWFwLmNvbS9kYXNoYm9hcmQiPkFjY291bnQgRGFzaGJvYXJkPC9hPiBhbmQgbmF2aWdhdGUgdG8gPGI+SG9zdGluZyBMaXN0PC9iPiBpbiB0aGUgbGVmdCBzaWRlYmFyIG9yIHZpc2l0IHRoaXMgPGEgaHJlZj0iaHR0cHM6Ly9hcC53d3cubmFtZWNoZWFwLmNvbS9Qcm9kdWN0TGlzdC9Ib3N0aW5nU3Vic2NyaXB0aW9ucyI+IGRpcmVjdCBsaW5rPC9hPjo8L2Rpdj48ZGl2PjxiciAvPjwvZGl2PjxiciAvPjxkaXY+PGltZyBjbGFzcz0ia2ItaW1hZ2UiIHNyYz0iaHR0cHM6Ly9OYW1lY2hlYXAuc2ltcGxla2IuY29tL1NpdGVDb250ZW50cy8yLTdDMjJENTIzNkE0NTQzRUI4MjdGM0JEODkzNkUxNTNFL21lZGlhL0F1dG9yZW5ld0FydGljbGUxMC5wbmciIC8+PC9kaXY+PGJyIC8+PGJyIC8+PGRpdj4zLiBGaW5kIHRoZSBkb21haW4gbmFtZSBhc3NvY2lhdGVkIHdpdGggeW91ciBob3N0aW5nIHBsYW4gYW5kIGVuYWJsZSB0aGUgPGI+QXV0by1SZW5ldzwvYj4gb3B0aW9uIGZvciB5b3VyIGhvc3RpbmcgcGFja2FnZTo8L2Rpdj48ZGl2PjxiciAvPjwvZGl2PjxiciAvPjxpbWcgY2xhc3M9ImtiLWltYWdlIiBzcmM9Imh0dHBzOi8vTmFtZWNoZWFwLnNpbXBsZWtiLmNvbS9TaXRlQ29udGVudHMvMi03QzIyRDUyMzZBNDU0M0VCODI3RjNCRDg5MzZFMTUzRS9tZWRpYS9BdXRvcmVuZXdBcnRpY2xlMTEucG5nIiAvPjxiciAvPjxiciAvPlRvIG1ha2UgaXQgZWFzaWVyIGZvciBvdXIgY3VzdG9tZXJzIHRvIHJlbmV3IHRoZWlyIGhvc3Rpbmcgc2VydmljZXMgaW4gYSB0aW1lbHkgbWFubmVyLCBvdXIgc3lzdGVtIHNlbmRzIG91dCByZW5ld2FsIG5vdGlmaWNhdGlvbnMgdGhhdCBzaG91bGQgaGVscCBhdm9pZCB1bndhbnRlZCBzZXJ2aWNlIGludGVycnVwdGlvbnMuPGJyIC8+PGJyIC8+T3VyIHN5c3RlbSBoYW5kbGVzIGF1dG9tYXRpY2FsbHkgaW52b2ljaW5nIGFuZCBzdXNwZW5kaW5nIGhvc3RpbmcgcGFja2FnZXMgYW5kIGd1YXJhbnRlZXMgYSA3LWRheSB3aW5kb3cgYmV0d2VlbiB0aGUgaW52b2ljZSBnZW5lcmF0aW9uIGFuZCB0aGUgYmVnaW5uaW5nIG9mIHRoZSBuZXh0IGJpbGxpbmcgY3ljbGUuPGJyIC8+PGJyIC8+UGxlYXNlIG5vdGUgdGhhdCBhIGhvc3Rpbmcgc2VydmljZSBpcyBub3QgaW1tZWRpYXRlbHkgc3VzcGVuZGVkIHdoZW4gYSBiaWxsaW5nIGRhdGUgYXJyaXZlcy4gRGVwZW5kaW5nIG9uIHRoZSB0eXBlIG9mIGhvc3RpbmcsIHRoZXJlIGlzIGFuIGFkZGl0aW9uYWwgZ3JhY2UgcGVyaW9kIGFmdGVyIHRoZSBiaWxsaW5nIGRhdGUgdG8gY292ZXIgdGhlIHBheW1lbnQgcHJpb3IgdG8gc2VydmljZSBzdXNwZW5zaW9uLiBUaGVzZSBwb2xpY2llcyBwcm92aWRlIG91ciBjdXN0b21lcnMgd2l0aCBhbXBsZSB0aW1lIHRvIHNldHRsZSB0aGVpciBpbnZvaWNlcy48YnIgLz48YnIgLz5Zb3UgY2FuIGZpbmQgbW9yZSBkZXRhaWxzIG9uIHRoZSB0aW1lZnJhbWVzIGluIHRoZSA8YSBocmVmPSJodHRwczovL3d3dy5uYW1lY2hlYXAuY29tL3N1cHBvcnQva25vd2xlZGdlYmFzZS9hcnRpY2xlLmFzcHgvOTE2NS8yMS9pbnZvaWNpbmctc3VzcGVuc2lvbi8iPiBJbnZvaWNpbmcgJmFtcDsgU3VzcGVuc2lvbjwvYT4gYXJ0aWNsZS48YnIgLz48YnIgLz4gUGxlYXNlIGNoZWNrIG91dCBvdXIgPGEgaHJlZj0iaHR0cHM6Ly93d3cubmFtZWNoZWFwLmNvbS9zdXBwb3J0L2tub3dsZWRnZWJhc2Uvc3ViY2F0ZWdvcnkvMjEvaG9zdGluZy1iaWxsaW5nLyI+IEhvc3RpbmcgQmlsbGluZzwvYT4gaW5mb3JtYXRpb24gYmxvY2sgdG8gZmluZCBhbnN3ZXJzIHRvIGNvbW1vbiBiaWxsaW5nIHF1ZXN0aW9ucywgb3VyIGJpbGxpbmcgcG9saWNpZXMsIGFuZCBpbnN0cnVjdGlvbnMgb24gY29tbW9uIGJpbGxpbmcgcHJvY2VkdXJlcyBmb3IgTmFtZWNoZWFwIGhvc3Rpbmcgc2VydmljZXMuPGJyIC8+PGJyIC8+V2Ugd291bGQgbGlrZSB0byBkcmF3IHNwZWNpYWwgYXR0ZW50aW9uIHRvIHRoZSBpbXBvcnRhbmNlIG9mIHRoZSBEZWRpY2F0ZWQgU2VydmVycyA8Yj5BdXRvLVJlbmV3YWw8L2I+LjxiciAvPjxiciAvPlVubGlrZSBvdGhlciBob3N0aW5nIHR5cGVzLCA8Yj5EZWRpY2F0ZWQgU2VydmVyczwvYj4gYXJlIGxvY2F0ZWQgb24gdGhlICJBcHBzIiB0YWIgaW4geW91ciBOYW1lY2hlYXAgYWNjb3VudCBhbmQgY2FuIG9ubHkgYmUgcmVuZXdlZCB1c2luZyB0aGUgQXV0by1SZW5ld2FsIG9wdGlvbi4gVG8gYmUgbW9yZSBwcmVjaXNlLCB0aGVyZSBpcyBubyBvcHRpb24gdG8gcmVuZXcgdGhpcyBzZXJ2aWNlIG1hbnVhbGx5LiBLZWVwIGluIG1pbmQgdGhhdCB0aGUgRGVkaWNhdGVkIFNlcnZlciB0ZXJtaW5hdGlvbiBkYXRlIHdpbGwgZGVwZW5kIG9uIHRoZSBBdXRvLVJlbmV3YWwgb3B0aW9uLiBJZiBlbmFibGVkLCB0aGUgc2VydmVyIHdpbGwgYmUgY2FuY2VsZWQgPGI+MyBkYXlzPC9iPiBhZnRlciB0aGUgYmlsbGluZyBkYXRlOyBpZiBub3QsIGl0IHdpbGwgYmUgY2FuY2VsZWQgPGI+b24gdGhlIGJpbGxpbmcgZGF0ZTwvYj4uPGJyIC8+PGJyIC8+VGhlIGluc3RydWN0aW9ucyBvbiBob3cgdG8gbWFuYWdlIHRoZSBBdXRvLVJlbmV3YWwgb3B0aW9uIGZvciBEZWRpY2F0ZWQgU2VydmVycyBhcmUgbG9jYXRlZCBpbiB0aGUg4oCcQXBwc+KAnSBzZWN0aW9uLjxiciAvPg0KDQrCoMKgwqDCoMKgIMKgPGJyIC8+PHA+PGEgbmFtZT0iRG9tYWlucyBhbmQgRG9tYWluIFByaXZhY3kgc3Vic2NyaXB0aW9ucyI+PGI+RG9tYWlucyBhbmQgRG9tYWluIFByaXZhY3kgc3Vic2NyaXB0aW9uczwvYj48L2E+PC9wPjxiciAvPjxiPk5PVEU8L2I+OiBUaGUgc3lzdGVtIHdpbGwgYXR0ZW1wdCB0byByZW5ldyB5b3VyIGRvbWFpbiAzMCBkYXlzIGJlZm9yZSBpdHMgZXhwaXJhdGlvbi4gSWYgeW91IGhhdmUgbm8gZnVuZHMgaW4geW91ciBOYW1lY2hlYXAgYWNjb3VudCBiYWxhbmNlIG9yIHRoZXJlIGFyZSBpc3N1ZXMgd2l0aCB5b3VyIGNhcmQgKGZvciBleGFtcGxlLCA8aT5ubyBtb25leSBvbiBhIGRlYml0IGNhcmQsIGEgY3JlZGl0IGNhcmQgaXMgbm90IHZhbGlkLCBvciB0aGVyZSdzIGEgbGltaXQgb24gcGF5bWVudHM8L2k+KSwgdGhlIHJlbmV3YWwgPGI+d2lsbCBub3QgaGFwcGVuPC9iPi48YnIgLz48YnIgLz5UaGUgc3lzdGVtIHdpbGwgdHJ5IHJlbmV3aW5nIHlvdXIgZG9tYWluIGV2ZXJ5IDI0IGhvdXJzIHVudGlsIHRoZSByZW5ld2FsIGlzIHN1Y2Nlc3NmdWwgb3IgdGhlIGRvbWFpbiBuYW1lIGV4cGlyZXMuIEZvciBtb3JlIGRldGFpbGVkIGluZm9ybWF0aW9uIG9uIHdoYXQgaGFwcGVucyB0byBhIGRvbWFpbiBhZnRlciBpdCBleHBpcmVzLCBwbGVhc2UgY2hlY2sgdGhlIDxhIGhyZWY9Imh0dHBzOi8vd3d3Lm5hbWVjaGVhcC5jb20vc3VwcG9ydC9rbm93bGVkZ2ViYXNlL2FydGljbGUuYXNweC8xMDA2NC8yMjA3L3doYXQtaGFwcGVucy10by1teS1kb21haW4tbmFtZS1hZnRlci1pdC1leHBpcmVzLyI+IFdoYXQgaGFwcGVucyB0byBteSBkb21haW4gbmFtZSBhZnRlciBpdCBleHBpcmVzPzwvYT4gYXJ0aWNsZS48YnIgLz48YnIgLz5UbyBlbmFibGUgdGhlIDxiPkF1dG8tUmVuZXc8L2I+IGZlYXR1cmUgZm9yIGEgZG9tYWluIG5hbWUvRG9tYWluIFByaXZhY3ksIHBsZWFzZSBkbyB0aGUgZm9sbG93aW5nOjxiciAvPjxiciAvPjEuIFNpZ24gaW50byB5b3VyIDxiPk5hbWVjaGVhcCBhY2NvdW50PC9iPi48YnIgLz48YnIgLz4yLiBHbyB0byB5b3VyIDxhIGhyZWY9Imh0dHBzOi8vYXAud3d3Lm5hbWVjaGVhcC5jb20vZGFzaGJvYXJkIj4gQWNjb3VudCBEYXNoYm9hcmQ8L2E+ICBhbmQgc2VsZWN0IDxiPkRvbWFpbiBMaXN0PC9iPg0KaW4gdGhlIGxlZnQgc2lkZWJhciBvciB2aXNpdCB0aGlzIDxhIGhyZWY9Imh0dHBzOi8vYXAud3d3Lm5hbWVjaGVhcC5jb20vZG9tYWlucy9saXN0LyI+IGRpcmVjdCBsaW5rPC9hPi48YnIgLz48YnIgLz48ZGl2PjMuIENsaWNrIG9uIHRoZSA8Yj5NYW5hZ2UgPC9iPmJ1dHRvbiBuZXh0IHRvIHlvdXIgZG9tYWluOjwvZGl2PjxkaXY+PGJyIC8+PC9kaXY+PGJyIC8+PGRpdj48aW1nIGNsYXNzPSJrYi1pbWFnZSIgc3JjPSJodHRwczovL05hbWVjaGVhcC5zaW1wbGVrYi5jb20vU2l0ZUNvbnRlbnRzLzItN0MyMkQ1MjM2QTQ1NDNFQjgyN0YzQkQ4OTM2RTE1M0UvbWVkaWEvQXV0b3JlbmV3QXJ0aWNsZTEyLnBuZyIgLz48L2Rpdj48YnIgLz48YnIgLz48ZGl2PjQuIFRvZ2dsZSB0aGUgY29ycmVzcG9uZGluZyBidXR0b25zIGZvciB0aGUgZG9tYWluIGFuZCBEb21haW4gUHJpdmFjeTo8L2Rpdj48ZGl2PjxiciAvPjwvZGl2PjxiciAvPjxkaXY+PGltZyBjbGFzcz0ia2ItaW1hZ2UiIHNyYz0iaHR0cHM6Ly9OYW1lY2hlYXAuc2ltcGxla2IuY29tL1NpdGVDb250ZW50cy8yLTdDMjJENTIzNkE0NTQzRUI4MjdGM0JEODkzNkUxNTNFL21lZGlhL0F1dG9yZW5ld0FydGljbGUxMy5wbmciIC8+PC9kaXY+PGJyIC8+PGJyIC8+VGhlIGNoYW5nZXMgd2lsbCBiZSBhcHBsaWVkIGF1dG9tYXRpY2FsbHkuPGJyIC8+PGJyIC8+PGRpdj5BbHNvLCBpdCBpcyBwb3NzaWJsZSB0byA8Yj5lbmFibGUvZGlzYWJsZTwvYj4gdGhlIGZlYXR1cmUgaW4gdGhlIDxiPkRvbWFpbiBMaXN0PC9iPiBzZWN0aW9uLiBKdXN0IGNsaWNrIG9uIHRoZSBjYXJldCBmb3IgdGhlIGRvbWFpbiBpbiBxdWVzdGlvbiwgdGhlbiB0b2dnbGUgdGhlIGJ1dHRvbiBmb3IgdGhlIHNlcnZpY2UgeW91IHdvdWxkIGxpa2UgdG8gdHVybiA8Yj5PbjwvYj4gb3IgPGI+T2ZmPC9iPiB0aGUgPGI+QXV0by1SZW5ld2FsPC9iPiBmb3I6PC9kaXY+PGRpdj48YnIgLz48L2Rpdj48YnIgLz48aW1nIGNsYXNzPSJrYi1pbWFnZSIgc3JjPSJodHRwczovL05hbWVjaGVhcC5zaW1wbGVrYi5jb20vU2l0ZUNvbnRlbnRzLzItN0MyMkQ1MjM2QTQ1NDNFQjgyN0YzQkQ4OTM2RTE1M0UvbWVkaWEvQXV0b3JlbmV3QXJ0aWNsZTE0LnBuZyIgLz48YnIgLz48YnIgLz5Zb3UgY2FuIGZpbmQgYWxsIGdlbmVyYWwgaW5mb3JtYXRpb24gcmVsYXRlZCB0byBkb21haW4gbmFtZXMgaW4gdGhlIDxhIGhyZWY9Imh0dHBzOi8vd3d3Lm5hbWVjaGVhcC5jb20vc3VwcG9ydC9rbm93bGVkZ2ViYXNlL3N1YmNhdGVnb3J5LzIyMDEvZG9tYWlucy1iaWxsaW5nLyI+IERvbWFpbnMgQmlsbGluZzwvYT4gaW5mb3JtYXRpb24gYmxvY2suDQoNCsKgwqDCoMKgwqAgwqA8YnIgLz48cD48YSBuYW1lPSJQcml2YXRlIEVtYWlsIHN1YnNjcmlwdGlvbnMiPjxiPlByaXZhdGUgRW1haWwgc3Vic2NyaXB0aW9uczwvYj48L2E+PC9wPjxiciAvPg0KDQpUbyBlbmFibGUgdGhlIDxiPkF1dG8tUmVuZXc8L2I+IGZlYXR1cmUgZm9yIGEgUHJpdmF0ZSBFbWFpbCBzdWJzY3JpcHRpb24sIHRha2UgdGhlIGZvbGxvd2luZyBzdGVwczo8YnIgLz48YnIgLz4xLiBTaWduIGludG8geW91ciA8Yj5OYW1lY2hlYXAgYWNjb3VudDwvYj4uPGJyIC8+PGJyIC8+PGRpdj4yLiBHbyB0byB5b3VyIDxhIGhyZWY9Imh0dHBzOi8vYXAud3d3Lm5hbWVjaGVhcC5jb20vZGFzaGJvYXJkIj4gQWNjb3VudCBEYXNoYm9hcmQ8L2E+IGFuZCBjaG9vc2UgdGhlIDxiPlByaXZhdGUgRW1haWw8L2I+IG1lbnUgaW4gdGhlIGxlZnQgc2lkZWJhciBvciB2aXNpdCB0aGlzIDxhIGhyZWY9Imh0dHBzOi8vYXAud3d3Lm5hbWVjaGVhcC5jb20vUHJvZHVjdExpc3QvRW1haWxTdWJzY3JpcHRpb25zIj4gZGlyZWN0IGxpbms8L2E+OjwvZGl2PjxkaXY+PGJyIC8+PC9kaXY+PGJyIC8+PGRpdj48aW1nIGNsYXNzPSJrYi1pbWFnZSIgc3JjPSJodHRwczovL05hbWVjaGVhcC5zaW1wbGVrYi5jb20vU2l0ZUNvbnRlbnRzLzItN0MyMkQ1MjM2QTQ1NDNFQjgyN0YzQkQ4OTM2RTE1M0UvbWVkaWEvQXV0b3JlbmV3QXJ0aWNsZTE1LnBuZyIgLz48L2Rpdj48YnIgLz48YnIgLz48ZGl2PjMuIEZpbmQgdGhlIFByaXZhdGUgRW1haWwgc3Vic2NyaXB0aW9uIGFzc29jaWF0ZWQgd2l0aCB5b3VyIGRvbWFpbiBuYW1lIGFuZCBlbmFibGUgdGhlIDxiPkF1dG8tUmVuZXc8L2I+IG9wdGlvbiBmb3IgaXQ6PC9kaXY+PGRpdj48YnIgLz48L2Rpdj48YnIgLz48aW1nIGNsYXNzPSJrYi1pbWFnZSIgc3JjPSJodHRwczovL05hbWVjaGVhcC5zaW1wbGVrYi5jb20vU2l0ZUNvbnRlbnRzLzItN0MyMkQ1MjM2QTQ1NDNFQjgyN0YzQkQ4OTM2RTE1M0UvbWVkaWEvQXV0b3JlbmV3QXJ0aWNsZTE2LnBuZyIgLz48YnIgLz48YnIgLz5UbyBmaW5kIG91dCBtb3JlIGFib3V0IFByaXZhdGUgRW1haWwgc3Vic2NyaXB0aW9ucywgZmVlbCBmcmVlIHRvIGNoZWNrIG91ciA8YSBocmVmPSJodHRwczovL3d3dy5uYW1lY2hlYXAuY29tL3N1cHBvcnQva25vd2xlZGdlYmFzZS9zdWJjYXRlZ29yeS8yMTc3L3ByaXZhdGUtZW1haWwvIj4gUHJpdmF0ZSBFbWFpbDwvYT4gS25vd2xlZGdlYmFzZSBhcnRpY2xlcy4NCg0KDQrCoMKgwqDCoMKgwqA8YnIgLz48cD48YSBuYW1lPSJBcHBzIj48Yj5BcHBzPC9iPjwvYT48L3A+PGJyIC8+PGI+Tk9URTwvYj46IEl0J3Mgbm90IHBvc3NpYmxlIHRvIHJlbmV3IEFwcHMgbWFudWFsbHk6IHRoZXkgY2FuIG9ubHkgYmUgcmVuZXdlZCBhdXRvbWF0aWNhbGx5LiBUaGF0J3Mgd2h5IGl0J3MgaW1wb3J0YW50IHRvIHNldCB1cCByZWN1cnJpbmcgY2hhcmdlcyBmb3IgdGhlc2Ugc2VydmljZXMuPGJyIC8+PGJyIC8+VG8gZW5hYmxlIGF1dG8tcmVuZXdhbCBmb3IgQXBwcyBzdWJzY3JpcHRpb25zLCB5b3Ugc2hvdWxkOjxiciAvPjxiciAvPjEuIFNpZ24gaW50byB5b3VyIDxiPk5hbWVjaGVhcCBhY2NvdW50PC9iPi48YnIgLz48YnIgLz48ZGl2PjIuIEdvIHRvIHlvdXIgPGEgaHJlZj0iaHR0cHM6Ly9hcC53d3cubmFtZWNoZWFwLmNvbS9kYXNoYm9hcmQiPkFjY291bnQgRGFzaGJvYXJkPC9hPiBhbmQgbmF2aWdhdGUgdG8gdGhlIDxiPkFwcHM8L2I+IHRhYiBpbiB0aGUgbGVmdCBzaWRlYmFyIG9mIHlvdXIgTmFtZWNoZWFwIGFjY291bnQgb3IgdmlzaXQgdGhpcyA8YSBocmVmPSJodHRwczovL3d3dy5uYW1lY2hlYXAuY29tL2FwcHMvZGFzaGJvYXJkIj4gZGlyZWN0IGxpbms8L2E+OjwvZGl2PjxkaXY+PGJyIC8+PC9kaXY+PGJyIC8+PGRpdj48aW1nIGNsYXNzPSJrYi1pbWFnZSIgc3JjPSJodHRwczovL05hbWVjaGVhcC5zaW1wbGVrYi5jb20vU2l0ZUNvbnRlbnRzLzItN0MyMkQ1MjM2QTQ1NDNFQjgyN0YzQkQ4OTM2RTE1M0UvbWVkaWEvQXV0b3JlbmV3QXJ0aWNsZTE3LnBuZyIgLz48L2Rpdj48YnIgLz48YnIgLz48ZGl2PjMuIFRoZW4sIHNlbGVjdCA8Yj5TdWJzY3JpcHRpb25zPC9iPiBhbmQgZW5hYmxlIHRoZSBhdXRvLXJlbmV3IG9wdGlvbiBmb3IgdGhlIG5lY2Vzc2FyeSBzZXJ2aWNlczo8L2Rpdj48ZGl2PjxiciAvPjwvZGl2PjxiciAvPjxkaXY+PGltZyBjbGFzcz0ia2ItaW1hZ2UiIHNyYz0iaHR0cHM6Ly9OYW1lY2hlYXAuc2ltcGxla2IuY29tL1NpdGVDb250ZW50cy8yLTdDMjJENTIzNkE0NTQzRUI4MjdGM0JEODkzNkUxNTNFL21lZGlhL0F1dG9yZW5ld0FydGljbGUxOC5wbmciIC8+PC9kaXY+PGJyIC8+PGJyIC8+VGhlcmUgYXJlIHNldmVyYWwgYXV0b21hdGljIGNoYXJnZSBhdHRlbXB0cyAoMi01LCBkZXBlbmRpbmcgb24gdGhlIGFwcCkuIElmIGFsbCB0aGUgYXR0ZW1wdHMgZmFpbCwgdGhlIHNlcnZpY2UgZ2V0cyBjYW5jZWxsZWQuIElmIGEgdXNlciB3YW50cyB0byBnZXQgaXQgYmFjaywgdGhleSB3aWxsIG5lZWQgdG8gcHVyY2hhc2UgYSBuZXcgc3Vic2NyaXB0aW9uLg0KPGJyIC8+PGJyIC8+SW5mb3JtYXRpb24gYWJvdXQgdXBjb21pbmcgY2hhcmdlcyB1c3VhbGx5IGNvbWVzIGJ5IGVtYWlsLCBzbyBwbGVhc2Uga2VlcCBhbiBleWUgb24gdGhlIG1haWxib3ggYXNzb2NpYXRlZCB3aXRoIHlvdXIgTmFtZWNoZWFwIHN1YnNjcmlwdGlvbnMgZm9yIG1lc3NhZ2VzIGZyb20gdXMuPGJyIC8+PGJyIC8+PGI+Tk9URTwvYj46IA0KQWxsIG9mIHRoZSByZWN1cnJpbmcgcHJvZHVjdHMgYXJlIHNldCBmb3IgYXV0by1yZW5ldyByaWdodCBhZnRlciBwdXJjaGFzZSwgYW5kIHlvdSBjYW4gZGlzYWJsZSBhdXRvLXJlbmV3IGZvciBhbiBhcHBsaWNhdGlvbiBhbnl0aW1lIGR1cmluZyB0aGUgY3VycmVudGx5IGFjdGl2ZSBiaWxsaW5nIGN5Y2xlIG9mIHlvdXIgYXBwbGljYXRpb24uIFlvdSBjYW4gZG8gaXQgaW4geW91ciBOYW1lY2hlYXAgYWNjb3VudC4=","NewTillDate":null,"FeaturedTillDate":null,"ModifiedDateTime":"2025-09-23T08:27:21.0000000","LiveDateTime":"1754-02-02T00:00:00.0000000","CreatedDateTime":"2022-11-14T15:19:40.0000000","ApprovalDatetime":"2022-11-14T15:19:40.0000000","RequestCount":24868,"MarkedAsNew":false,"MarkedAsFeatured":false,"RatingValue":0,"CategoryPaths":[{"__type":"Nc:SimpleKB:Abstractions:Dtos:CategoryPathDto","Level":1,"CategoryId":34,"CategoryName":"Domains"},{"__type":"Nc:SimpleKB:Abstractions:Dtos:CategoryPathDto","Level":2,"CategoryId":2207,"CategoryName":"Renewal questions"}],"AssociatedCategories":[{"CategoryId":2207,"CategoryName":"Renewal questions","CategoryDisplayName":"DomainsRenewal questions"}],"AssociatedTags":[{"TagId":83290,"Tag":"billing "}],"RelatedArticles":[{"ArticleId":9165,"PreferedCategoryId":21,"ArticleTypeId":0,"ArticleName":"Invoicing & Suspension","ArticleTypeName":null,"Title":"Invoicing & Suspension","LiveDateTime":null,"ModifiedDateTime":"07/18/2023","MarkedAsNew":false,"MarkedAsFeatured":false},{"ArticleId":232,"PreferedCategoryId":7,"ArticleTypeId":3,"ArticleName":"How can I add funds to my Namecheap account?","ArticleTypeName":"How_To","Title":"How can I add funds to my Namecheap account?","LiveDateTime":null,"ModifiedDateTime":"12/12/2024","MarkedAsNew":false,"MarkedAsFeatured":false}],"AssociatedMedias":[],"PreferredCategoryId":0,"RootParentCategoryName":"","RootParentCategoryId":0},"status":200,"statusText":"OK"},"/api/v1/ncpl/simplekb/getcategorybycategoryid:\"{\\\"categoryId\\\":2207}\"":{"body":{"__type":"Nc:SimpleKB:Abstractions:Dtos:CategoryDto","ParentCategoryId":34,"Parent_Category_Name":"Domains","FriendlyId":null,"ApprovedYN":true,"TreatAsTopicYN":false,"CreatedDateTime":"06/02/2014 15:19:21","CurrentCategoryPaths":[{"__type":"Nc:SimpleKB:Abstractions:Dtos:CategoryPathDto","Level":1,"CategoryId":34,"CategoryName":"Domains"},{"__type":"Nc:SimpleKB:Abstractions:Dtos:CategoryPathDto","Level":2,"CategoryId":2207,"CategoryName":"Renewal questions"}],"RelatedCategories":[],"AssociatedArticles":[{"ArticleId":10564,"Title":"Can I set up automatic billing for my Namecheap services?","ArticleName":"Can I set up automatic billing for my Namecheap services?","LiveDateTime":"02/02/1754 00:00:00","NewTillDate":null,"FeaturedTillDate":null,"ModifiedDateTime":"09/23/2025"},{"ArticleId":9916,"Title":"TLDs' grace periods","ArticleName":"TLDs' grace periods","LiveDateTime":"02/02/1754 00:00:00","NewTillDate":null,"FeaturedTillDate":null,"ModifiedDateTime":"09/10/2025"},{"ArticleId":239,"Title":"How can I renew my domain?","ArticleName":"How can I renew my domain?","LiveDateTime":"02/02/1754 00:00:00","NewTillDate":null,"FeaturedTillDate":null,"ModifiedDateTime":"05/19/2025"},{"ArticleId":241,"Title":"How can I renew my expired domain?","ArticleName":"How can I renew my expired domain?","LiveDateTime":"02/02/1754 00:00:00","NewTillDate":null,"FeaturedTillDate":null,"ModifiedDateTime":"05/19/2025"},{"ArticleId":10064,"Title":"What happens to my domain name after it expires?","ArticleName":"What happens to my domain name after it expires?","LiveDateTime":"02/02/1754 00:00:00","NewTillDate":null,"FeaturedTillDate":null,"ModifiedDateTime":"07/11/2024"},{"ArticleId":240,"Title":"Do you email notices about pending domain expirations?","ArticleName":"Do you email notices about pending domain expirations?","LiveDateTime":"02/02/1754 00:00:00","NewTillDate":null,"FeaturedTillDate":null,"ModifiedDateTime":"06/25/2021"},{"ArticleId":242,"Title":"What is the domain Redemption Grace Period?","ArticleName":"What is the domain Redemption Grace Period?","LiveDateTime":"02/02/1754 00:00:00","NewTillDate":null,"FeaturedTillDate":null,"ModifiedDateTime":"09/10/2025"},{"ArticleId":1420,"Title":"Why is the redemption fee so high?","ArticleName":"Why is the redemption fee so high?","LiveDateTime":"02/02/1754 00:00:00","NewTillDate":null,"FeaturedTillDate":null,"ModifiedDateTime":"09/10/2025"},{"ArticleId":248,"Title":"How do I renew .CX, .DE, .EU and .NL domains?","ArticleName":"How do I renew .CX, .DE, .EU and .NL domains?","LiveDateTime":"02/02/1754 00:00:00","NewTillDate":null,"FeaturedTillDate":null,"ModifiedDateTime":"07/16/2025"},{"ArticleId":585,"Title":"How do I renew expired .CX, .DE, .EU and .NL domains?","ArticleName":"How do I renew expired .CX, .DE, .EU and .NL domains?","LiveDateTime":"02/02/1754 00:00:00","NewTillDate":null,"FeaturedTillDate":null,"ModifiedDateTime":"02/05/2025"},{"ArticleId":9296,"Title":"How do I renew .CH / .ES / .FR / .LI / .PE / .SG/ .AU domain?","ArticleName":"How do I renew .CH / .ES / .FR / .LI / .PE / .SG/ .AU domain?","LiveDateTime":"02/02/1754 00:00:00","NewTillDate":null,"FeaturedTillDate":null,"ModifiedDateTime":"02/21/2025"},{"ArticleId":1256,"Title":"What is the ICANN fee?","ArticleName":"What is the ICANN fee?","LiveDateTime":"02/02/1754 00:00:00","NewTillDate":null,"FeaturedTillDate":null,"ModifiedDateTime":"07/27/2025"}],"AssociatedTags":[],"CategoryId":2207,"CategoryName":"Renewal questions"},"status":200,"statusText":"OK"},"/api/v1/ncpl/simplekb/getcategories:\"{\\\"parentCategoryId\\\":0,\\\"getTree\\\":true}\"":{"body":[{"__type":"Nc:SimpleKB:Abstractions:Dtos:CategoryItemDto","ParentCategoryId":93,"TreatAsTopicYN":false,"Description":"","ImageUrl":"","ShortDesc":"","CategoryId":2216,"CategoryName":"Spam Protection"},{"__type":"Nc:SimpleKB:Abstractions:Dtos:CategoryItemDto","ParentCategoryId":14,"TreatAsTopicYN":false,"Description":"","ImageUrl":"","ShortDesc":"","CategoryId":2217,"CategoryName":"Renewal"},{"__type":"Nc:SimpleKB:Abstractions:Dtos:CategoryItemDto","ParentCategoryId":14,"TreatAsTopicYN":false,"Description":"","ImageUrl":"","ShortDesc":"","CategoryId":2218,"CategoryName":"cPanel SSL Plugin"},{"__type":"Nc:SimpleKB:Abstractions:Dtos:CategoryItemDto","ParentCategoryId":12,"TreatAsTopicYN":false,"Description":"","ImageUrl":"","ShortDesc":"","CategoryId":2219,"CategoryName":"PHP Configuration"},{"__type":"Nc:SimpleKB:Abstractions:Dtos:CategoryItemDto","ParentCategoryId":14,"TreatAsTopicYN":false,"Description":"","ImageUrl":"","ShortDesc":"","CategoryId":2221,"CategoryName":"Multi-Domain SSL Certificates"},{"__type":"Nc:SimpleKB:Abstractions:Dtos:CategoryItemDto","ParentCategoryId":14,"TreatAsTopicYN":false,"Description":"","ImageUrl":"","ShortDesc":"","CategoryId":2222,"CategoryName":"Cancellation"},{"__type":"Nc:SimpleKB:Abstractions:Dtos:CategoryItemDto","ParentCategoryId":14,"TreatAsTopicYN":false,"Description":"","ImageUrl":"","ShortDesc":"","CategoryId":2223,"CategoryName":"Browser errors"},{"__type":"Nc:SimpleKB:Abstractions:Dtos:CategoryItemDto","ParentCategoryId":14,"TreatAsTopicYN":false,"Description":"","ImageUrl":"","ShortDesc":"","CategoryId":2224,"CategoryName":"Site Seal, Logo"},{"__type":"Nc:SimpleKB:Abstractions:Dtos:CategoryItemDto","ParentCategoryId":12,"TreatAsTopicYN":false,"Description":"","ImageUrl":"","ShortDesc":"","CategoryId":2225,"CategoryName":"SEO"},{"__type":"Nc:SimpleKB:Abstractions:Dtos:CategoryItemDto","ParentCategoryId":93,"TreatAsTopicYN":false,"Description":"","ImageUrl":"","ShortDesc":"","CategoryId":2226,"CategoryName":"Email Migration"},{"__type":"Nc:SimpleKB:Abstractions:Dtos:CategoryItemDto","ParentCategoryId":2211,"TreatAsTopicYN":false,"Description":"","ImageUrl":"","ShortDesc":"","CategoryId":2227,"CategoryName":"SSL Resellers"},{"__type":"Nc:SimpleKB:Abstractions:Dtos:CategoryItemDto","ParentCategoryId":0,"TreatAsTopicYN":true,"Description":"","ImageUrl":"/assets/img/pictograms/150/cloud-red.png","ShortDesc":"","CategoryId":2228,"CategoryName":"Apps","SubCategories":[{"__type":"Nc:SimpleKB:Abstractions:Dtos:CategoryItemDto","ParentCategoryId":2228,"TreatAsTopicYN":false,"Description":"","ImageUrl":"","ShortDesc":"","CategoryId":2251,"CategoryName":"Supersonic CDN"},{"__type":"Nc:SimpleKB:Abstractions:Dtos:CategoryItemDto","ParentCategoryId":2228,"TreatAsTopicYN":false,"Description":"","ImageUrl":"","ShortDesc":"","CategoryId":2298,"CategoryName":"Site Maker"},{"__type":"Nc:SimpleKB:Abstractions:Dtos:CategoryItemDto","ParentCategoryId":2228,"TreatAsTopicYN":false,"Description":"","ImageUrl":"","ShortDesc":"","CategoryId":177,"CategoryName":"Google Workspace (formerly G Suite)"}]},{"__type":"Nc:SimpleKB:Abstractions:Dtos:CategoryItemDto","ParentCategoryId":2211,"TreatAsTopicYN":false,"Description":"","ImageUrl":"","ShortDesc":"","CategoryId":2229,"CategoryName":"Hosting Resellers"},{"__type":"Nc:SimpleKB:Abstractions:Dtos:CategoryItemDto","ParentCategoryId":34,"TreatAsTopicYN":false,"Description":"","ImageUrl":"","ShortDesc":"","CategoryId":2232,"CategoryName":"DNSSEC"},{"__type":"Nc:SimpleKB:Abstractions:Dtos:CategoryItemDto","ParentCategoryId":34,"TreatAsTopicYN":false,"Description":"","ImageUrl":"","ShortDesc":"","CategoryId":2234,"CategoryName":"Google Workspace (formerly G Suite)"},{"__type":"Nc:SimpleKB:Abstractions:Dtos:CategoryItemDto","ParentCategoryId":34,"TreatAsTopicYN":false,"Description":"","ImageUrl":"","ShortDesc":"","CategoryId":2237,"CategoryName":"Host records setup"},{"__type":"Nc:SimpleKB:Abstractions:Dtos:CategoryItemDto","ParentCategoryId":14,"TreatAsTopicYN":false,"Description":"","ImageUrl":"","ShortDesc":"","CategoryId":2238,"CategoryName":"SSL installation errors"},{"__type":"Nc:SimpleKB:Abstractions:Dtos:CategoryItemDto","ParentCategoryId":0,"TreatAsTopicYN":false,"Description":"","ImageUrl":"/assets/img/pictograms/150/easywp-red.png","ShortDesc":"","CategoryId":2239,"CategoryName":"EasyWP","SubCategories":[{"__type":"Nc:SimpleKB:Abstractions:Dtos:CategoryItemDto","ParentCategoryId":2239,"TreatAsTopicYN":false,"Description":"","ImageUrl":"","ShortDesc":"","CategoryId":2280,"CategoryName":"Getting Started"},{"__type":"Nc:SimpleKB:Abstractions:Dtos:CategoryItemDto","ParentCategoryId":2239,"TreatAsTopicYN":false,"Description":"","ImageUrl":"","ShortDesc":"","CategoryId":2279,"CategoryName":"General Information"},{"__type":"Nc:SimpleKB:Abstractions:Dtos:CategoryItemDto","ParentCategoryId":2239,"TreatAsTopicYN":false,"Description":"","ImageUrl":"","ShortDesc":"","CategoryId":2281,"CategoryName":"WordPress Migration"},{"__type":"Nc:SimpleKB:Abstractions:Dtos:CategoryItemDto","ParentCategoryId":2239,"TreatAsTopicYN":false,"Description":"","ImageUrl":"","ShortDesc":"","CategoryId":2282,"CategoryName":"Plugins and Themes"},{"__type":"Nc:SimpleKB:Abstractions:Dtos:CategoryItemDto","ParentCategoryId":2239,"TreatAsTopicYN":false,"Description":"","ImageUrl":"","ShortDesc":"","CategoryId":2284,"CategoryName":"WordPress Management"},{"__type":"Nc:SimpleKB:Abstractions:Dtos:CategoryItemDto","ParentCategoryId":2239,"TreatAsTopicYN":false,"Description":"","ImageUrl":"","ShortDesc":"","CategoryId":2285,"CategoryName":"SFTP and Database access"},{"__type":"Nc:SimpleKB:Abstractions:Dtos:CategoryItemDto","ParentCategoryId":2239,"TreatAsTopicYN":false,"Description":"","ImageUrl":"","ShortDesc":"","CategoryId":2286,"CategoryName":"Domains questions"},{"__type":"Nc:SimpleKB:Abstractions:Dtos:CategoryItemDto","ParentCategoryId":2239,"TreatAsTopicYN":false,"Description":"","ImageUrl":"","ShortDesc":"","CategoryId":2288,"CategoryName":"Billing questions"},{"__type":"Nc:SimpleKB:Abstractions:Dtos:CategoryItemDto","ParentCategoryId":2239,"TreatAsTopicYN":false,"Description":"","ImageUrl":"","ShortDesc":"","CategoryId":2287,"CategoryName":"SSL questions"}]},{"__type":"Nc:SimpleKB:Abstractions:Dtos:CategoryItemDto","ParentCategoryId":2228,"TreatAsTopicYN":false,"Description":"","ImageUrl":"","ShortDesc":"","CategoryId":2251,"CategoryName":"Supersonic CDN"},{"__type":"Nc:SimpleKB:Abstractions:Dtos:CategoryItemDto","ParentCategoryId":12,"TreatAsTopicYN":false,"Description":"","ImageUrl":"","ShortDesc":"","CategoryId":2252,"CategoryName":"InterWorx questions"},{"__type":"Nc:SimpleKB:Abstractions:Dtos:CategoryItemDto","ParentCategoryId":2253,"TreatAsTopicYN":false,"Description":"","ImageUrl":"","ShortDesc":"","CategoryId":2254,"CategoryName":"Domains How-To"},{"__type":"Nc:SimpleKB:Abstractions:Dtos:CategoryItemDto","ParentCategoryId":2253,"TreatAsTopicYN":false,"Description":"","ImageUrl":"","ShortDesc":"","CategoryId":2255,"CategoryName":"Hosting How-To"},{"__type":"Nc:SimpleKB:Abstractions:Dtos:CategoryItemDto","ParentCategoryId":2253,"TreatAsTopicYN":false,"Description":"","ImageUrl":"","ShortDesc":"","CategoryId":2257,"CategoryName":"Sales & Payments How-To"},{"__type":"Nc:SimpleKB:Abstractions:Dtos:CategoryItemDto","ParentCategoryId":2253,"TreatAsTopicYN":false,"Description":"","ImageUrl":"","ShortDesc":"","CategoryId":2258,"CategoryName":"cPanel Email How-To"},{"__type":"Nc:SimpleKB:Abstractions:Dtos:CategoryItemDto","ParentCategoryId":93,"TreatAsTopicYN":false,"Description":"","ImageUrl":"","ShortDesc":"","CategoryId":2260,"CategoryName":"Private Email Contacts and Calendars Setup"},{"__type":"Nc:SimpleKB:Abstractions:Dtos:CategoryItemDto","ParentCategoryId":2253,"TreatAsTopicYN":false,"Description":"","ImageUrl":"","ShortDesc":"","CategoryId":2262,"CategoryName":"EasyWP How-To"},{"__type":"Nc:SimpleKB:Abstractions:Dtos:CategoryItemDto","ParentCategoryId":0,"TreatAsTopicYN":false,"Description":"","ImageUrl":"https://download.namecheap.com/assets/img/domainvault-red@2x.png","ShortDesc":"","CategoryId":2289,"CategoryName":"Domain Vault","SubCategories":[]},{"__type":"Nc:SimpleKB:Abstractions:Dtos:CategoryItemDto","ParentCategoryId":14,"TreatAsTopicYN":false,"Description":"","ImageUrl":"","ShortDesc":"","CategoryId":2290,"CategoryName":"CSR code"},{"__type":"Nc:SimpleKB:Abstractions:Dtos:CategoryItemDto","ParentCategoryId":12,"TreatAsTopicYN":false,"Description":"","ImageUrl":"","ShortDesc":"","CategoryId":2291,"CategoryName":"Webuzo questions"},{"__type":"Nc:SimpleKB:Abstractions:Dtos:CategoryItemDto","ParentCategoryId":2265,"TreatAsTopicYN":false,"Description":"","ImageUrl":"","ShortDesc":"","CategoryId":2292,"CategoryName":"Browser Extensions"},{"__type":"Nc:SimpleKB:Abstractions:Dtos:CategoryItemDto","ParentCategoryId":14,"TreatAsTopicYN":false,"Description":"","ImageUrl":"","ShortDesc":"","CategoryId":2293,"CategoryName":"Automated SSL management"},{"__type":"Nc:SimpleKB:Abstractions:Dtos:CategoryItemDto","ParentCategoryId":2228,"TreatAsTopicYN":false,"Description":"","ImageUrl":"","ShortDesc":"","CategoryId":2298,"CategoryName":"Site Maker"},{"__type":"Nc:SimpleKB:Abstractions:Dtos:CategoryItemDto","ParentCategoryId":12,"TreatAsTopicYN":false,"Description":"","ImageUrl":"","ShortDesc":"","CategoryId":27,"CategoryName":"Getting Started"},{"__type":"Nc:SimpleKB:Abstractions:Dtos:CategoryItemDto","ParentCategoryId":0,"TreatAsTopicYN":false,"Description":"","ImageUrl":"/assets/img/pictograms/150/support-red.png","ShortDesc":"","CategoryId":5,"CategoryName":"General & Support","SubCategories":[]},{"__type":"Nc:SimpleKB:Abstractions:Dtos:CategoryItemDto","ParentCategoryId":2200,"TreatAsTopicYN":false,"Description":"","ImageUrl":"","ShortDesc":"","CategoryId":7,"CategoryName":"Billing FAQ"},{"__type":"Nc:SimpleKB:Abstractions:Dtos:CategoryItemDto","ParentCategoryId":2209,"TreatAsTopicYN":false,"Description":"","ImageUrl":"","ShortDesc":"","CategoryId":8,"CategoryName":"Transfer Information"},{"__type":"Nc:SimpleKB:Abstractions:Dtos:CategoryItemDto","ParentCategoryId":12,"TreatAsTopicYN":false,"Description":"","ImageUrl":"","ShortDesc":"","CategoryId":22,"CategoryName":"Hosting Information"},{"__type":"Nc:SimpleKB:Abstractions:Dtos:CategoryItemDto","ParentCategoryId":14,"TreatAsTopicYN":false,"Description":"","ImageUrl":"","ShortDesc":"","CategoryId":38,"CategoryName":"SSL General"},{"__type":"Nc:SimpleKB:Abstractions:Dtos:CategoryItemDto","ParentCategoryId":9,"TreatAsTopicYN":false,"Description":"","ImageUrl":"","ShortDesc":"","CategoryId":45,"CategoryName":"Account Security"},{"__type":"Nc:SimpleKB:Abstractions:Dtos:CategoryItemDto","ParentCategoryId":34,"TreatAsTopicYN":false,"Description":"","ImageUrl":"","ShortDesc":"","CategoryId":46,"CategoryName":"Domain Management"},{"__type":"Nc:SimpleKB:Abstractions:Dtos:CategoryItemDto","ParentCategoryId":2211,"TreatAsTopicYN":false,"Description":"","ImageUrl":"","ShortDesc":"","CategoryId":63,"CategoryName":"Namecheap API"},{"__type":"Nc:SimpleKB:Abstractions:Dtos:CategoryItemDto","ParentCategoryId":2228,"TreatAsTopicYN":false,"Description":"","ImageUrl":"","ShortDesc":"","CategoryId":177,"CategoryName":"Google Workspace (formerly G Suite)"},{"__type":"Nc:SimpleKB:Abstractions:Dtos:CategoryItemDto","ParentCategoryId":93,"TreatAsTopicYN":false,"Description":"","ImageUrl":"","ShortDesc":"","CategoryId":2179,"CategoryName":"Private Email: General Information"},{"__type":"Nc:SimpleKB:Abstractions:Dtos:CategoryItemDto","ParentCategoryId":2265,"TreatAsTopicYN":false,"Description":"","ImageUrl":"","ShortDesc":"","CategoryId":2274,"CategoryName":"General"},{"__type":"Nc:SimpleKB:Abstractions:Dtos:CategoryItemDto","ParentCategoryId":2239,"TreatAsTopicYN":false,"Description":"","ImageUrl":"","ShortDesc":"","CategoryId":2280,"CategoryName":"Getting Started"},{"__type":"Nc:SimpleKB:Abstractions:Dtos:CategoryItemDto","ParentCategoryId":2239,"TreatAsTopicYN":false,"Description":"","ImageUrl":"","ShortDesc":"","CategoryId":2279,"CategoryName":"General Information"},{"__type":"Nc:SimpleKB:Abstractions:Dtos:CategoryItemDto","ParentCategoryId":93,"TreatAsTopicYN":false,"Description":"","ImageUrl":"","ShortDesc":"","CategoryId":2215,"CategoryName":"Private Email: Mailbox Management"},{"__type":"Nc:SimpleKB:Abstractions:Dtos:CategoryItemDto","ParentCategoryId":2211,"TreatAsTopicYN":false,"Description":"","ImageUrl":"","ShortDesc":"","CategoryId":2196,"CategoryName":"WHMCS module for SSL"},{"__type":"Nc:SimpleKB:Abstractions:Dtos:CategoryItemDto","ParentCategoryId":0,"TreatAsTopicYN":false,"Description":"","ImageUrl":"/assets/img/pictograms/150/savings-red.png","ShortDesc":"","CategoryId":2200,"CategoryName":"Checkout & Billing","SubCategories":[{"__type":"Nc:SimpleKB:Abstractions:Dtos:CategoryItemDto","ParentCategoryId":2200,"TreatAsTopicYN":false,"Description":"","ImageUrl":"","ShortDesc":"","CategoryId":7,"CategoryName":"Billing FAQ"},{"__type":"Nc:SimpleKB:Abstractions:Dtos:CategoryItemDto","ParentCategoryId":2200,"TreatAsTopicYN":false,"Description":"","ImageUrl":"","ShortDesc":"","CategoryId":2201,"CategoryName":"Domains Billing"},{"__type":"Nc:SimpleKB:Abstractions:Dtos:CategoryItemDto","ParentCategoryId":2200,"TreatAsTopicYN":false,"Description":"","ImageUrl":"","ShortDesc":"","CategoryId":21,"CategoryName":"Hosting Billing"},{"__type":"Nc:SimpleKB:Abstractions:Dtos:CategoryItemDto","ParentCategoryId":2200,"TreatAsTopicYN":false,"Description":"","ImageUrl":"","ShortDesc":"","CategoryId":71,"CategoryName":"SSL Certificates Billing"},{"__type":"Nc:SimpleKB:Abstractions:Dtos:CategoryItemDto","ParentCategoryId":2200,"TreatAsTopicYN":false,"Description":"","ImageUrl":"","ShortDesc":"","CategoryId":2177,"CategoryName":"Private Email"}]},{"__type":"Nc:SimpleKB:Abstractions:Dtos:CategoryItemDto","ParentCategoryId":2200,"TreatAsTopicYN":false,"Description":"","ImageUrl":"","ShortDesc":"","CategoryId":2201,"CategoryName":"Domains Billing"},{"__type":"Nc:SimpleKB:Abstractions:Dtos:CategoryItemDto","ParentCategoryId":14,"TreatAsTopicYN":false,"Description":"","ImageUrl":"","ShortDesc":"","CategoryId":67,"CategoryName":"Activation"},{"__type":"Nc:SimpleKB:Abstractions:Dtos:CategoryItemDto","ParentCategoryId":2209,"TreatAsTopicYN":false,"Description":"","ImageUrl":"","ShortDesc":"","CategoryId":83,"CategoryName":"Transfer to Namecheap"},{"__type":"Nc:SimpleKB:Abstractions:Dtos:CategoryItemDto","ParentCategoryId":9,"TreatAsTopicYN":false,"Description":"","ImageUrl":"","ShortDesc":"","CategoryId":43,"CategoryName":"Profile Management"},{"__type":"Nc:SimpleKB:Abstractions:Dtos:CategoryItemDto","ParentCategoryId":34,"TreatAsTopicYN":false,"Description":"","ImageUrl":"","ShortDesc":"","CategoryId":10,"CategoryName":"DNS Questions"},{"__type":"Nc:SimpleKB:Abstractions:Dtos:CategoryItemDto","ParentCategoryId":12,"TreatAsTopicYN":false,"Description":"","ImageUrl":"","ShortDesc":"","CategoryId":29,"CategoryName":"cPanel questions"},{"__type":"Nc:SimpleKB:Abstractions:Dtos:CategoryItemDto","ParentCategoryId":2200,"TreatAsTopicYN":false,"Description":"","ImageUrl":"","ShortDesc":"","CategoryId":21,"CategoryName":"Hosting Billing"},{"__type":"Nc:SimpleKB:Abstractions:Dtos:CategoryItemDto","ParentCategoryId":34,"TreatAsTopicYN":false,"Description":"","ImageUrl":"","ShortDesc":"","CategoryId":11,"CategoryName":"Dynamic DNS"},{"__type":"Nc:SimpleKB:Abstractions:Dtos:CategoryItemDto","ParentCategoryId":9,"TreatAsTopicYN":false,"Description":"","ImageUrl":"","ShortDesc":"","CategoryId":44,"CategoryName":"Account Access"},{"__type":"Nc:SimpleKB:Abstractions:Dtos:CategoryItemDto","ParentCategoryId":2209,"TreatAsTopicYN":false,"Description":"","ImageUrl":"","ShortDesc":"","CategoryId":84,"CategoryName":"Transfer to another provider"},{"__type":"Nc:SimpleKB:Abstractions:Dtos:CategoryItemDto","ParentCategoryId":14,"TreatAsTopicYN":false,"Description":"","ImageUrl":"","ShortDesc":"","CategoryId":68,"CategoryName":"Validation"},{"__type":"Nc:SimpleKB:Abstractions:Dtos:CategoryItemDto","ParentCategoryId":12,"TreatAsTopicYN":false,"Description":"","ImageUrl":"","ShortDesc":"","CategoryId":2182,"CategoryName":"cPanel: Software Management"},{"__type":"Nc:SimpleKB:Abstractions:Dtos:CategoryItemDto","ParentCategoryId":93,"TreatAsTopicYN":false,"Description":"","ImageUrl":"","ShortDesc":"","CategoryId":2214,"CategoryName":"Email Forwarding"},{"__type":"Nc:SimpleKB:Abstractions:Dtos:CategoryItemDto","ParentCategoryId":2265,"TreatAsTopicYN":false,"Description":"","ImageUrl":"","ShortDesc":"","CategoryId":2270,"CategoryName":"Routers"},{"__type":"Nc:SimpleKB:Abstractions:Dtos:CategoryItemDto","ParentCategoryId":2239,"TreatAsTopicYN":false,"Description":"","ImageUrl":"","ShortDesc":"","CategoryId":2281,"CategoryName":"WordPress Migration"},{"__type":"Nc:SimpleKB:Abstractions:Dtos:CategoryItemDto","ParentCategoryId":2239,"TreatAsTopicYN":false,"Description":"","ImageUrl":"","ShortDesc":"","CategoryId":2282,"CategoryName":"Plugins and Themes"},{"__type":"Nc:SimpleKB:Abstractions:Dtos:CategoryItemDto","ParentCategoryId":2265,"TreatAsTopicYN":false,"Description":"","ImageUrl":"","ShortDesc":"","CategoryId":2272,"CategoryName":"TV"},{"__type":"Nc:SimpleKB:Abstractions:Dtos:CategoryItemDto","ParentCategoryId":12,"TreatAsTopicYN":false,"Description":"","ImageUrl":"","ShortDesc":"","CategoryId":2187,"CategoryName":"cPanel: WordPress"},{"__type":"Nc:SimpleKB:Abstractions:Dtos:CategoryItemDto","ParentCategoryId":2209,"TreatAsTopicYN":false,"Description":"","ImageUrl":"","ShortDesc":"","CategoryId":219,"CategoryName":"Canceled Transfers"},{"__type":"Nc:SimpleKB:Abstractions:Dtos:CategoryItemDto","ParentCategoryId":2200,"TreatAsTopicYN":false,"Description":"","ImageUrl":"","ShortDesc":"","CategoryId":71,"CategoryName":"SSL Certificates Billing"},{"__type":"Nc:SimpleKB:Abstractions:Dtos:CategoryItemDto","ParentCategoryId":93,"TreatAsTopicYN":false,"Description":"","ImageUrl":"","ShortDesc":"","CategoryId":2176,"CategoryName":"Private Email: DNS Settings"},{"__type":"Nc:SimpleKB:Abstractions:Dtos:CategoryItemDto","ParentCategoryId":14,"TreatAsTopicYN":false,"Description":"","ImageUrl":"","ShortDesc":"","CategoryId":69,"CategoryName":"Installation"},{"__type":"Nc:SimpleKB:Abstractions:Dtos:CategoryItemDto","ParentCategoryId":0,"TreatAsTopicYN":false,"Description":"","ImageUrl":"/assets/img/pictograms/150/reseller-red.png","ShortDesc":"","CategoryId":34,"CategoryName":"Domains","SubCategories":[{"__type":"Nc:SimpleKB:Abstractions:Dtos:CategoryItemDto","ParentCategoryId":34,"TreatAsTopicYN":false,"Description":"","ImageUrl":"","ShortDesc":"","CategoryId":2232,"CategoryName":"DNSSEC"},{"__type":"Nc:SimpleKB:Abstractions:Dtos:CategoryItemDto","ParentCategoryId":34,"TreatAsTopicYN":false,"Description":"","ImageUrl":"","ShortDesc":"","CategoryId":2234,"CategoryName":"Google Workspace (formerly G Suite)"},{"__type":"Nc:SimpleKB:Abstractions:Dtos:CategoryItemDto","ParentCategoryId":34,"TreatAsTopicYN":false,"Description":"","ImageUrl":"","ShortDesc":"","CategoryId":2237,"CategoryName":"Host records setup"},{"__type":"Nc:SimpleKB:Abstractions:Dtos:CategoryItemDto","ParentCategoryId":34,"TreatAsTopicYN":false,"Description":"","ImageUrl":"","ShortDesc":"","CategoryId":46,"CategoryName":"Domain Management"},{"__type":"Nc:SimpleKB:Abstractions:Dtos:CategoryItemDto","ParentCategoryId":34,"TreatAsTopicYN":false,"Description":"","ImageUrl":"","ShortDesc":"","CategoryId":10,"CategoryName":"DNS Questions"},{"__type":"Nc:SimpleKB:Abstractions:Dtos:CategoryItemDto","ParentCategoryId":34,"TreatAsTopicYN":false,"Description":"","ImageUrl":"","ShortDesc":"","CategoryId":11,"CategoryName":"Dynamic DNS"},{"__type":"Nc:SimpleKB:Abstractions:Dtos:CategoryItemDto","ParentCategoryId":34,"TreatAsTopicYN":false,"Description":"","ImageUrl":"","ShortDesc":"","CategoryId":35,"CategoryName":"Registrations"},{"__type":"Nc:SimpleKB:Abstractions:Dtos:CategoryItemDto","ParentCategoryId":34,"TreatAsTopicYN":false,"Description":"","ImageUrl":"","ShortDesc":"","CategoryId":2207,"CategoryName":"Renewal questions"},{"__type":"Nc:SimpleKB:Abstractions:Dtos:CategoryItemDto","ParentCategoryId":34,"TreatAsTopicYN":false,"Description":"","ImageUrl":"","ShortDesc":"","CategoryId":36,"CategoryName":"Domains with extended attributes"},{"__type":"Nc:SimpleKB:Abstractions:Dtos:CategoryItemDto","ParentCategoryId":34,"TreatAsTopicYN":false,"Description":"","ImageUrl":"","ShortDesc":"","CategoryId":51,"CategoryName":"FreeDNS"},{"__type":"Nc:SimpleKB:Abstractions:Dtos:CategoryItemDto","ParentCategoryId":34,"TreatAsTopicYN":false,"Description":"","ImageUrl":"","ShortDesc":"","CategoryId":15,"CategoryName":"Namecheap Market"},{"__type":"Nc:SimpleKB:Abstractions:Dtos:CategoryItemDto","ParentCategoryId":34,"TreatAsTopicYN":false,"Description":"","ImageUrl":"","ShortDesc":"","CategoryId":2208,"CategoryName":"3rd Party Services Setup"},{"__type":"Nc:SimpleKB:Abstractions:Dtos:CategoryItemDto","ParentCategoryId":34,"TreatAsTopicYN":false,"Description":"","ImageUrl":"","ShortDesc":"","CategoryId":2278,"CategoryName":"Handshake TLDs"}]},{"__type":"Nc:SimpleKB:Abstractions:Dtos:CategoryItemDto","ParentCategoryId":34,"TreatAsTopicYN":false,"Description":"","ImageUrl":"","ShortDesc":"","CategoryId":35,"CategoryName":"Registrations"},{"__type":"Nc:SimpleKB:Abstractions:Dtos:CategoryItemDto","ParentCategoryId":14,"TreatAsTopicYN":false,"Description":"","ImageUrl":"","ShortDesc":"","CategoryId":70,"CategoryName":"Reissuance"},{"__type":"Nc:SimpleKB:Abstractions:Dtos:CategoryItemDto","ParentCategoryId":0,"TreatAsTopicYN":false,"Description":"","ImageUrl":"/assets/img/pictograms/150/protection-red.png","ShortDesc":"","CategoryId":37,"CategoryName":"Domain Privacy Protection","SubCategories":[]},{"__type":"Nc:SimpleKB:Abstractions:Dtos:CategoryItemDto","ParentCategoryId":2200,"TreatAsTopicYN":false,"Description":"","ImageUrl":"","ShortDesc":"","CategoryId":2177,"CategoryName":"Private Email"},{"__type":"Nc:SimpleKB:Abstractions:Dtos:CategoryItemDto","ParentCategoryId":93,"TreatAsTopicYN":false,"Description":"","ImageUrl":"","ShortDesc":"","CategoryId":2178,"CategoryName":"Private Email: Webmail Features"},{"__type":"Nc:SimpleKB:Abstractions:Dtos:CategoryItemDto","ParentCategoryId":34,"TreatAsTopicYN":false,"Description":"","ImageUrl":"","ShortDesc":"","CategoryId":2207,"CategoryName":"Renewal questions"},{"__type":"Nc:SimpleKB:Abstractions:Dtos:CategoryItemDto","ParentCategoryId":12,"TreatAsTopicYN":false,"Description":"","ImageUrl":"","ShortDesc":"","CategoryId":2210,"CategoryName":"cPanel Add-ons"},{"__type":"Nc:SimpleKB:Abstractions:Dtos:CategoryItemDto","ParentCategoryId":2265,"TreatAsTopicYN":false,"Description":"","ImageUrl":"","ShortDesc":"","CategoryId":2273,"CategoryName":"Gaming Consoles"},{"__type":"Nc:SimpleKB:Abstractions:Dtos:CategoryItemDto","ParentCategoryId":2239,"TreatAsTopicYN":false,"Description":"","ImageUrl":"","ShortDesc":"","CategoryId":2284,"CategoryName":"WordPress Management"},{"__type":"Nc:SimpleKB:Abstractions:Dtos:CategoryItemDto","ParentCategoryId":2239,"TreatAsTopicYN":false,"Description":"","ImageUrl":"","ShortDesc":"","CategoryId":2285,"CategoryName":"SFTP and Database access"},{"__type":"Nc:SimpleKB:Abstractions:Dtos:CategoryItemDto","ParentCategoryId":2265,"TreatAsTopicYN":false,"Description":"","ImageUrl":"","ShortDesc":"","CategoryId":2268,"CategoryName":"macOS"},{"__type":"Nc:SimpleKB:Abstractions:Dtos:CategoryItemDto","ParentCategoryId":93,"TreatAsTopicYN":false,"Description":"","ImageUrl":"","ShortDesc":"","CategoryId":2175,"CategoryName":"Private Email: Client Setup"},{"__type":"Nc:SimpleKB:Abstractions:Dtos:CategoryItemDto","ParentCategoryId":0,"TreatAsTopicYN":false,"Description":"","ImageUrl":"/assets/img/pictograms/150/status-red.png","ShortDesc":"","CategoryId":2209,"CategoryName":"Domain Transfers","SubCategories":[{"__type":"Nc:SimpleKB:Abstractions:Dtos:CategoryItemDto","ParentCategoryId":2209,"TreatAsTopicYN":false,"Description":"","ImageUrl":"","ShortDesc":"","CategoryId":8,"CategoryName":"Transfer Information"},{"__type":"Nc:SimpleKB:Abstractions:Dtos:CategoryItemDto","ParentCategoryId":2209,"TreatAsTopicYN":false,"Description":"","ImageUrl":"","ShortDesc":"","CategoryId":83,"CategoryName":"Transfer to Namecheap"},{"__type":"Nc:SimpleKB:Abstractions:Dtos:CategoryItemDto","ParentCategoryId":2209,"TreatAsTopicYN":false,"Description":"","ImageUrl":"","ShortDesc":"","CategoryId":84,"CategoryName":"Transfer to another provider"},{"__type":"Nc:SimpleKB:Abstractions:Dtos:CategoryItemDto","ParentCategoryId":2209,"TreatAsTopicYN":false,"Description":"","ImageUrl":"","ShortDesc":"","CategoryId":219,"CategoryName":"Canceled Transfers"}]},{"__type":"Nc:SimpleKB:Abstractions:Dtos:CategoryItemDto","ParentCategoryId":12,"TreatAsTopicYN":false,"Description":"","ImageUrl":"","ShortDesc":"","CategoryId":48,"CategoryName":"VPS"},{"__type":"Nc:SimpleKB:Abstractions:Dtos:CategoryItemDto","ParentCategoryId":34,"TreatAsTopicYN":false,"Description":"","ImageUrl":"","ShortDesc":"","CategoryId":36,"CategoryName":"Domains with extended attributes"},{"__type":"Nc:SimpleKB:Abstractions:Dtos:CategoryItemDto","ParentCategoryId":0,"TreatAsTopicYN":true,"Description":"","ImageUrl":"/assets/img/pictograms/150/server-red.png","ShortDesc":"","CategoryId":12,"CategoryName":"Hosting","SubCategories":[{"__type":"Nc:SimpleKB:Abstractions:Dtos:CategoryItemDto","ParentCategoryId":12,"TreatAsTopicYN":false,"Description":"","ImageUrl":"","ShortDesc":"","CategoryId":2219,"CategoryName":"PHP Configuration"},{"__type":"Nc:SimpleKB:Abstractions:Dtos:CategoryItemDto","ParentCategoryId":12,"TreatAsTopicYN":false,"Description":"","ImageUrl":"","ShortDesc":"","CategoryId":2225,"CategoryName":"SEO"},{"__type":"Nc:SimpleKB:Abstractions:Dtos:CategoryItemDto","ParentCategoryId":12,"TreatAsTopicYN":false,"Description":"","ImageUrl":"","ShortDesc":"","CategoryId":2252,"CategoryName":"InterWorx questions"},{"__type":"Nc:SimpleKB:Abstractions:Dtos:CategoryItemDto","ParentCategoryId":12,"TreatAsTopicYN":false,"Description":"","ImageUrl":"","ShortDesc":"","CategoryId":2291,"CategoryName":"Webuzo questions"},{"__type":"Nc:SimpleKB:Abstractions:Dtos:CategoryItemDto","ParentCategoryId":12,"TreatAsTopicYN":false,"Description":"","ImageUrl":"","ShortDesc":"","CategoryId":27,"CategoryName":"Getting Started"},{"__type":"Nc:SimpleKB:Abstractions:Dtos:CategoryItemDto","ParentCategoryId":12,"TreatAsTopicYN":false,"Description":"","ImageUrl":"","ShortDesc":"","CategoryId":22,"CategoryName":"Hosting Information"},{"__type":"Nc:SimpleKB:Abstractions:Dtos:CategoryItemDto","ParentCategoryId":12,"TreatAsTopicYN":false,"Description":"","ImageUrl":"","ShortDesc":"","CategoryId":29,"CategoryName":"cPanel questions"},{"__type":"Nc:SimpleKB:Abstractions:Dtos:CategoryItemDto","ParentCategoryId":12,"TreatAsTopicYN":false,"Description":"","ImageUrl":"","ShortDesc":"","CategoryId":2182,"CategoryName":"cPanel: Software Management"},{"__type":"Nc:SimpleKB:Abstractions:Dtos:CategoryItemDto","ParentCategoryId":12,"TreatAsTopicYN":false,"Description":"","ImageUrl":"","ShortDesc":"","CategoryId":2187,"CategoryName":"cPanel: WordPress"},{"__type":"Nc:SimpleKB:Abstractions:Dtos:CategoryItemDto","ParentCategoryId":12,"TreatAsTopicYN":false,"Description":"","ImageUrl":"","ShortDesc":"","CategoryId":2210,"CategoryName":"cPanel Add-ons"},{"__type":"Nc:SimpleKB:Abstractions:Dtos:CategoryItemDto","ParentCategoryId":12,"TreatAsTopicYN":false,"Description":"","ImageUrl":"","ShortDesc":"","CategoryId":48,"CategoryName":"VPS"},{"__type":"Nc:SimpleKB:Abstractions:Dtos:CategoryItemDto","ParentCategoryId":12,"TreatAsTopicYN":false,"Description":"","ImageUrl":"","ShortDesc":"","CategoryId":2188,"CategoryName":"Dedicated Server"},{"__type":"Nc:SimpleKB:Abstractions:Dtos:CategoryItemDto","ParentCategoryId":12,"TreatAsTopicYN":false,"Description":"","ImageUrl":"","ShortDesc":"","CategoryId":30,"CategoryName":"WHM questions"},{"__type":"Nc:SimpleKB:Abstractions:Dtos:CategoryItemDto","ParentCategoryId":12,"TreatAsTopicYN":false,"Description":"","ImageUrl":"","ShortDesc":"","CategoryId":32,"CategoryName":"DNS settings"},{"__type":"Nc:SimpleKB:Abstractions:Dtos:CategoryItemDto","ParentCategoryId":12,"TreatAsTopicYN":false,"Description":"","ImageUrl":"","ShortDesc":"","CategoryId":103,"CategoryName":"LVE (CloudLinux)"},{"__type":"Nc:SimpleKB:Abstractions:Dtos:CategoryItemDto","ParentCategoryId":12,"TreatAsTopicYN":false,"Description":"","ImageUrl":"","ShortDesc":"","CategoryId":89,"CategoryName":"SSH Access"},{"__type":"Nc:SimpleKB:Abstractions:Dtos:CategoryItemDto","ParentCategoryId":12,"TreatAsTopicYN":false,"Description":"","ImageUrl":"","ShortDesc":"","CategoryId":205,"CategoryName":"FTP questions"},{"__type":"Nc:SimpleKB:Abstractions:Dtos:CategoryItemDto","ParentCategoryId":12,"TreatAsTopicYN":false,"Description":"","ImageUrl":"","ShortDesc":"","CategoryId":2180,"CategoryName":"MySQL questions"},{"__type":"Nc:SimpleKB:Abstractions:Dtos:CategoryItemDto","ParentCategoryId":12,"TreatAsTopicYN":false,"Description":"","ImageUrl":"","ShortDesc":"","CategoryId":2199,"CategoryName":"Hosting Migration"},{"__type":"Nc:SimpleKB:Abstractions:Dtos:CategoryItemDto","ParentCategoryId":12,"TreatAsTopicYN":false,"Description":"","ImageUrl":"","ShortDesc":"","CategoryId":2194,"CategoryName":"Tips & Tricks"},{"__type":"Nc:SimpleKB:Abstractions:Dtos:CategoryItemDto","ParentCategoryId":12,"TreatAsTopicYN":false,"Description":"","ImageUrl":"","ShortDesc":"","CategoryId":239,"CategoryName":"WHMCS"},{"__type":"Nc:SimpleKB:Abstractions:Dtos:CategoryItemDto","ParentCategoryId":12,"TreatAsTopicYN":false,"Description":"","ImageUrl":"","ShortDesc":"","CategoryId":33,"CategoryName":"SSL Installation"}]},{"__type":"Nc:SimpleKB:Abstractions:Dtos:CategoryItemDto","ParentCategoryId":93,"TreatAsTopicYN":false,"Description":"","ImageUrl":"","ShortDesc":"","CategoryId":2171,"CategoryName":"Private Email: Active Sync (Exchange) Setup"},{"__type":"Nc:SimpleKB:Abstractions:Dtos:CategoryItemDto","ParentCategoryId":12,"TreatAsTopicYN":false,"Description":"","ImageUrl":"","ShortDesc":"","CategoryId":2188,"CategoryName":"Dedicated Server"},{"__type":"Nc:SimpleKB:Abstractions:Dtos:CategoryItemDto","ParentCategoryId":2265,"TreatAsTopicYN":false,"Description":"","ImageUrl":"","ShortDesc":"","CategoryId":2269,"CategoryName":"iOS"},{"__type":"Nc:SimpleKB:Abstractions:Dtos:CategoryItemDto","ParentCategoryId":2239,"TreatAsTopicYN":false,"Description":"","ImageUrl":"","ShortDesc":"","CategoryId":2286,"CategoryName":"Domains questions"},{"__type":"Nc:SimpleKB:Abstractions:Dtos:CategoryItemDto","ParentCategoryId":2239,"TreatAsTopicYN":false,"Description":"","ImageUrl":"","ShortDesc":"","CategoryId":2288,"CategoryName":"Billing questions"},{"__type":"Nc:SimpleKB:Abstractions:Dtos:CategoryItemDto","ParentCategoryId":2265,"TreatAsTopicYN":false,"Description":"","ImageUrl":"","ShortDesc":"","CategoryId":2271,"CategoryName":"Linux"},{"__type":"Nc:SimpleKB:Abstractions:Dtos:CategoryItemDto","ParentCategoryId":12,"TreatAsTopicYN":false,"Description":"","ImageUrl":"","ShortDesc":"","CategoryId":30,"CategoryName":"WHM questions"},{"__type":"Nc:SimpleKB:Abstractions:Dtos:CategoryItemDto","ParentCategoryId":93,"TreatAsTopicYN":false,"Description":"","ImageUrl":"","ShortDesc":"","CategoryId":31,"CategoryName":"cPanel Email FAQs"},{"__type":"Nc:SimpleKB:Abstractions:Dtos:CategoryItemDto","ParentCategoryId":34,"TreatAsTopicYN":false,"Description":"","ImageUrl":"","ShortDesc":"","CategoryId":51,"CategoryName":"FreeDNS"},{"__type":"Nc:SimpleKB:Abstractions:Dtos:CategoryItemDto","ParentCategoryId":0,"TreatAsTopicYN":false,"Description":"","ImageUrl":"/assets/img/pictograms/150/email-red.png","ShortDesc":"","CategoryId":93,"CategoryName":"Email service","SubCategories":[{"__type":"Nc:SimpleKB:Abstractions:Dtos:CategoryItemDto","ParentCategoryId":93,"TreatAsTopicYN":false,"Description":"","ImageUrl":"","ShortDesc":"","CategoryId":2216,"CategoryName":"Spam Protection"},{"__type":"Nc:SimpleKB:Abstractions:Dtos:CategoryItemDto","ParentCategoryId":93,"TreatAsTopicYN":false,"Description":"","ImageUrl":"","ShortDesc":"","CategoryId":2226,"CategoryName":"Email Migration"},{"__type":"Nc:SimpleKB:Abstractions:Dtos:CategoryItemDto","ParentCategoryId":93,"TreatAsTopicYN":false,"Description":"","ImageUrl":"","ShortDesc":"","CategoryId":2260,"CategoryName":"Private Email Contacts and Calendars Setup"},{"__type":"Nc:SimpleKB:Abstractions:Dtos:CategoryItemDto","ParentCategoryId":93,"TreatAsTopicYN":false,"Description":"","ImageUrl":"","ShortDesc":"","CategoryId":2179,"CategoryName":"Private Email: General Information"},{"__type":"Nc:SimpleKB:Abstractions:Dtos:CategoryItemDto","ParentCategoryId":93,"TreatAsTopicYN":false,"Description":"","ImageUrl":"","ShortDesc":"","CategoryId":2215,"CategoryName":"Private Email: Mailbox Management"},{"__type":"Nc:SimpleKB:Abstractions:Dtos:CategoryItemDto","ParentCategoryId":93,"TreatAsTopicYN":false,"Description":"","ImageUrl":"","ShortDesc":"","CategoryId":2214,"CategoryName":"Email Forwarding"},{"__type":"Nc:SimpleKB:Abstractions:Dtos:CategoryItemDto","ParentCategoryId":93,"TreatAsTopicYN":false,"Description":"","ImageUrl":"","ShortDesc":"","CategoryId":2176,"CategoryName":"Private Email: DNS Settings"},{"__type":"Nc:SimpleKB:Abstractions:Dtos:CategoryItemDto","ParentCategoryId":93,"TreatAsTopicYN":false,"Description":"","ImageUrl":"","ShortDesc":"","CategoryId":2178,"CategoryName":"Private Email: Webmail Features"},{"__type":"Nc:SimpleKB:Abstractions:Dtos:CategoryItemDto","ParentCategoryId":93,"TreatAsTopicYN":false,"Description":"","ImageUrl":"","ShortDesc":"","CategoryId":2175,"CategoryName":"Private Email: Client Setup"},{"__type":"Nc:SimpleKB:Abstractions:Dtos:CategoryItemDto","ParentCategoryId":93,"TreatAsTopicYN":false,"Description":"","ImageUrl":"","ShortDesc":"","CategoryId":2171,"CategoryName":"Private Email: Active Sync (Exchange) Setup"},{"__type":"Nc:SimpleKB:Abstractions:Dtos:CategoryItemDto","ParentCategoryId":93,"TreatAsTopicYN":false,"Description":"","ImageUrl":"","ShortDesc":"","CategoryId":31,"CategoryName":"cPanel Email FAQs"},{"__type":"Nc:SimpleKB:Abstractions:Dtos:CategoryItemDto","ParentCategoryId":93,"TreatAsTopicYN":false,"Description":"","ImageUrl":"","ShortDesc":"","CategoryId":2186,"CategoryName":"cPanel Email: Client Setup"},{"__type":"Nc:SimpleKB:Abstractions:Dtos:CategoryItemDto","ParentCategoryId":93,"TreatAsTopicYN":false,"Description":"","ImageUrl":"","ShortDesc":"","CategoryId":2204,"CategoryName":"Private Email: Video Overview"}]},{"__type":"Nc:SimpleKB:Abstractions:Dtos:CategoryItemDto","ParentCategoryId":12,"TreatAsTopicYN":false,"Description":"","ImageUrl":"","ShortDesc":"","CategoryId":32,"CategoryName":"DNS settings"},{"__type":"Nc:SimpleKB:Abstractions:Dtos:CategoryItemDto","ParentCategoryId":34,"TreatAsTopicYN":false,"Description":"","ImageUrl":"","ShortDesc":"","CategoryId":15,"CategoryName":"Namecheap Market"},{"__type":"Nc:SimpleKB:Abstractions:Dtos:CategoryItemDto","ParentCategoryId":93,"TreatAsTopicYN":false,"Description":"","ImageUrl":"","ShortDesc":"","CategoryId":2186,"CategoryName":"cPanel Email: Client Setup"},{"__type":"Nc:SimpleKB:Abstractions:Dtos:CategoryItemDto","ParentCategoryId":2265,"TreatAsTopicYN":false,"Description":"","ImageUrl":"","ShortDesc":"","CategoryId":2266,"CategoryName":"Windows"},{"__type":"Nc:SimpleKB:Abstractions:Dtos:CategoryItemDto","ParentCategoryId":2239,"TreatAsTopicYN":false,"Description":"","ImageUrl":"","ShortDesc":"","CategoryId":2287,"CategoryName":"SSL questions"},{"__type":"Nc:SimpleKB:Abstractions:Dtos:CategoryItemDto","ParentCategoryId":2265,"TreatAsTopicYN":false,"Description":"","ImageUrl":"","ShortDesc":"","CategoryId":2267,"CategoryName":"Android"},{"__type":"Nc:SimpleKB:Abstractions:Dtos:CategoryItemDto","ParentCategoryId":34,"TreatAsTopicYN":false,"Description":"","ImageUrl":"","ShortDesc":"","CategoryId":2208,"CategoryName":"3rd Party Services Setup"},{"__type":"Nc:SimpleKB:Abstractions:Dtos:CategoryItemDto","ParentCategoryId":93,"TreatAsTopicYN":false,"Description":"","ImageUrl":"","ShortDesc":"","CategoryId":2204,"CategoryName":"Private Email: Video Overview"},{"__type":"Nc:SimpleKB:Abstractions:Dtos:CategoryItemDto","ParentCategoryId":0,"TreatAsTopicYN":false,"Description":"","ImageUrl":"/assets/img/pictograms/150/security-red.png","ShortDesc":"","CategoryId":14,"CategoryName":"SSL Certificates","SubCategories":[{"__type":"Nc:SimpleKB:Abstractions:Dtos:CategoryItemDto","ParentCategoryId":14,"TreatAsTopicYN":false,"Description":"","ImageUrl":"","ShortDesc":"","CategoryId":2217,"CategoryName":"Renewal"},{"__type":"Nc:SimpleKB:Abstractions:Dtos:CategoryItemDto","ParentCategoryId":14,"TreatAsTopicYN":false,"Description":"","ImageUrl":"","ShortDesc":"","CategoryId":2218,"CategoryName":"cPanel SSL Plugin"},{"__type":"Nc:SimpleKB:Abstractions:Dtos:CategoryItemDto","ParentCategoryId":14,"TreatAsTopicYN":false,"Description":"","ImageUrl":"","ShortDesc":"","CategoryId":2221,"CategoryName":"Multi-Domain SSL Certificates"},{"__type":"Nc:SimpleKB:Abstractions:Dtos:CategoryItemDto","ParentCategoryId":14,"TreatAsTopicYN":false,"Description":"","ImageUrl":"","ShortDesc":"","CategoryId":2222,"CategoryName":"Cancellation"},{"__type":"Nc:SimpleKB:Abstractions:Dtos:CategoryItemDto","ParentCategoryId":14,"TreatAsTopicYN":false,"Description":"","ImageUrl":"","ShortDesc":"","CategoryId":2223,"CategoryName":"Browser errors"},{"__type":"Nc:SimpleKB:Abstractions:Dtos:CategoryItemDto","ParentCategoryId":14,"TreatAsTopicYN":false,"Description":"","ImageUrl":"","ShortDesc":"","CategoryId":2224,"CategoryName":"Site Seal, Logo"},{"__type":"Nc:SimpleKB:Abstractions:Dtos:CategoryItemDto","ParentCategoryId":14,"TreatAsTopicYN":false,"Description":"","ImageUrl":"","ShortDesc":"","CategoryId":2238,"CategoryName":"SSL installation errors"},{"__type":"Nc:SimpleKB:Abstractions:Dtos:CategoryItemDto","ParentCategoryId":14,"TreatAsTopicYN":false,"Description":"","ImageUrl":"","ShortDesc":"","CategoryId":2290,"CategoryName":"CSR code"},{"__type":"Nc:SimpleKB:Abstractions:Dtos:CategoryItemDto","ParentCategoryId":14,"TreatAsTopicYN":false,"Description":"","ImageUrl":"","ShortDesc":"","CategoryId":2293,"CategoryName":"Automated SSL management"},{"__type":"Nc:SimpleKB:Abstractions:Dtos:CategoryItemDto","ParentCategoryId":14,"TreatAsTopicYN":false,"Description":"","ImageUrl":"","ShortDesc":"","CategoryId":38,"CategoryName":"SSL General"},{"__type":"Nc:SimpleKB:Abstractions:Dtos:CategoryItemDto","ParentCategoryId":14,"TreatAsTopicYN":false,"Description":"","ImageUrl":"","ShortDesc":"","CategoryId":67,"CategoryName":"Activation"},{"__type":"Nc:SimpleKB:Abstractions:Dtos:CategoryItemDto","ParentCategoryId":14,"TreatAsTopicYN":false,"Description":"","ImageUrl":"","ShortDesc":"","CategoryId":68,"CategoryName":"Validation"},{"__type":"Nc:SimpleKB:Abstractions:Dtos:CategoryItemDto","ParentCategoryId":14,"TreatAsTopicYN":false,"Description":"","ImageUrl":"","ShortDesc":"","CategoryId":69,"CategoryName":"Installation"},{"__type":"Nc:SimpleKB:Abstractions:Dtos:CategoryItemDto","ParentCategoryId":14,"TreatAsTopicYN":false,"Description":"","ImageUrl":"","ShortDesc":"","CategoryId":70,"CategoryName":"Reissuance"}]},{"__type":"Nc:SimpleKB:Abstractions:Dtos:CategoryItemDto","ParentCategoryId":0,"TreatAsTopicYN":true,"Description":"","ImageUrl":"/assets/img/pictograms/150/performance-red.png","ShortDesc":"","CategoryId":9,"CategoryName":"My Account","SubCategories":[{"__type":"Nc:SimpleKB:Abstractions:Dtos:CategoryItemDto","ParentCategoryId":9,"TreatAsTopicYN":false,"Description":"","ImageUrl":"","ShortDesc":"","CategoryId":45,"CategoryName":"Account Security"},{"__type":"Nc:SimpleKB:Abstractions:Dtos:CategoryItemDto","ParentCategoryId":9,"TreatAsTopicYN":false,"Description":"","ImageUrl":"","ShortDesc":"","CategoryId":43,"CategoryName":"Profile Management"},{"__type":"Nc:SimpleKB:Abstractions:Dtos:CategoryItemDto","ParentCategoryId":9,"TreatAsTopicYN":false,"Description":"","ImageUrl":"","ShortDesc":"","CategoryId":44,"CategoryName":"Account Access"}]},{"__type":"Nc:SimpleKB:Abstractions:Dtos:CategoryItemDto","ParentCategoryId":34,"TreatAsTopicYN":false,"Description":"","ImageUrl":"","ShortDesc":"","CategoryId":2278,"CategoryName":"Handshake TLDs"},{"__type":"Nc:SimpleKB:Abstractions:Dtos:CategoryItemDto","ParentCategoryId":12,"TreatAsTopicYN":false,"Description":"","ImageUrl":"","ShortDesc":"","CategoryId":103,"CategoryName":"LVE (CloudLinux)"},{"__type":"Nc:SimpleKB:Abstractions:Dtos:CategoryItemDto","ParentCategoryId":0,"TreatAsTopicYN":false,"Description":"","ImageUrl":"/assets/img/pictograms/150/affiliates-red.png","ShortDesc":"","CategoryId":55,"CategoryName":"Affiliates","SubCategories":[]},{"__type":"Nc:SimpleKB:Abstractions:Dtos:CategoryItemDto","ParentCategoryId":12,"TreatAsTopicYN":false,"Description":"","ImageUrl":"","ShortDesc":"","CategoryId":89,"CategoryName":"SSH Access"},{"__type":"Nc:SimpleKB:Abstractions:Dtos:CategoryItemDto","ParentCategoryId":0,"TreatAsTopicYN":false,"Description":"","ImageUrl":"/assets/img/pictograms/150/tools-red.png","ShortDesc":"","CategoryId":2211,"CategoryName":"API & Resellers","SubCategories":[{"__type":"Nc:SimpleKB:Abstractions:Dtos:CategoryItemDto","ParentCategoryId":2211,"TreatAsTopicYN":false,"Description":"","ImageUrl":"","ShortDesc":"","CategoryId":2227,"CategoryName":"SSL Resellers"},{"__type":"Nc:SimpleKB:Abstractions:Dtos:CategoryItemDto","ParentCategoryId":2211,"TreatAsTopicYN":false,"Description":"","ImageUrl":"","ShortDesc":"","CategoryId":2229,"CategoryName":"Hosting Resellers"},{"__type":"Nc:SimpleKB:Abstractions:Dtos:CategoryItemDto","ParentCategoryId":2211,"TreatAsTopicYN":false,"Description":"","ImageUrl":"","ShortDesc":"","CategoryId":63,"CategoryName":"Namecheap API"},{"__type":"Nc:SimpleKB:Abstractions:Dtos:CategoryItemDto","ParentCategoryId":2211,"TreatAsTopicYN":false,"Description":"","ImageUrl":"","ShortDesc":"","CategoryId":2196,"CategoryName":"WHMCS module for SSL"}]},{"__type":"Nc:SimpleKB:Abstractions:Dtos:CategoryItemDto","ParentCategoryId":0,"TreatAsTopicYN":false,"Description":"","ImageUrl":"/assets/img/pictograms/150/timer-red.png","ShortDesc":"","CategoryId":2212,"CategoryName":"Legacy Products","SubCategories":[]},{"__type":"Nc:SimpleKB:Abstractions:Dtos:CategoryItemDto","ParentCategoryId":12,"TreatAsTopicYN":false,"Description":"","ImageUrl":"","ShortDesc":"","CategoryId":205,"CategoryName":"FTP questions"},{"__type":"Nc:SimpleKB:Abstractions:Dtos:CategoryItemDto","ParentCategoryId":12,"TreatAsTopicYN":false,"Description":"","ImageUrl":"","ShortDesc":"","CategoryId":2180,"CategoryName":"MySQL questions"},{"__type":"Nc:SimpleKB:Abstractions:Dtos:CategoryItemDto","ParentCategoryId":12,"TreatAsTopicYN":false,"Description":"","ImageUrl":"","ShortDesc":"","CategoryId":2199,"CategoryName":"Hosting Migration"},{"__type":"Nc:SimpleKB:Abstractions:Dtos:CategoryItemDto","ParentCategoryId":0,"TreatAsTopicYN":false,"Description":"","ImageUrl":"/assets/img/pictograms/150/premiumdns-red.png","ShortDesc":"","CategoryId":2231,"CategoryName":"PremiumDNS","SubCategories":[]},{"__type":"Nc:SimpleKB:Abstractions:Dtos:CategoryItemDto","ParentCategoryId":12,"TreatAsTopicYN":false,"Description":"","ImageUrl":"","ShortDesc":"","CategoryId":2194,"CategoryName":"Tips & Tricks"},{"__type":"Nc:SimpleKB:Abstractions:Dtos:CategoryItemDto","ParentCategoryId":0,"TreatAsTopicYN":false,"Description":"","ImageUrl":"https://static.nc-img.com/live-resource/icons/knowledgebase/fastVPN_icon-150px.png","ShortDesc":"","CategoryId":2265,"CategoryName":"FastVPN","SubCategories":[{"__type":"Nc:SimpleKB:Abstractions:Dtos:CategoryItemDto","ParentCategoryId":2265,"TreatAsTopicYN":false,"Description":"","ImageUrl":"","ShortDesc":"","CategoryId":2292,"CategoryName":"Browser Extensions"},{"__type":"Nc:SimpleKB:Abstractions:Dtos:CategoryItemDto","ParentCategoryId":2265,"TreatAsTopicYN":false,"Description":"","ImageUrl":"","ShortDesc":"","CategoryId":2274,"CategoryName":"General"},{"__type":"Nc:SimpleKB:Abstractions:Dtos:CategoryItemDto","ParentCategoryId":2265,"TreatAsTopicYN":false,"Description":"","ImageUrl":"","ShortDesc":"","CategoryId":2270,"CategoryName":"Routers"},{"__type":"Nc:SimpleKB:Abstractions:Dtos:CategoryItemDto","ParentCategoryId":2265,"TreatAsTopicYN":false,"Description":"","ImageUrl":"","ShortDesc":"","CategoryId":2272,"CategoryName":"TV"},{"__type":"Nc:SimpleKB:Abstractions:Dtos:CategoryItemDto","ParentCategoryId":2265,"TreatAsTopicYN":false,"Description":"","ImageUrl":"","ShortDesc":"","CategoryId":2273,"CategoryName":"Gaming Consoles"},{"__type":"Nc:SimpleKB:Abstractions:Dtos:CategoryItemDto","ParentCategoryId":2265,"TreatAsTopicYN":false,"Description":"","ImageUrl":"","ShortDesc":"","CategoryId":2268,"CategoryName":"macOS"},{"__type":"Nc:SimpleKB:Abstractions:Dtos:CategoryItemDto","ParentCategoryId":2265,"TreatAsTopicYN":false,"Description":"","ImageUrl":"","ShortDesc":"","CategoryId":2269,"CategoryName":"iOS"},{"__type":"Nc:SimpleKB:Abstractions:Dtos:CategoryItemDto","ParentCategoryId":2265,"TreatAsTopicYN":false,"Description":"","ImageUrl":"","ShortDesc":"","CategoryId":2271,"CategoryName":"Linux"},{"__type":"Nc:SimpleKB:Abstractions:Dtos:CategoryItemDto","ParentCategoryId":2265,"TreatAsTopicYN":false,"Description":"","ImageUrl":"","ShortDesc":"","CategoryId":2266,"CategoryName":"Windows"},{"__type":"Nc:SimpleKB:Abstractions:Dtos:CategoryItemDto","ParentCategoryId":2265,"TreatAsTopicYN":false,"Description":"","ImageUrl":"","ShortDesc":"","CategoryId":2267,"CategoryName":"Android"}]},{"__type":"Nc:SimpleKB:Abstractions:Dtos:CategoryItemDto","ParentCategoryId":12,"TreatAsTopicYN":false,"Description":"","ImageUrl":"","ShortDesc":"","CategoryId":239,"CategoryName":"WHMCS"},{"__type":"Nc:SimpleKB:Abstractions:Dtos:CategoryItemDto","ParentCategoryId":12,"TreatAsTopicYN":false,"Description":"","ImageUrl":"","ShortDesc":"","CategoryId":33,"CategoryName":"SSL Installation"}],"status":200,"statusText":"OK"}}How to set up your card for recurring payments (all services except Apps)
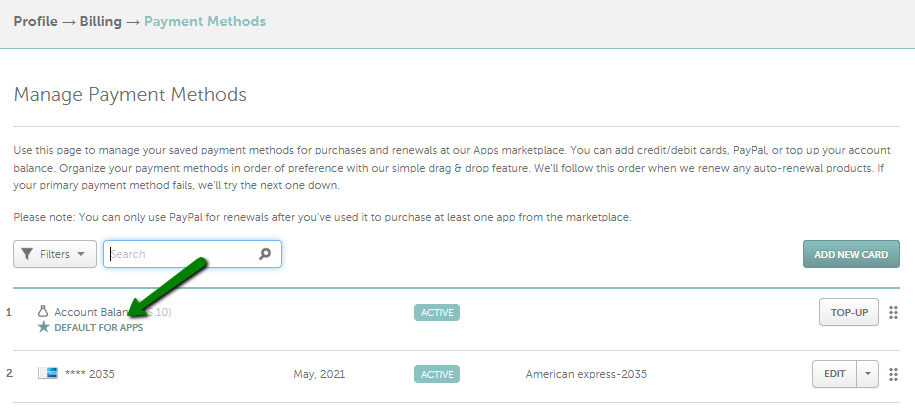
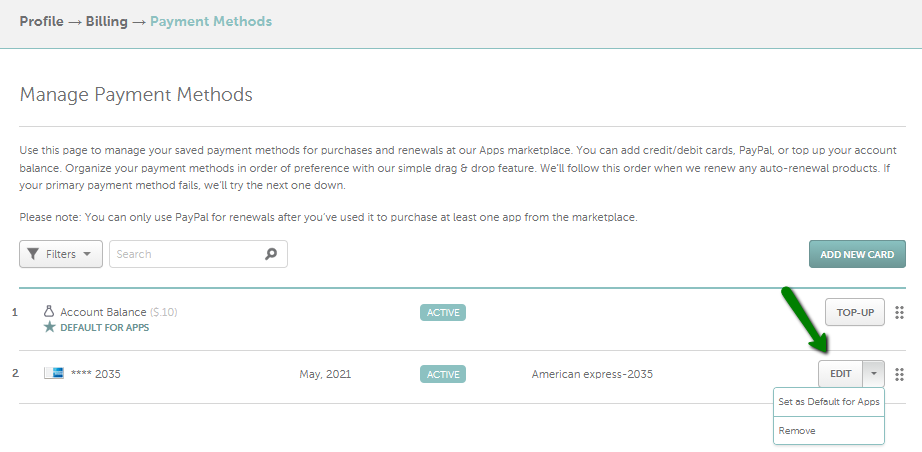
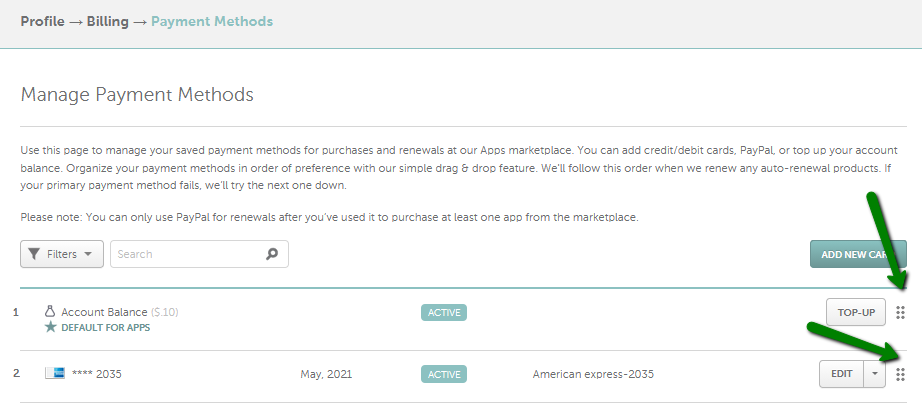
How to set up your card for Apps auto-renewal only
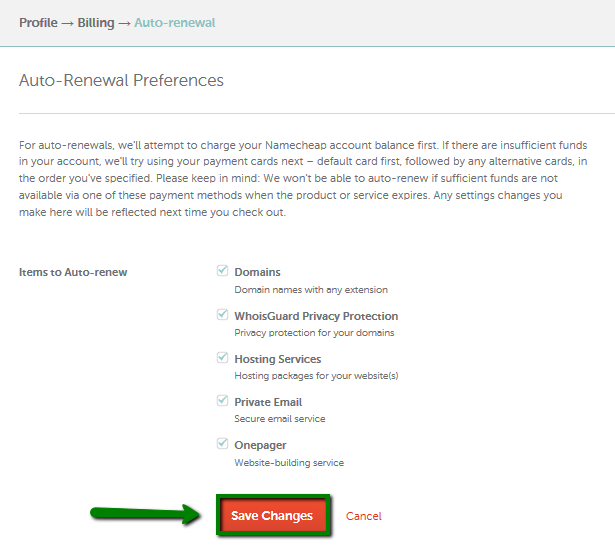
Enabling Auto-Renewal for future services

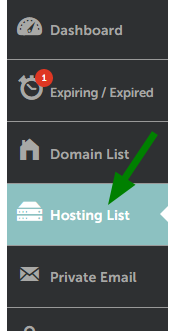

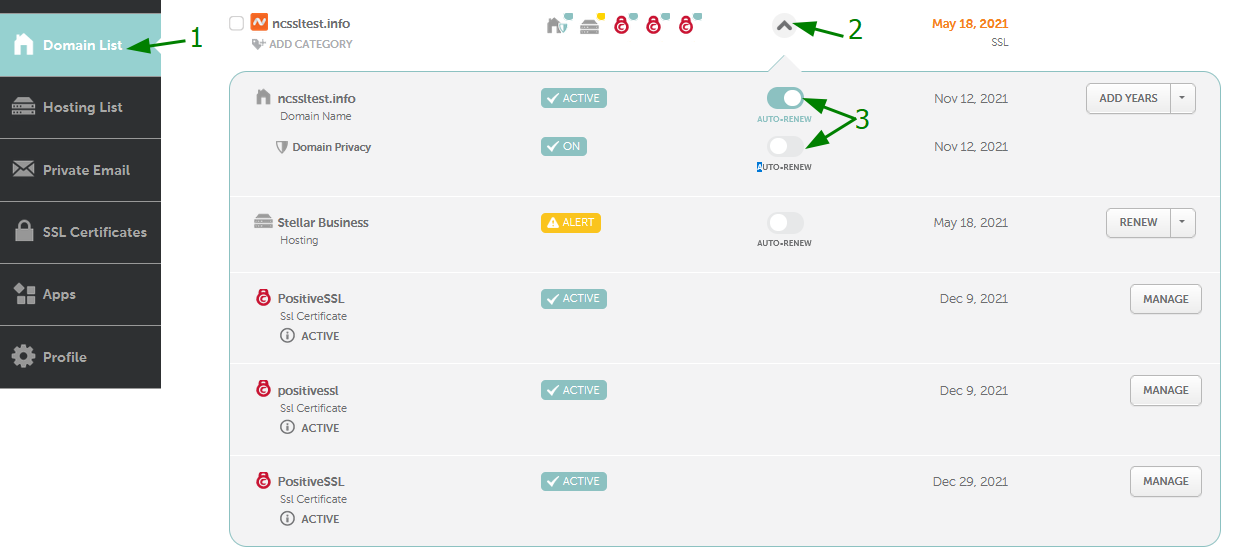
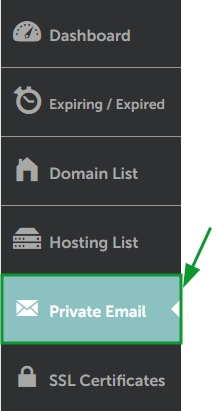
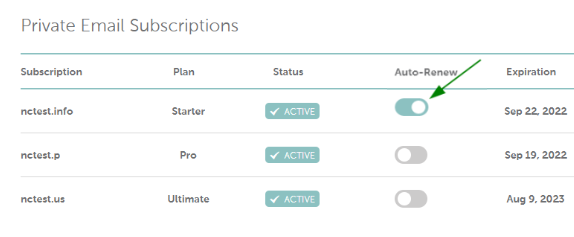
Domains and Domain Privacy subscriptions


{}Need help? We're always here for you.
{}