mkdir -p /root/rpmdb_bak && cp -avr /var/lib/rpm/* /root/rpmdb_bak && rm -vf /var/lib/rpm/__db* && rpm --rebuilddb -vv && /scripts/check_cpanel_rpms --fix && /scripts/upcp --force && whmapi1 set_local_mysql_root_password password="$(openssl rand -base64 14)”
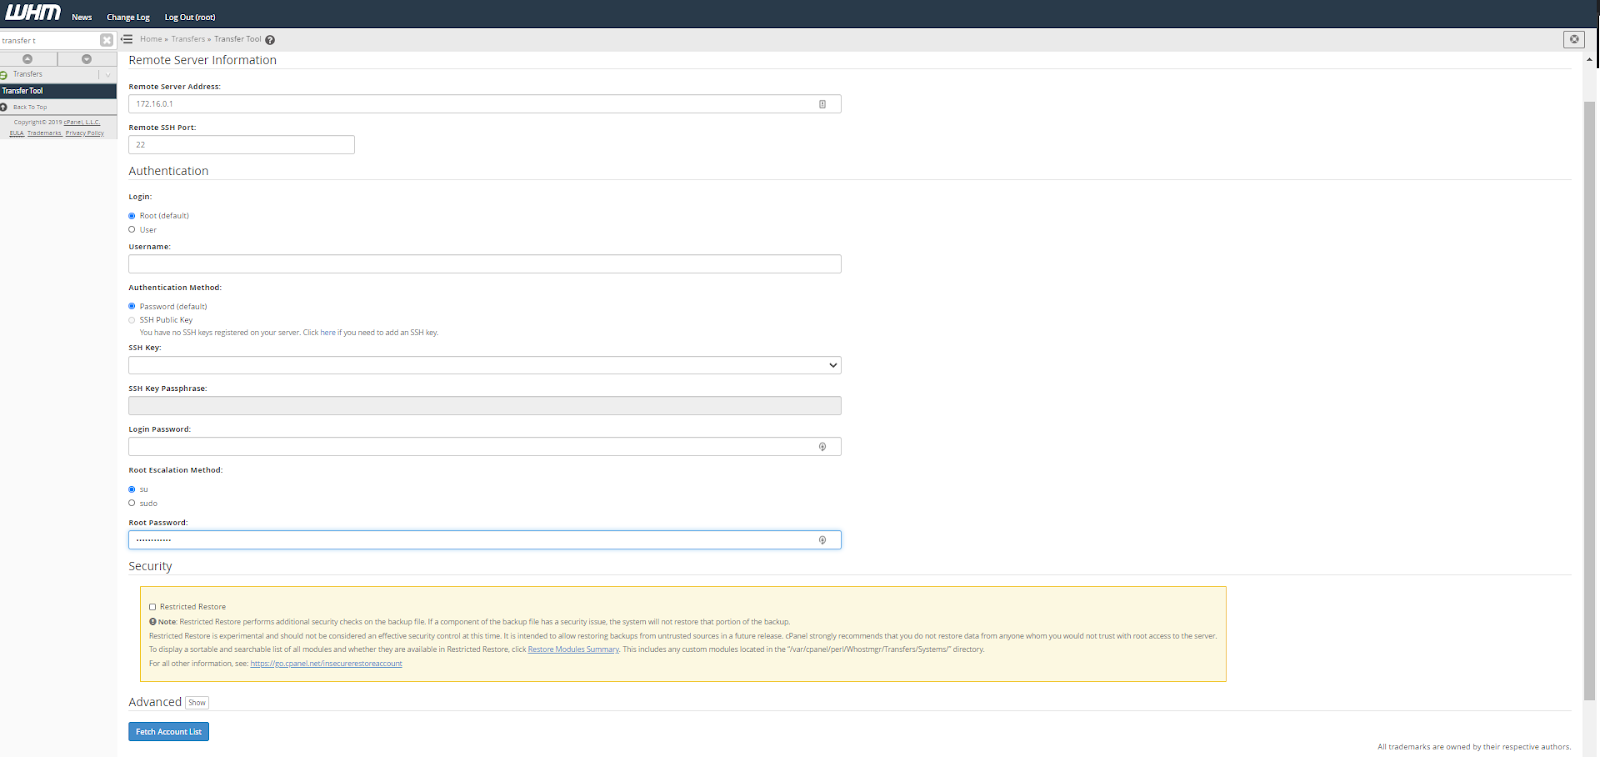
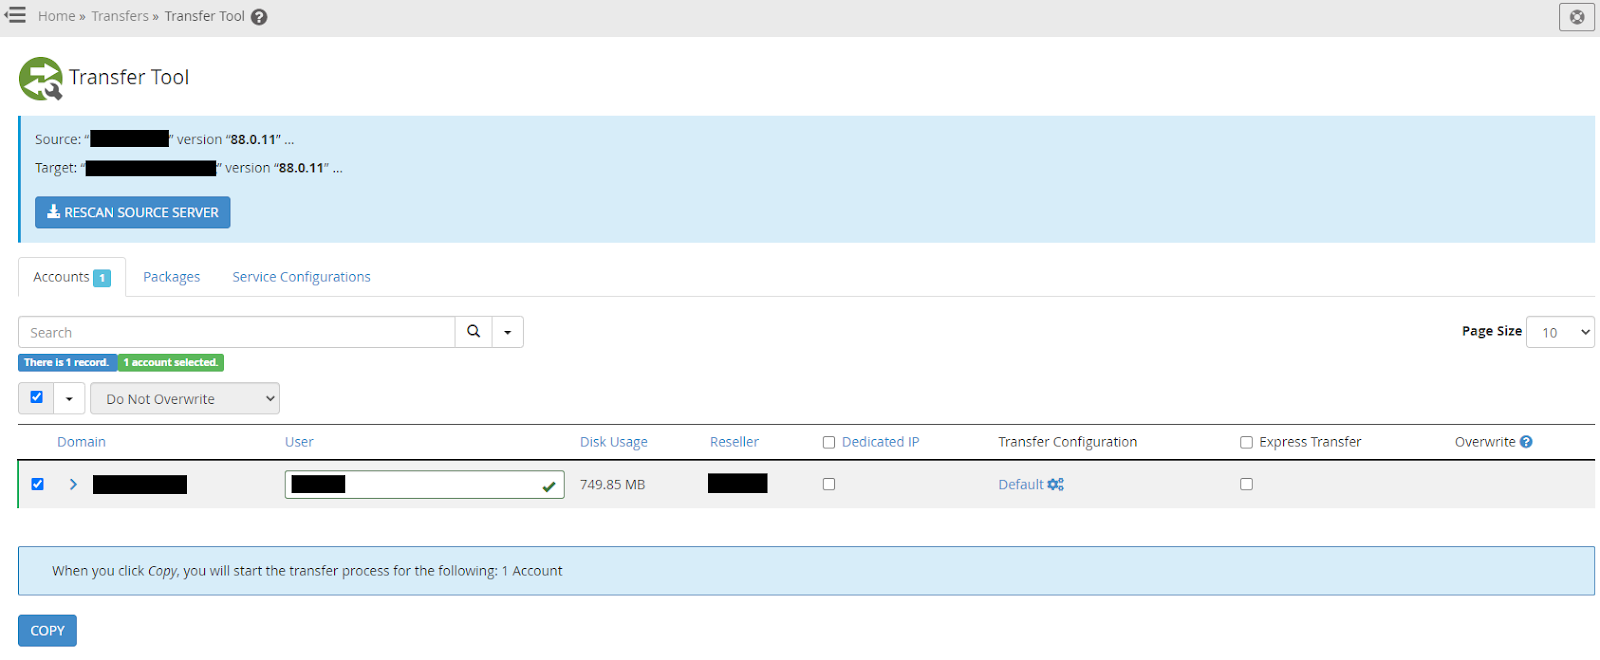

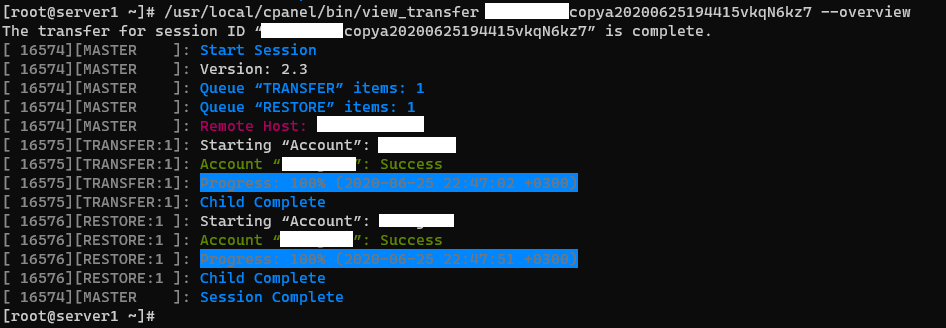
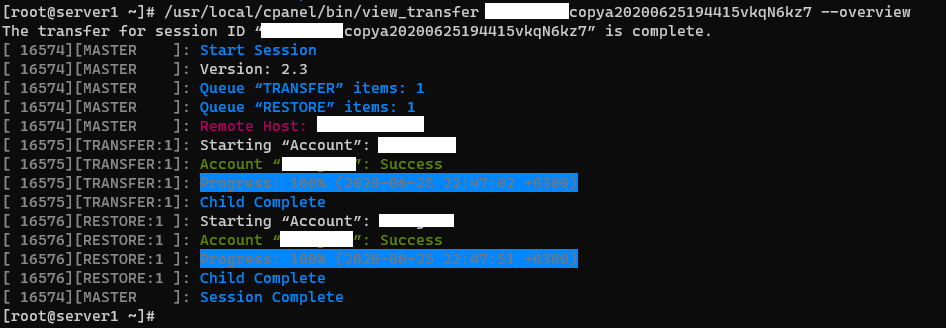
/usr/local/cpanel/bin/view_transfer transfer_id_you_saved_before --overview
mkdir -p /root/rpmdb_bak && cp -avr /var/lib/rpm/* /root/rpmdb_bak && rm -vf /var/lib/rpm/__db* && rpm --rebuilddb -vv && /scripts/check_cpanel_rpms --fix && /scripts/upcp --force && whmapi1 set_local_mysql_root_password password="$(openssl rand -base64 14)”Below you can find the decryption of the command:
| Part of the command | Descryption |
|---|---|
| mkdir -p /root/rpmdb_bak && cp -avr /var/lib/rpm/* /root/rpmdb_bak && rm -vf /var/lib/rpm/__db* && rpm --rebuilddb -vv | There is a minor chance that the RPM database on the server will be corrupt. In this case, several cPanel scripts (and yum) will not work. This one-liner backs up the current database and rebuilds it from scratch. |
| /scripts/check_cpanel_rpms --fix | This script ensures integrity and presence of packages required by cPanel |
| /scripts/upcp --force | Immediately update cPanel. Update ensures that various assets and packages required for normal operations of cPanel are present and up-to-date. |
| whmapi1 set_local_mysql_root_password password="$(openssl rand -base64 14)” | Ensure that local MySQL root password is set (generally it should be out of the box, but there are no downsides of making sure that it is true) |
| Package name | Installation commands to execute via shell access |
|---|---|
| Engintron | cd / && rm -f engintron.sh && wget --no-check-certificate https://raw.githubusercontent.com/engintron/engintron/master/engintron.sh && bash engintron.sh install |
| Node.js NOTE: this applies to CentOS/AlmaLinux + cPanel. If you are using CloudLinux, start by reading this | yum -y install epel yum -y install ea-ruby24-mod_passenger ea-apache24-mod_env ea-nodejs10 ea-ruby24-ruby-devel Detailed steps as well as example configs are available here. |
| ConfigServer Firewall (csf) NOTE: we install CSF on new servers with cPanel by default, installation steps are provided mostly for your reference. | cd /usr/src; rm -fv csf.tgz; wget
https://download.configserver.com/csf.tgz; tar -xzf csf.tgz; cd csf; sh install.sh # Running those is not obligatory, but otherwise csf will spam you with false-positive notifications sed -i 's/^TESTING = .*$/TESTING = "0"/' /etc/csf/csf.conf sed -i 's/^IPV6 = .*$/IPV6 = "0"/' /etc/csf/csf.conf sed -i 's/^LF_EMAIL_ALERT = .*$/LF_EMAIL_ALERT = "0"/' /etc/csf/csf.conf sed -i 's/^LF_SU_EMAIL_ALERT = .*$/LF_SU_EMAIL_ALERT = "0"/' /etc/csf/csf.conf sed -i 's/^LF_WEBMIN_EMAIL_ALERT = .*$/LF_WEBMIN_EMAIL_ALERT = "0"/' /etc/csf/csf.conf sed -i 's/^LF_CONSOLE_EMAIL_ALERT = .*$/LF_CONSOLE_EMAIL_ALERT = "0"/' /etc/csf/csf.conf sed -i 's/^PT_USERMEM = .*$/PT_USERMEM = "0"/' /etc/csf/csf.conf sed -i 's/^PT_USERRSS = .*$/PT_USERRSS = "0"/' /etc/csf/csf.conf sed -i 's/^PT_USERTIME = .*$/PT_USERTIME = "0"/' /etc/csf/csf.conf sed -i 's/^PT_USERKILL_ALERT = .*$/PT_USERKILL_ALERT = "0"/' /etc/csf/csf.conf sed -i 's/^LF_PERMBLOCK_ALERT = .*$/LF_PERMBLOCK_ALERT = "0"/' /etc/csf/csf.conf sed -i 's/^LF_NETBLOCK_ALERT = .*$/LF_NETBLOCK_ALERT = "0"/' /etc/csf/csf.conf sed -i 's/^LT_EMAIL_ALERT = .*$/LT_EMAIL_ALERT = "0"/' /etc/csf/csf.conf sed -i 's/^RT_RELAY_ALERT = .*$/RT_RELAY_ALERT = "0"/' /etc/csf/csf.conf sed -i 's/^RT_AUTHRELAY_ALERT = .*$/RT_AUTHRELAY_ALERT = "0"/' /etc/csf/csf.conf sed -i 's/^RT_POPRELAY_ALERT = .*$/RT_POPRELAY_ALERT = "0"/' /etc/csf/csf.conf sed -i 's/^RT_LOCALHOSTRELAY_ALERT = .*$/RT_LOCALHOSTRELAY_ALERT = "0"/' /etc/csf/csf.conf sed -i 's/^CT_EMAIL_ALERT = .*$/CT_EMAIL_ALERT = "0"/' /etc/csf/csf.conf |
| Softaculous | whmapi1 set_tweaksetting key=phploader value=ioncube & /usr/local/cpanel/whostmgr/bin/whostmgr2 --updatetweaksettings; wget -N https://files.softaculous.com/install.sh; chmod 755 install.sh; ./install.sh |
Ensure connectivity between servers
| Security feature | How to make transfer work when the feature is enabled |
|---|---|
| SSH password auth is disabled | Use
SSH key for transfer instead. |
| Root auth is disabled | Use a user with necessary sudo rights in the transfer tool. The steps on how it should be set up can be found in
this article. |
| SSH logins are only allowed from specific IPs | Add destination server to /etc/hosts.allow on the source server (or use
Host Access Control WHM menu) |
| Non-standard SSH port | Make sure that outgoing connections via that given port are
allowed on the destination server. If you are using CSF, they can be
changed in WHM >> ConfigServer Security & Firewall >>
Firewall Configuration For more details, check this article. Alternatively, edit /etc/csf/csf.conf and restart csf (csf -r). If you are using iptables, add the following chain: iptables -A OUTPUT -p tcp --dport your_ssh_port -j ACCEPT If you are using a different firewall, refer to it’s man page. The easier way is to whitelist IP of source server on destination server and vice versa. Example: [source] # ifconfig | grep inet | head -1 inet 172.16.0.1 netmask 255.255.255.0 broadcast 172.16.0.255 [destination] # ifconfig | grep inet | head -1 inet 172.16.0.2 netmask 255.255.255.0 broadcast 172.16.0.255 [source] # csf -a 172.16.0.2 [destination] # csf -a 172.16.0.1 or [source] # iptables -A INPUT -s 172.16.0.2 -j ACCEPT |
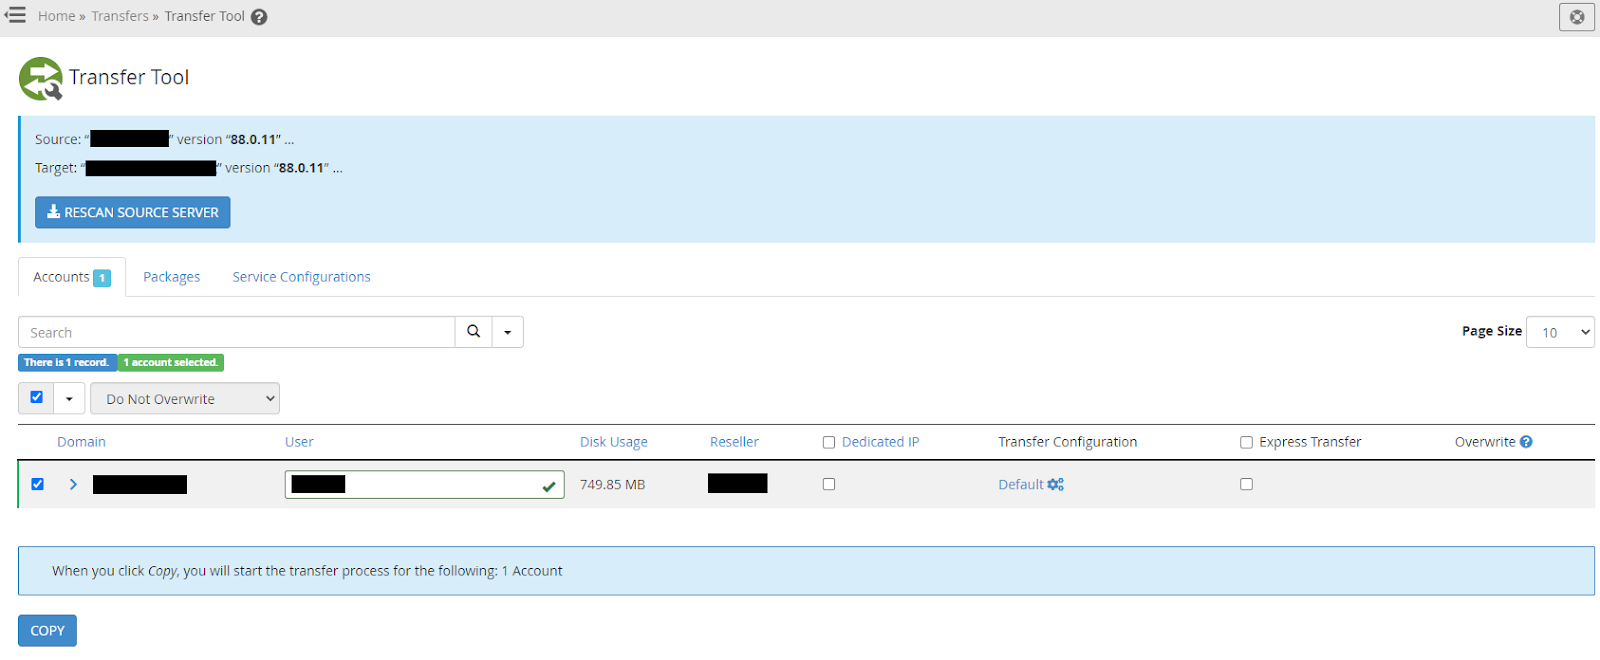

/usr/local/cpanel/bin/view_transfer transfer_id_you_saved_before --overview
/usr/local/cpanel/bin/view_transfer transfer_id_you_saved_before | less -RNOTE 1: if you lost the transfer session ID for some reason, check contents of the /var/cpanel/transfer_session folder.
| Error | Solution |
|---|---|
| ‘domain.com’ already exists in userdata | Domain already exists on the target server. Due to this, the tool is not able to transfer it’s userdata settings because it would break the Apache (at the very least) configuration. Most likely, you have created an empty account for that domain on the destination server. If the account with the domain in question holds no valuable data, you can remove it along with the transferred account from the destination server and re-transfer. Another option is to ignore the error and move the contents of the site to the account the domain is tied to on the new server. The owner of the domain can be checked with the following command: /scripts/whoowns domain.com |
| Databases are not transferred with ‘max_allowed_packet exceeded’ messages. | Databases use big chunks of space to store data. You can confirm this trying to dump the database on the source server mysqldump your_database > your_database.sql If you face similar errors, try this: mysqldump --max_allowed_packet=512M your_database > your_database.sql (increase the value of max_allowed_packet until the error is gone) Once you know what value works, run this both on source and destination servers: cat >> /etc/my.cnf << EOF max_allowed_packet=512M EOF /scripts/restartsrv_mysql After that, remove the affected account on destination and re-transfer it. Alternatively, you can dump databases and transfer them manually (or deselect ‘Home Directory’ in Transfer Tool) |
| Errors related to source server load in transfer session | Transfer sessions are suspended if the load on the source server is too high. You will need to either wait for a less traffic-heavy period to do the transfer or go for ‘hard’ measures such as shutting down resource-heavy services on the source server (e.g. Apache web-server). |
| Error | Solution |
|---|---|
| cPanel errors without verbose description2. | 1. Try updating cPanel, it works in 95% of cases /scripts/upcp --force 2. If that does not help, check cPanel error log and act accordingly. less /usr/local/cpanel/logs/error_log |
| The site was working on the old server but broke on the new | Most likely, the new server did not have the same PHP version installed and reverted to the system default. In this case, install the required version and switch to it. Alternatively, you can try switching PHP-FPM for the domain on/off. Both can be done in WHM > MultiPHP Manager If neither of the fixes worked, you will need to examine PHP/Apache error logs for relevant errors. |
| The following entries in PHP error_log (or on the site, depending on what error_reporting is set) [25-Jun-2020 01:10:00 UTC] PHP Warning: Module 'PDO' already loaded in Unknown on line 0 [25-Jun-2020 01:10:00 UTC] PHP Warning: Module 'pdo_sqlite' already loaded in Unknown on line 0 .... | find /opt/cpanel/ea-php*/root/etc/php.d/zzzzzzz-pecl.ini -delete |
| /var/log/messages | General system log. ftp, named, ssh errors. Kernel messages and many more. |
| /usr/local/cpanel/logs/error_log | Error log of cPanel itself (errors that you will see on cPanel interface are most likely logged here with extra info) |
| /var/log/apache2/error_log or /var/log/httpd/error_log | Apache web-server error log |
| /var/cpanel/php-fpm/user/logs/error.log | User’s php-fpm error log |
| /opt/cpanel/ea-phpversion/root/var/log/php-fpm/error.log Ex: /opt/cpanel/ea-php56/root/var/log/php-fpm/error.log /opt/cpanel/ea-php72/root/var/log/php-fpm/error.log | Global php-fpm errors for a given version |
| /home/user/logs | Local user’s php-fpm logs |
| /home/user/site_document_root/error_log | Local php error log (when php-fpm is not used) |
Adjusting DNS and local email/FTP clients
Need help? We're always here for you.