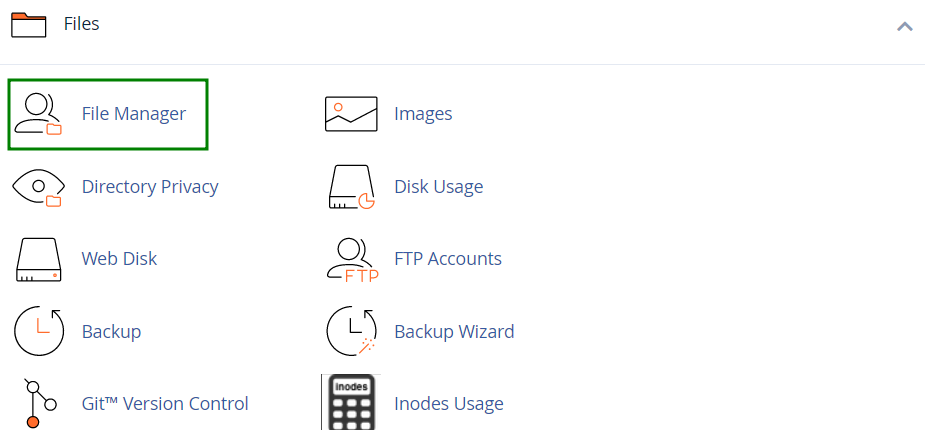
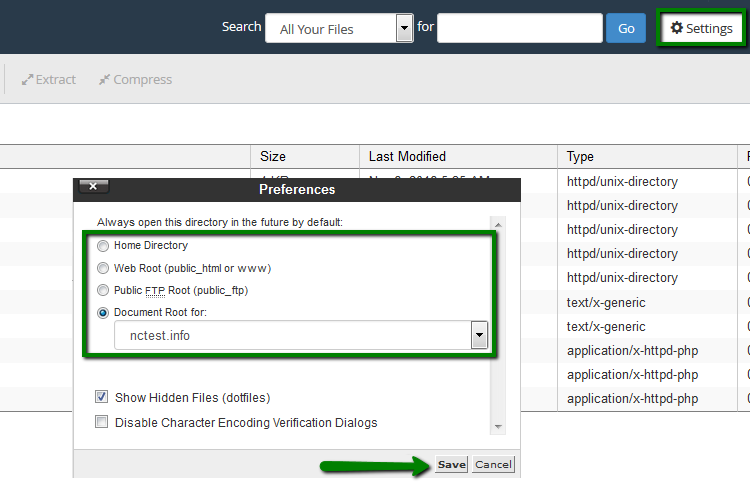
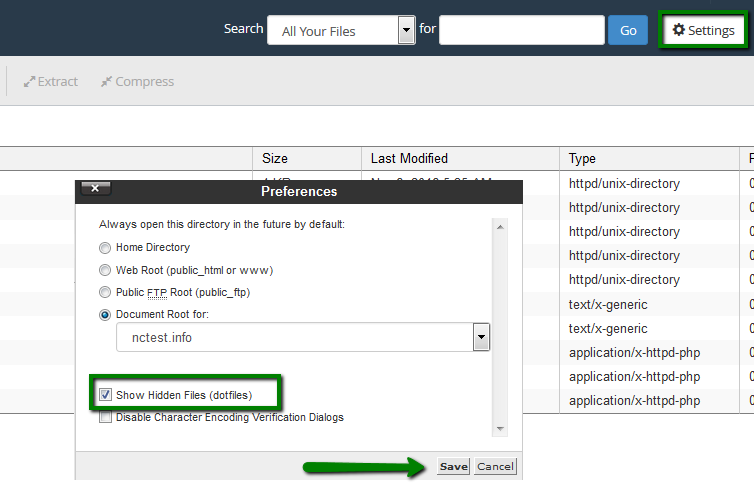
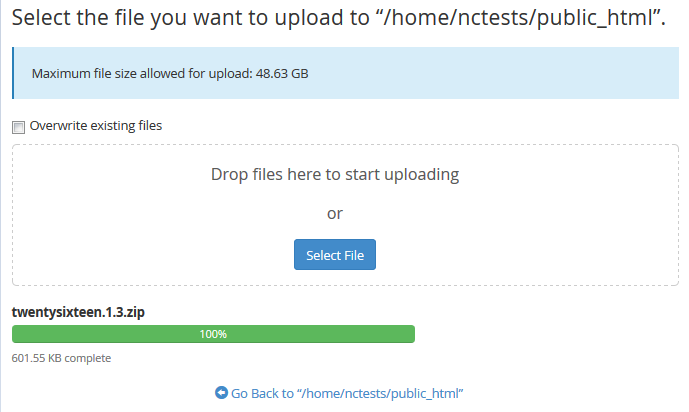
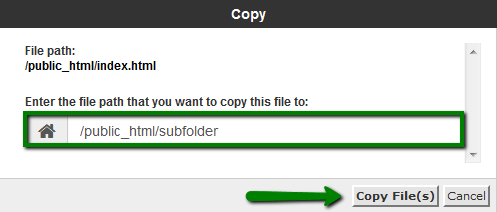
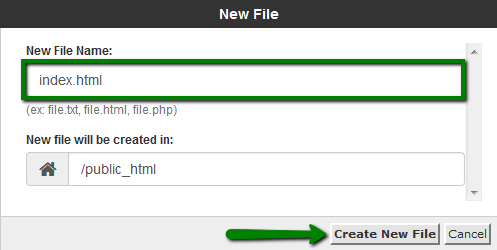
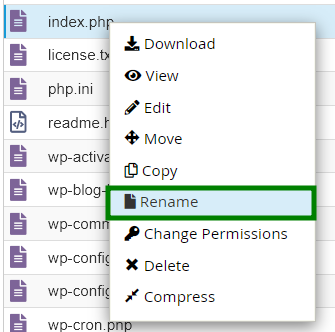
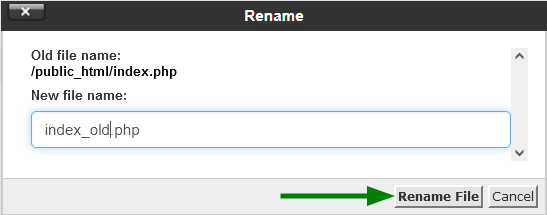
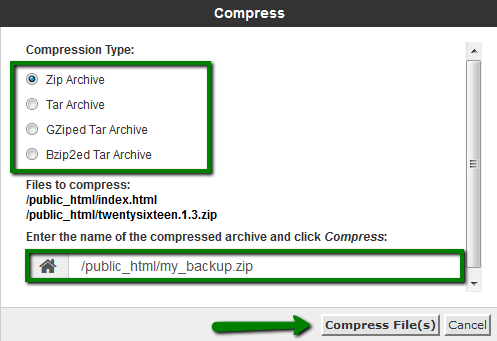
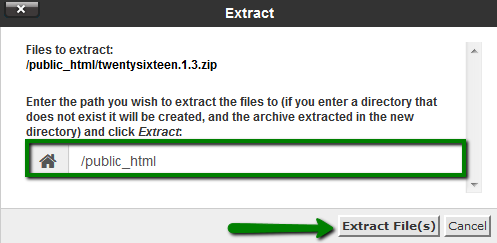
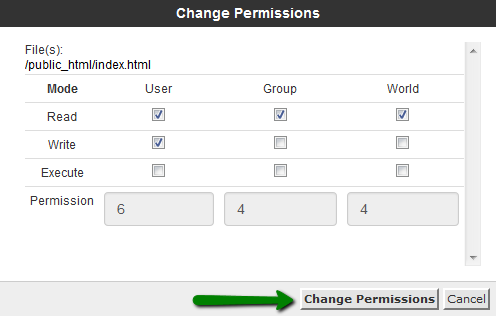
{"/api/v1/ncpl/simplekb/getarticle:\"{\\\"articleId\\\":9700,\\\"categoryId\\\":29}\"":{"body":{"Id":9700,"FriendlyId":"","ArticleTypeId":3,"Title":"How to use File Manager in cPanel","ArticleName":"How to use File Manager in cPanel","ArticleSummary":null,"PreponedSummary":false,"Approved":true,"Body":"DQoJCTxkaXY+SW4gdGhpcyBndWlkZWxpbmUsIHlvdSB3aWxsIGZpbmQgZGV0YWlsZWQgaW5zdHJ1Y3Rpb25zIG9uIGhvdyB0byBtYW5hZ2UgKGFkZCwgZGVsZXRlLCB2aWV3LCBtb2RpZnkpIGZpbGVzIGZyb20geW91ciBjUGFuZWwgYWNjb3VudCB1c2luZyB0aGUgPGI+RmlsZSBNYW5hZ2VyPC9iPiBtZW51LjwvZGl2Pg0KCQk8YnIgLz4NCgkJPGRpdj4NCgkJCQk8cD4NCgkJCQkJCTxhIGhyZWY9IiNhY2Nlc3MiPkFjY2Vzc2luZyBGaWxlIE1hbmFnZXI8L2E+DQoJCQkJPC9wPg0KCQkJCTxwPg0KCQkJCQkJPGEgaHJlZj0iI2ludGVyZmFjZSI+RmlsZSBNYW5hZ2VyIGludGVyZmFjZSBhbmQgb3B0aW9uczwvYT4NCgkJCQk8L3A+DQoJCQkJPHVsPg0KCQkJCQkJPGxpPg0KCQkJCQkJCQk8YSBocmVmPSIjdXBsb2FkIj5VcGxvYWQ8L2E+DQoJCQkJCQk8L2xpPg0KCQkJCQkJPGxpPg0KCQkJCQkJCQk8YSBocmVmPSIjY29weV9tb3ZlIj5Db3B5L01vdmU8L2E+DQoJCQkJCQk8L2xpPg0KCQkJCQkJPGxpPg0KCQkJCQkJCQk8YSBocmVmPSIjY3JlYXRlIj5DcmVhdGUgYSBuZXcgZmlsZS9mb2xkZXI8L2E+DQoJCQkJCQk8L2xpPg0KCQkJCQkJPGxpPg0KCQkJCQkJCQk8YSBocmVmPSIjZGVsZXRlIj5EZWxldGU8L2E+DQoJCQkJCQk8L2xpPg0KCQkJCQkJPGxpPg0KCQkJCQkJCQk8YSBocmVmPSIjcmVzdG9yZSI+UmVzdG9yZTwvYT4NCgkJCQkJCTwvbGk+DQoJCQkJCQk8bGk+DQoJCQkJCQkJCTxhIGhyZWY9IiNyZW5hbWUiPlJlbmFtZTwvYT4NCgkJCQkJCTwvbGk+DQoJCQkJCQk8bGk+DQoJCQkJCQkJCTxhIGhyZWY9IiNlZGl0Ij5FZGl0PC9hPg0KCQkJCQkJPC9saT4NCgkJCQkJCTxsaT4NCgkJCQkJCQkJPGEgaHJlZj0iI2NvbXByZXNzIj5Db21wcmVzczwvYT4NCgkJCQkJCTwvbGk+DQoJCQkJCQk8bGk+DQoJCQkJCQkJCTxhIGhyZWY9IiNleHRyYWN0Ij5FeHRyYWN0PC9hPg0KCQkJCQkJPC9saT4NCgkJCQkJCTxsaT4NCgkJCQkJCQkJPGEgaHJlZj0iI3Blcm1pc3Npb25zIj5DaGFuZ2UgUGVybWlzc2lvbnM8L2E+DQoJCQkJCQk8L2xpPg0KCQkJCTwvdWw+DQoJCQkJPGJyIC8+DQoJCQkJPGEgbmFtZT0iYWNjZXNzIj4NCgkJCQkJCTxiPkFjY2Vzc2luZyBGaWxlIE1hbmFnZXI8L2I+DQoJCQkJPC9hPg0KCQkJCTxiciAvPg0KCQkJCTxiciAvPlRvIGxvY2F0ZSB0aGUgbWVudSwgPGEgaHJlZj0iaHR0cHM6Ly93d3cubmFtZWNoZWFwLmNvbS9zdXBwb3J0L2tub3dsZWRnZWJhc2UvYXJ0aWNsZS5hc3B4LzEwMTMyLzI3L3doZXJlLWNhbi1pLWxvZy1pbnRvLW15LWNwYW5lbCI+bG9nIGluIHRvIHlvdXIgY1BhbmVsIGFjY291bnQ8L2E+IGFuZCBuYXZpZ2F0ZSB0byA8Yj5GaWxlczwvYj4gc2VjdGlvbiAmZ3Q7Jmd0OyBjbGljayBvbiA8Yj5GaWxlIE1hbmFnZXI8L2I+IGZyb20gdGhlcmU6IA0KPGJyIC8+PGJyIC8+PGltZyBjbGFzcz0ia2ItaW1hZ2UiIHNyYz0iaHR0cHM6Ly9OYW1lY2hlYXAuc2ltcGxla2IuY29tL1NpdGVDb250ZW50cy8yLTdDMjJENTIzNkE0NTQzRUI4MjdGM0JEODkzNkUxNTNFL21lZGlhL2ZpbGUxLjEucG5nIiAvPjxiciAvPjxiciAvPg0KCQlGb3IgcXVpY2sgYWNjZXNzIHRvIEZpbGUgTWFuYWdlciwgdXNlIG91ciA8YSBocmVmPSJodHRwczovL3d3dy5uYW1lY2hlYXAuY29tL3N1cHBvcnQva25vd2xlZGdlYmFzZS9hcnRpY2xlLmFzcHgvMTAxMzIvMjcvd2hlcmUtY2FuLWktbG9nLWludG8tbXktY3BhbmVsLWhvc3RpbmctYWNjb3VudCNjUGFuZWwlMjBTaG9ydGN1dHMiIGxpbmt0ZXh0PSJjUGFuZWwgc2hvcnRjdXRzIiBsaW5rdHlwZT0iQ3VzdG9tIiB0YXJnZXQ9Il9wYXJlbnQiPmNQYW5lbCBTaG9ydGN1dHM8L2E+LjxiciAvPjxiciAvPg0KCQlZb3Ugd2lsbCBiZSB0YWtlbiB0byB0aGUgPGI+L2hvbWUvdXNlcjwvYj4gZGlyZWN0b3J5IGJ5IGRlZmF1bHQuIFRoZSBkZWZhdWx0IGRpcmVjdG9yeSBjYW4gYmUgY2hhbmdlZCB3aXRoIHRoZSBoZWxwIG9mIHRoZSA8Yj5TZXR0aW5nczwvYj4gb3B0aW9uOiA8YnIgLz48YnIgLz48aW1nIGNsYXNzPSJrYi1pbWFnZSIgc3JjPSJodHRwczovL05hbWVjaGVhcC5zaW1wbGVrYi5jb20vU2l0ZUNvbnRlbnRzLzItN0MyMkQ1MjM2QTQ1NDNFQjgyN0YzQkQ4OTM2RTE1M0UvbWVkaWEvRk1fMS5wbmciIC8+PGJyIC8+PGJyIC8+PGltZyBjbGFzcz0ia2ItaW1hZ2UiIHNyYz0iaHR0cHM6Ly9OYW1lY2hlYXAuc2ltcGxla2IuY29tL1NpdGVDb250ZW50cy8yLTdDMjJENTIzNkE0NTQzRUI4MjdGM0JEODkzNkUxNTNFL21lZGlhL3BsX2ZpbGVfbWFuYWdlcl8zMC5wbmciIC8+PGJyIC8+PGJyIC8+RnJvbSB0aGUgc2FtZSA8Yj5TZXR0aW5nczwvYj4gd2luZG93LCB5b3UgY2FuIGFsc28gZW5hYmxlIHRoZSA8Yj5TaG93IEhpZGRlbiBGaWxlcyAoZG90ZmlsZXMpPC9iPiBvcHRpb24uIEluIHRoaXMgd2F5LCBzeXN0ZW0gZmlsZXMsIGxpa2UgLmh0YWNjZXNzLCB3aWxsIGJlIGRpc3BsYXllZCBpbiBGaWxlIE1hbmFnZXIgYXMgd2VsbDoNCjxiciAvPjxiciAvPjxpbWcgY2xhc3M9ImtiLWltYWdlIiBzcmM9Imh0dHBzOi8vTmFtZWNoZWFwLnNpbXBsZWtiLmNvbS9TaXRlQ29udGVudHMvMi03QzIyRDUyMzZBNDU0M0VCODI3RjNCRDg5MzZFMTUzRS9tZWRpYS9wbF9maWxlX21hbmFnZXJfMjIucG5nIiAvPjxiciAvPjxiciAvPlRoZSA8Yj5wdWJsaWNfaHRtbDwvYj4gZm9sZGVyIGlzIHRoZSB3ZWIgcm9vdCBmb3IgeW91ciBwcmltYXJ5IGRvbWFpbiBuYW1lLiBUaGlzIG1lYW5zIHRoYXQgcHVibGljX2h0bWwgaXMgdGhlIGZvbGRlciB3aGVyZSB5b3UgcHV0IGFsbCB3ZWJzaXRlIGZpbGVzIHdoaWNoIHlvdSB3YW50IHRvIGFwcGVhciB3aGVuIHNvbWVvbmUgdHlwZXMgeW91ciBtYWluIGRvbWFpbiAodGhlIG9uZSB5b3UgcHJvdmlkZWQgd2hlbiB5b3Ugc2lnbmVkIHVwIGZvciBob3N0aW5nKS4NCjxiciAvPjxiciAvPklmIHlvdSB3aXNoIHRvIHVwbG9hZCBmaWxlcyBmb3IgeW91ciBhZGRvbiBkb21haW4sIHlvdSB3aWxsIG5lZWQgdG8gbW92ZSB0byB0aGUgPGI+aG9tZS91c2VyL3lvdXJhZGRvbmRvbWFpbi5jb208L2I+IGRpcmVjdG9yeS4gIA0KVGhpcyBkaXJlY3RvcnkgaXMgY3JlYXRlZCBhdXRvbWF0aWNhbGx5IG9uIDxhIGhyZWY9Imh0dHBzOi8vd3d3Lm5hbWVjaGVhcC5jb20vc3VwcG9ydC9rbm93bGVkZ2ViYXNlL2FydGljbGUuYXNweC84OTcvMjkvaG93LXRvLWNyZWF0ZS1hZGRvbi1kb21haW4iIGxpbmt0ZXh0PSJhZGRpbmcgYW4gYWRkb24iIGxpbmt0eXBlPSJDdXN0b20iIHRhcmdldD0iX3BhcmVudCI+YWRkaW5nIGFuIGFkZG9uPC9hPiBkb21haW4gdG8gdGhlIGNQYW5lbCBhY2NvdW50LiA8YnIgLz48YnIgLz48Yj5OQjo8L2I+IFRvIGNoZWNrIGEgZG9jdW1lbnQgcm9vdCAoZGlyZWN0b3J5KSBmb3IgYSBkb21haW4gbmFtZSwgbmF2aWdhdGUgdG8gdGhlIDxiPkRvbWFpbnM8L2I+IG1lbnUgb2YgeW91ciBjUGFuZWwgJmd0OyZndDsgbG9vayBmb3IgdGhlIG5lZWRlZCBkb21haW4gaW4gdGhlIGxpc3QgJmd0OyZndDsgaXRzIGRvY3VtZW50IHJvb3QgKHRoZSBmb2xkZXIgd2hlcmUgaXRzIGZpbGVzIGFyZSB1cGxvYWRlZCkgd2lsbCBiZSBkaXNwbGF5ZWQgdW5kZXIgdGhlIDxiPkRvY3VtZW50IFJvb3Q8L2I+IGNvbHVtbi4gQ2xpY2sgb24gdGhlIGRvY3VtZW50IHJvb3QgdG8gb3BlbiBpdDo8YnIgLz48YnIgLz48aW1nIGNsYXNzPSJrYi1pbWFnZSIgc3JjPSJodHRwczovL05hbWVjaGVhcC5zaW1wbGVrYi5jb20vU2l0ZUNvbnRlbnRzLzItN0MyMkQ1MjM2QTQ1NDNFQjgyN0YzQkQ4OTM2RTE1M0UvbWVkaWEvRk1fMi5wbmciIC8+PGJyIC8+PGJyIC8+PGJyIC8+PGEgbmFtZT0iaW50ZXJmYWNlIj48Yj5GaWxlIE1hbmFnZXIgaW50ZXJmYWNlIGFuZCBvcHRpb25zPC9iPjwvYT48YnIgLz48YnIgLz5UaGUgaW50ZXJmYWNlICBvZiANCkZpbGUgTWFuYWdlciBpcyBkaXZpZGVkIGludG8gNCBzZWN0aW9uczo8b2w+PGxpPlRoZSA8Yj50b29sYmFyPC9iPiB3aGVyZSB3aGVyZSB5b3UgY2FuIGZpbmQgYWxsIHRoZSBiYXNpYyBmdW5jdGlvbnMgZm9yIG1hbmFnaW5nIGZpbGVzIGxpa2UgY3JlYXRlIGEgbmV3IGZvbGRlciwgZGVsZXRlIGEgZmlsZSwgdXBsb2FkL2Rvd25sb2FkIGFuZCBtdWNoIG1vcmUuPC9saT48bGk+VGhlIDxiPmZpbGUgbGlzdGluZzwvYj4gc2VjdGlvbiB0aGF0IGRpc3BsYXlzIHRoZSBjb250ZW50IG9mIHRoZSBzZWxlY3RlZCBkaXJlY3RvcnkuIDxiciAvPjxiPk5COjwvYj4gSWYgbm8gZmlsZXMgb3IgZm9sZGVycyBhcmUgY3JlYXRlZCwgdGhlIGZvbGxvd2luZyBtZXNzYWdlIHdpbGwgYmUgZGlzcGxheWVkIGluIHRoZSBmaWxlIHdpbmRvdzogIjxpPlRoaXMgZGlyZWN0b3J5IGlzIGFuIGVtcHR5IG1lc3NhZ2UuPC9pPiI8L2xpPjxsaT5UaGUgPGI+bmF2aWdhdGlvbiB0b29sYmFyPC9iPiB0aGF0IGFsbG93cyBuYXZpZ2F0aW5nIGJldHdlZW4gZm9sZGVycyBpbiB0aGUgZmlsZSB3aW5kb3cuPC9saT48bGk+PGI+Q3VycmVudCBsb2NhdGlvbjwvYj4gd2luZG93IHRoYXQgc2hvd3MgdGhlIGRpcmVjdG9yeSB5b3UgYXJlIGN1cnJlbnRseSBsb2NhdGVkIGluLjwvbGk+PC9vbD48YnIgLz48aW1nIGNsYXNzPSJrYi1pbWFnZSIgc3JjPSJodHRwczovL05hbWVjaGVhcC5zaW1wbGVrYi5jb20vU2l0ZUNvbnRlbnRzLzItN0MyMkQ1MjM2QTQ1NDNFQjgyN0YzQkQ4OTM2RTE1M0UvbWVkaWEvRk1fMy5wbmciIC8+PGJyIC8+PGJyIC8+PHVsPjxsaT48YSBuYW1lPSJ1cGxvYWQiPjxiPlVwbG9hZDwvYj48L2E+PC9saT48L3VsPlRvIHVwbG9hZCBhIGZpbGUvZm9sZGVyIHVzaW5nIHRoZSA8Yj5GaWxlIE1hbmFnZXI8L2I+IG1lbnUsIGRvIHRoZSBmb2xsb3dpbmc6PHVsPjxsaT5HbyB0bzxiPiBGaWxlIE1hbmFnZXI8L2I+OzwvbGk+PGxpPk5hdmlnYXRlIHRvIHRoZSBmb2xkZXIgeW91IHdpc2ggdG8gdXBsb2FkIHRoZSBmaWxlKHMpIHRvOzwvbGk+PGxpPkNsaWNrIG9uIHRoZSA8Yj5VcGxvYWQgPC9iPmljb247PC9saT48bGk+Q2xpY2s8Yj4gU2VsZWN0IEZpbGU8L2I+IGFuZCBsb2NhdGUgdGhlIGZpbGUgb24geW91ciBsb2NhbCBtYWNoaW5lOzwvbGk+PGxpPlNlbGVjdCB0aGUgZmlsZSBhbmQgY2xpY2sgb24gPGI+T3Blbi9DaG9vc2U8L2I+IG9yIHNpbXBseSBkcmFnIGFuZCBkcm9wIHRoZSBuZWVkZWQgZmlsZSBmcm9tIHlvdXIgbG9jYWwgbWFjaGluZSB0byB0aGUgdXBsb2FkIHdpbmRvdzo8L2xpPjwvdWw+PGJyIC8+PGltZyBjbGFzcz0ia2ItaW1hZ2UiIHNyYz0iaHR0cHM6Ly9OYW1lY2hlYXAuc2ltcGxla2IuY29tL1NpdGVDb250ZW50cy8yLTdDMjJENTIzNkE0NTQzRUI4MjdGM0JEODkzNkUxNTNFL21lZGlhL0ZNXzUucG5nIiAvPjxiciAvPjxiciAvPjxpbWcgY2xhc3M9ImtiLWltYWdlIiBzcmM9Imh0dHBzOi8vTmFtZWNoZWFwLnNpbXBsZWtiLmNvbS9TaXRlQ29udGVudHMvMi03QzIyRDUyMzZBNDU0M0VCODI3RjNCRDg5MzZFMTUzRS9tZWRpYS9wbF9maWxlX21hbmFnZXJfNDAucG5nIiAvPjxiciAvPjxiciAvPjxiciAvPjx1bD48bGk+PGEgbmFtZT0iY29weV9tb3ZlIiAiPSIiPjxiPkNvcHkvTW92ZTwvYj48L2E+PC9saT48L3VsPjxiciAvPjxpZnJhbWUgc3JjPSIvL3d3dy55b3V0dWJlLW5vY29va2llLmNvbS9lbWJlZC9GVVl4SVVyOGJDYz9mZWF0dXJlPXBsYXllcl9kZXRhaWxwYWdlIiBhbGxvd2Z1bGxzY3JlZW49IiIgd2lkdGg9IjY0MCIgaGVpZ2h0PSIzNjAiIGZyYW1lYm9yZGVyPSIwIj48L2lmcmFtZT48YnIgLz48YnIgLz4NClRvIENvcHkvTW92ZSBhIGZpbGUsIGRvIHRoZSBmb2xsb3dpbmc6PHVsPjxsaT5HbyB0byA8Yj5GaWxlIE1hbmFnZXI8L2I+OzwvbGk+PGxpPlNlbGVjdCB0aGUgZmlsZShzKSB5b3Ugd2lzaCB0byBjb3B5L21vdmUgKHRvIHNlbGVjdCBtdWx0aXBsZSBmaWxlcywgaG9sZCB0aGUgQ3RybCtDb21tYW5kIGJ1dHRvbik7PC9saT48bGk+QWZ0ZXIgdGhlIG5lZWRlZCBpdGVtcyBhcmUgc2VsZWN0ZWQsIGhpdCB0aGUgPGI+Q29weSA8L2I+b3IgPGI+TW92ZSA8L2I+IGljb24gb3IgcmlnaHQtY2xpY2sgb24gdGhlIHNlbGVjdGVkIGZpbGUocykgYW5kIGNob29zZSB0aGUgPGI+Q29weSA8L2I+b3IgPGI+TW92ZTwvYj4gb3B0aW9uIGZyb20gdGhlIGRyb3AtZG93biBtZW51OzwvbGk+PGxpPk9uY2UgZG9uZSwgdGhlIGNvbmZpcm1hdGlvbiB3aW5kb3cgd2l0aCB0aGUgZmluYWwgZGVzdGluYXRpb24gd2lsbCBwb3AtdXA6PC9saT48L3VsPjxpbWcgY2xhc3M9ImtiLWltYWdlIiBzcmM9Imh0dHBzOi8vTmFtZWNoZWFwLnNpbXBsZWtiLmNvbS9TaXRlQ29udGVudHMvMi03QzIyRDUyMzZBNDU0M0VCODI3RjNCRDg5MzZFMTUzRS9tZWRpYS9GTV82LnBuZyIgLz48YnIgLz48YnIgLz48aW1nIGNsYXNzPSJrYi1pbWFnZSIgc3JjPSJodHRwczovL05hbWVjaGVhcC5zaW1wbGVrYi5jb20vU2l0ZUNvbnRlbnRzLzItN0MyMkQ1MjM2QTQ1NDNFQjgyN0YzQkQ4OTM2RTE1M0UvbWVkaWEvcGxfZmlsZV9tYW5hZ2VyXzQyLnBuZyIgLz48YnIgLz48YnIgLz48YnIgLz48dWw+PGxpPjxhIG5hbWU9ImNyZWF0ZSI+PGI+Q3JlYXRlIGEgbmV3IGZpbGUvZm9sZGVyPC9iPjwvYT48L2xpPjwvdWw+IFRvIGNyZWF0ZSBhIG5ldyBmaWxlLCBkbyB0aGUgZm9sbG93aW5nOjx1bD48bGk+R28gdG88Yj4gRmlsZSBNYW5hZ2VyPC9iPjs8L2xpPjxsaT5OYXZpZ2F0ZSB0byB0aGUgZm9sZGVyIHdoZXJlIHlvdSB3aXNoIHRvIGNyZWF0ZSBhIGZpbGU7PC9saT48bGk+Q2xpY2sgb24gdGhlPGI+ICtGaWxlPC9iPiBpY29uIOKAkyBhIG5ldyBwb3AgdXAgYm94IHdpbGwgYXBwZWFyIHRvIGVudGVyIHRoZSBuYW1lIG9mIHRoZSBmaWxlIHlvdSB3aXNoIHRvIGJlIGNyZWF0ZWQ7PC9saT48bGk+Q2xpY2sgb24gdGhlIDxiPkNyZWF0ZSBOZXcgRmlsZTwvYj46PC9saT48L3VsPjxiciAvPjxpbWcgY2xhc3M9ImtiLWltYWdlIiBzcmM9Imh0dHBzOi8vTmFtZWNoZWFwLnNpbXBsZWtiLmNvbS9TaXRlQ29udGVudHMvMi03QzIyRDUyMzZBNDU0M0VCODI3RjNCRDg5MzZFMTUzRS9tZWRpYS9wbF9maWxlX21hbmFnZXJfMzMucG5nIiAvPjxiciAvPjxiciAvPjxpbWcgY2xhc3M9ImtiLWltYWdlIiBzcmM9Imh0dHBzOi8vTmFtZWNoZWFwLnNpbXBsZWtiLmNvbS9TaXRlQ29udGVudHMvMi03QzIyRDUyMzZBNDU0M0VCODI3RjNCRDg5MzZFMTUzRS9tZWRpYS9wbF9maWxlX21hbmFnZXJfNDMucG5nIiAvPjxiciAvPjxiciAvPjxiciAvPjx1bD48bGk+PGEgbmFtZT0iZGVsZXRlIj48Yj5EZWxldGU8L2I+PC9hPjwvbGk+PC91bD48YnIgLz48aWZyYW1lIHNyYz0iLy93d3cueW91dHViZS1ub2Nvb2tpZS5jb20vZW1iZWQvT1RrdE1KTmJyZHc/ZmVhdHVyZT1wbGF5ZXJfZGV0YWlscGFnZSIgYWxsb3dmdWxsc2NyZWVuPSIiIHdpZHRoPSI2NDAiIGhlaWdodD0iMzYwIiBmcmFtZWJvcmRlcj0iMCI+PC9pZnJhbWU+PGJyIC8+PGJyIC8+IFRvIGRlbGV0ZSBhIGZpbGUsIGRvIHRoZSBmb2xsb3dpbmc6PHVsPjxsaT5HbyA8Yj5GaWxlIE1hbmFnZXI8L2I+OzwvbGk+PGxpPk5hdmlnYXRlIHRvIHRoZSBmb2xkZXIgd2hlcmUgdGhlIGZpbGUocykgeW91IHdpc2ggdG8gZGVsZXRlIGlzIGxvY2F0ZWQ7PC9saT48bGk+U2VsZWN0IHRoZSBmaWxlKHMpIGFuZCBoaXQgdGhlIDxiPkRlbGV0ZSA8L2I+aWNvbiBvciByaWdodC1jbGljayBvbiB0aGUgZmlsZSBhbmQgdXNlIHRoZSA8Yj5EZWxldGUgPC9iPm9wdGlvbiBmcm9tIHRoZSBkcm9wLWRvd24gbWVudTs8L2xpPjxsaT5PbmNlIGRvbmUsIHRoZSBjb25maXJtYXRpb24gd2luZG93IHdpbGwgcG9wLXVwOzwvbGk+PGxpPlRoZSBkZWxldGVkIGZpbGVzIGFyZSBtb3ZlZCB0byB0aGUgc3lzdGVtIDxiPi50cmFzaDwvYj4gZm9sZGVyLiBJZiB5b3Ugd2lzaCB0byByZW1vdmUgdGhlIGZpbGUocykgcGVybWFuZW50bHksIGNoZWNrLW1hcmsgdGhlIDxiPlNraXAgdGhlIHRyYXNoIGFuZCBwZXJtYW5lbnRseSBkZWxldGUgdGhlIGZpbGVzPC9iPiBvcHRpb246PC9saT48L3VsPjxiciAvPjxpbWcgY2xhc3M9ImtiLWltYWdlIiBzcmM9Imh0dHBzOi8vTmFtZWNoZWFwLnNpbXBsZWtiLmNvbS9TaXRlQ29udGVudHMvMi03QzIyRDUyMzZBNDU0M0VCODI3RjNCRDg5MzZFMTUzRS9tZWRpYS9wbF9maWxlX21hbmFnZXJfMzQucG5nIiAvPjxiciAvPjxiciAvPjxpbWcgY2xhc3M9ImtiLWltYWdlIiBzcmM9Imh0dHBzOi8vTmFtZWNoZWFwLnNpbXBsZWtiLmNvbS9TaXRlQ29udGVudHMvMi03QzIyRDUyMzZBNDU0M0VCODI3RjNCRDg5MzZFMTUzRS9tZWRpYS9wbF9maWxlX21hbmFnZXJfNDQucG5nIiAvPjxiciAvPjxiciAvPjxiPk5PVEU8L2I+OiBUaGUgZmlsZXMgd2lsbCBiZSBzdG9yZWQgaW4gdGhlIHRyYXNoIGZvbGRlciBmb3IgOTAgZGF5cy4gQWZ0ZXIgdGhhdCwgdGhleSB3aWxsIGJlIHJlbW92ZWQgZnJvbSB0aGUgc2VydmVyIGF1dG9tYXRpY2FsbHkuPGJyIC8+PGJyIC8+PGJyIC8+PHVsPjxsaT48YSBuYW1lPSJyZXN0b3JlIj48Yj5SZXN0b3JlPC9iPjwvYT48L2xpPjwvdWw+PGJyIC8+PGlmcmFtZSBzcmM9Ii8vd3d3LnlvdXR1YmUtbm9jb29raWUuY29tL2VtYmVkL2NkMU1hQXRHSDk4P2ZlYXR1cmU9cGxheWVyX2RldGFpbHBhZ2UiIGFsbG93ZnVsbHNjcmVlbj0iIiB3aWR0aD0iNjQwIiBoZWlnaHQ9IjM2MCIgZnJhbWVib3JkZXI9IjAiPjwvaWZyYW1lPjxiciAvPjxiciAvPlRvIHJlc3RvcmUgYSBmaWxlLCBkbyB0aGUgZm9sbG93aW5nOg0KPHVsPjxsaT5HbyB0byA8Yj5GaWxlIE1hbmFnZXI8L2I+OzwvbGk+PGxpPk5hdmlnYXRlIHRvIHRoZSA8Yj4udHJhc2g8L2I+IGZvbGRlciBpbiB0aGU8Yj4gL2hvbWUvdXNlci88L2I+IGRpcmVjdG9yeTs8L2xpPjxsaT5TZWxlY3QgdGhlIG5lZWRlZCBmaWxlKHMpIGFuZCBoaXQgdGhlIDxiPlJlc3RvcmUgPC9iPmljb24gb3IgcmlnaHQtY2xpY2sgb24gdGhlIGZpbGUgYW5kIHVzZSB0aGUgPGI+UmVzdG9yZSA8L2I+b3B0aW9uIGZyb20gdGhlIGRyb3AtZG93biBtZW51OzwvbGk+PGxpPk9uY2UgZG9uZSwgdGhlIGNvbmZpcm1hdGlvbiB3aW5kb3cgd2lsbCBwb3AtdXA6PC9saT48L3VsPjxpbWcgY2xhc3M9ImtiLWltYWdlIiBzcmM9Imh0dHBzOi8vTmFtZWNoZWFwLnNpbXBsZWtiLmNvbS9TaXRlQ29udGVudHMvMi03QzIyRDUyMzZBNDU0M0VCODI3RjNCRDg5MzZFMTUzRS9tZWRpYS9wbF9maWxlX21hbmFnZXJfNDEucG5nIiAvPjxiciAvPjxiciAvPjxpbWcgY2xhc3M9ImtiLWltYWdlIiBzcmM9Imh0dHBzOi8vTmFtZWNoZWFwLnNpbXBsZWtiLmNvbS9TaXRlQ29udGVudHMvMi03QzIyRDUyMzZBNDU0M0VCODI3RjNCRDg5MzZFMTUzRS9tZWRpYS9wbF9maWxlX21hbmFnZXJfNDUucG5nIiAvPjxiciAvPjxiciAvPjxiciAvPjx1bD48bGk+PGEgbmFtZT0icmVuYW1lIj48Yj5SZW5hbWU8L2I+PC9hPjwvbGk+PC91bD4gVG8gcmVuYW1lIGEgZmlsZSwgZG8gdGhlIGZvbGxvd2luZzo8dWw+PGxpPkdvIDxiPkZpbGUgTWFuYWdlcjwvYj47PC9saT48bGk+TmF2aWdhdGUgdG8gdGhlIGZvbGRlciB3aGVyZSB0aGUgZmlsZShzKSB5b3Ugd2lzaCB0byByZW5hbWUgaXMgbG9jYXRlZDs8L2xpPjxsaT5TZWxlY3QgdGhlIGZpbGUocykgYW5kIGhpdCB0aGUgPGI+UmVuYW1lIDwvYj5pY29uIG9yIHJpZ2h0LWNsaWNrIG9uIHRoZSBmaWxlIGFuZCB1c2UgdGhlIDxiPlJlbmFtZSA8L2I+b3B0aW9uIGZyb20gdGhlIGRyb3AtZG93biBtZW51OjwvbGk+PGJyIC8+PGltZyBjbGFzcz0ia2ItaW1hZ2UiIHNyYz0iaHR0cHM6Ly9OYW1lY2hlYXAuc2ltcGxla2IuY29tL1NpdGVDb250ZW50cy8yLTdDMjJENTIzNkE0NTQzRUI4MjdGM0JEODkzNkUxNTNFL21lZGlhL3JlbmFtZV9maWxlMDEucG5nIiAvPjxiciAvPjxiciAvPjxpbWcgY2xhc3M9ImtiLWltYWdlIiBzcmM9Imh0dHBzOi8vTmFtZWNoZWFwLnNpbXBsZWtiLmNvbS9TaXRlQ29udGVudHMvMi03QzIyRDUyMzZBNDU0M0VCODI3RjNCRDg5MzZFMTUzRS9tZWRpYS9yZW5hbWVfZmlsZTAzLnBuZyIgLz48YnIgLz48YnIgLz48bGk+T25jZSBkb25lLCB0aGUgY29uZmlybWF0aW9uIHdpbmRvdyB3aWxsIHBvcC11cDo8L2xpPjwvdWw+PGltZyBjbGFzcz0ia2ItaW1hZ2UiIHNyYz0iaHR0cHM6Ly9OYW1lY2hlYXAuc2ltcGxla2IuY29tL1NpdGVDb250ZW50cy8yLTdDMjJENTIzNkE0NTQzRUI4MjdGM0JEODkzNkUxNTNFL21lZGlhL3JlbmFtZV9maWxlMDIucG5nIiAvPjxiciAvPjxiciAvPjxiciAvPjx1bD48bGk+PGEgbmFtZT0iZWRpdCI+PGI+RWRpdDwvYj48L2E+PC9saT48L3VsPjxiciAvPjxpZnJhbWUgc3JjPSIvL3d3dy55b3V0dWJlLW5vY29va2llLmNvbS9lbWJlZC9FdjZSajZNd25xUT9mZWF0dXJlPXBsYXllcl9kZXRhaWxwYWdlIiBhbGxvd2Z1bGxzY3JlZW49IiIgd2lkdGg9IjY0MCIgaGVpZ2h0PSIzNjAiIGZyYW1lYm9yZGVyPSIwIj48L2lmcmFtZT48YnIgLz48YnIgLz5UbyBlZGl0IGEgZmlsZSwgZG8gdGhlIGZvbGxvd2luZzo8dWw+PGxpPkdvIDxiPkZpbGUgTWFuYWdlcjwvYj47PC9saT48bGk+U2VsZWN0IHRoZSBmaWxlIHlvdSB3aXNoIHRvIGVkaXQgYW5kIGhpdCBvbmUgb2YgdGhlIDxiPkVkaXQgPC9iPmljb248YnIgLz4gb3IgcmlnaHQtY2xpY2sgb24gdGhlIGZpbGUgYW5kIHVzZSA8Yj5FZGl0PC9iPiBmcm9tIHRoZSBkcm9wLWRvd24gbWVudTxiciAvPjxiciAvPjxpbWcgY2xhc3M9ImtiLWltYWdlIiBzcmM9Imh0dHBzOi8vTmFtZWNoZWFwLnNpbXBsZWtiLmNvbS9TaXRlQ29udGVudHMvMi03QzIyRDUyMzZBNDU0M0VCODI3RjNCRDg5MzZFMTUzRS9tZWRpYS9lZGl0MDEucG5nIiAvPjxiciAvPjwvbGk+PC91bD48YnIgLz48dWw+PGxpPjxhIG5hbWU9ImNvbXByZXNzIj48Yj5Db21wcmVzczwvYj48L2E+PC9saT48L3VsPjxiciAvPjxpZnJhbWUgc3JjPSIvL3d3dy55b3V0dWJlLW5vY29va2llLmNvbS9lbWJlZC9sazRuMUlqS09WOD9mZWF0dXJlPXBsYXllcl9kZXRhaWxwYWdlIiBhbGxvd2Z1bGxzY3JlZW49IiIgd2lkdGg9IjY0MCIgaGVpZ2h0PSIzNjAiIGZyYW1lYm9yZGVyPSIwIj48L2lmcmFtZT48YnIgLz48YnIgLz4gSXQgaXMgdXNlZnVsIHRvIHN0b3JlIGEgZ3JvdXAgb2YgZmlsZXMgaW4gb25lIGZpbGUgZm9yIGFuIGVhc3kgYmFja3VwIG9yIGZvciBhIHRyYW5zZmVyIHRvIGFub3RoZXIgZGlyZWN0b3J5IGFzIHdlbGwgYXMgY29tcHJlc3MgbGFyZ2UgZmlsZXMuIENvbXByZXNzZWQgZmlsZXMgdGFrZSB1cCBsZXNzIGRpc2sgc3BhY2UgYW5kIGFyZSBkb3dubG9hZGVkIGZhc3RlciB2aWEgdGhlIEludGVybmV0LiBUaGUgZGF0YSBjYW4gYmUgY29tcHJlc3NlZCBpbnRvIGEgc2luZ2xlICouemlwLCAqLkd6LCBvciAqLkJ6MiBhcmNoaXZlLg0KDQo8YnIgLz5UbyBjb21wcmVzcyBhIGZpbGUsIGRvIHRoZSBmb2xsb3dpbmc6PHVsPjxsaT5HbyB0byA8Yj5GaWxlIE1hbmFnZXI8L2I+OzwvbGk+PGxpPlNlbGVjdCB0aGUgZmlsZXMvZGlyZWN0b3JpZXMgeW91IHdpc2ggdG8gY29tcHJlc3MgYW5kIGhpdCB0aGUgPGI+Q29tcHJlc3MgPC9iPmljb247PC9saT48bGk+RGVmaW5lIDxiPkNvbXByZXNzaW9uIFR5cGU8L2I+IGFuZCBlbnRlciB0aGUgPGI+bmFtZTwvYj4gb2YgdGhlIGFyY2hpdmU7PC9saT48bGk+T25jZSBkb25lLCBoaXQgPGI+Q29tcHJlc3MgRmlsZShzKTwvYj46PC9saT48L3VsPjxpbWcgY2xhc3M9ImtiLWltYWdlIiBzcmM9Imh0dHBzOi8vTmFtZWNoZWFwLnNpbXBsZWtiLmNvbS9TaXRlQ29udGVudHMvMi03QzIyRDUyMzZBNDU0M0VCODI3RjNCRDg5MzZFMTUzRS9tZWRpYS9wbF9maWxlX21hbmFnZXJfMzcucG5nIiAvPjxiciAvPjxiciAvPjxpbWcgY2xhc3M9ImtiLWltYWdlIiBzcmM9Imh0dHBzOi8vTmFtZWNoZWFwLnNpbXBsZWtiLmNvbS9TaXRlQ29udGVudHMvMi03QzIyRDUyMzZBNDU0M0VCODI3RjNCRDg5MzZFMTUzRS9tZWRpYS9wbF9maWxlX21hbmFnZXJfNDYucG5nIiAvPjxiciAvPjxiciAvPjxiciAvPjx1bD48bGk+PGEgbmFtZT0iZXh0cmFjdCI+PGI+RXh0cmFjdDwvYj48L2E+PC9saT48L3VsPjxiciAvPjxpZnJhbWUgc3JjPSIvL3d3dy55b3V0dWJlLW5vY29va2llLmNvbS9lbWJlZC9wbzh2VExHdjZlVT9mZWF0dXJlPXBsYXllcl9kZXRhaWxwYWdlIiBhbGxvd2Z1bGxzY3JlZW49IiIgd2lkdGg9IjY0MCIgaGVpZ2h0PSIzNjAiIGZyYW1lYm9yZGVyPSIwIj48L2lmcmFtZT48YnIgLz48YnIgLz5UbyBleHRyYWN0IGEgZmlsZSwgZG8gdGhlIGZvbGxvd2luZzo8dWw+PGxpPkdvIHRvPGI+IEZpbGUgTWFuYWdlcjwvYj47PC9saT48bGk+U2VsZWN0IHRoZSBmaWxlIHlvdSB3aXNoIHRvIHVuY29tcHJlc3M7PC9saT48bGk+SGl0IHRoZSA8Yj5FeHRyYWN0IDwvYj5pY29uIG9yIHJpZ2h0LWNsaWNrIG9uIHRoZSBmaWxlIGFuZCB1c2UgdGhlIDxiPkV4dHJhY3QgPC9iPm9wdGlvbjs8L2xpPjxsaT5EZWZpbmUgdGhlIDxiPnBhdGggPC9iPnlvdSB3aXNoIHRvIGV4dHJhY3QgdGhlIGZpbGUgdG87PC9saT48bGk+T25jZSBkb25lLCBoaXQgPGI+RXh0cmFjdCBGaWxlKHMpPC9iPjo8L2xpPjwvdWw+PGltZyBjbGFzcz0ia2ItaW1hZ2UiIHNyYz0iaHR0cHM6Ly9OYW1lY2hlYXAuc2ltcGxla2IuY29tL1NpdGVDb250ZW50cy8yLTdDMjJENTIzNkE0NTQzRUI4MjdGM0JEODkzNkUxNTNFL21lZGlhL3BsX2ZpbGVfbWFuYWdlcl8zOC5wbmciIC8+PGJyIC8+PGJyIC8+PGltZyBjbGFzcz0ia2ItaW1hZ2UiIHNyYz0iaHR0cHM6Ly9OYW1lY2hlYXAuc2ltcGxla2IuY29tL1NpdGVDb250ZW50cy8yLTdDMjJENTIzNkE0NTQzRUI4MjdGM0JEODkzNkUxNTNFL21lZGlhL3BsX2ZpbGVfbWFuYWdlcl80Ny5wbmciIC8+PGJyIC8+PGJyIC8+PGJyIC8+PHVsPjxsaT48YSBuYW1lPSJwZXJtaXNzaW9ucyI+PGI+Q2hhbmdlIFBlcm1pc3Npb25zPC9iPjwvYT48L2xpPjwvdWw+IFRvIGNoYW5nZSBwZXJtaXNzaW9ucyBmb3IgYSBmaWxlLCBkbyB0aGUgZm9sbG93aW5nOg0KPHVsPjxsaT4NCiAgICBHbyA8Yj5GaWxlIE1hbmFnZXI8L2I+OzwvbGk+PGxpPlNlbGVjdCB0aGUgZmlsZS9mb2xkZXIgeW91IHdpc2ggdG8gY2hhbmdlIHBlcm1pc3Npb25zIGZvciBhbmQgaGl0IHRoZSA8Yj5QZXJtaXNzaW9ucyA8L2I+aWNvbiBvciByaWdodC1jbGljayBvbiB0aGUgZmlsZS9mb2xkZXIgYW5kIHVzZSB0aGUgPGI+Q2hhbmdlIFBlcm1pc3Npb25zPC9iPiBvcHRpb24gZnJvbSB0aGUgZHJvcC1kb3duIG1lbnU6PC9saT48YnIgLz48aW1nIGNsYXNzPSJrYi1pbWFnZSIgc3JjPSJodHRwczovL05hbWVjaGVhcC5zaW1wbGVrYi5jb20vU2l0ZUNvbnRlbnRzLzItN0MyMkQ1MjM2QTQ1NDNFQjgyN0YzQkQ4OTM2RTE1M0UvbWVkaWEvZWRpdDIucG5nIiAvPjxiciAvPjxiciAvPjxsaT5TZXQgdGhlIG5lZWRlZCB2YWx1ZSBhbmQgaGl0IDxiPkNoYW5nZSBQZXJtaXNzaW9uczwvYj46DQo8L2xpPjxiciAvPjxpbWcgY2xhc3M9ImtiLWltYWdlIiBzcmM9Imh0dHBzOi8vTmFtZWNoZWFwLnNpbXBsZWtiLmNvbS9TaXRlQ29udGVudHMvMi03QzIyRDUyMzZBNDU0M0VCODI3RjNCRDg5MzZFMTUzRS9tZWRpYS9wbF9maWxlX21hbmFnZXJfNDgucG5nIiAvPjxiciAvPjwvdWw+PGJyIC8+TW9yZSBpbmZvcm1hdGlvbiBvbiBob3cgdG8gY2hhbmdlIGZpbGUvZm9sZGVyIHBlcm1pc3Npb25zIGNhbiBiZSBmb3VuZCA8YSBocmVmPSJodHRwczovL3d3dy5uYW1lY2hlYXAuY29tL3N1cHBvcnQva25vd2xlZGdlYmFzZS9hcnRpY2xlLmFzcHgvNDAwLzIxOTQvbW9yZS1hYm91dC1maWxlLXBlcm1pc3Npb25zIj5oZXJlPC9hPi4NCg0KDQo8YnIgLz48YnIgLz48YnIgLz5UaGF0J3MgaXQhPGJyIC8+PGJyIC8+DQrCoMKgwqDCoMKgwqDCoMKgwqDCoMKgwqDCoMKgIDxiciAvPsKgwqDCoMKgwqDCoMKgwqDCoMKgwqDCoMKgwqDCoMKgwqDCoMKgwqDCoCBOZWVkIGFueSBoZWxwPyBDb250YWN0IG91ciA8YSBocmVmPSJodHRwczovL3d3dy5uYW1lY2hlYXAuY29tL2hlbHAtY2VudGVyLyI+SGVscERlc2s8L2E+PGJyIC8+PGJyIC8+PC9kaXY+DQo=","NewTillDate":null,"FeaturedTillDate":null,"ModifiedDateTime":"2025-06-24T14:15:59.0000000","LiveDateTime":"1754-02-02T00:00:00.0000000","CreatedDateTime":"2016-01-25T11:02:08.0000000","ApprovalDatetime":"2016-01-25T12:07:14.0000000","RequestCount":83856,"MarkedAsNew":false,"MarkedAsFeatured":false,"RatingValue":3,"CategoryPaths":[{"__type":"Nc:SimpleKB:Abstractions:Dtos:CategoryPathDto","Level":1,"CategoryId":12,"CategoryName":"Hosting"},{"__type":"Nc:SimpleKB:Abstractions:Dtos:CategoryPathDto","Level":2,"CategoryId":29,"CategoryName":"cPanel questions"}],"AssociatedCategories":[{"CategoryId":29,"CategoryName":"cPanel questions","CategoryDisplayName":"HostingcPanel questions"}],"AssociatedTags":[{"TagId":64,"Tag":"cpanel"},{"TagId":19666,"Tag":" backup"},{"TagId":23570,"Tag":" remove"},{"TagId":26572,"Tag":" file manager"},{"TagId":83118,"Tag":" upload files"},{"TagId":83119,"Tag":" unzip"},{"TagId":83120,"Tag":" extract"}],"RelatedArticles":[],"AssociatedMedias":[],"PreferredCategoryId":0,"RootParentCategoryName":"","RootParentCategoryId":0},"status":200,"statusText":"OK"},"/api/v1/ncpl/simplekb/getcategorybycategoryid:\"{\\\"categoryId\\\":29}\"":{"body":{"__type":"Nc:SimpleKB:Abstractions:Dtos:CategoryDto","ParentCategoryId":12,"Parent_Category_Name":"Hosting","FriendlyId":null,"ApprovedYN":true,"TreatAsTopicYN":false,"CreatedDateTime":"07/21/2008 16:03:59","CurrentCategoryPaths":[{"__type":"Nc:SimpleKB:Abstractions:Dtos:CategoryPathDto","Level":1,"CategoryId":12,"CategoryName":"Hosting"},{"__type":"Nc:SimpleKB:Abstractions:Dtos:CategoryPathDto","Level":2,"CategoryId":29,"CategoryName":"cPanel questions"}],"RelatedCategories":[],"AssociatedArticles":[{"ArticleId":9317,"Title":"List of time zones available","ArticleName":"List of time zones available","LiveDateTime":"02/02/1754 00:00:00","NewTillDate":null,"FeaturedTillDate":null,"ModifiedDateTime":"12/10/2020"},{"ArticleId":10041,"Title":"How to change contact information in cPanel","ArticleName":"How to change contact information in cPanel","LiveDateTime":"02/02/1754 00:00:00","NewTillDate":null,"FeaturedTillDate":null,"ModifiedDateTime":"12/07/2023"},{"ArticleId":10125,"Title":"How to manage domains in cPanel","ArticleName":"How to manage domains in cPanel","LiveDateTime":"02/02/1754 00:00:00","NewTillDate":null,"FeaturedTillDate":null,"ModifiedDateTime":"06/30/2023"},{"ArticleId":10170,"Title":"How to use User Manager in cPanel. Can I create a separate cPanel user?","ArticleName":"How to use User Manager in cPanel. Can I create a separate cPanel user?","LiveDateTime":"02/02/1754 00:00:00","NewTillDate":null,"FeaturedTillDate":null,"ModifiedDateTime":"02/15/2024"},{"ArticleId":10294,"Title":"How to navigate in cPanel’s File Manager","ArticleName":"How to navigate in cPanel’s File Manager","LiveDateTime":"02/02/1754 00:00:00","NewTillDate":null,"FeaturedTillDate":null,"ModifiedDateTime":"09/25/2024"},{"ArticleId":10566,"Title":"How to reset your cPanel account","ArticleName":"How to reset your cPanel account","LiveDateTime":"02/02/1754 00:00:00","NewTillDate":null,"FeaturedTillDate":null,"ModifiedDateTime":"07/22/2024"},{"ArticleId":10686,"Title":"How to deploy React.js, Vite.js, React Native, and Next.js applications in cPanel","ArticleName":"How to deploy React.js, Vite.js, React Native, and Next.js applications in cPanel","LiveDateTime":"02/02/1754 00:00:00","NewTillDate":null,"FeaturedTillDate":null,"ModifiedDateTime":"05/23/2024"},{"ArticleId":10691,"Title":"How to deploy Angular Applications in cPanel","ArticleName":"How to deploy Angular Applications in cPanel","LiveDateTime":"02/02/1754 00:00:00","NewTillDate":null,"FeaturedTillDate":null,"ModifiedDateTime":"06/21/2024"},{"ArticleId":9977,"Title":"How to install Composer on Shared servers","ArticleName":"How to install Composer on Shared servers","LiveDateTime":"02/02/1754 00:00:00","NewTillDate":null,"FeaturedTillDate":null,"ModifiedDateTime":"01/03/2024"},{"ArticleId":9797,"Title":"cPanel control panel overview","ArticleName":"cPanel control panel overview","LiveDateTime":"02/02/1754 00:00:00","NewTillDate":null,"FeaturedTillDate":null,"ModifiedDateTime":"02/03/2026"},{"ArticleId":9674,"Title":"Difference between cPanel and WHM","ArticleName":"Difference between cPanel and WHM","LiveDateTime":"02/02/1754 00:00:00","NewTillDate":null,"FeaturedTillDate":null,"ModifiedDateTime":"06/15/2023"},{"ArticleId":173,"Title":"Can I change my cPanel account username?","ArticleName":"Can I change my cPanel account username?","LiveDateTime":"02/02/1754 00:00:00","NewTillDate":null,"FeaturedTillDate":null,"ModifiedDateTime":"06/19/2024"},{"ArticleId":733,"Title":"How can I reset my cPanel password?","ArticleName":"How can I reset my cPanel password?","LiveDateTime":"02/02/1754 00:00:00","NewTillDate":null,"FeaturedTillDate":null,"ModifiedDateTime":"09/25/2024"},{"ArticleId":9976,"Title":"I can't access cPanel. What should I do?","ArticleName":"I can't access cPanel. What should I do?","LiveDateTime":"02/02/1754 00:00:00","NewTillDate":null,"FeaturedTillDate":null,"ModifiedDateTime":"12/19/2025"},{"ArticleId":1345,"Title":"cPanel inaccessible. Reasons for IP block","ArticleName":"cPanel inaccessible. Reasons for IP block","LiveDateTime":"02/02/1754 00:00:00","NewTillDate":null,"FeaturedTillDate":null,"ModifiedDateTime":"12/22/2021"},{"ArticleId":9568,"Title":"My website is down: what to do?","ArticleName":"My website is down: what to do?","LiveDateTime":"02/02/1754 00:00:00","NewTillDate":null,"FeaturedTillDate":null,"ModifiedDateTime":"06/25/2024"},{"ArticleId":897,"Title":"How to Create an Addon Domain","ArticleName":"How to Create an Addon Domain","LiveDateTime":"02/02/1754 00:00:00","NewTillDate":null,"FeaturedTillDate":null,"ModifiedDateTime":"10/28/2025"},{"ArticleId":9728,"Title":"How to set up Parked Domains","ArticleName":"How to set up Parked Domains","LiveDateTime":"02/02/1754 00:00:00","NewTillDate":null,"FeaturedTillDate":null,"ModifiedDateTime":"02/07/2025"},{"ArticleId":184,"Title":"Can I add addon domains without changing DNS?","ArticleName":"Can I add addon domains without changing DNS?","LiveDateTime":"02/02/1754 00:00:00","NewTillDate":null,"FeaturedTillDate":null,"ModifiedDateTime":"06/10/2020"},{"ArticleId":190,"Title":"Why is an addon domain connected to a subdomain?","ArticleName":"Why is an addon domain connected to a subdomain?","LiveDateTime":"02/02/1754 00:00:00","NewTillDate":null,"FeaturedTillDate":null,"ModifiedDateTime":"06/15/2023"},{"ArticleId":189,"Title":"Can I point a parked domain to a specific folder?","ArticleName":"Can I point a parked domain to a specific folder?","LiveDateTime":"02/02/1754 00:00:00","NewTillDate":null,"FeaturedTillDate":null,"ModifiedDateTime":"08/14/2019"},{"ArticleId":9190,"Title":"How to create a subdomain in cPanel","ArticleName":"How to create a subdomain in cPanel","LiveDateTime":"02/02/1754 00:00:00","NewTillDate":null,"FeaturedTillDate":null,"ModifiedDateTime":"09/25/2024"},{"ArticleId":9191,"Title":"How to create a wildcard subdomain in cPanel","ArticleName":"How to create a wildcard subdomain in cPanel","LiveDateTime":"02/02/1754 00:00:00","NewTillDate":null,"FeaturedTillDate":null,"ModifiedDateTime":"01/10/2024"},{"ArticleId":9257,"Title":"How to create a site/domain redirect in cPanel","ArticleName":"How to create a site/domain redirect in cPanel","LiveDateTime":"02/02/1754 00:00:00","NewTillDate":null,"FeaturedTillDate":null,"ModifiedDateTime":"04/15/2025"},{"ArticleId":896,"Title":"How to set up URL Frame in cPanel","ArticleName":"How to set up URL Frame in cPanel","LiveDateTime":"02/02/1754 00:00:00","NewTillDate":null,"FeaturedTillDate":null,"ModifiedDateTime":"06/13/2023"},{"ArticleId":9256,"Title":"How to edit DNS zone in cPanel","ArticleName":"How to edit DNS zone in cPanel","LiveDateTime":"02/02/1754 00:00:00","NewTillDate":null,"FeaturedTillDate":null,"ModifiedDateTime":"12/19/2025"},{"ArticleId":9700,"Title":"How to use File Manager in cPanel","ArticleName":"How to use File Manager in cPanel","LiveDateTime":"02/02/1754 00:00:00","NewTillDate":null,"FeaturedTillDate":null,"ModifiedDateTime":"06/24/2025"},{"ArticleId":1034,"Title":"How to fix Error You do not have permission to access…","ArticleName":"How to fix Error You do not have permission to access…","LiveDateTime":"02/02/1754 00:00:00","NewTillDate":null,"FeaturedTillDate":null,"ModifiedDateTime":"06/05/2024"},{"ArticleId":1011,"Title":"How to change permissions for files and directories","ArticleName":"How to change permissions for files and directories","LiveDateTime":"02/02/1754 00:00:00","NewTillDate":null,"FeaturedTillDate":null,"ModifiedDateTime":"09/25/2024"},{"ArticleId":9563,"Title":"How can I check my website access logs?","ArticleName":"How can I check my website access logs?","LiveDateTime":"02/02/1754 00:00:00","NewTillDate":null,"FeaturedTillDate":null,"ModifiedDateTime":"06/29/2023"},{"ArticleId":399,"Title":"What to do if my website stats are not updated?","ArticleName":"What to do if my website stats are not updated?","LiveDateTime":"02/02/1754 00:00:00","NewTillDate":null,"FeaturedTillDate":null,"ModifiedDateTime":"06/15/2023"},{"ArticleId":9410,"Title":"How to set up rules and redirects in .htaccess","ArticleName":"How to set up rules and redirects in .htaccess","LiveDateTime":"02/02/1754 00:00:00","NewTillDate":null,"FeaturedTillDate":null,"ModifiedDateTime":"09/25/2024"},{"ArticleId":9157,"Title":"How to set up internal protection for .htaccess","ArticleName":"How to set up internal protection for .htaccess","LiveDateTime":"02/02/1754 00:00:00","NewTillDate":null,"FeaturedTillDate":null,"ModifiedDateTime":"12/15/2021"},{"ArticleId":9767,"Title":"How to password protect files and directories","ArticleName":"How to password protect files and directories","LiveDateTime":"02/02/1754 00:00:00","NewTillDate":null,"FeaturedTillDate":null,"ModifiedDateTime":"07/16/2025"},{"ArticleId":193,"Title":"How to add custom error pages","ArticleName":"How to add custom error pages","LiveDateTime":"02/02/1754 00:00:00","NewTillDate":null,"FeaturedTillDate":null,"ModifiedDateTime":"06/15/2023"},{"ArticleId":9536,"Title":"How to block IPs from accessing your website","ArticleName":"How to block IPs from accessing your website","LiveDateTime":"02/02/1754 00:00:00","NewTillDate":null,"FeaturedTillDate":null,"ModifiedDateTime":"06/09/2023"},{"ArticleId":9565,"Title":"How to create and manage mailing lists in cPanel","ArticleName":"How to create and manage mailing lists in cPanel","LiveDateTime":"02/02/1754 00:00:00","NewTillDate":null,"FeaturedTillDate":null,"ModifiedDateTime":"12/29/2025"},{"ArticleId":9720,"Title":"How to use cPanel Calendars and Contacts Client","ArticleName":"How to use cPanel Calendars and Contacts Client","LiveDateTime":"02/02/1754 00:00:00","NewTillDate":null,"FeaturedTillDate":null,"ModifiedDateTime":"05/05/2025"},{"ArticleId":9258,"Title":"How to change MX records and Email Routing in cPanel","ArticleName":"How to change MX records and Email Routing in cPanel","LiveDateTime":"02/02/1754 00:00:00","NewTillDate":null,"FeaturedTillDate":null,"ModifiedDateTime":"09/25/2024"},{"ArticleId":9621,"Title":"How to set up Web Disk on Windows 8","ArticleName":"How to set up Web Disk on Windows 8","LiveDateTime":"02/02/1754 00:00:00","NewTillDate":null,"FeaturedTillDate":null,"ModifiedDateTime":"12/09/2021"},{"ArticleId":915,"Title":"How to set up automatic backups","ArticleName":"How to set up automatic backups","LiveDateTime":"02/02/1754 00:00:00","NewTillDate":null,"FeaturedTillDate":null,"ModifiedDateTime":"05/05/2025"},{"ArticleId":9453,"Title":"How to run scripts via cron jobs","ArticleName":"How to run scripts via cron jobs","LiveDateTime":"02/02/1754 00:00:00","NewTillDate":null,"FeaturedTillDate":null,"ModifiedDateTime":"01/21/2025"},{"ArticleId":9561,"Title":"How to create a symbolic link in cPanel","ArticleName":"How to create a symbolic link in cPanel","LiveDateTime":"02/02/1754 00:00:00","NewTillDate":null,"FeaturedTillDate":null,"ModifiedDateTime":"07/20/2023"},{"ArticleId":9331,"Title":"How to check the number of inodes in your hosting account","ArticleName":"How to check the number of inodes in your hosting account","LiveDateTime":"02/02/1754 00:00:00","NewTillDate":null,"FeaturedTillDate":null,"ModifiedDateTime":"08/04/2025"},{"ArticleId":9531,"Title":"How to set up hotlink protection","ArticleName":"How to set up hotlink protection","LiveDateTime":"02/02/1754 00:00:00","NewTillDate":null,"FeaturedTillDate":null,"ModifiedDateTime":"07/20/2023"},{"ArticleId":9694,"Title":"How to install Laravel on our server","ArticleName":"How to install Laravel on our server","LiveDateTime":"02/02/1754 00:00:00","NewTillDate":null,"FeaturedTillDate":null,"ModifiedDateTime":"07/01/2024"},{"ArticleId":9587,"Title":"How to run Python scripts","ArticleName":"How to run Python scripts","LiveDateTime":"02/02/1754 00:00:00","NewTillDate":null,"FeaturedTillDate":null,"ModifiedDateTime":"12/19/2025"},{"ArticleId":9693,"Title":"How to install Perl modules on shared servers","ArticleName":"How to install Perl modules on shared servers","LiveDateTime":"02/02/1754 00:00:00","NewTillDate":null,"FeaturedTillDate":null,"ModifiedDateTime":"09/05/2022"},{"ArticleId":6,"Title":"cPanel Documentation","ArticleName":"cPanel Documentation","LiveDateTime":"02/02/1754 00:00:00","NewTillDate":null,"FeaturedTillDate":null,"ModifiedDateTime":"07/01/2024"}],"AssociatedTags":[],"CategoryId":29,"CategoryName":"cPanel questions"},"status":200,"statusText":"OK"},"/api/v1/ncpl/simplekb/getcategories:\"{\\\"parentCategoryId\\\":0,\\\"getTree\\\":true}\"":{"body":[{"__type":"Nc:SimpleKB:Abstractions:Dtos:CategoryItemDto","ParentCategoryId":93,"TreatAsTopicYN":false,"Description":"","ImageUrl":"","ShortDesc":"","CategoryId":2216,"CategoryName":"Spam Protection"},{"__type":"Nc:SimpleKB:Abstractions:Dtos:CategoryItemDto","ParentCategoryId":14,"TreatAsTopicYN":false,"Description":"","ImageUrl":"","ShortDesc":"","CategoryId":2217,"CategoryName":"Renewal"},{"__type":"Nc:SimpleKB:Abstractions:Dtos:CategoryItemDto","ParentCategoryId":14,"TreatAsTopicYN":false,"Description":"","ImageUrl":"","ShortDesc":"","CategoryId":2218,"CategoryName":"cPanel SSL Plugin"},{"__type":"Nc:SimpleKB:Abstractions:Dtos:CategoryItemDto","ParentCategoryId":12,"TreatAsTopicYN":false,"Description":"","ImageUrl":"","ShortDesc":"","CategoryId":2219,"CategoryName":"PHP Configuration"},{"__type":"Nc:SimpleKB:Abstractions:Dtos:CategoryItemDto","ParentCategoryId":14,"TreatAsTopicYN":false,"Description":"","ImageUrl":"","ShortDesc":"","CategoryId":2221,"CategoryName":"Multi-Domain SSL Certificates"},{"__type":"Nc:SimpleKB:Abstractions:Dtos:CategoryItemDto","ParentCategoryId":14,"TreatAsTopicYN":false,"Description":"","ImageUrl":"","ShortDesc":"","CategoryId":2222,"CategoryName":"Cancellation"},{"__type":"Nc:SimpleKB:Abstractions:Dtos:CategoryItemDto","ParentCategoryId":14,"TreatAsTopicYN":false,"Description":"","ImageUrl":"","ShortDesc":"","CategoryId":2223,"CategoryName":"Browser errors"},{"__type":"Nc:SimpleKB:Abstractions:Dtos:CategoryItemDto","ParentCategoryId":14,"TreatAsTopicYN":false,"Description":"","ImageUrl":"","ShortDesc":"","CategoryId":2224,"CategoryName":"Site Seal, Logo"},{"__type":"Nc:SimpleKB:Abstractions:Dtos:CategoryItemDto","ParentCategoryId":12,"TreatAsTopicYN":false,"Description":"","ImageUrl":"","ShortDesc":"","CategoryId":2225,"CategoryName":"SEO"},{"__type":"Nc:SimpleKB:Abstractions:Dtos:CategoryItemDto","ParentCategoryId":93,"TreatAsTopicYN":false,"Description":"","ImageUrl":"","ShortDesc":"","CategoryId":2226,"CategoryName":"Email Migration"},{"__type":"Nc:SimpleKB:Abstractions:Dtos:CategoryItemDto","ParentCategoryId":2211,"TreatAsTopicYN":false,"Description":"","ImageUrl":"","ShortDesc":"","CategoryId":2227,"CategoryName":"SSL Resellers"},{"__type":"Nc:SimpleKB:Abstractions:Dtos:CategoryItemDto","ParentCategoryId":0,"TreatAsTopicYN":true,"Description":"","ImageUrl":"/assets/img/pictograms/150/cloud-red.png","ShortDesc":"","CategoryId":2228,"CategoryName":"Apps","SubCategories":[{"__type":"Nc:SimpleKB:Abstractions:Dtos:CategoryItemDto","ParentCategoryId":2228,"TreatAsTopicYN":false,"Description":"","ImageUrl":"","ShortDesc":"","CategoryId":2251,"CategoryName":"Supersonic CDN"},{"__type":"Nc:SimpleKB:Abstractions:Dtos:CategoryItemDto","ParentCategoryId":2228,"TreatAsTopicYN":false,"Description":"","ImageUrl":"","ShortDesc":"","CategoryId":2298,"CategoryName":"Site Maker"},{"__type":"Nc:SimpleKB:Abstractions:Dtos:CategoryItemDto","ParentCategoryId":2228,"TreatAsTopicYN":false,"Description":"","ImageUrl":"","ShortDesc":"","CategoryId":177,"CategoryName":"Google Workspace (formerly G Suite)"}]},{"__type":"Nc:SimpleKB:Abstractions:Dtos:CategoryItemDto","ParentCategoryId":2211,"TreatAsTopicYN":false,"Description":"","ImageUrl":"","ShortDesc":"","CategoryId":2229,"CategoryName":"Hosting Resellers"},{"__type":"Nc:SimpleKB:Abstractions:Dtos:CategoryItemDto","ParentCategoryId":34,"TreatAsTopicYN":false,"Description":"","ImageUrl":"","ShortDesc":"","CategoryId":2232,"CategoryName":"DNSSEC"},{"__type":"Nc:SimpleKB:Abstractions:Dtos:CategoryItemDto","ParentCategoryId":34,"TreatAsTopicYN":false,"Description":"","ImageUrl":"","ShortDesc":"","CategoryId":2234,"CategoryName":"Google Workspace (formerly G Suite)"},{"__type":"Nc:SimpleKB:Abstractions:Dtos:CategoryItemDto","ParentCategoryId":34,"TreatAsTopicYN":false,"Description":"","ImageUrl":"","ShortDesc":"","CategoryId":2237,"CategoryName":"Host records setup"},{"__type":"Nc:SimpleKB:Abstractions:Dtos:CategoryItemDto","ParentCategoryId":14,"TreatAsTopicYN":false,"Description":"","ImageUrl":"","ShortDesc":"","CategoryId":2238,"CategoryName":"SSL installation errors"},{"__type":"Nc:SimpleKB:Abstractions:Dtos:CategoryItemDto","ParentCategoryId":0,"TreatAsTopicYN":false,"Description":"","ImageUrl":"/assets/img/pictograms/150/easywp-red.png","ShortDesc":"","CategoryId":2239,"CategoryName":"EasyWP","SubCategories":[{"__type":"Nc:SimpleKB:Abstractions:Dtos:CategoryItemDto","ParentCategoryId":2239,"TreatAsTopicYN":false,"Description":"","ImageUrl":"","ShortDesc":"","CategoryId":2280,"CategoryName":"Getting Started"},{"__type":"Nc:SimpleKB:Abstractions:Dtos:CategoryItemDto","ParentCategoryId":2239,"TreatAsTopicYN":false,"Description":"","ImageUrl":"","ShortDesc":"","CategoryId":2279,"CategoryName":"General Information"},{"__type":"Nc:SimpleKB:Abstractions:Dtos:CategoryItemDto","ParentCategoryId":2239,"TreatAsTopicYN":false,"Description":"","ImageUrl":"","ShortDesc":"","CategoryId":2281,"CategoryName":"WordPress Migration"},{"__type":"Nc:SimpleKB:Abstractions:Dtos:CategoryItemDto","ParentCategoryId":2239,"TreatAsTopicYN":false,"Description":"","ImageUrl":"","ShortDesc":"","CategoryId":2282,"CategoryName":"Plugins and Themes"},{"__type":"Nc:SimpleKB:Abstractions:Dtos:CategoryItemDto","ParentCategoryId":2239,"TreatAsTopicYN":false,"Description":"","ImageUrl":"","ShortDesc":"","CategoryId":2284,"CategoryName":"WordPress Management"},{"__type":"Nc:SimpleKB:Abstractions:Dtos:CategoryItemDto","ParentCategoryId":2239,"TreatAsTopicYN":false,"Description":"","ImageUrl":"","ShortDesc":"","CategoryId":2285,"CategoryName":"SFTP and Database access"},{"__type":"Nc:SimpleKB:Abstractions:Dtos:CategoryItemDto","ParentCategoryId":2239,"TreatAsTopicYN":false,"Description":"","ImageUrl":"","ShortDesc":"","CategoryId":2286,"CategoryName":"Domains questions"},{"__type":"Nc:SimpleKB:Abstractions:Dtos:CategoryItemDto","ParentCategoryId":2239,"TreatAsTopicYN":false,"Description":"","ImageUrl":"","ShortDesc":"","CategoryId":2288,"CategoryName":"Billing questions"},{"__type":"Nc:SimpleKB:Abstractions:Dtos:CategoryItemDto","ParentCategoryId":2239,"TreatAsTopicYN":false,"Description":"","ImageUrl":"","ShortDesc":"","CategoryId":2287,"CategoryName":"SSL questions"}]},{"__type":"Nc:SimpleKB:Abstractions:Dtos:CategoryItemDto","ParentCategoryId":2228,"TreatAsTopicYN":false,"Description":"","ImageUrl":"","ShortDesc":"","CategoryId":2251,"CategoryName":"Supersonic CDN"},{"__type":"Nc:SimpleKB:Abstractions:Dtos:CategoryItemDto","ParentCategoryId":12,"TreatAsTopicYN":false,"Description":"","ImageUrl":"","ShortDesc":"","CategoryId":2252,"CategoryName":"InterWorx questions"},{"__type":"Nc:SimpleKB:Abstractions:Dtos:CategoryItemDto","ParentCategoryId":2253,"TreatAsTopicYN":false,"Description":"","ImageUrl":"","ShortDesc":"","CategoryId":2254,"CategoryName":"Domains How-To"},{"__type":"Nc:SimpleKB:Abstractions:Dtos:CategoryItemDto","ParentCategoryId":2253,"TreatAsTopicYN":false,"Description":"","ImageUrl":"","ShortDesc":"","CategoryId":2255,"CategoryName":"Hosting How-To"},{"__type":"Nc:SimpleKB:Abstractions:Dtos:CategoryItemDto","ParentCategoryId":2253,"TreatAsTopicYN":false,"Description":"","ImageUrl":"","ShortDesc":"","CategoryId":2257,"CategoryName":"Sales & Payments How-To"},{"__type":"Nc:SimpleKB:Abstractions:Dtos:CategoryItemDto","ParentCategoryId":2253,"TreatAsTopicYN":false,"Description":"","ImageUrl":"","ShortDesc":"","CategoryId":2258,"CategoryName":"cPanel Email How-To"},{"__type":"Nc:SimpleKB:Abstractions:Dtos:CategoryItemDto","ParentCategoryId":93,"TreatAsTopicYN":false,"Description":"","ImageUrl":"","ShortDesc":"","CategoryId":2260,"CategoryName":"Private Email Contacts and Calendars Setup"},{"__type":"Nc:SimpleKB:Abstractions:Dtos:CategoryItemDto","ParentCategoryId":2253,"TreatAsTopicYN":false,"Description":"","ImageUrl":"","ShortDesc":"","CategoryId":2262,"CategoryName":"EasyWP How-To"},{"__type":"Nc:SimpleKB:Abstractions:Dtos:CategoryItemDto","ParentCategoryId":0,"TreatAsTopicYN":false,"Description":"","ImageUrl":"https://download.namecheap.com/assets/img/domainvault-red@2x.png","ShortDesc":"","CategoryId":2289,"CategoryName":"Domain Vault","SubCategories":[]},{"__type":"Nc:SimpleKB:Abstractions:Dtos:CategoryItemDto","ParentCategoryId":14,"TreatAsTopicYN":false,"Description":"","ImageUrl":"","ShortDesc":"","CategoryId":2290,"CategoryName":"CSR code"},{"__type":"Nc:SimpleKB:Abstractions:Dtos:CategoryItemDto","ParentCategoryId":12,"TreatAsTopicYN":false,"Description":"","ImageUrl":"","ShortDesc":"","CategoryId":2291,"CategoryName":"Webuzo questions"},{"__type":"Nc:SimpleKB:Abstractions:Dtos:CategoryItemDto","ParentCategoryId":2265,"TreatAsTopicYN":false,"Description":"","ImageUrl":"","ShortDesc":"","CategoryId":2292,"CategoryName":"Browser Extensions"},{"__type":"Nc:SimpleKB:Abstractions:Dtos:CategoryItemDto","ParentCategoryId":14,"TreatAsTopicYN":false,"Description":"","ImageUrl":"","ShortDesc":"","CategoryId":2293,"CategoryName":"Automated SSL management"},{"__type":"Nc:SimpleKB:Abstractions:Dtos:CategoryItemDto","ParentCategoryId":2228,"TreatAsTopicYN":false,"Description":"","ImageUrl":"","ShortDesc":"","CategoryId":2298,"CategoryName":"Site Maker"},{"__type":"Nc:SimpleKB:Abstractions:Dtos:CategoryItemDto","ParentCategoryId":12,"TreatAsTopicYN":false,"Description":"","ImageUrl":"","ShortDesc":"","CategoryId":27,"CategoryName":"Getting Started"},{"__type":"Nc:SimpleKB:Abstractions:Dtos:CategoryItemDto","ParentCategoryId":0,"TreatAsTopicYN":false,"Description":"","ImageUrl":"/assets/img/pictograms/150/support-red.png","ShortDesc":"","CategoryId":5,"CategoryName":"General & Support","SubCategories":[]},{"__type":"Nc:SimpleKB:Abstractions:Dtos:CategoryItemDto","ParentCategoryId":2200,"TreatAsTopicYN":false,"Description":"","ImageUrl":"","ShortDesc":"","CategoryId":7,"CategoryName":"Billing FAQ"},{"__type":"Nc:SimpleKB:Abstractions:Dtos:CategoryItemDto","ParentCategoryId":2209,"TreatAsTopicYN":false,"Description":"","ImageUrl":"","ShortDesc":"","CategoryId":8,"CategoryName":"Transfer Information"},{"__type":"Nc:SimpleKB:Abstractions:Dtos:CategoryItemDto","ParentCategoryId":12,"TreatAsTopicYN":false,"Description":"","ImageUrl":"","ShortDesc":"","CategoryId":22,"CategoryName":"Hosting Information"},{"__type":"Nc:SimpleKB:Abstractions:Dtos:CategoryItemDto","ParentCategoryId":14,"TreatAsTopicYN":false,"Description":"","ImageUrl":"","ShortDesc":"","CategoryId":38,"CategoryName":"SSL General"},{"__type":"Nc:SimpleKB:Abstractions:Dtos:CategoryItemDto","ParentCategoryId":9,"TreatAsTopicYN":false,"Description":"","ImageUrl":"","ShortDesc":"","CategoryId":45,"CategoryName":"Account Security"},{"__type":"Nc:SimpleKB:Abstractions:Dtos:CategoryItemDto","ParentCategoryId":34,"TreatAsTopicYN":false,"Description":"","ImageUrl":"","ShortDesc":"","CategoryId":46,"CategoryName":"Domain Management"},{"__type":"Nc:SimpleKB:Abstractions:Dtos:CategoryItemDto","ParentCategoryId":2211,"TreatAsTopicYN":false,"Description":"","ImageUrl":"","ShortDesc":"","CategoryId":63,"CategoryName":"Namecheap API"},{"__type":"Nc:SimpleKB:Abstractions:Dtos:CategoryItemDto","ParentCategoryId":2228,"TreatAsTopicYN":false,"Description":"","ImageUrl":"","ShortDesc":"","CategoryId":177,"CategoryName":"Google Workspace (formerly G Suite)"},{"__type":"Nc:SimpleKB:Abstractions:Dtos:CategoryItemDto","ParentCategoryId":93,"TreatAsTopicYN":false,"Description":"","ImageUrl":"","ShortDesc":"","CategoryId":2179,"CategoryName":"Private Email: General Information"},{"__type":"Nc:SimpleKB:Abstractions:Dtos:CategoryItemDto","ParentCategoryId":2265,"TreatAsTopicYN":false,"Description":"","ImageUrl":"","ShortDesc":"","CategoryId":2274,"CategoryName":"General"},{"__type":"Nc:SimpleKB:Abstractions:Dtos:CategoryItemDto","ParentCategoryId":2239,"TreatAsTopicYN":false,"Description":"","ImageUrl":"","ShortDesc":"","CategoryId":2280,"CategoryName":"Getting Started"},{"__type":"Nc:SimpleKB:Abstractions:Dtos:CategoryItemDto","ParentCategoryId":2239,"TreatAsTopicYN":false,"Description":"","ImageUrl":"","ShortDesc":"","CategoryId":2279,"CategoryName":"General Information"},{"__type":"Nc:SimpleKB:Abstractions:Dtos:CategoryItemDto","ParentCategoryId":93,"TreatAsTopicYN":false,"Description":"","ImageUrl":"","ShortDesc":"","CategoryId":2215,"CategoryName":"Private Email: Mailbox Management"},{"__type":"Nc:SimpleKB:Abstractions:Dtos:CategoryItemDto","ParentCategoryId":2211,"TreatAsTopicYN":false,"Description":"","ImageUrl":"","ShortDesc":"","CategoryId":2196,"CategoryName":"WHMCS module for SSL"},{"__type":"Nc:SimpleKB:Abstractions:Dtos:CategoryItemDto","ParentCategoryId":0,"TreatAsTopicYN":false,"Description":"","ImageUrl":"/assets/img/pictograms/150/savings-red.png","ShortDesc":"","CategoryId":2200,"CategoryName":"Checkout & Billing","SubCategories":[{"__type":"Nc:SimpleKB:Abstractions:Dtos:CategoryItemDto","ParentCategoryId":2200,"TreatAsTopicYN":false,"Description":"","ImageUrl":"","ShortDesc":"","CategoryId":7,"CategoryName":"Billing FAQ"},{"__type":"Nc:SimpleKB:Abstractions:Dtos:CategoryItemDto","ParentCategoryId":2200,"TreatAsTopicYN":false,"Description":"","ImageUrl":"","ShortDesc":"","CategoryId":2201,"CategoryName":"Domains Billing"},{"__type":"Nc:SimpleKB:Abstractions:Dtos:CategoryItemDto","ParentCategoryId":2200,"TreatAsTopicYN":false,"Description":"","ImageUrl":"","ShortDesc":"","CategoryId":21,"CategoryName":"Hosting Billing"},{"__type":"Nc:SimpleKB:Abstractions:Dtos:CategoryItemDto","ParentCategoryId":2200,"TreatAsTopicYN":false,"Description":"","ImageUrl":"","ShortDesc":"","CategoryId":71,"CategoryName":"SSL Certificates Billing"},{"__type":"Nc:SimpleKB:Abstractions:Dtos:CategoryItemDto","ParentCategoryId":2200,"TreatAsTopicYN":false,"Description":"","ImageUrl":"","ShortDesc":"","CategoryId":2177,"CategoryName":"Private Email"}]},{"__type":"Nc:SimpleKB:Abstractions:Dtos:CategoryItemDto","ParentCategoryId":2200,"TreatAsTopicYN":false,"Description":"","ImageUrl":"","ShortDesc":"","CategoryId":2201,"CategoryName":"Domains Billing"},{"__type":"Nc:SimpleKB:Abstractions:Dtos:CategoryItemDto","ParentCategoryId":14,"TreatAsTopicYN":false,"Description":"","ImageUrl":"","ShortDesc":"","CategoryId":67,"CategoryName":"Activation"},{"__type":"Nc:SimpleKB:Abstractions:Dtos:CategoryItemDto","ParentCategoryId":2209,"TreatAsTopicYN":false,"Description":"","ImageUrl":"","ShortDesc":"","CategoryId":83,"CategoryName":"Transfer to Namecheap"},{"__type":"Nc:SimpleKB:Abstractions:Dtos:CategoryItemDto","ParentCategoryId":9,"TreatAsTopicYN":false,"Description":"","ImageUrl":"","ShortDesc":"","CategoryId":43,"CategoryName":"Profile Management"},{"__type":"Nc:SimpleKB:Abstractions:Dtos:CategoryItemDto","ParentCategoryId":34,"TreatAsTopicYN":false,"Description":"","ImageUrl":"","ShortDesc":"","CategoryId":10,"CategoryName":"DNS Questions"},{"__type":"Nc:SimpleKB:Abstractions:Dtos:CategoryItemDto","ParentCategoryId":12,"TreatAsTopicYN":false,"Description":"","ImageUrl":"","ShortDesc":"","CategoryId":29,"CategoryName":"cPanel questions"},{"__type":"Nc:SimpleKB:Abstractions:Dtos:CategoryItemDto","ParentCategoryId":2200,"TreatAsTopicYN":false,"Description":"","ImageUrl":"","ShortDesc":"","CategoryId":21,"CategoryName":"Hosting Billing"},{"__type":"Nc:SimpleKB:Abstractions:Dtos:CategoryItemDto","ParentCategoryId":34,"TreatAsTopicYN":false,"Description":"","ImageUrl":"","ShortDesc":"","CategoryId":11,"CategoryName":"Dynamic DNS"},{"__type":"Nc:SimpleKB:Abstractions:Dtos:CategoryItemDto","ParentCategoryId":9,"TreatAsTopicYN":false,"Description":"","ImageUrl":"","ShortDesc":"","CategoryId":44,"CategoryName":"Account Access"},{"__type":"Nc:SimpleKB:Abstractions:Dtos:CategoryItemDto","ParentCategoryId":2209,"TreatAsTopicYN":false,"Description":"","ImageUrl":"","ShortDesc":"","CategoryId":84,"CategoryName":"Transfer to another provider"},{"__type":"Nc:SimpleKB:Abstractions:Dtos:CategoryItemDto","ParentCategoryId":14,"TreatAsTopicYN":false,"Description":"","ImageUrl":"","ShortDesc":"","CategoryId":68,"CategoryName":"Validation"},{"__type":"Nc:SimpleKB:Abstractions:Dtos:CategoryItemDto","ParentCategoryId":12,"TreatAsTopicYN":false,"Description":"","ImageUrl":"","ShortDesc":"","CategoryId":2182,"CategoryName":"cPanel: Software Management"},{"__type":"Nc:SimpleKB:Abstractions:Dtos:CategoryItemDto","ParentCategoryId":93,"TreatAsTopicYN":false,"Description":"","ImageUrl":"","ShortDesc":"","CategoryId":2214,"CategoryName":"Email Forwarding"},{"__type":"Nc:SimpleKB:Abstractions:Dtos:CategoryItemDto","ParentCategoryId":2265,"TreatAsTopicYN":false,"Description":"","ImageUrl":"","ShortDesc":"","CategoryId":2270,"CategoryName":"Routers"},{"__type":"Nc:SimpleKB:Abstractions:Dtos:CategoryItemDto","ParentCategoryId":2239,"TreatAsTopicYN":false,"Description":"","ImageUrl":"","ShortDesc":"","CategoryId":2281,"CategoryName":"WordPress Migration"},{"__type":"Nc:SimpleKB:Abstractions:Dtos:CategoryItemDto","ParentCategoryId":2239,"TreatAsTopicYN":false,"Description":"","ImageUrl":"","ShortDesc":"","CategoryId":2282,"CategoryName":"Plugins and Themes"},{"__type":"Nc:SimpleKB:Abstractions:Dtos:CategoryItemDto","ParentCategoryId":2265,"TreatAsTopicYN":false,"Description":"","ImageUrl":"","ShortDesc":"","CategoryId":2272,"CategoryName":"TV"},{"__type":"Nc:SimpleKB:Abstractions:Dtos:CategoryItemDto","ParentCategoryId":12,"TreatAsTopicYN":false,"Description":"","ImageUrl":"","ShortDesc":"","CategoryId":2187,"CategoryName":"cPanel: WordPress"},{"__type":"Nc:SimpleKB:Abstractions:Dtos:CategoryItemDto","ParentCategoryId":2209,"TreatAsTopicYN":false,"Description":"","ImageUrl":"","ShortDesc":"","CategoryId":219,"CategoryName":"Canceled Transfers"},{"__type":"Nc:SimpleKB:Abstractions:Dtos:CategoryItemDto","ParentCategoryId":2200,"TreatAsTopicYN":false,"Description":"","ImageUrl":"","ShortDesc":"","CategoryId":71,"CategoryName":"SSL Certificates Billing"},{"__type":"Nc:SimpleKB:Abstractions:Dtos:CategoryItemDto","ParentCategoryId":93,"TreatAsTopicYN":false,"Description":"","ImageUrl":"","ShortDesc":"","CategoryId":2176,"CategoryName":"Private Email: DNS Settings"},{"__type":"Nc:SimpleKB:Abstractions:Dtos:CategoryItemDto","ParentCategoryId":14,"TreatAsTopicYN":false,"Description":"","ImageUrl":"","ShortDesc":"","CategoryId":69,"CategoryName":"Installation"},{"__type":"Nc:SimpleKB:Abstractions:Dtos:CategoryItemDto","ParentCategoryId":0,"TreatAsTopicYN":false,"Description":"","ImageUrl":"/assets/img/pictograms/150/reseller-red.png","ShortDesc":"","CategoryId":34,"CategoryName":"Domains","SubCategories":[{"__type":"Nc:SimpleKB:Abstractions:Dtos:CategoryItemDto","ParentCategoryId":34,"TreatAsTopicYN":false,"Description":"","ImageUrl":"","ShortDesc":"","CategoryId":2232,"CategoryName":"DNSSEC"},{"__type":"Nc:SimpleKB:Abstractions:Dtos:CategoryItemDto","ParentCategoryId":34,"TreatAsTopicYN":false,"Description":"","ImageUrl":"","ShortDesc":"","CategoryId":2234,"CategoryName":"Google Workspace (formerly G Suite)"},{"__type":"Nc:SimpleKB:Abstractions:Dtos:CategoryItemDto","ParentCategoryId":34,"TreatAsTopicYN":false,"Description":"","ImageUrl":"","ShortDesc":"","CategoryId":2237,"CategoryName":"Host records setup"},{"__type":"Nc:SimpleKB:Abstractions:Dtos:CategoryItemDto","ParentCategoryId":34,"TreatAsTopicYN":false,"Description":"","ImageUrl":"","ShortDesc":"","CategoryId":46,"CategoryName":"Domain Management"},{"__type":"Nc:SimpleKB:Abstractions:Dtos:CategoryItemDto","ParentCategoryId":34,"TreatAsTopicYN":false,"Description":"","ImageUrl":"","ShortDesc":"","CategoryId":10,"CategoryName":"DNS Questions"},{"__type":"Nc:SimpleKB:Abstractions:Dtos:CategoryItemDto","ParentCategoryId":34,"TreatAsTopicYN":false,"Description":"","ImageUrl":"","ShortDesc":"","CategoryId":11,"CategoryName":"Dynamic DNS"},{"__type":"Nc:SimpleKB:Abstractions:Dtos:CategoryItemDto","ParentCategoryId":34,"TreatAsTopicYN":false,"Description":"","ImageUrl":"","ShortDesc":"","CategoryId":35,"CategoryName":"Registrations"},{"__type":"Nc:SimpleKB:Abstractions:Dtos:CategoryItemDto","ParentCategoryId":34,"TreatAsTopicYN":false,"Description":"","ImageUrl":"","ShortDesc":"","CategoryId":2207,"CategoryName":"Renewal questions"},{"__type":"Nc:SimpleKB:Abstractions:Dtos:CategoryItemDto","ParentCategoryId":34,"TreatAsTopicYN":false,"Description":"","ImageUrl":"","ShortDesc":"","CategoryId":36,"CategoryName":"Domains with extended attributes"},{"__type":"Nc:SimpleKB:Abstractions:Dtos:CategoryItemDto","ParentCategoryId":34,"TreatAsTopicYN":false,"Description":"","ImageUrl":"","ShortDesc":"","CategoryId":51,"CategoryName":"FreeDNS"},{"__type":"Nc:SimpleKB:Abstractions:Dtos:CategoryItemDto","ParentCategoryId":34,"TreatAsTopicYN":false,"Description":"","ImageUrl":"","ShortDesc":"","CategoryId":15,"CategoryName":"Namecheap Market"},{"__type":"Nc:SimpleKB:Abstractions:Dtos:CategoryItemDto","ParentCategoryId":34,"TreatAsTopicYN":false,"Description":"","ImageUrl":"","ShortDesc":"","CategoryId":2208,"CategoryName":"3rd Party Services Setup"},{"__type":"Nc:SimpleKB:Abstractions:Dtos:CategoryItemDto","ParentCategoryId":34,"TreatAsTopicYN":false,"Description":"","ImageUrl":"","ShortDesc":"","CategoryId":2278,"CategoryName":"Handshake TLDs"}]},{"__type":"Nc:SimpleKB:Abstractions:Dtos:CategoryItemDto","ParentCategoryId":34,"TreatAsTopicYN":false,"Description":"","ImageUrl":"","ShortDesc":"","CategoryId":35,"CategoryName":"Registrations"},{"__type":"Nc:SimpleKB:Abstractions:Dtos:CategoryItemDto","ParentCategoryId":14,"TreatAsTopicYN":false,"Description":"","ImageUrl":"","ShortDesc":"","CategoryId":70,"CategoryName":"Reissuance"},{"__type":"Nc:SimpleKB:Abstractions:Dtos:CategoryItemDto","ParentCategoryId":0,"TreatAsTopicYN":false,"Description":"","ImageUrl":"/assets/img/pictograms/150/protection-red.png","ShortDesc":"","CategoryId":37,"CategoryName":"Domain Privacy Protection","SubCategories":[]},{"__type":"Nc:SimpleKB:Abstractions:Dtos:CategoryItemDto","ParentCategoryId":2200,"TreatAsTopicYN":false,"Description":"","ImageUrl":"","ShortDesc":"","CategoryId":2177,"CategoryName":"Private Email"},{"__type":"Nc:SimpleKB:Abstractions:Dtos:CategoryItemDto","ParentCategoryId":93,"TreatAsTopicYN":false,"Description":"","ImageUrl":"","ShortDesc":"","CategoryId":2178,"CategoryName":"Private Email: Webmail Features"},{"__type":"Nc:SimpleKB:Abstractions:Dtos:CategoryItemDto","ParentCategoryId":34,"TreatAsTopicYN":false,"Description":"","ImageUrl":"","ShortDesc":"","CategoryId":2207,"CategoryName":"Renewal questions"},{"__type":"Nc:SimpleKB:Abstractions:Dtos:CategoryItemDto","ParentCategoryId":12,"TreatAsTopicYN":false,"Description":"","ImageUrl":"","ShortDesc":"","CategoryId":2210,"CategoryName":"cPanel Add-ons"},{"__type":"Nc:SimpleKB:Abstractions:Dtos:CategoryItemDto","ParentCategoryId":2265,"TreatAsTopicYN":false,"Description":"","ImageUrl":"","ShortDesc":"","CategoryId":2273,"CategoryName":"Gaming Consoles"},{"__type":"Nc:SimpleKB:Abstractions:Dtos:CategoryItemDto","ParentCategoryId":2239,"TreatAsTopicYN":false,"Description":"","ImageUrl":"","ShortDesc":"","CategoryId":2284,"CategoryName":"WordPress Management"},{"__type":"Nc:SimpleKB:Abstractions:Dtos:CategoryItemDto","ParentCategoryId":2239,"TreatAsTopicYN":false,"Description":"","ImageUrl":"","ShortDesc":"","CategoryId":2285,"CategoryName":"SFTP and Database access"},{"__type":"Nc:SimpleKB:Abstractions:Dtos:CategoryItemDto","ParentCategoryId":2265,"TreatAsTopicYN":false,"Description":"","ImageUrl":"","ShortDesc":"","CategoryId":2268,"CategoryName":"macOS"},{"__type":"Nc:SimpleKB:Abstractions:Dtos:CategoryItemDto","ParentCategoryId":93,"TreatAsTopicYN":false,"Description":"","ImageUrl":"","ShortDesc":"","CategoryId":2175,"CategoryName":"Private Email: Client Setup"},{"__type":"Nc:SimpleKB:Abstractions:Dtos:CategoryItemDto","ParentCategoryId":0,"TreatAsTopicYN":false,"Description":"","ImageUrl":"/assets/img/pictograms/150/status-red.png","ShortDesc":"","CategoryId":2209,"CategoryName":"Domain Transfers","SubCategories":[{"__type":"Nc:SimpleKB:Abstractions:Dtos:CategoryItemDto","ParentCategoryId":2209,"TreatAsTopicYN":false,"Description":"","ImageUrl":"","ShortDesc":"","CategoryId":8,"CategoryName":"Transfer Information"},{"__type":"Nc:SimpleKB:Abstractions:Dtos:CategoryItemDto","ParentCategoryId":2209,"TreatAsTopicYN":false,"Description":"","ImageUrl":"","ShortDesc":"","CategoryId":83,"CategoryName":"Transfer to Namecheap"},{"__type":"Nc:SimpleKB:Abstractions:Dtos:CategoryItemDto","ParentCategoryId":2209,"TreatAsTopicYN":false,"Description":"","ImageUrl":"","ShortDesc":"","CategoryId":84,"CategoryName":"Transfer to another provider"},{"__type":"Nc:SimpleKB:Abstractions:Dtos:CategoryItemDto","ParentCategoryId":2209,"TreatAsTopicYN":false,"Description":"","ImageUrl":"","ShortDesc":"","CategoryId":219,"CategoryName":"Canceled Transfers"}]},{"__type":"Nc:SimpleKB:Abstractions:Dtos:CategoryItemDto","ParentCategoryId":12,"TreatAsTopicYN":false,"Description":"","ImageUrl":"","ShortDesc":"","CategoryId":48,"CategoryName":"VPS"},{"__type":"Nc:SimpleKB:Abstractions:Dtos:CategoryItemDto","ParentCategoryId":34,"TreatAsTopicYN":false,"Description":"","ImageUrl":"","ShortDesc":"","CategoryId":36,"CategoryName":"Domains with extended attributes"},{"__type":"Nc:SimpleKB:Abstractions:Dtos:CategoryItemDto","ParentCategoryId":0,"TreatAsTopicYN":true,"Description":"","ImageUrl":"/assets/img/pictograms/150/server-red.png","ShortDesc":"","CategoryId":12,"CategoryName":"Hosting","SubCategories":[{"__type":"Nc:SimpleKB:Abstractions:Dtos:CategoryItemDto","ParentCategoryId":12,"TreatAsTopicYN":false,"Description":"","ImageUrl":"","ShortDesc":"","CategoryId":2219,"CategoryName":"PHP Configuration"},{"__type":"Nc:SimpleKB:Abstractions:Dtos:CategoryItemDto","ParentCategoryId":12,"TreatAsTopicYN":false,"Description":"","ImageUrl":"","ShortDesc":"","CategoryId":2225,"CategoryName":"SEO"},{"__type":"Nc:SimpleKB:Abstractions:Dtos:CategoryItemDto","ParentCategoryId":12,"TreatAsTopicYN":false,"Description":"","ImageUrl":"","ShortDesc":"","CategoryId":2252,"CategoryName":"InterWorx questions"},{"__type":"Nc:SimpleKB:Abstractions:Dtos:CategoryItemDto","ParentCategoryId":12,"TreatAsTopicYN":false,"Description":"","ImageUrl":"","ShortDesc":"","CategoryId":2291,"CategoryName":"Webuzo questions"},{"__type":"Nc:SimpleKB:Abstractions:Dtos:CategoryItemDto","ParentCategoryId":12,"TreatAsTopicYN":false,"Description":"","ImageUrl":"","ShortDesc":"","CategoryId":27,"CategoryName":"Getting Started"},{"__type":"Nc:SimpleKB:Abstractions:Dtos:CategoryItemDto","ParentCategoryId":12,"TreatAsTopicYN":false,"Description":"","ImageUrl":"","ShortDesc":"","CategoryId":22,"CategoryName":"Hosting Information"},{"__type":"Nc:SimpleKB:Abstractions:Dtos:CategoryItemDto","ParentCategoryId":12,"TreatAsTopicYN":false,"Description":"","ImageUrl":"","ShortDesc":"","CategoryId":29,"CategoryName":"cPanel questions"},{"__type":"Nc:SimpleKB:Abstractions:Dtos:CategoryItemDto","ParentCategoryId":12,"TreatAsTopicYN":false,"Description":"","ImageUrl":"","ShortDesc":"","CategoryId":2182,"CategoryName":"cPanel: Software Management"},{"__type":"Nc:SimpleKB:Abstractions:Dtos:CategoryItemDto","ParentCategoryId":12,"TreatAsTopicYN":false,"Description":"","ImageUrl":"","ShortDesc":"","CategoryId":2187,"CategoryName":"cPanel: WordPress"},{"__type":"Nc:SimpleKB:Abstractions:Dtos:CategoryItemDto","ParentCategoryId":12,"TreatAsTopicYN":false,"Description":"","ImageUrl":"","ShortDesc":"","CategoryId":2210,"CategoryName":"cPanel Add-ons"},{"__type":"Nc:SimpleKB:Abstractions:Dtos:CategoryItemDto","ParentCategoryId":12,"TreatAsTopicYN":false,"Description":"","ImageUrl":"","ShortDesc":"","CategoryId":48,"CategoryName":"VPS"},{"__type":"Nc:SimpleKB:Abstractions:Dtos:CategoryItemDto","ParentCategoryId":12,"TreatAsTopicYN":false,"Description":"","ImageUrl":"","ShortDesc":"","CategoryId":2188,"CategoryName":"Dedicated Server"},{"__type":"Nc:SimpleKB:Abstractions:Dtos:CategoryItemDto","ParentCategoryId":12,"TreatAsTopicYN":false,"Description":"","ImageUrl":"","ShortDesc":"","CategoryId":30,"CategoryName":"WHM questions"},{"__type":"Nc:SimpleKB:Abstractions:Dtos:CategoryItemDto","ParentCategoryId":12,"TreatAsTopicYN":false,"Description":"","ImageUrl":"","ShortDesc":"","CategoryId":32,"CategoryName":"DNS settings"},{"__type":"Nc:SimpleKB:Abstractions:Dtos:CategoryItemDto","ParentCategoryId":12,"TreatAsTopicYN":false,"Description":"","ImageUrl":"","ShortDesc":"","CategoryId":103,"CategoryName":"LVE (CloudLinux)"},{"__type":"Nc:SimpleKB:Abstractions:Dtos:CategoryItemDto","ParentCategoryId":12,"TreatAsTopicYN":false,"Description":"","ImageUrl":"","ShortDesc":"","CategoryId":89,"CategoryName":"SSH Access"},{"__type":"Nc:SimpleKB:Abstractions:Dtos:CategoryItemDto","ParentCategoryId":12,"TreatAsTopicYN":false,"Description":"","ImageUrl":"","ShortDesc":"","CategoryId":205,"CategoryName":"FTP questions"},{"__type":"Nc:SimpleKB:Abstractions:Dtos:CategoryItemDto","ParentCategoryId":12,"TreatAsTopicYN":false,"Description":"","ImageUrl":"","ShortDesc":"","CategoryId":2180,"CategoryName":"MySQL questions"},{"__type":"Nc:SimpleKB:Abstractions:Dtos:CategoryItemDto","ParentCategoryId":12,"TreatAsTopicYN":false,"Description":"","ImageUrl":"","ShortDesc":"","CategoryId":2199,"CategoryName":"Hosting Migration"},{"__type":"Nc:SimpleKB:Abstractions:Dtos:CategoryItemDto","ParentCategoryId":12,"TreatAsTopicYN":false,"Description":"","ImageUrl":"","ShortDesc":"","CategoryId":2194,"CategoryName":"Tips & Tricks"},{"__type":"Nc:SimpleKB:Abstractions:Dtos:CategoryItemDto","ParentCategoryId":12,"TreatAsTopicYN":false,"Description":"","ImageUrl":"","ShortDesc":"","CategoryId":239,"CategoryName":"WHMCS"},{"__type":"Nc:SimpleKB:Abstractions:Dtos:CategoryItemDto","ParentCategoryId":12,"TreatAsTopicYN":false,"Description":"","ImageUrl":"","ShortDesc":"","CategoryId":33,"CategoryName":"SSL Installation"}]},{"__type":"Nc:SimpleKB:Abstractions:Dtos:CategoryItemDto","ParentCategoryId":93,"TreatAsTopicYN":false,"Description":"","ImageUrl":"","ShortDesc":"","CategoryId":2171,"CategoryName":"Private Email: Active Sync (Exchange) Setup"},{"__type":"Nc:SimpleKB:Abstractions:Dtos:CategoryItemDto","ParentCategoryId":12,"TreatAsTopicYN":false,"Description":"","ImageUrl":"","ShortDesc":"","CategoryId":2188,"CategoryName":"Dedicated Server"},{"__type":"Nc:SimpleKB:Abstractions:Dtos:CategoryItemDto","ParentCategoryId":2265,"TreatAsTopicYN":false,"Description":"","ImageUrl":"","ShortDesc":"","CategoryId":2269,"CategoryName":"iOS"},{"__type":"Nc:SimpleKB:Abstractions:Dtos:CategoryItemDto","ParentCategoryId":2239,"TreatAsTopicYN":false,"Description":"","ImageUrl":"","ShortDesc":"","CategoryId":2286,"CategoryName":"Domains questions"},{"__type":"Nc:SimpleKB:Abstractions:Dtos:CategoryItemDto","ParentCategoryId":2239,"TreatAsTopicYN":false,"Description":"","ImageUrl":"","ShortDesc":"","CategoryId":2288,"CategoryName":"Billing questions"},{"__type":"Nc:SimpleKB:Abstractions:Dtos:CategoryItemDto","ParentCategoryId":2265,"TreatAsTopicYN":false,"Description":"","ImageUrl":"","ShortDesc":"","CategoryId":2271,"CategoryName":"Linux"},{"__type":"Nc:SimpleKB:Abstractions:Dtos:CategoryItemDto","ParentCategoryId":12,"TreatAsTopicYN":false,"Description":"","ImageUrl":"","ShortDesc":"","CategoryId":30,"CategoryName":"WHM questions"},{"__type":"Nc:SimpleKB:Abstractions:Dtos:CategoryItemDto","ParentCategoryId":93,"TreatAsTopicYN":false,"Description":"","ImageUrl":"","ShortDesc":"","CategoryId":31,"CategoryName":"cPanel Email FAQs"},{"__type":"Nc:SimpleKB:Abstractions:Dtos:CategoryItemDto","ParentCategoryId":34,"TreatAsTopicYN":false,"Description":"","ImageUrl":"","ShortDesc":"","CategoryId":51,"CategoryName":"FreeDNS"},{"__type":"Nc:SimpleKB:Abstractions:Dtos:CategoryItemDto","ParentCategoryId":0,"TreatAsTopicYN":false,"Description":"","ImageUrl":"/assets/img/pictograms/150/email-red.png","ShortDesc":"","CategoryId":93,"CategoryName":"Email service","SubCategories":[{"__type":"Nc:SimpleKB:Abstractions:Dtos:CategoryItemDto","ParentCategoryId":93,"TreatAsTopicYN":false,"Description":"","ImageUrl":"","ShortDesc":"","CategoryId":2216,"CategoryName":"Spam Protection"},{"__type":"Nc:SimpleKB:Abstractions:Dtos:CategoryItemDto","ParentCategoryId":93,"TreatAsTopicYN":false,"Description":"","ImageUrl":"","ShortDesc":"","CategoryId":2226,"CategoryName":"Email Migration"},{"__type":"Nc:SimpleKB:Abstractions:Dtos:CategoryItemDto","ParentCategoryId":93,"TreatAsTopicYN":false,"Description":"","ImageUrl":"","ShortDesc":"","CategoryId":2260,"CategoryName":"Private Email Contacts and Calendars Setup"},{"__type":"Nc:SimpleKB:Abstractions:Dtos:CategoryItemDto","ParentCategoryId":93,"TreatAsTopicYN":false,"Description":"","ImageUrl":"","ShortDesc":"","CategoryId":2179,"CategoryName":"Private Email: General Information"},{"__type":"Nc:SimpleKB:Abstractions:Dtos:CategoryItemDto","ParentCategoryId":93,"TreatAsTopicYN":false,"Description":"","ImageUrl":"","ShortDesc":"","CategoryId":2215,"CategoryName":"Private Email: Mailbox Management"},{"__type":"Nc:SimpleKB:Abstractions:Dtos:CategoryItemDto","ParentCategoryId":93,"TreatAsTopicYN":false,"Description":"","ImageUrl":"","ShortDesc":"","CategoryId":2214,"CategoryName":"Email Forwarding"},{"__type":"Nc:SimpleKB:Abstractions:Dtos:CategoryItemDto","ParentCategoryId":93,"TreatAsTopicYN":false,"Description":"","ImageUrl":"","ShortDesc":"","CategoryId":2176,"CategoryName":"Private Email: DNS Settings"},{"__type":"Nc:SimpleKB:Abstractions:Dtos:CategoryItemDto","ParentCategoryId":93,"TreatAsTopicYN":false,"Description":"","ImageUrl":"","ShortDesc":"","CategoryId":2178,"CategoryName":"Private Email: Webmail Features"},{"__type":"Nc:SimpleKB:Abstractions:Dtos:CategoryItemDto","ParentCategoryId":93,"TreatAsTopicYN":false,"Description":"","ImageUrl":"","ShortDesc":"","CategoryId":2175,"CategoryName":"Private Email: Client Setup"},{"__type":"Nc:SimpleKB:Abstractions:Dtos:CategoryItemDto","ParentCategoryId":93,"TreatAsTopicYN":false,"Description":"","ImageUrl":"","ShortDesc":"","CategoryId":2171,"CategoryName":"Private Email: Active Sync (Exchange) Setup"},{"__type":"Nc:SimpleKB:Abstractions:Dtos:CategoryItemDto","ParentCategoryId":93,"TreatAsTopicYN":false,"Description":"","ImageUrl":"","ShortDesc":"","CategoryId":31,"CategoryName":"cPanel Email FAQs"},{"__type":"Nc:SimpleKB:Abstractions:Dtos:CategoryItemDto","ParentCategoryId":93,"TreatAsTopicYN":false,"Description":"","ImageUrl":"","ShortDesc":"","CategoryId":2186,"CategoryName":"cPanel Email: Client Setup"},{"__type":"Nc:SimpleKB:Abstractions:Dtos:CategoryItemDto","ParentCategoryId":93,"TreatAsTopicYN":false,"Description":"","ImageUrl":"","ShortDesc":"","CategoryId":2204,"CategoryName":"Private Email: Video Overview"}]},{"__type":"Nc:SimpleKB:Abstractions:Dtos:CategoryItemDto","ParentCategoryId":12,"TreatAsTopicYN":false,"Description":"","ImageUrl":"","ShortDesc":"","CategoryId":32,"CategoryName":"DNS settings"},{"__type":"Nc:SimpleKB:Abstractions:Dtos:CategoryItemDto","ParentCategoryId":34,"TreatAsTopicYN":false,"Description":"","ImageUrl":"","ShortDesc":"","CategoryId":15,"CategoryName":"Namecheap Market"},{"__type":"Nc:SimpleKB:Abstractions:Dtos:CategoryItemDto","ParentCategoryId":93,"TreatAsTopicYN":false,"Description":"","ImageUrl":"","ShortDesc":"","CategoryId":2186,"CategoryName":"cPanel Email: Client Setup"},{"__type":"Nc:SimpleKB:Abstractions:Dtos:CategoryItemDto","ParentCategoryId":2265,"TreatAsTopicYN":false,"Description":"","ImageUrl":"","ShortDesc":"","CategoryId":2266,"CategoryName":"Windows"},{"__type":"Nc:SimpleKB:Abstractions:Dtos:CategoryItemDto","ParentCategoryId":2239,"TreatAsTopicYN":false,"Description":"","ImageUrl":"","ShortDesc":"","CategoryId":2287,"CategoryName":"SSL questions"},{"__type":"Nc:SimpleKB:Abstractions:Dtos:CategoryItemDto","ParentCategoryId":2265,"TreatAsTopicYN":false,"Description":"","ImageUrl":"","ShortDesc":"","CategoryId":2267,"CategoryName":"Android"},{"__type":"Nc:SimpleKB:Abstractions:Dtos:CategoryItemDto","ParentCategoryId":34,"TreatAsTopicYN":false,"Description":"","ImageUrl":"","ShortDesc":"","CategoryId":2208,"CategoryName":"3rd Party Services Setup"},{"__type":"Nc:SimpleKB:Abstractions:Dtos:CategoryItemDto","ParentCategoryId":93,"TreatAsTopicYN":false,"Description":"","ImageUrl":"","ShortDesc":"","CategoryId":2204,"CategoryName":"Private Email: Video Overview"},{"__type":"Nc:SimpleKB:Abstractions:Dtos:CategoryItemDto","ParentCategoryId":0,"TreatAsTopicYN":false,"Description":"","ImageUrl":"/assets/img/pictograms/150/security-red.png","ShortDesc":"","CategoryId":14,"CategoryName":"SSL Certificates","SubCategories":[{"__type":"Nc:SimpleKB:Abstractions:Dtos:CategoryItemDto","ParentCategoryId":14,"TreatAsTopicYN":false,"Description":"","ImageUrl":"","ShortDesc":"","CategoryId":2217,"CategoryName":"Renewal"},{"__type":"Nc:SimpleKB:Abstractions:Dtos:CategoryItemDto","ParentCategoryId":14,"TreatAsTopicYN":false,"Description":"","ImageUrl":"","ShortDesc":"","CategoryId":2218,"CategoryName":"cPanel SSL Plugin"},{"__type":"Nc:SimpleKB:Abstractions:Dtos:CategoryItemDto","ParentCategoryId":14,"TreatAsTopicYN":false,"Description":"","ImageUrl":"","ShortDesc":"","CategoryId":2221,"CategoryName":"Multi-Domain SSL Certificates"},{"__type":"Nc:SimpleKB:Abstractions:Dtos:CategoryItemDto","ParentCategoryId":14,"TreatAsTopicYN":false,"Description":"","ImageUrl":"","ShortDesc":"","CategoryId":2222,"CategoryName":"Cancellation"},{"__type":"Nc:SimpleKB:Abstractions:Dtos:CategoryItemDto","ParentCategoryId":14,"TreatAsTopicYN":false,"Description":"","ImageUrl":"","ShortDesc":"","CategoryId":2223,"CategoryName":"Browser errors"},{"__type":"Nc:SimpleKB:Abstractions:Dtos:CategoryItemDto","ParentCategoryId":14,"TreatAsTopicYN":false,"Description":"","ImageUrl":"","ShortDesc":"","CategoryId":2224,"CategoryName":"Site Seal, Logo"},{"__type":"Nc:SimpleKB:Abstractions:Dtos:CategoryItemDto","ParentCategoryId":14,"TreatAsTopicYN":false,"Description":"","ImageUrl":"","ShortDesc":"","CategoryId":2238,"CategoryName":"SSL installation errors"},{"__type":"Nc:SimpleKB:Abstractions:Dtos:CategoryItemDto","ParentCategoryId":14,"TreatAsTopicYN":false,"Description":"","ImageUrl":"","ShortDesc":"","CategoryId":2290,"CategoryName":"CSR code"},{"__type":"Nc:SimpleKB:Abstractions:Dtos:CategoryItemDto","ParentCategoryId":14,"TreatAsTopicYN":false,"Description":"","ImageUrl":"","ShortDesc":"","CategoryId":2293,"CategoryName":"Automated SSL management"},{"__type":"Nc:SimpleKB:Abstractions:Dtos:CategoryItemDto","ParentCategoryId":14,"TreatAsTopicYN":false,"Description":"","ImageUrl":"","ShortDesc":"","CategoryId":38,"CategoryName":"SSL General"},{"__type":"Nc:SimpleKB:Abstractions:Dtos:CategoryItemDto","ParentCategoryId":14,"TreatAsTopicYN":false,"Description":"","ImageUrl":"","ShortDesc":"","CategoryId":67,"CategoryName":"Activation"},{"__type":"Nc:SimpleKB:Abstractions:Dtos:CategoryItemDto","ParentCategoryId":14,"TreatAsTopicYN":false,"Description":"","ImageUrl":"","ShortDesc":"","CategoryId":68,"CategoryName":"Validation"},{"__type":"Nc:SimpleKB:Abstractions:Dtos:CategoryItemDto","ParentCategoryId":14,"TreatAsTopicYN":false,"Description":"","ImageUrl":"","ShortDesc":"","CategoryId":69,"CategoryName":"Installation"},{"__type":"Nc:SimpleKB:Abstractions:Dtos:CategoryItemDto","ParentCategoryId":14,"TreatAsTopicYN":false,"Description":"","ImageUrl":"","ShortDesc":"","CategoryId":70,"CategoryName":"Reissuance"}]},{"__type":"Nc:SimpleKB:Abstractions:Dtos:CategoryItemDto","ParentCategoryId":0,"TreatAsTopicYN":true,"Description":"","ImageUrl":"/assets/img/pictograms/150/performance-red.png","ShortDesc":"","CategoryId":9,"CategoryName":"My Account","SubCategories":[{"__type":"Nc:SimpleKB:Abstractions:Dtos:CategoryItemDto","ParentCategoryId":9,"TreatAsTopicYN":false,"Description":"","ImageUrl":"","ShortDesc":"","CategoryId":45,"CategoryName":"Account Security"},{"__type":"Nc:SimpleKB:Abstractions:Dtos:CategoryItemDto","ParentCategoryId":9,"TreatAsTopicYN":false,"Description":"","ImageUrl":"","ShortDesc":"","CategoryId":43,"CategoryName":"Profile Management"},{"__type":"Nc:SimpleKB:Abstractions:Dtos:CategoryItemDto","ParentCategoryId":9,"TreatAsTopicYN":false,"Description":"","ImageUrl":"","ShortDesc":"","CategoryId":44,"CategoryName":"Account Access"}]},{"__type":"Nc:SimpleKB:Abstractions:Dtos:CategoryItemDto","ParentCategoryId":34,"TreatAsTopicYN":false,"Description":"","ImageUrl":"","ShortDesc":"","CategoryId":2278,"CategoryName":"Handshake TLDs"},{"__type":"Nc:SimpleKB:Abstractions:Dtos:CategoryItemDto","ParentCategoryId":12,"TreatAsTopicYN":false,"Description":"","ImageUrl":"","ShortDesc":"","CategoryId":103,"CategoryName":"LVE (CloudLinux)"},{"__type":"Nc:SimpleKB:Abstractions:Dtos:CategoryItemDto","ParentCategoryId":0,"TreatAsTopicYN":false,"Description":"","ImageUrl":"/assets/img/pictograms/150/affiliates-red.png","ShortDesc":"","CategoryId":55,"CategoryName":"Affiliates","SubCategories":[]},{"__type":"Nc:SimpleKB:Abstractions:Dtos:CategoryItemDto","ParentCategoryId":12,"TreatAsTopicYN":false,"Description":"","ImageUrl":"","ShortDesc":"","CategoryId":89,"CategoryName":"SSH Access"},{"__type":"Nc:SimpleKB:Abstractions:Dtos:CategoryItemDto","ParentCategoryId":0,"TreatAsTopicYN":false,"Description":"","ImageUrl":"/assets/img/pictograms/150/tools-red.png","ShortDesc":"","CategoryId":2211,"CategoryName":"API & Resellers","SubCategories":[{"__type":"Nc:SimpleKB:Abstractions:Dtos:CategoryItemDto","ParentCategoryId":2211,"TreatAsTopicYN":false,"Description":"","ImageUrl":"","ShortDesc":"","CategoryId":2227,"CategoryName":"SSL Resellers"},{"__type":"Nc:SimpleKB:Abstractions:Dtos:CategoryItemDto","ParentCategoryId":2211,"TreatAsTopicYN":false,"Description":"","ImageUrl":"","ShortDesc":"","CategoryId":2229,"CategoryName":"Hosting Resellers"},{"__type":"Nc:SimpleKB:Abstractions:Dtos:CategoryItemDto","ParentCategoryId":2211,"TreatAsTopicYN":false,"Description":"","ImageUrl":"","ShortDesc":"","CategoryId":63,"CategoryName":"Namecheap API"},{"__type":"Nc:SimpleKB:Abstractions:Dtos:CategoryItemDto","ParentCategoryId":2211,"TreatAsTopicYN":false,"Description":"","ImageUrl":"","ShortDesc":"","CategoryId":2196,"CategoryName":"WHMCS module for SSL"}]},{"__type":"Nc:SimpleKB:Abstractions:Dtos:CategoryItemDto","ParentCategoryId":0,"TreatAsTopicYN":false,"Description":"","ImageUrl":"/assets/img/pictograms/150/timer-red.png","ShortDesc":"","CategoryId":2212,"CategoryName":"Legacy Products","SubCategories":[]},{"__type":"Nc:SimpleKB:Abstractions:Dtos:CategoryItemDto","ParentCategoryId":12,"TreatAsTopicYN":false,"Description":"","ImageUrl":"","ShortDesc":"","CategoryId":205,"CategoryName":"FTP questions"},{"__type":"Nc:SimpleKB:Abstractions:Dtos:CategoryItemDto","ParentCategoryId":12,"TreatAsTopicYN":false,"Description":"","ImageUrl":"","ShortDesc":"","CategoryId":2180,"CategoryName":"MySQL questions"},{"__type":"Nc:SimpleKB:Abstractions:Dtos:CategoryItemDto","ParentCategoryId":12,"TreatAsTopicYN":false,"Description":"","ImageUrl":"","ShortDesc":"","CategoryId":2199,"CategoryName":"Hosting Migration"},{"__type":"Nc:SimpleKB:Abstractions:Dtos:CategoryItemDto","ParentCategoryId":0,"TreatAsTopicYN":false,"Description":"","ImageUrl":"/assets/img/pictograms/150/premiumdns-red.png","ShortDesc":"","CategoryId":2231,"CategoryName":"PremiumDNS","SubCategories":[]},{"__type":"Nc:SimpleKB:Abstractions:Dtos:CategoryItemDto","ParentCategoryId":12,"TreatAsTopicYN":false,"Description":"","ImageUrl":"","ShortDesc":"","CategoryId":2194,"CategoryName":"Tips & Tricks"},{"__type":"Nc:SimpleKB:Abstractions:Dtos:CategoryItemDto","ParentCategoryId":0,"TreatAsTopicYN":false,"Description":"","ImageUrl":"https://static.nc-img.com/live-resource/icons/knowledgebase/fastVPN_icon-150px.png","ShortDesc":"","CategoryId":2265,"CategoryName":"FastVPN","SubCategories":[{"__type":"Nc:SimpleKB:Abstractions:Dtos:CategoryItemDto","ParentCategoryId":2265,"TreatAsTopicYN":false,"Description":"","ImageUrl":"","ShortDesc":"","CategoryId":2292,"CategoryName":"Browser Extensions"},{"__type":"Nc:SimpleKB:Abstractions:Dtos:CategoryItemDto","ParentCategoryId":2265,"TreatAsTopicYN":false,"Description":"","ImageUrl":"","ShortDesc":"","CategoryId":2274,"CategoryName":"General"},{"__type":"Nc:SimpleKB:Abstractions:Dtos:CategoryItemDto","ParentCategoryId":2265,"TreatAsTopicYN":false,"Description":"","ImageUrl":"","ShortDesc":"","CategoryId":2270,"CategoryName":"Routers"},{"__type":"Nc:SimpleKB:Abstractions:Dtos:CategoryItemDto","ParentCategoryId":2265,"TreatAsTopicYN":false,"Description":"","ImageUrl":"","ShortDesc":"","CategoryId":2272,"CategoryName":"TV"},{"__type":"Nc:SimpleKB:Abstractions:Dtos:CategoryItemDto","ParentCategoryId":2265,"TreatAsTopicYN":false,"Description":"","ImageUrl":"","ShortDesc":"","CategoryId":2273,"CategoryName":"Gaming Consoles"},{"__type":"Nc:SimpleKB:Abstractions:Dtos:CategoryItemDto","ParentCategoryId":2265,"TreatAsTopicYN":false,"Description":"","ImageUrl":"","ShortDesc":"","CategoryId":2268,"CategoryName":"macOS"},{"__type":"Nc:SimpleKB:Abstractions:Dtos:CategoryItemDto","ParentCategoryId":2265,"TreatAsTopicYN":false,"Description":"","ImageUrl":"","ShortDesc":"","CategoryId":2269,"CategoryName":"iOS"},{"__type":"Nc:SimpleKB:Abstractions:Dtos:CategoryItemDto","ParentCategoryId":2265,"TreatAsTopicYN":false,"Description":"","ImageUrl":"","ShortDesc":"","CategoryId":2271,"CategoryName":"Linux"},{"__type":"Nc:SimpleKB:Abstractions:Dtos:CategoryItemDto","ParentCategoryId":2265,"TreatAsTopicYN":false,"Description":"","ImageUrl":"","ShortDesc":"","CategoryId":2266,"CategoryName":"Windows"},{"__type":"Nc:SimpleKB:Abstractions:Dtos:CategoryItemDto","ParentCategoryId":2265,"TreatAsTopicYN":false,"Description":"","ImageUrl":"","ShortDesc":"","CategoryId":2267,"CategoryName":"Android"}]},{"__type":"Nc:SimpleKB:Abstractions:Dtos:CategoryItemDto","ParentCategoryId":12,"TreatAsTopicYN":false,"Description":"","ImageUrl":"","ShortDesc":"","CategoryId":239,"CategoryName":"WHMCS"},{"__type":"Nc:SimpleKB:Abstractions:Dtos:CategoryItemDto","ParentCategoryId":12,"TreatAsTopicYN":false,"Description":"","ImageUrl":"","ShortDesc":"","CategoryId":33,"CategoryName":"SSL Installation"}],"status":200,"statusText":"OK"}}File Manager interface and options











Need help? We're always here for you.