{"/api/v1/ncpl/currencies/getAll":{"body":[{"Name":"U.S. Dollar","Code":"USD","Symbol":"$","Separator":".","Culture":"en-US"},{"Name":"Euro","Code":"EUR","Symbol":"€","Separator":",","Culture":"en-US"},{"Name":"British Pound","Code":"GBP","Symbol":"£","Separator":".","Culture":"en-US"},{"Name":"Canadian Dollars","Code":"CAD","Symbol":"C$","Separator":".","Culture":"en-US"},{"Name":"Australian Dollars","Code":"AUD","Symbol":"A$","Separator":".","Culture":"en-US"},{"Name":"Indian Rupees","Code":"INR","Symbol":"Rs","Separator":".","Culture":"en-US"},{"Name":"China Yuan RMB","Code":"CNY","Symbol":"¥","Separator":".","Culture":"en-US"}],"status":200,"statusText":"OK"},"/api/v1/ncpl/usermanagement/uiuser/getHeaderUserInfo:\"{\\\"hideSupportPin\\\":true}\"":{"body":{"__ctxId":"99702346033D47968F0B3873FDA07E71","__isError":true,"__errorType":"Nc.Platform.Abstractions.UnauthorizedException","Http_WWW_Authenticate":"Bearer","StatusCode":"Unauthorized","LogLevel":3,"Message":"","InnerException":null,"HelpLink":null,"Source":"Nc.Security.Middleware"},"status":401,"statusText":"Unauthorized"},"/api/v1/ncpl/cart/user/getShoppingCartSummary:\"{\\\"finalTotalOnly\\\":true}\"":{"body":null,"status":200,"statusText":"OK"}}{"/api/v1/ncpl/simplekb/getarticle:\"{\\\"articleId\\\":10076,\\\"categoryId\\\":2187}\"":{"body":{"Id":10076,"FriendlyId":"","ArticleTypeId":0,"Title":"How to Create a WordPress Staging Site","ArticleName":"How to Create a WordPress Staging Site","ArticleSummary":null,"PreponedSummary":false,"Approved":true,"Body":"V29yZFByZXNzLCBhbHRob3VnaCB0aGUgbW9zdCBwb3B1bGFyIGJsb2dnaW5nIHNvZnR3YXJlIHdpdGggdGhvdXNhbmRzIG9mIHVzZXJzLCBzb21laG93IGZhaWxzIHRvIGJlIHRoZSBtb3N0IHJlbGlhYmxlIHdlYnNpdGUgYnVpbGRlci4gTm93YWRheXMsIHJlbGlhYmlsaXR5IGlzIHNvbWV0aGluZyB0aGF0IGdvZXMgYWxvbmcgd2l0aCBhbnkgdHlwZSBvZiBwcm9kdWN0IGRldmVsb3BtZW50LiBIYXZlIHlvdSBldmVyIHdvbmRlcmVkIGlmIGEgY2VydGFpbiB1cGRhdGUgb3IgY2hhbmdlIHdvdWxkIHNodXQgZG93biBhbiBlbnRpcmUgd2Vic2l0ZSBvciBtYWtlIGl0IGxvb2sgbGlrZSBpdCBoYWQgbmV2ZXIgYmVlbiB1cCBpbiB0aGUgZmlyc3QgcGxhY2U/IFN0YWdpbmcgd2Vic2l0ZXMgY2FuIGJlIGEgdmVyeSB1c2VmdWwgd2F5IHRvIGF2b2lkIHN1Y2ggaW5jb252ZW5pZW5jZXMgYW5kIG1ha2UgdGhlIHVzZXIgZXhwZXJpZW5jZSBvZiB5b3VyIHdlYnNpdGUgdmlzaXRvcnMgc2VhbWxlc3MuPGJyIC8+PGJyIC8+SWYgeW91IGFyZSBzdGlsbCB1bnN1cmUgd2hldGhlciBvciBub3QgeW91IG5lZWQgYSBzdGFnaW5nIHdlYnNpdGUsIGNoZWNrIHRoZSByZWFzb25zIGJlbG93OjxiciAvPjx1bD48bGk+SXQgZ2l2ZXMgeW91IHRoZSBhYmlsaXR5IHRvIHRlc3QgYWxsIHR5cGVzIG9mIGNoYW5nZXMgYmVmb3JlIHB1c2hpbmcgdGhlbSB0byB5b3VyIG1haW4gd2Vic2l0ZSBvciBnb2luZyBsaXZlLiA8L2xpPjxsaT5JdCByZWR1Y2VzIHRoZSBhbW91bnQgb2YgdGltZSBvZiB5b3VyIHdlYnNpdGUgaXMgYmxvY2tlZCB0byB2aXNpdG9ycyB3aGlsZSBpbiDigJxNYWludGVuYW5jZSBtb2Rl4oCdIGJlY2F1c2UgZGVwbG95aW5nIHRoZSBjaGFuZ2VzIHlvdSBoYXZlIGFscmVhZHkgdGVzdGVkIHRha2VzIGxlc3MgdGltZS48L2xpPjxsaT5UaGUgY2hhbmNlcyBvZiBpbXBsZW1lbnRpbmcgYW4gaXJyZXZlcnNpYmxlIGNoYW5nZSBhcmUgcmVkdWNlZCB0byBhIG1pbmltdW0gd2hlbiB5b3UgdGVzdCBiZWZvcmUgc3dpdGNoaW5nIGNvbnRlbnQgdG8gbGl2ZSBwYWdlcy4gPC9saT48bGk+VGhlIGFmb3JlbWVudGlvbmVkIHBvaW50IHJlc3VsdHMgaW4geW91ciB3ZWJzaXRl4oCZcyBoaWdoZXIgU0VPIHJhbmtpbmcgYW5kIHJlcHV0YXRpb24gd2hpbGUga2VlcGluZyB5b3VyIHZpc2l0b3JzIHNhdGlzZmllZC48L2xpPjwvdWw+PGJyIC8+PGRpdj5Ob3cgdGhhdCB5b3Uga25vdyB0aGUgdmFsdWUgb2Ygc3RhZ2luZyBhIHdlYnNpdGUgYmVmb3JlIHByb2R1Y3Rpb24sIGxldOKAmXMgbG9vayBhdCBob3cgdGhpcyB0YXNrIGNhbiBiZSBhY2NvbXBsaXNoZWQuIDxiciAvPjwvZGl2PjxkaXY+PGJyIC8+PC9kaXY+PGRpdj48Yj5OT1RFOjwvYj4gVGhpcyBndWlkZSBpcyBub3QgYXBwbGljYWJsZSB0byBXb3JkUHJlc3Mgd2Vic2l0ZXMgYnVpbHQgb24gPGEgaHJlZj0iaHR0cHM6Ly93d3cubmFtZWNoZWFwLmNvbS93b3JkcHJlc3MiIGxpbmt0ZXh0PSJNYW5hZ2VkIFdvcmRQcmVzcyBIb3N0aW5nIiBsaW5rdHlwZT0iQ3VzdG9tIiB0YXJnZXQ9Il9ibGFuayI+TWFuYWdlZCBXb3JkUHJlc3MgSG9zdGluZzwvYT4uPGJyIC8+PC9kaXY+PGRpdj48YnIgLz48L2Rpdj48ZGl2PjxiciAvPjwvZGl2PjxkaXY+PHA+PGEgaHJlZj0iI2luc3RhbGxhdGlvbiI+PGI+V29yZFByZXNzIEluc3RhbGxhdGlvbjwvYj48L2E+PC9wPjxwPjxhIGhyZWY9IiNzb2Z0YWN1bG91cyI+PGI+U29mdGFjdWxvdXMgU3RhZ2luZyBUb29sPC9iPjwvYT48L3A+PHA+PGEgaHJlZj0iI3BsdWdpbnMiPjxiPlN0YWdpbmcgUGx1Z2luczwvYj48L2E+PC9wPjx1bD48bGk+PGEgaHJlZj0iI3dwX3N0YWdpbmciPldQIFN0YWdpbmc8L2E+PC9saT48bGk+PGEgaHJlZj0iI2FsbF9pbl9vbmUiPkFsbC1pbi1PbmUgV29yZFByZXNzIE1pZ3JhdGlvbjwvYT48L2xpPjxsaT48YSBocmVmPSIjZHVwbGljYXRvciI+RHVwbGljYXRvcjwvYT48L2xpPjwvdWw+PHA+PGEgaHJlZj0iI21hbnVhbCI+PGI+TWFudWFsIGNyZWF0aW9uPC9iPjwvYT48L3A+PGJyIC8+PC9kaXY+PGRpdj48YnIgLz48L2Rpdj48ZGl2PjxiciAvPjwvZGl2PjxkaXY+PHA+PGEgbmFtZT0iaW5zdGFsbGF0aW9uIj48Yj5Xb3JkUHJlc3MgSW5zdGFsbGF0aW9uPC9iPjwvYT48L3A+PC9kaXY+PGRpdj48YnIgLz48L2Rpdj48ZGl2PkJlZm9yZSB5b3UgY2FuIGNyZWF0ZSBhIHN0YWdpbmcgdmVyc2lvbiBvZiB5b3VyIHdlYnNpdGUsIHlvdSBuZWVkIHRvIGNyZWF0ZSB0aGUgbWFpbiB3ZWJzaXRlLiBXZSByZWNvbW1lbmQgPGEgaHJlZj0iaHR0cHM6Ly93d3cubmFtZWNoZWFwLmNvbS9zdXBwb3J0L2tub3dsZWRnZWJhc2UvYXJ0aWNsZS5hc3B4LzEyNTUvMjE4Ny9ob3ctdG8taW5zdGFsbC13b3JkcHJlc3MtdXNpbmctc29mdGFjdWxvdXMiIGxpbmt0ZXh0PSJpbnN0YWxsaW5nIGl0IHZpYSB0aGUgU29mdGFjdWxvdXMgdG9vbCIgbGlua3R5cGU9IkN1c3RvbSIgdGFyZ2V0PSJfYmxhbmsiPmluc3RhbGxpbmcgaXQgdmlhIHRoZSBTb2Z0YWN1bG91cyB0b29sPC9hPiBhcyBpdCBnaXZlcyB5b3UgYWRkaXRpb25hbCB0b29scyBmb3Igd2Vic2l0ZSBtYW5hZ2VtZW50IGFuZCBzaW1wbGlmaWVzIHN0YWdpbmcgd2Vic2l0ZSBjcmVhdGlvbi48YnIgLz48L2Rpdj48ZGl2PjxiciAvPjwvZGl2PjxkaXY+PGJyIC8+PC9kaXY+PGRpdj48YnIgLz48L2Rpdj48ZGl2PjxwPjxhIG5hbWU9InNvZnRhY3Vsb3VzIj48Yj5Tb2Z0YWN1bG91cyBTdGFnaW5nIFRvb2w8L2I+PC9hPjwvcD48YnIgLz48L2Rpdj48ZGl2PkFwYXJ0IGZyb20gb3RoZXIgdG9vbHMsIFNvZnRhY3Vsb3VzIHByb3ZpZGVzIHRoZSBtb3N0IGVmZmVjdGl2ZSB3YXkgdG8gc3RhZ2UgYSB3ZWJzaXRlLiBIb3dldmVyLCB0aGlzIHJlcXVpcmVzIHlvdXIgd2Vic2l0ZSBiZSBpbnN0YWxsZWQgdmlhIFNvZnRhY3Vsb3VzIGFuZCB0aGF0IGl0IGlzIGxvY2F0ZWQgaW4gdGhlIG9yaWdpbmFsIDxhIGhyZWY9Imh0dHBzOi8vd3d3Lm5hbWVjaGVhcC5jb20vaG9zdGluZy9zaGFyZWQuYXNweCI+aG9zdGluZyBhY2NvdW50PC9hPi4gSWYgeW91IGFyZSB1bnN1cmUgd2hldGhlciB0aGlzIGlzIHlvdXIgY2FzZSwgeW91IGNhbiBjaGVjayBpZiB5b3VyIHdlYnNpdGUgaXMgcHJlc2VudCBpbiA8Yj5jUGFuZWwgJmd0OyZndDsgU29mdGFjdWxvdXMgQXBwcyBJbnN0YWxsZXIgJmd0OyZndDsgQWxsIEluc3RhbGxhdGlvbnM8L2I+IHNlY3Rpb24uIEZvciB0ZXN0aW5nLCB3ZSB1c2UgdGhlIDxpPm5jdGVzdC5pbmZvPC9pPiB3ZWJzaXRlOjwvZGl2PjxkaXY+PGJyIC8+PC9kaXY+PGRpdj48aW1nIGNsYXNzPSJrYi1pbWFnZSIgc3JjPSJodHRwczovL05hbWVjaGVhcC5zaW1wbGVrYi5jb20vU2l0ZUNvbnRlbnRzLzItN0MyMkQ1MjM2QTQ1NDNFQjgyN0YzQkQ4OTM2RTE1M0UvbWVkaWEvd3Bfc3RhZ2luZ19zaXRlMS5wbmciIGFsdD0iQSBzY3JlZW5zaG90IG9mIHRoZSBTb2Z0YWN1bG91cyBkYXNoYm9hcmQgaW5zaWRlIGNQYW5lbCIgLz48L2Rpdj48ZGl2PjxiciAvPjwvZGl2PjxkaXY+SWYgeW91ciB3ZWJzaXRlIHdhcyBjcmVhdGVkIHVzaW5nIFNvZnRhY3Vsb3VzLCB5b3UgY2FuIHByb2NlZWQgd2l0aCB0aGUgc3RhZ2luZyBjcmVhdGlvbiBhcyA8YSBocmVmPSJodHRwczovL3d3dy5uYW1lY2hlYXAuY29tL3N1cHBvcnQva25vd2xlZGdlYmFzZS9hcnRpY2xlLmFzcHgvMTI1OC8yMTgyL2hvdy10by13b3JrLXdpdGgtc2NyaXB0cy1pbi1zb2Z0YWN1bG91cy8jc3RhZ2luZyIgbGlua3RleHQ9ImRlc2NyaWJlZCBpbiB0aGlzIGd1aWRlIiBsaW5rdHlwZT0iQ3VzdG9tIiB0YXJnZXQ9Il9ibGFuayI+ZGVzY3JpYmVkIGluIHRoaXMgZ3VpZGU8L2E+LjxiciAvPjwvZGl2PjxkaXY+PGJyIC8+PC9kaXY+PGRpdj48YnIgLz48L2Rpdj48ZGl2PjxiciAvPjwvZGl2PjxkaXY+PHA+PGEgbmFtZT0icGx1Z2lucyI+PGI+U3RhZ2luZyBQbHVnaW5zPC9iPjwvYT48L3A+PC9kaXY+PGRpdj48YnIgLz48L2Rpdj48ZGl2PkJlbG93LCB5b3Ugd2lsbCBmaW5kIGluZm9ybWF0aW9uIGFib3V0IHN0YWdpbmcgd2Vic2l0ZSBjcmVhdGlvbiB1c2luZyAzIGRpZmZlcmVudCBwbHVnaW5zLiBZb3UgY2FuIHVzZSBhbnkgb3RoZXIgcGx1Z2lucyBhcyBhbGwgb2YgdGhlbSBzaG91bGQgd29yayBpbiBhIHNpbWlsYXIgd2F5LiA8YnIgLz48L2Rpdj48ZGl2PjxiciAvPjwvZGl2PjxkaXY+PGJyIC8+PC9kaXY+PGRpdj48YnIgLz48L2Rpdj48ZGl2PjxwPjxhIG5hbWU9IndwX3N0YWdpbmciPjxiPldQIFN0YWdpbmc8L2I+PC9hPjwvcD48L2Rpdj48ZGl2PjxiciAvPjwvZGl2PjxkaXY+MS4gSW5zdGFsbCB0aGUgPGEgaHJlZj0iaHR0cHM6Ly93b3JkcHJlc3Mub3JnL3BsdWdpbnMvd3Atc3RhZ2luZy8iIGxpbmt0ZXh0PSJXUCBTdGFnaW5nIiBsaW5rdHlwZT0iQ3VzdG9tIiB0YXJnZXQ9Il9ibGFuayI+V1AgU3RhZ2luZzwvYT4gcGx1Z2luIGFzIDxhIGhyZWY9Imh0dHBzOi8vd3d3Lm5hbWVjaGVhcC5jb20vc3VwcG9ydC9rbm93bGVkZ2ViYXNlL2FydGljbGUuYXNweC85NDMzLzIxODcvaG93LXRvLW1hbmFnZS1wbHVnaW5zLWluLXdvcmRwcmVzcyIgbGlua3RleHQ9ImRlc2NyaWJlZCBoZXJlIiBsaW5rdHlwZT0iQ3VzdG9tIiB0YXJnZXQ9Il9ibGFuayI+ZGVzY3JpYmVkIGhlcmU8L2E+LjxiciAvPjIuIE9uIHRoZSBsZWZ0IHBhbmVsIGNsaWNrIDxiPldQIFN0YWdpbmcgJmd0OyZndDsgU2l0ZXMgLyBTdGFydDwvYj46PC9kaXY+PGRpdj48YnIgLz48L2Rpdj48aW1nIGNsYXNzPSJrYi1pbWFnZSIgc3JjPSJodHRwczovL05hbWVjaGVhcC5zaW1wbGVrYi5jb20vU2l0ZUNvbnRlbnRzLzItN0MyMkQ1MjM2QTQ1NDNFQjgyN0YzQkQ4OTM2RTE1M0UvbWVkaWEvd3Bfc3RhZ2luZ19zaXRlMi5wbmciIGFsdD0iQW4gZXhhbXBsZSBvZiB0aGUgc3RhZ2luZyBvcHRpb25zIGluc2lkZSB0aGUgV29yZFByZXNzIGRhc2hib2FyZCIgLz48ZGl2PjxiciAvPjwvZGl2PjxkaXY+My4gQ2xpY2sgPGI+Q3JlYXRlIE5ldyBTdGFnaW5nIFNpdGU8L2I+OjwvZGl2PjxkaXY+PGJyIC8+PC9kaXY+PGltZyBjbGFzcz0ia2ItaW1hZ2UiIHNyYz0iaHR0cHM6Ly9OYW1lY2hlYXAuc2ltcGxla2IuY29tL1NpdGVDb250ZW50cy8yLTdDMjJENTIzNkE0NTQzRUI4MjdGM0JEODkzNkUxNTNFL21lZGlhL3dwX3N0YWdpbmdfc2l0ZTMucG5nIiAvPjxkaXY+PGJyIC8+PC9kaXY+PGRpdj40LiBFbnRlciB5b3VyIDxiPlN0YWdpbmcgU2l0ZSBOYW1lPC9iPiBhbmQgY2xpY2sgPGI+U3RhcnQgQ2xvbmluZzwvYj46PC9kaXY+PGRpdj48YnIgLz48L2Rpdj48aW1nIGNsYXNzPSJrYi1pbWFnZSIgc3JjPSJodHRwczovL05hbWVjaGVhcC5zaW1wbGVrYi5jb20vU2l0ZUNvbnRlbnRzLzItN0MyMkQ1MjM2QTQ1NDNFQjgyN0YzQkQ4OTM2RTE1M0UvbWVkaWEvd3Bfc3RhZ2luZ19zaXRlNC5wbmciIC8+PGRpdj48YnIgLz48L2Rpdj48ZGl2PjxiPlBMRUFTRSBOT1RFOjwvYj4gSWYgeW91IGRvIG5vdCBlbnRlciB0aGUgbmFtZSwgYSByYW5kb20gZGlnaXQgdmFsdWUgd2lsbCBiZSBhc3NpZ25lZCBpbnN0ZWFkLjwvZGl2PjxkaXY+PGJyIC8+PC9kaXY+PGRpdj41LiBJdCBtYXkgdGFrZSBhIGZldyBtaW51dGVzIGZvciB0aGlzIHByb2Nlc3MgdG8gZmluaXNoLiBPbmNlIHJlYWR5LCBtYWtlIHN1cmUgdG8gcmVhZCB0aGUgbm90ZXMgYmVsb3cgYW5kIGNsaWNrIDxiPk9wZW4gc3RhZ2luZyBzaXRlPC9iPiB0byBwcm9jZWVkIHRvIHRoZSBsb2dpbiBwYWdlLiBZb3VyIGNyZWRlbnRpYWxzIGFyZSB0aGUgc2FtZSBhcyB0aGF0IG9mIHRoZSBtYWluIHdlYnNpdGU6IDxiciAvPjwvZGl2PjxkaXY+PGJyIC8+PC9kaXY+PGRpdj48aW1nIGNsYXNzPSJrYi1pbWFnZSIgc3JjPSJodHRwczovL05hbWVjaGVhcC5zaW1wbGVrYi5jb20vU2l0ZUNvbnRlbnRzLzItN0MyMkQ1MjM2QTQ1NDNFQjgyN0YzQkQ4OTM2RTE1M0UvbWVkaWEvd3Bfc3RhZ2luZ19zaXRlNS5wbmciIC8+PC9kaXY+PGRpdj48YnIgLz48L2Rpdj48ZGl2PlRoZSBvbmx5IDxiPmRpc2FkdmFudGFnZSBvZiB0aGlzIHBsdWdpbjwvYj4gaXMgdGhhdCB5b3UgY2Fubm90IHB1c2ggdGhlIGNoYW5nZXMgdG8gdGhlIG1haW4gd2Vic2l0ZXMgd2l0aCBhIGZyZWUgdmVyc2lvbiwgc28gdGhlIHN0YWdpbmcgd2Vic2l0ZSBpcyBqdXN0IGZvciB0ZXN0aW5nIHBsdWdpbnMvdGhlbWVzIGJlZm9yZSBhcHBseWluZyB0aGUgY2hhbmdlcyBvbiB0aGUgbWFpbiBvbmUuIFRoZSBiZXN0IHNjZW5hcmlvIGZyb20gdXNpbmcgdGhpcyBwbHVnaW4gaXMgdG8gY3JlYXRlIGEgbmV3IHN0YWdpbmcgZW52aXJvbm1lbnQgZWFjaCB0aW1lIHlvdSB3aXNoIHRvIHRlc3QgY2hhbmdlcyBiZWNhdXNlIHRlc3RpbmcgY2hhbmdlcyBvbiBhbiBvbGQgc3RhZ2luZyB3ZWJzaXRlIG1heSBwcm92ZSBpcnJlbGV2YW50LjxiciAvPjwvZGl2PjxkaXY+PGJyIC8+PC9kaXY+PGRpdj48YnIgLz48L2Rpdj48ZGl2PjxiciAvPjwvZGl2PjxkaXY+PHA+PGEgbmFtZT0iYWxsX2luX29uZSI+PGI+QWxsLWluLU9uZSBXb3JkUHJlc3MgTWlncmF0aW9uPC9iPjwvYT48L3A+PC9kaXY+PGRpdj48YnIgLz48L2Rpdj48ZGl2PjEuIEluc3RhbGwgdGhlIDxhIGhyZWY9Imh0dHBzOi8vd29yZHByZXNzLm9yZy9wbHVnaW5zL2FsbC1pbi1vbmUtd3AtbWlncmF0aW9uLyIgdGFyZ2V0PSJfYmxhbmsiPkFsbC1pbi1PbmUgV1AgTWlncmF0aW9uPC9hPiBwbHVnaW4gYXMgPGEgaHJlZj0iaHR0cHM6Ly93d3cubmFtZWNoZWFwLmNvbS9zdXBwb3J0L2tub3dsZWRnZWJhc2UvYXJ0aWNsZS5hc3B4Lzk0MzMvMjE4Ny9ob3ctdG8tbWFuYWdlLXBsdWdpbnMtaW4td29yZHByZXNzIiB0YXJnZXQ9Il9ibGFuayI+ZGVzY3JpYmVkIGhlcmU8L2E+LjxiciAvPjIuIE9uIHRoZSBsZWZ0IHBhbmVsIGNsaWNrIDxiPkFsbC1pbi1PbmUgV1AgTWlncmF0aW9uICZndDsmZ3Q7IEV4cG9ydDwvYj46IDxiciAvPjwvZGl2PjxkaXY+PGJyIC8+PC9kaXY+PGltZyBjbGFzcz0ia2ItaW1hZ2UiIHNyYz0iaHR0cHM6Ly9OYW1lY2hlYXAuc2ltcGxla2IuY29tL1NpdGVDb250ZW50cy8yLTdDMjJENTIzNkE0NTQzRUI4MjdGM0JEODkzNkUxNTNFL21lZGlhL3dwX3N0YWdpbmdfc2l0ZTYucG5nIiBhbHQ9IkdyZWVuIGFycm93cyBwb2ludCB0byBBbGwgaW4gT25lIE1pZ3JhdGlvbiBvcHRpb25zIGluc2lkZSB0aGUgV29yZFByZXNzIGRhc2hib2FyZCIgLz48ZGl2PjxiciAvPjwvZGl2PjxkaXY+My4gTW9kaWZ5IHRoZSBmaWxlIHlvdSBhcmUgZ29pbmcgdG8gZXhwb3J0IHBlciB5b3VyIGxpa2luZyB1c2luZyB0aGUgPGI+QWR2YW5jZWQgb3B0aW9uczwvYj4gZHJvcC1kb3duIG1lbnU6PC9kaXY+PGRpdj48YnIgLz48L2Rpdj48aW1nIGNsYXNzPSJrYi1pbWFnZSIgc3JjPSJodHRwczovL05hbWVjaGVhcC5zaW1wbGVrYi5jb20vU2l0ZUNvbnRlbnRzLzItN0MyMkQ1MjM2QTQ1NDNFQjgyN0YzQkQ4OTM2RTE1M0UvbWVkaWEvd3Bfc3RhZ2luZ19zaXRlNy5wbmciIC8+PGRpdj48YnIgLz48L2Rpdj48ZGl2PjQuIENsaWNrIDxiPkV4cG9ydCBUbyAmZ3Q7Jmd0OyBGaWxlPC9iPjo8L2Rpdj48ZGl2PjxiciAvPjwvZGl2PjxpbWcgY2xhc3M9ImtiLWltYWdlIiBzcmM9Imh0dHBzOi8vTmFtZWNoZWFwLnNpbXBsZWtiLmNvbS9TaXRlQ29udGVudHMvMi03QzIyRDUyMzZBNDU0M0VCODI3RjNCRDg5MzZFMTUzRS9tZWRpYS93cF9zdGFnaW5nX3NpdGU4LnBuZyIgLz48ZGl2PjxiciAvPjwvZGl2PjxkaXY+NS4gQ2xpY2sgPGI+RG93bmxvYWQgWzxpPmRvbWFpbi5jb208L2k+XTwvYj4gdG8gZXhwb3J0IHRoZSBmaWxlLjxiciAvPjYuIEluc3RhbGwgYSBmcmVzaCBXb3JkUHJlc3Mgb24gYSA8YSBocmVmPSJodHRwczovL3d3dy5uYW1lY2hlYXAuY29tL3N1cHBvcnQva25vd2xlZGdlYmFzZS9hcnRpY2xlLmFzcHgvOTE5MC8yOS8iIGxpbmt0ZXh0PSJzdWJkb21haW4iIGxpbmt0eXBlPSJDdXN0b20iIHRhcmdldD0iX2JsYW5rIj5zdWJkb21haW48L2E+IChlLmcuLCA8aT5zdGFnaW5nLm5jdGVzdC5pbmZvPC9pPikgb3IgaW4gYSBzdWJkaXJlY3RvcnkgKGUuZy4sIDxpPm5jdGVzdC5pbmZvL3N0YWdpbmc8L2k+KS4gPGJyIC8+Ny4gTG9nIGluIHRvIHRoZSBXb3JkUHJlc3MgRGFzaGJvYXJkIG9mIHRoZSBzdGFnaW5nIHdlYnNpdGUsIDxhIGhyZWY9Imh0dHBzOi8vd3d3Lm5hbWVjaGVhcC5jb20vc3VwcG9ydC9rbm93bGVkZ2ViYXNlL2FydGljbGUuYXNweC85NDMzLzIxODcvaG93LXRvLW1hbmFnZS1wbHVnaW5zLWluLXdvcmRwcmVzcyIgbGlua3RleHQ9Imluc3RhbGwiIGxpbmt0eXBlPSJDdXN0b20iIHRhcmdldD0iX2JsYW5rIj5pbnN0YWxsPC9hPiB0aGUgPGEgaHJlZj0iaHR0cHM6Ly93b3JkcHJlc3Mub3JnL3BsdWdpbnMvYWxsLWluLW9uZS13cC1taWdyYXRpb24vIiB0YXJnZXQ9Il9ibGFuayI+QWxsLWluLU9uZSBXUCBNaWdyYXRpb248L2E+IHBsdWdpbiBvbmNlIGFnYWluIGFuZCBnbyB0byB0aGUgPGI+SW1wb3J0PC9iPiB0YWI6PC9kaXY+PGRpdj48YnIgLz48L2Rpdj48aW1nIGNsYXNzPSJrYi1pbWFnZSIgc3JjPSJodHRwczovL05hbWVjaGVhcC5zaW1wbGVrYi5jb20vU2l0ZUNvbnRlbnRzLzItN0MyMkQ1MjM2QTQ1NDNFQjgyN0YzQkQ4OTM2RTE1M0UvbWVkaWEvd3Bfc3RhZ2luZ19zaXRlOS5wbmciIC8+PGRpdj48YnIgLz48L2Rpdj48ZGl2PjguIENsaWNrIDxiPkltcG9ydCBGcm9tICZndDsmZ3Q7IEZpbGU8L2I+IGFuZCBjaG9vc2UgdGhlIGZpbGUgeW914oCZdmUgcHJldmlvdXNseSBkb3dubG9hZGVkLjxiciAvPjwvZGl2PjxkaXY+PGJyIC8+PC9kaXY+PGltZyBjbGFzcz0ia2ItaW1hZ2UiIHNyYz0iaHR0cHM6Ly9OYW1lY2hlYXAuc2ltcGxla2IuY29tL1NpdGVDb250ZW50cy8yLTdDMjJENTIzNkE0NTQzRUI4MjdGM0JEODkzNkUxNTNFL21lZGlhL3dwX3N0YWdpbmdfc2l0ZTEwLnBuZyIgLz48ZGl2PjxiciAvPjwvZGl2PjxkaXY+OS4gUmVhZCB0aGUgd2FybmluZyBjYXJlZnVsbHkgYW5kIGNsaWNrIDxiPlByb2NlZWQgPC9iPnRvIGNvbnRpbnVlLjxiciAvPjEwLiBJZiB5b3VyIGltcG9ydCBpcyBzdWNjZXNzZnVsLCB5b3Ugc2hvdWxkIHNlZSB0aGUgZm9sbG93aW5nIG1lc3NhZ2U6PC9kaXY+PGRpdj48YnIgLz48L2Rpdj48aW1nIGNsYXNzPSJrYi1pbWFnZSIgc3JjPSJodHRwczovL05hbWVjaGVhcC5zaW1wbGVrYi5jb20vU2l0ZUNvbnRlbnRzLzItN0MyMkQ1MjM2QTQ1NDNFQjgyN0YzQkQ4OTM2RTE1M0UvbWVkaWEvd3Bfc3RhZ2luZ19zaXRlMTEucG5nIiAvPjxkaXY+PGJyIC8+PC9kaXY+PGRpdj5Db25ncmF0cyEgWW91ciBzdGFnaW5nIHdlYnNpdGUgaXMgbm93IHJlYWR5LjxiciAvPjwvZGl2PjxkaXY+PGJyIC8+PC9kaXY+PGRpdj48YnIgLz48L2Rpdj48ZGl2PjxiciAvPjwvZGl2PjxkaXY+PHA+PGEgbmFtZT0iZHVwbGljYXRvciI+PGI+RHVwbGljYXRvcjwvYj48L2E+PC9wPjwvZGl2PjxkaXY+PGJyIC8+PC9kaXY+PGRpdj4xLiBJbnN0YWxsIHRoZSA8YSBocmVmPSJodHRwczovL3dvcmRwcmVzcy5vcmcvcGx1Z2lucy9kdXBsaWNhdG9yLyIgbGlua3RleHQ9IkR1cGxpY2F0b3IiIGxpbmt0eXBlPSJDdXN0b20iIHRhcmdldD0iX2JsYW5rIj5EdXBsaWNhdG9yPC9hPiBwbHVnaW4gYXMgPGEgaHJlZj0iaHR0cHM6Ly93d3cubmFtZWNoZWFwLmNvbS9zdXBwb3J0L2tub3dsZWRnZWJhc2UvYXJ0aWNsZS5hc3B4Lzk0MzMvMjE4Ny9ob3ctdG8tbWFuYWdlLXBsdWdpbnMtaW4td29yZHByZXNzIiB0YXJnZXQ9Il9ibGFuayI+ZGVzY3JpYmVkIGhlcmU8L2E+LjxiciAvPjIuIE5hdmlnYXRlIHRvIDxiPkR1cGxpY2F0b3IgJmd0OyZndDsgUGFja2FnZXM8L2I+OjwvZGl2PjxkaXY+PGJyIC8+PC9kaXY+PGltZyBjbGFzcz0ia2ItaW1hZ2UiIHNyYz0iaHR0cHM6Ly9OYW1lY2hlYXAuc2ltcGxla2IuY29tL1NpdGVDb250ZW50cy8yLTdDMjJENTIzNkE0NTQzRUI4MjdGM0JEODkzNkUxNTNFL21lZGlhL3dwX3N0YWdpbmdfc2l0ZTEyLnBuZyIgLz48ZGl2PjxiciAvPjwvZGl2PjxkaXY+My4gQ2xpY2sgPGI+Q3JlYXRlIE5ldzwvYj4gb24gdGhlIHVwcGVyIHJpZ2h0IGNvcm5lci48YnIgLz40LiBFbnRlciB0aGUgZGVzaXJlZCBuYW1lIG9yIHVzZSBhIGdlbmVyYXRlZCBvbmUuIExlYXZlIG90aGVyIHZhbHVlcyB1bnRvdWNoZWQgYW5kIGNsaWNrIDxiPk5leHQ8L2I+OjxiciAvPjwvZGl2PjxiciAvPjxpbWcgY2xhc3M9ImtiLWltYWdlIiBzcmM9Imh0dHBzOi8vTmFtZWNoZWFwLnNpbXBsZWtiLmNvbS9TaXRlQ29udGVudHMvMi03QzIyRDUyMzZBNDU0M0VCODI3RjNCRDg5MzZFMTUzRS9tZWRpYS93cF9zdGFnaW5nX3NpdGUxMy5wbmciIC8+PGJyIC8+PGRpdj48YnIgLz48L2Rpdj48ZGl2PjUuIENoZWNrIHRoZSBub3RpY2VzIGlmIHRoZXJlIGFyZSBhbnkuIEhhdmluZyBtYWRlIHN1cmUgdGhhdCB5b3UgdW5kZXJzdGFuZCB0aGUgY29uc2VxdWVuY2VzLCBzZWxlY3QgdGhlIGNvbmZpcm1hdGlvbiBjaGVja21hcmsgYW5kIGNsaWNrIDxiPkJ1aWxkPC9iPjo8L2Rpdj48YnIgLz48aW1nIGNsYXNzPSJrYi1pbWFnZSIgc3JjPSJodHRwczovL05hbWVjaGVhcC5zaW1wbGVrYi5jb20vU2l0ZUNvbnRlbnRzLzItN0MyMkQ1MjM2QTQ1NDNFQjgyN0YzQkQ4OTM2RTE1M0UvbWVkaWEvd3Bfc3RhZ2luZ19zaXRlMTQucG5nIiAvPjxiciAvPjxkaXY+PGJyIC8+PC9kaXY+PGRpdj42LiBDbGljayA8Yj5PbmUtQ2xpY2sgRG93bmxvYWQ8L2I+IHRvIGRvd25sb2FkIGFuIGFyY2hpdmUgd2l0aCB0aGUgd2Vic2l0ZSBkYXRhIGFuZCB0aGUgaW5zdGFsbGVyIGZpbGUuIDxiciAvPjwvZGl2PjxkaXY+PGJyIC8+PC9kaXY+PGRpdj48Yj5QTEVBU0UgTk9URTo8L2I+IFlvdSBtYXkgbmVlZCB0byB1c2UgdGhlIDxiPkluc3RhbGxlciA8L2I+YW5kIDxiPkFyY2hpdmUgPC9iPmJ1dHRvbnMgdG8gZG93bmxvYWQgZmlsZXMgc2VwYXJhdGVseSBhcyBzb21lIGJyb3dzZXJzIGJsb2NrIHNpbXVsdGFuZW91cyBkb3dubG9hZHMuPGJyIC8+PGJyIC8+Ny4gQ3JlYXRlIGEgc3ViZG9tYWluIGZvciB5b3VyIHN0YWdpbmcgd2Vic2l0ZSwgcmVtZW1iZXJpbmcgdGhlIGRvY3VtZW50IHJvb3QsIHdpdGggdGhlIGhlbHAgb2YgPGEgaHJlZj0iaHR0cHM6Ly93d3cubmFtZWNoZWFwLmNvbS9zdXBwb3J0L2tub3dsZWRnZWJhc2UvYXJ0aWNsZS5hc3B4LzkxOTAvMjkvIiBsaW5rdGV4dD0idGhpcyBndWlkZSIgbGlua3R5cGU9IkN1c3RvbSIgdGFyZ2V0PSJfYmxhbmsiPnRoaXMgZ3VpZGU8L2E+LiBBbHRlcm5hdGl2ZWx5LCB5b3UgY2FuIGNyZWF0ZSBhIHN1YmRpcmVjdG9yeSB1bmRlciB5b3VyIGRvbWFpbuKAmXMgZG9jdW1lbnQgcm9vdC48YnIgLz44LiA8YSBocmVmPSJodHRwczovL3d3dy5uYW1lY2hlYXAuY29tL3N1cHBvcnQva25vd2xlZGdlYmFzZS9hcnRpY2xlLmFzcHgvMTgxLzI3L2hvdy1kby1pLXVwbG9hZC1teS1zaXRlIiBsaW5rdGV4dD0iVXBsb2FkIiBsaW5rdHlwZT0iQ3VzdG9tIiB0YXJnZXQ9Il9ibGFuayI+VXBsb2FkPC9hPiB0aGUgcHJldmlvdXNseS1kb3dubG9hZGVkIGZpbGVzIHRvIHRoZSBkb2N1bWVudCByb290IG9mIHlvdXIgc3ViZG9tYWluIG9yIGEgc3ViZGlyZWN0b3J5IChlLmcuLCA8aT5uY3Rlc3QuaW5mby9zdGFnaW5nPC9pPikuPGJyIC8+OS4gQ3JlYXRlIGEgZGF0YWJhc2UgZm9yIHlvdXIgaW5zdGFsbGF0aW9uLCByZW1lbWJlcmluZyB0aGUgZm9sbG93aW5nIGRldGFpbHM6PGJyIC8+PHVsPjxsaT5EYXRhYmFzZSBuYW1lPC9saT48bGk+RGF0YWJhc2UgdXNlcjwvbGk+PGxpPkRhdGFiYXNlIHVzZXIgcGFzc3dvcmQ8L2xpPjwvdWw+QWxsIHJlbGF0ZWQgaW5zdHJ1Y3Rpb25zIGNhbiBiZSA8YSBocmVmPSJodHRwczovL3d3dy5uYW1lY2hlYXAuY29tL3N1cHBvcnQva25vd2xlZGdlYmFzZS9hcnRpY2xlLmFzcHgvOTM2MyIgbGlua3RleHQ9ImZvdW5kIGluIHRoaXMgZ3VpZGUiIGxpbmt0eXBlPSJDdXN0b20iIHRhcmdldD0iX2JsYW5rIj5mb3VuZCBpbiB0aGlzIGd1aWRlPC9hPi4gPGJyIC8+PC9kaXY+PGRpdj48YnIgLz48L2Rpdj48ZGl2PjEwLiBPcGVuIHRoZSBJbnN0YWxsZXIgaW4geW91ciBicm93c2VyLiBJdCB3aWxsIGxvb2sgbGlrZSA8aT5zdGFnaW5nLmRvbWFpbi5jb20vPGI+aW5zdGFsbGVyLnBocDwvYj48L2k+IGlmIHlvdSBjcmVhdGVkIGEgc3ViZG9tYWluLjxiciAvPkluIGNhc2UgeW91IHVwbG9hZCB0aGUgZmlsZXMgdG8gYSBzdWJkaXJlY3RvcnksIGl0IHdpbGwgbG9vayBsaWtlOiA8aT5kb21haW4uY29tL3N0YWdpbmcvPGI+aW5zdGFsbGVyLnBocDwvYj48L2k+LiA8YnIgLz48YnIgLz5Eb27igJl0IGZvcmdldCB0byByZXBsYWNlIDxpPmRvbWFpbi5jb208L2k+IHdpdGggeW91ciBhY3R1YWwgZG9tYWluLiBTZWUgYmVsb3c6PGJyIC8+PC9kaXY+PGJyIC8+PGltZyBjbGFzcz0ia2ItaW1hZ2UiIHNyYz0iaHR0cHM6Ly9OYW1lY2hlYXAuc2ltcGxla2IuY29tL1NpdGVDb250ZW50cy8yLTdDMjJENTIzNkE0NTQzRUI4MjdGM0JEODkzNkUxNTNFL21lZGlhL3dwX3N0YWdpbmdfc2l0ZTE1LnBuZyIgLz48ZGl2PjxiciAvPjwvZGl2PjxkaXY+MTEuIFNlbGVjdCB0aGUgY2hlY2ttYXJrIHRvIGNvbmZpcm0gdGhlIHRlcm1zIGFuZCBub3RpY2VzIGFuZCBjbGljayA8Yj5OZXh0PC9iPi48YnIgLz4xMi4gRW50ZXIgdGhlIGRldGFpbHMgb2YgdGhlIGRhdGFiYXNlIHlvdeKAmXZlIGNyZWF0ZWQgb24gc3RlcCA5IGFuZCBjbGljayA8Yj5OZXh0PC9iPi48YnIgLz4xMy4gQ2xpY2sgPGI+WWVzPC9iPiBpbiB0aGUgcG9wLXVwIHdpbmRvdyB0byBjb25maXJtIHRoZSBkZXRhaWxzLjxiciAvPjE0LiBFbnRlciB0aGUgdGl0bGUgb2YgeW91ciB3ZWJzaXRlIGFuZCBjbGljayA8Yj5OZXh0PC9iPi48YnIgLz4xNS4gQ2xpY2sgPGI+U2l0ZSBMb2dpbjwvYj4gdG8gYmUgcmVkaXJlY3RlZCB0byB0aGUgbG9naW4gcGFnZS4gWW91ciBsb2dpbiBkZXRhaWxzIGFyZSB0aGUgc2FtZSBhcyBmb3IgdGhlIG1haW4gd2Vic2l0ZS4gPGJyIC8+MTYuIEdvIHRvIHRoZSBkb2N1bWVudCByb290IG9mIHlvdXIgc3RhZ2luZyB3ZWJzaXRlIGFuZCBkZWxldGUgdGhlIDxpPmluc3RhbGxlci5waHA8L2k+IGZpbGUgdG8gYXZvaWQgYW55IHNlY3VyaXR5IGlzc3Vlcy4gPGJyIC8+PC9kaXY+PGRpdj48YnIgLz48L2Rpdj48ZGl2PjxiciAvPjwvZGl2PjxkaXY+PGJyIC8+PC9kaXY+PGRpdj48cD48YSBuYW1lPSJtYW51YWwiPjxiPk1hbnVhbCBjcmVhdGlvbjwvYj48L2E+PC9wPjwvZGl2PjxkaXY+PGJyIC8+PC9kaXY+PGRpdj5JZiB5b3UgY2hvb3NlIG5vdCB0byBtZXNzIHdpdGggcGx1Z2lucyB0byBtYWtlIHlvdXIgc2l0ZSBldmVuIG1vcmUgY29tcGxleCBhbmQgZmVlbCBicmF2ZSBlbm91Z2ggdG8gZ28gb2xkIHNjaG9vbCwgeW91IGNhbiBtYW51YWxseSBjcmVhdGUgYSBzdGFnaW5nIHdlYnNpdGUgcGx1Z2luIGZyZWUuIEJlZm9yZSB5b3UgcHJvY2VlZCwgbWFrZSBzdXJlIHRvIHJlYWQgdGhlIGZvbGxvd2luZyBndWlkZXM6PGJyIC8+PHVsPjxsaT48YSBocmVmPSJodHRwczovL3d3dy5uYW1lY2hlYXAuY29tL3N1cHBvcnQva25vd2xlZGdlYmFzZS9hcnRpY2xlLmFzcHgvOTcwMC8yOS9ob3ctdG8tdXNlLWZpbGUtbWFuYWdlci1pbi1jcGFuZWwiIGxpbmt0ZXh0PSJGaWxlIE1hbmFnZXIgdHV0b3JpYWwiIGxpbmt0eXBlPSJDdXN0b20iIHRhcmdldD0iX2JsYW5rIj5GaWxlIE1hbmFnZXIgdHV0b3JpYWw8L2E+PC9saT48bGk+PGEgaHJlZj0iaHR0cHM6Ly93d3cubmFtZWNoZWFwLmNvbS9zdXBwb3J0L2tub3dsZWRnZWJhc2UvYXJ0aWNsZS5hc3B4LzkxNDMvIiBsaW5rdGV4dD0iUEhQTXlBZG1pbiB0dXRvcmlhbCIgbGlua3R5cGU9IkN1c3RvbSIgdGFyZ2V0PSJfYmxhbmsiPlBIUE15QWRtaW4gdHV0b3JpYWw8L2E+PC9saT48L3VsPjxiciAvPk5vdyB0aGF0IHlvdSBhcmUgZmFtaWxpYXIgd2l0aCB0aGUgdG9vbHMgeW91IGFyZSBnb2luZyB0byB1c2UsIHByb2NlZWQgd2l0aCB0aGVzZSBzdGVwczo8YnIgLz48YnIgLz4xLiBGaW5kIHRoZSBmaWxlcyBvZiB5b3VyIGluc3RhbGxhdGlvbi4gSW4gY2FzZSBpdOKAmXMgeW91ciBtYWluIGhvc3RpbmcgZG9tYWluLCB5b3UgY2FuIGZpbmQgdGhlbSBpbiA8aT5ob21lL3B1YmxpY19odG1sPC9pPiBmb2xkZXIuIDxiciAvPklmIGl04oCZcyBhbiBhZGRvbiBkb21haW4sIHlvdSBjYW4gY2hlY2sgaXRzIHJvb3QgZm9sZGVyIGluIDxiPmNQYW5lbCAmZ3Q7Jmd0OyBBZGRvbiBEb21haW5zPC9iPiBtZW51LCBsb2NhdGVkIGluIHRoZSA8Yj5Eb2N1bWVudCBSb290PC9iPiBjb2x1bW4uIElmIGl04oCZcyBhIHN1YmRvbWFpbiwgeW91IGNhbiBjaGVjayBpdCBpbiA8Yj5jUGFuZWwgJmd0OyZndDsgU3ViZG9tYWluczwvYj4gbWVudSBpbiB0aGUgc2FtZSBjb2x1bW4uIFNlZSBiZWxvdzo8L2Rpdj48ZGl2PjxiciAvPjwvZGl2PjxpbWcgY2xhc3M9ImtiLWltYWdlIiBzcmM9Imh0dHBzOi8vTmFtZWNoZWFwLnNpbXBsZWtiLmNvbS9TaXRlQ29udGVudHMvMi03QzIyRDUyMzZBNDU0M0VCODI3RjNCRDg5MzZFMTUzRS9tZWRpYS93cF9zdGFnaW5nX3NpdGUxNi5wbmciIC8+PGRpdj48YnIgLz48L2Rpdj4NCg0KMi4gU2VsZWN0IGFsbCB0aGUgZmlsZXMgb2YgdGhlIGluc3RhbGxhdGlvbiBhbmQgY29weSB0aGVtIHRvIHRoZSBkb2N1bWVudCByb290IG9mIHRoZSBkZXNpcmVkIHN1YmRvbWFpbi4gQWx0ZXJuYXRpdmVseSwgeW91IGNhbiBjcmVhdGUgYSBkaXJlY3RvcnkgaW4gdGhlIGRvY3VtZW50IHJvb3Qgb2YgeW91ciB3ZWJzaXRlIGFuZCBjb3B5IHRoZSBmaWxlcyBpbnRvIHRoYXQgZm9sZGVyIGZvciB5b3VyIHdlYnNpdGUgc3RhZ2luZyBVUkwgdG8gbG9vayBsaWtlIDxpPmRvbWFpbi5jb20vc3RhZ2luZzwvaT4uPGJyIC8+PGRpdj4zLiBPcGVuIHRoZSA8aT53cC1jb25maWcucGhwPC9pPiBmaWxlIG9mIHlvdXIgd2Vic2l0ZSB1c2luZyB0aGUgPGI+VmlldyA8L2I+b3IgPGI+RWRpdCA8L2I+b3B0aW9uIHRvIGZpbmQgdGhlIGZvbGxvd2luZyBsaW5lOjwvZGl2PjxkaXY+PGk+PGJyIC8+PC9pPjwvZGl2PjxkaXY+PGk+LyoqIFRoZSBuYW1lIG9mIHRoZSBkYXRhYmFzZSBmb3IgV29yZFByZXNzICovIDwvaT48YnIgLz48L2Rpdj48ZGl2PjxiciAvPjwvZGl2Pkp1c3QgYmVsb3csIHlvdSBzaG91bGQgc2VlIHRoZSBuYW1lIG9mIHlvdXIgd2Vic2l0ZSBkYXRhYmFzZS4gU2VlIGJlbG93OjxiciAvPjxiciAvPjxpbWcgY2xhc3M9ImtiLWltYWdlIiBzcmM9Imh0dHBzOi8vTmFtZWNoZWFwLnNpbXBsZWtiLmNvbS9TaXRlQ29udGVudHMvMi03QzIyRDUyMzZBNDU0M0VCODI3RjNCRDg5MzZFMTUzRS9tZWRpYS93cF9zdGFnaW5nX3NpdGUxNy5wbmciIC8+PGJyIC8+PGJyIC8+PGRpdj40LiBOYXZpZ2F0ZSB0byA8Yj5jUGFuZWwgJmd0OyZndDsgUEhQTXlBZG1pbjwvYj4gYW5kIGV4cG9ydCB0aGUgZGF0YWJhc2UgaW4gcXVlc3Rpb24uPGJyIC8+NS4gVXBkYXRlIHRoZSBVUkwgb2YgeW91ciB3ZWJzaXRlIHRvIHRoZSBkZXNpcmVkIG9uZSB1c2luZyA8YSBocmVmPSJodHRwczovL3d3dy5uYW1lY2hlYXAuY29tL3N1cHBvcnQva25vd2xlZGdlYmFzZS9hcnRpY2xlLmFzcHgvOTIwMS8yMTg3L2hvdy10by1jaGFuZ2Utd29yZHByZXNzLXNpdGUtYWRkcmVzcy11cmwjZGF0YWJhc2UiIGxpbmt0ZXh0PSJ0aGlzIGd1aWRlIiBsaW5rdHlwZT0iQ3VzdG9tIiB0YXJnZXQ9Il9ibGFuayI+dGhpcyBndWlkZTwvYT4uIDxiciAvPkZvciBleGFtcGxlLCBpZiB3ZSB3YW50IHRoZSBVUkwgb2Ygb3VyIHN0YWdpbmcgYXJlYSB0byBiZSA8aT5uY3Rlc3QuaW5mby9zdGFnaW5nPC9pPiBpbnN0ZWFkIG9mIDxpPm5jdGVzdC5pbmZvPC9pPiwgd2UgdXBkYXRlIHRoZSBkYXRhYmFzZSwgcmVwbGFjaW5nIGFsbCBvY2N1cnJlbmNlcyBvZiA8aT5uY3Rlc3QuaW5mbzwvaT4gd2l0aCA8aT5uY3Rlc3QuaW5mby9zdGFnaW5nPC9pPi4gPGJyIC8+Ni7CoCBDcmVhdGUgYSBkYXRhYmFzZSBmb3IgeW91ciBzdGFnaW5nIGluc3RhbGxhdGlvbiwgcmVtZW1iZXJpbmcgdGhlIGZvbGxvd2luZyBkZXRhaWxzOjxiciAvPjx1bD48bGk+RGF0YWJhc2UgbmFtZTwvbGk+PGxpPkRhdGFiYXNlIHVzZXI8L2xpPjxsaT5EYXRhYmFzZSB1c2VyIHBhc3N3b3JkPC9saT48L3VsPkFsbCB0aGUgcmVsYXRlZCBpbnN0cnVjdGlvbnMgY2FuIGJlIDxhIGhyZWY9Imh0dHBzOi8vd3d3Lm5hbWVjaGVhcC5jb20vc3VwcG9ydC9rbm93bGVkZ2ViYXNlL2FydGljbGUuYXNweC85MzYzIiB0YXJnZXQ9Il9ibGFuayI+Zm91bmQgaW4gdGhpcyBndWlkZTwvYT4uIDxiciAvPjwvZGl2PjxkaXY+PGJyIC8+PC9kaXY+PGRpdj43LiBJbXBvcnQgdGhlIC5zcWwgZmlsZSB5b3XigJl2ZSB1cGRhdGVkIG9uIHlvdXIgY29tcHV0ZXIgaW50byB0aGUgbmV3bHktY3JlYXRlZCBkYXRhYmFzZSB2aWEgUEhQTXlBZG1pbi4gPGJyIC8+PGJyIC8+PGI+UExFQVNFIE5PVEU6PC9iPiBJZiB0aGUgZGF0YWJhc2UgaW4gcXVlc3Rpb24gZXhjZWVkcyB0aGUgNTAgTUIgaW4gc2l6ZSwgPGEgaHJlZj0iaHR0cHM6Ly93d3cubmFtZWNoZWFwLmNvbS9zdXBwb3J0L2tub3dsZWRnZWJhc2UvYXJ0aWNsZS5hc3B4LzkxODQvODkvaG93LXRvLWltcG9ydC1hbmQtZXhwb3J0LWRhdGFiYXNlLXZpYS1zc2giIGxpbmt0ZXh0PSJyZWZlciB0byB0aGlzIGd1aWRlIiBsaW5rdHlwZT0iQ3VzdG9tIiB0YXJnZXQ9Il9ibGFuayI+cmVmZXIgdG8gdGhpcyBndWlkZTwvYT4uIDxiciAvPjxiciAvPjguIFVzaW5nIDxiPkZpbGUgTWFuYWdlcjwvYj4sIG5hdmlnYXRlIHRvIHRoZSBkb2N1bWVudCByb290IG9mIHlvdXIgc3RhZ2luZyB3ZWJzaXRlIHRvIDxiPkVkaXQgPC9iPnRoZSA8aT53cC1jb25maWcucGhwPC9pPiBmaWxlLiBGaWxsIGluIHRoZSBsaW5lcyB3aXRoIHRoZSBhcHByb3ByaWF0ZSBuYW1lLCB1c2VyLCBhbmQgcGFzc3dvcmQgb2YgdGhlIGRhdGFiYXNlIHRoYXQgaGFzIGJlZW4gY3JlYXRlZCBhbmQgaW1wb3J0ZWQgYmVmb3JlLiBTZWUgYmVsb3cgZm9yIHJlZmVyZW5jZTo8YnIgLz48L2Rpdj48ZGl2PjxiciAvPjwvZGl2PjxkaXY+PGltZyBjbGFzcz0ia2ItaW1hZ2UiIHNyYz0iaHR0cHM6Ly9OYW1lY2hlYXAuc2ltcGxla2IuY29tL1NpdGVDb250ZW50cy8yLTdDMjJENTIzNkE0NTQzRUI4MjdGM0JEODkzNkUxNTNFL21lZGlhL3dwX3N0YWdpbmdfc2l0ZTE4LnBuZyIgLz48L2Rpdj48ZGl2PjxiciAvPjwvZGl2PjxkaXY+PGJyIC8+PC9kaXY+PGRpdj5UaGF0J3MgaXQhPGJyIC8+PC9kaXY+","NewTillDate":null,"FeaturedTillDate":null,"ModifiedDateTime":"2022-01-18T12:23:06.0000000","LiveDateTime":"1754-02-02T00:00:00.0000000","CreatedDateTime":"2018-10-29T13:29:07.0000000","ApprovalDatetime":"2018-10-29T13:31:31.0000000","RequestCount":36830,"MarkedAsNew":false,"MarkedAsFeatured":false,"RatingValue":3,"CategoryPaths":[{"__type":"Nc:SimpleKB:Abstractions:Dtos:CategoryPathDto","Level":1,"CategoryId":12,"CategoryName":"Hosting"},{"__type":"Nc:SimpleKB:Abstractions:Dtos:CategoryPathDto","Level":2,"CategoryId":2187,"CategoryName":"cPanel: WordPress"}],"AssociatedCategories":[{"CategoryId":2187,"CategoryName":"cPanel: WordPress","CategoryDisplayName":"HostingcPanel: WordPress"}],"AssociatedTags":[{"TagId":592,"Tag":" wordpress"},{"TagId":42160,"Tag":" duplicate"},{"TagId":69994,"Tag":"staging"}],"RelatedArticles":[{"ArticleId":1255,"PreferedCategoryId":2187,"ArticleTypeId":3,"ArticleName":"How to install WordPress using Softaculous","ArticleTypeName":"How_To","Title":"How to install WordPress using Softaculous","LiveDateTime":null,"ModifiedDateTime":"09/25/2024","MarkedAsNew":false,"MarkedAsFeatured":false},{"ArticleId":1258,"PreferedCategoryId":2182,"ArticleTypeId":2,"ArticleName":"How to work with scripts in Softaculous","ArticleTypeName":"Regular","Title":"How to work with scripts in Softaculous","LiveDateTime":null,"ModifiedDateTime":"04/11/2025","MarkedAsNew":false,"MarkedAsFeatured":false}],"AssociatedMedias":[],"PreferredCategoryId":0,"RootParentCategoryName":"","RootParentCategoryId":0},"status":200,"statusText":"OK"},"/api/v1/ncpl/simplekb/getcategorybycategoryid:\"{\\\"categoryId\\\":2187}\"":{"body":{"__type":"Nc:SimpleKB:Abstractions:Dtos:CategoryDto","ParentCategoryId":12,"Parent_Category_Name":"Hosting","FriendlyId":null,"ApprovedYN":true,"TreatAsTopicYN":false,"CreatedDateTime":"04/19/2013 16:31:19","CurrentCategoryPaths":[{"__type":"Nc:SimpleKB:Abstractions:Dtos:CategoryPathDto","Level":1,"CategoryId":12,"CategoryName":"Hosting"},{"__type":"Nc:SimpleKB:Abstractions:Dtos:CategoryPathDto","Level":2,"CategoryId":2187,"CategoryName":"cPanel: WordPress"}],"RelatedCategories":[],"AssociatedArticles":[{"ArticleId":10008,"Title":"How to manage WordPress website with iPhone application","ArticleName":"How to manage WordPress website with iPhone application","LiveDateTime":"02/02/1754 00:00:00","NewTillDate":null,"FeaturedTillDate":null,"ModifiedDateTime":"12/10/2021"},{"ArticleId":10076,"Title":"How to Create a WordPress Staging Site","ArticleName":"How to Create a WordPress Staging Site","LiveDateTime":"02/02/1754 00:00:00","NewTillDate":null,"FeaturedTillDate":null,"ModifiedDateTime":"01/18/2022"},{"ArticleId":10115,"Title":"How to fix WordPress blank page (white screen)","ArticleName":"How to fix WordPress blank page (white screen)","LiveDateTime":"02/02/1754 00:00:00","NewTillDate":null,"FeaturedTillDate":null,"ModifiedDateTime":"06/25/2024"},{"ArticleId":10185,"Title":"How to deal with the hacked WordPress website?","ArticleName":"How to deal with the hacked WordPress website?","LiveDateTime":"02/02/1754 00:00:00","NewTillDate":null,"FeaturedTillDate":null,"ModifiedDateTime":"01/31/2025"},{"ArticleId":10316,"Title":"How to change upload filesize limit in WordPress multisite","ArticleName":"How to change upload filesize limit in WordPress multisite","LiveDateTime":"02/02/1754 00:00:00","NewTillDate":null,"FeaturedTillDate":null,"ModifiedDateTime":"09/24/2020"},{"ArticleId":10645,"Title":"How to fix a WordPress critical error","ArticleName":"How to fix a WordPress critical error","LiveDateTime":"02/02/1754 00:00:00","NewTillDate":null,"FeaturedTillDate":null,"ModifiedDateTime":"12/19/2025"},{"ArticleId":10649,"Title":"Extendify Overview","ArticleName":"Extendify Overview","LiveDateTime":"02/02/1754 00:00:00","NewTillDate":null,"FeaturedTillDate":null,"ModifiedDateTime":"10/03/2025"},{"ArticleId":10752,"Title":"How to update WordPress admin email via a database","ArticleName":"How to update WordPress admin email via a database","LiveDateTime":"02/02/1754 00:00:00","NewTillDate":null,"FeaturedTillDate":null,"ModifiedDateTime":"10/09/2025"},{"ArticleId":1255,"Title":"How to install WordPress using Softaculous","ArticleName":"How to install WordPress using Softaculous","LiveDateTime":"02/02/1754 00:00:00","NewTillDate":null,"FeaturedTillDate":null,"ModifiedDateTime":"09/25/2024"},{"ArticleId":9495,"Title":"How to move WordPress from a subfolder","ArticleName":"How to move WordPress from a subfolder","LiveDateTime":"02/02/1754 00:00:00","NewTillDate":null,"FeaturedTillDate":null,"ModifiedDateTime":"12/21/2021"},{"ArticleId":9202,"Title":"How to reset/change WordPress admin password","ArticleName":"How to reset/change WordPress admin password","LiveDateTime":"02/02/1754 00:00:00","NewTillDate":null,"FeaturedTillDate":null,"ModifiedDateTime":"04/27/2025"},{"ArticleId":9972,"Title":"How to log in to WordPress using Softaculous","ArticleName":"How to log in to WordPress using Softaculous","LiveDateTime":"02/02/1754 00:00:00","NewTillDate":null,"FeaturedTillDate":null,"ModifiedDateTime":"12/27/2022"},{"ArticleId":9809,"Title":"How to change your WordPress Admin URL","ArticleName":"How to change your WordPress Admin URL","LiveDateTime":"02/02/1754 00:00:00","NewTillDate":null,"FeaturedTillDate":null,"ModifiedDateTime":"12/21/2021"},{"ArticleId":9451,"Title":"How to manage WordPress user roles","ArticleName":"How to manage WordPress user roles","LiveDateTime":"02/02/1754 00:00:00","NewTillDate":null,"FeaturedTillDate":null,"ModifiedDateTime":"10/23/2024"},{"ArticleId":9328,"Title":"How to install a new theme for WordPress","ArticleName":"How to install a new theme for WordPress","LiveDateTime":"02/02/1754 00:00:00","NewTillDate":null,"FeaturedTillDate":null,"ModifiedDateTime":"09/25/2024"},{"ArticleId":9761,"Title":"How to add a favicon to a WordPress website","ArticleName":"How to add a favicon to a WordPress website","LiveDateTime":"02/02/1754 00:00:00","NewTillDate":null,"FeaturedTillDate":null,"ModifiedDateTime":"12/10/2021"},{"ArticleId":9433,"Title":"How to manage plugins in WordPress","ArticleName":"How to manage plugins in WordPress","LiveDateTime":"02/02/1754 00:00:00","NewTillDate":null,"FeaturedTillDate":null,"ModifiedDateTime":"09/25/2024"},{"ArticleId":9555,"Title":"How to disable WordPress plugins","ArticleName":"How to disable WordPress plugins","LiveDateTime":"02/02/1754 00:00:00","NewTillDate":null,"FeaturedTillDate":null,"ModifiedDateTime":"09/25/2024"},{"ArticleId":9516,"Title":"How to flush WordPress caching plugins","ArticleName":"How to flush WordPress caching plugins","LiveDateTime":"02/02/1754 00:00:00","NewTillDate":null,"FeaturedTillDate":null,"ModifiedDateTime":"12/15/2021"},{"ArticleId":9201,"Title":"How to change WordPress site address (URL)","ArticleName":"How to change WordPress site address (URL)","LiveDateTime":"02/02/1754 00:00:00","NewTillDate":null,"FeaturedTillDate":null,"ModifiedDateTime":"09/25/2024"},{"ArticleId":9452,"Title":"How to set up WordPress Contact Form 7","ArticleName":"How to set up WordPress Contact Form 7","LiveDateTime":"02/02/1754 00:00:00","NewTillDate":null,"FeaturedTillDate":null,"ModifiedDateTime":"09/25/2024"},{"ArticleId":1414,"Title":"How to back up a WordPress site using CodeGuard","ArticleName":"How to back up a WordPress site using CodeGuard","LiveDateTime":"02/02/1754 00:00:00","NewTillDate":null,"FeaturedTillDate":null,"ModifiedDateTime":"07/08/2019"},{"ArticleId":9948,"Title":"What is WordPress cron and how to work with it","ArticleName":"What is WordPress cron and how to work with it","LiveDateTime":"02/02/1754 00:00:00","NewTillDate":null,"FeaturedTillDate":null,"ModifiedDateTime":"05/30/2024"},{"ArticleId":9971,"Title":"What is WordPress heartbeat and how to deal with admin-ajax.php usage","ArticleName":"What is WordPress heartbeat and how to deal with admin-ajax.php usage","LiveDateTime":"02/02/1754 00:00:00","NewTillDate":null,"FeaturedTillDate":null,"ModifiedDateTime":"04/24/2020"},{"ArticleId":9491,"Title":"How to set up HTTPS for WordPress","ArticleName":"How to set up HTTPS for WordPress","LiveDateTime":"02/02/1754 00:00:00","NewTillDate":null,"FeaturedTillDate":null,"ModifiedDateTime":"04/04/2022"},{"ArticleId":9937,"Title":"How to create temporary login details for WordPress","ArticleName":"How to create temporary login details for WordPress","LiveDateTime":"02/02/1754 00:00:00","NewTillDate":null,"FeaturedTillDate":null,"ModifiedDateTime":"12/10/2021"},{"ArticleId":9941,"Title":"How to manually add an admin user to the WordPress database via phpMyAdmin","ArticleName":"How to manually add an admin user to the WordPress database via phpMyAdmin","LiveDateTime":"02/02/1754 00:00:00","NewTillDate":null,"FeaturedTillDate":null,"ModifiedDateTime":"05/20/2024"},{"ArticleId":9951,"Title":"Maintenance mode for different CMS","ArticleName":"Maintenance mode for different CMS","LiveDateTime":"02/02/1754 00:00:00","NewTillDate":null,"FeaturedTillDate":null,"ModifiedDateTime":"10/21/2022"},{"ArticleId":9399,"Title":"How to speed up and optimize a WordPress website","ArticleName":"How to speed up and optimize a WordPress website","LiveDateTime":"02/02/1754 00:00:00","NewTillDate":null,"FeaturedTillDate":null,"ModifiedDateTime":"01/14/2025"},{"ArticleId":9564,"Title":"How to create a mobile version of a WordPress website","ArticleName":"How to create a mobile version of a WordPress website","LiveDateTime":"02/02/1754 00:00:00","NewTillDate":null,"FeaturedTillDate":null,"ModifiedDateTime":"11/30/2021"},{"ArticleId":9892,"Title":"How to edit wp-config.php file in WordPress","ArticleName":"How to edit wp-config.php file in WordPress","LiveDateTime":"02/02/1754 00:00:00","NewTillDate":null,"FeaturedTillDate":null,"ModifiedDateTime":"06/24/2025"},{"ArticleId":9959,"Title":"How to add Google AdSense to your WordPress website","ArticleName":"How to add Google AdSense to your WordPress website","LiveDateTime":"02/02/1754 00:00:00","NewTillDate":null,"FeaturedTillDate":null,"ModifiedDateTime":"11/22/2021"},{"ArticleId":9663,"Title":"How to fix Error Establishing A Database Connection in WordPress","ArticleName":"How to fix Error Establishing A Database Connection in WordPress","LiveDateTime":"02/02/1754 00:00:00","NewTillDate":null,"FeaturedTillDate":null,"ModifiedDateTime":"09/25/2024"},{"ArticleId":9947,"Title":"How to increase WordPress memory limit","ArticleName":"How to increase WordPress memory limit","LiveDateTime":"02/02/1754 00:00:00","NewTillDate":null,"FeaturedTillDate":null,"ModifiedDateTime":"11/29/2021"},{"ArticleId":9463,"Title":"What is the robots.txt file and how to use it","ArticleName":"What is the robots.txt file and how to use it","LiveDateTime":"02/02/1754 00:00:00","NewTillDate":null,"FeaturedTillDate":null,"ModifiedDateTime":"01/09/2024"},{"ArticleId":9156,"Title":"How to improve WordPress website security","ArticleName":"How to improve WordPress website security","LiveDateTime":"02/02/1754 00:00:00","NewTillDate":null,"FeaturedTillDate":null,"ModifiedDateTime":"11/23/2023"},{"ArticleId":9411,"Title":"How to set up and manage WordPress Multisite (WPMU)","ArticleName":"How to set up and manage WordPress Multisite (WPMU)","LiveDateTime":"02/02/1754 00:00:00","NewTillDate":null,"FeaturedTillDate":null,"ModifiedDateTime":"08/03/2022"},{"ArticleId":9427,"Title":"How to transfer WordPress Multisite (WPMU)","ArticleName":"How to transfer WordPress Multisite (WPMU)","LiveDateTime":"02/02/1754 00:00:00","NewTillDate":null,"FeaturedTillDate":null,"ModifiedDateTime":"05/30/2024"},{"ArticleId":9243,"Title":"How to transfer a WordPress website to Namecheap manually","ArticleName":"How to transfer a WordPress website to Namecheap manually","LiveDateTime":"02/02/1754 00:00:00","NewTillDate":null,"FeaturedTillDate":null,"ModifiedDateTime":"05/10/2025"},{"ArticleId":9359,"Title":"How to migrate website from wordpress.com to Namecheap","ArticleName":"How to migrate website from wordpress.com to Namecheap","LiveDateTime":"02/02/1754 00:00:00","NewTillDate":null,"FeaturedTillDate":null,"ModifiedDateTime":"12/10/2021"},{"ArticleId":9950,"Title":"How to move a website from Wix to WordPress","ArticleName":"How to move a website from Wix to WordPress","LiveDateTime":"02/02/1754 00:00:00","NewTillDate":null,"FeaturedTillDate":null,"ModifiedDateTime":"12/28/2020"},{"ArticleId":9949,"Title":"How to move a website from Squarespace to WordPress","ArticleName":"How to move a website from Squarespace to WordPress","LiveDateTime":"02/02/1754 00:00:00","NewTillDate":null,"FeaturedTillDate":null,"ModifiedDateTime":"12/14/2021"},{"ArticleId":9714,"Title":"How to move from Blogger to WordPress hosted with us","ArticleName":"How to move from Blogger to WordPress hosted with us","LiveDateTime":"02/02/1754 00:00:00","NewTillDate":null,"FeaturedTillDate":null,"ModifiedDateTime":"12/10/2021"}],"AssociatedTags":[],"CategoryId":2187,"CategoryName":"cPanel: WordPress"},"status":200,"statusText":"OK"},"/api/v1/ncpl/simplekb/getcategories:\"{\\\"parentCategoryId\\\":0,\\\"getTree\\\":true}\"":{"body":[{"__type":"Nc:SimpleKB:Abstractions:Dtos:CategoryItemDto","ParentCategoryId":93,"TreatAsTopicYN":false,"Description":"","ImageUrl":"","ShortDesc":"","CategoryId":2216,"CategoryName":"Spam Protection"},{"__type":"Nc:SimpleKB:Abstractions:Dtos:CategoryItemDto","ParentCategoryId":14,"TreatAsTopicYN":false,"Description":"","ImageUrl":"","ShortDesc":"","CategoryId":2217,"CategoryName":"Renewal"},{"__type":"Nc:SimpleKB:Abstractions:Dtos:CategoryItemDto","ParentCategoryId":14,"TreatAsTopicYN":false,"Description":"","ImageUrl":"","ShortDesc":"","CategoryId":2218,"CategoryName":"cPanel SSL Plugin"},{"__type":"Nc:SimpleKB:Abstractions:Dtos:CategoryItemDto","ParentCategoryId":12,"TreatAsTopicYN":false,"Description":"","ImageUrl":"","ShortDesc":"","CategoryId":2219,"CategoryName":"PHP Configuration"},{"__type":"Nc:SimpleKB:Abstractions:Dtos:CategoryItemDto","ParentCategoryId":14,"TreatAsTopicYN":false,"Description":"","ImageUrl":"","ShortDesc":"","CategoryId":2221,"CategoryName":"Multi-Domain SSL Certificates"},{"__type":"Nc:SimpleKB:Abstractions:Dtos:CategoryItemDto","ParentCategoryId":14,"TreatAsTopicYN":false,"Description":"","ImageUrl":"","ShortDesc":"","CategoryId":2222,"CategoryName":"Cancellation"},{"__type":"Nc:SimpleKB:Abstractions:Dtos:CategoryItemDto","ParentCategoryId":14,"TreatAsTopicYN":false,"Description":"","ImageUrl":"","ShortDesc":"","CategoryId":2223,"CategoryName":"Browser errors"},{"__type":"Nc:SimpleKB:Abstractions:Dtos:CategoryItemDto","ParentCategoryId":14,"TreatAsTopicYN":false,"Description":"","ImageUrl":"","ShortDesc":"","CategoryId":2224,"CategoryName":"Site Seal, Logo"},{"__type":"Nc:SimpleKB:Abstractions:Dtos:CategoryItemDto","ParentCategoryId":12,"TreatAsTopicYN":false,"Description":"","ImageUrl":"","ShortDesc":"","CategoryId":2225,"CategoryName":"SEO"},{"__type":"Nc:SimpleKB:Abstractions:Dtos:CategoryItemDto","ParentCategoryId":93,"TreatAsTopicYN":false,"Description":"","ImageUrl":"","ShortDesc":"","CategoryId":2226,"CategoryName":"Email Migration"},{"__type":"Nc:SimpleKB:Abstractions:Dtos:CategoryItemDto","ParentCategoryId":2211,"TreatAsTopicYN":false,"Description":"","ImageUrl":"","ShortDesc":"","CategoryId":2227,"CategoryName":"SSL Resellers"},{"__type":"Nc:SimpleKB:Abstractions:Dtos:CategoryItemDto","ParentCategoryId":0,"TreatAsTopicYN":true,"Description":"","ImageUrl":"/assets/img/pictograms/150/cloud-red.png","ShortDesc":"","CategoryId":2228,"CategoryName":"Apps","SubCategories":[{"__type":"Nc:SimpleKB:Abstractions:Dtos:CategoryItemDto","ParentCategoryId":2228,"TreatAsTopicYN":false,"Description":"","ImageUrl":"","ShortDesc":"","CategoryId":2251,"CategoryName":"Supersonic CDN"},{"__type":"Nc:SimpleKB:Abstractions:Dtos:CategoryItemDto","ParentCategoryId":2228,"TreatAsTopicYN":false,"Description":"","ImageUrl":"","ShortDesc":"","CategoryId":2298,"CategoryName":"Site Maker"},{"__type":"Nc:SimpleKB:Abstractions:Dtos:CategoryItemDto","ParentCategoryId":2228,"TreatAsTopicYN":false,"Description":"","ImageUrl":"","ShortDesc":"","CategoryId":177,"CategoryName":"Google Workspace (formerly G Suite)"}]},{"__type":"Nc:SimpleKB:Abstractions:Dtos:CategoryItemDto","ParentCategoryId":2211,"TreatAsTopicYN":false,"Description":"","ImageUrl":"","ShortDesc":"","CategoryId":2229,"CategoryName":"Hosting Resellers"},{"__type":"Nc:SimpleKB:Abstractions:Dtos:CategoryItemDto","ParentCategoryId":34,"TreatAsTopicYN":false,"Description":"","ImageUrl":"","ShortDesc":"","CategoryId":2232,"CategoryName":"DNSSEC"},{"__type":"Nc:SimpleKB:Abstractions:Dtos:CategoryItemDto","ParentCategoryId":34,"TreatAsTopicYN":false,"Description":"","ImageUrl":"","ShortDesc":"","CategoryId":2234,"CategoryName":"Google Workspace (formerly G Suite)"},{"__type":"Nc:SimpleKB:Abstractions:Dtos:CategoryItemDto","ParentCategoryId":34,"TreatAsTopicYN":false,"Description":"","ImageUrl":"","ShortDesc":"","CategoryId":2237,"CategoryName":"Host records setup"},{"__type":"Nc:SimpleKB:Abstractions:Dtos:CategoryItemDto","ParentCategoryId":14,"TreatAsTopicYN":false,"Description":"","ImageUrl":"","ShortDesc":"","CategoryId":2238,"CategoryName":"SSL installation errors"},{"__type":"Nc:SimpleKB:Abstractions:Dtos:CategoryItemDto","ParentCategoryId":0,"TreatAsTopicYN":false,"Description":"","ImageUrl":"/assets/img/pictograms/150/easywp-red.png","ShortDesc":"","CategoryId":2239,"CategoryName":"EasyWP","SubCategories":[{"__type":"Nc:SimpleKB:Abstractions:Dtos:CategoryItemDto","ParentCategoryId":2239,"TreatAsTopicYN":false,"Description":"","ImageUrl":"","ShortDesc":"","CategoryId":2280,"CategoryName":"Getting Started"},{"__type":"Nc:SimpleKB:Abstractions:Dtos:CategoryItemDto","ParentCategoryId":2239,"TreatAsTopicYN":false,"Description":"","ImageUrl":"","ShortDesc":"","CategoryId":2279,"CategoryName":"General Information"},{"__type":"Nc:SimpleKB:Abstractions:Dtos:CategoryItemDto","ParentCategoryId":2239,"TreatAsTopicYN":false,"Description":"","ImageUrl":"","ShortDesc":"","CategoryId":2281,"CategoryName":"WordPress Migration"},{"__type":"Nc:SimpleKB:Abstractions:Dtos:CategoryItemDto","ParentCategoryId":2239,"TreatAsTopicYN":false,"Description":"","ImageUrl":"","ShortDesc":"","CategoryId":2282,"CategoryName":"Plugins and Themes"},{"__type":"Nc:SimpleKB:Abstractions:Dtos:CategoryItemDto","ParentCategoryId":2239,"TreatAsTopicYN":false,"Description":"","ImageUrl":"","ShortDesc":"","CategoryId":2284,"CategoryName":"WordPress Management"},{"__type":"Nc:SimpleKB:Abstractions:Dtos:CategoryItemDto","ParentCategoryId":2239,"TreatAsTopicYN":false,"Description":"","ImageUrl":"","ShortDesc":"","CategoryId":2285,"CategoryName":"SFTP and Database access"},{"__type":"Nc:SimpleKB:Abstractions:Dtos:CategoryItemDto","ParentCategoryId":2239,"TreatAsTopicYN":false,"Description":"","ImageUrl":"","ShortDesc":"","CategoryId":2286,"CategoryName":"Domains questions"},{"__type":"Nc:SimpleKB:Abstractions:Dtos:CategoryItemDto","ParentCategoryId":2239,"TreatAsTopicYN":false,"Description":"","ImageUrl":"","ShortDesc":"","CategoryId":2288,"CategoryName":"Billing questions"},{"__type":"Nc:SimpleKB:Abstractions:Dtos:CategoryItemDto","ParentCategoryId":2239,"TreatAsTopicYN":false,"Description":"","ImageUrl":"","ShortDesc":"","CategoryId":2287,"CategoryName":"SSL questions"}]},{"__type":"Nc:SimpleKB:Abstractions:Dtos:CategoryItemDto","ParentCategoryId":2228,"TreatAsTopicYN":false,"Description":"","ImageUrl":"","ShortDesc":"","CategoryId":2251,"CategoryName":"Supersonic CDN"},{"__type":"Nc:SimpleKB:Abstractions:Dtos:CategoryItemDto","ParentCategoryId":12,"TreatAsTopicYN":false,"Description":"","ImageUrl":"","ShortDesc":"","CategoryId":2252,"CategoryName":"InterWorx questions"},{"__type":"Nc:SimpleKB:Abstractions:Dtos:CategoryItemDto","ParentCategoryId":2253,"TreatAsTopicYN":false,"Description":"","ImageUrl":"","ShortDesc":"","CategoryId":2254,"CategoryName":"Domains How-To"},{"__type":"Nc:SimpleKB:Abstractions:Dtos:CategoryItemDto","ParentCategoryId":2253,"TreatAsTopicYN":false,"Description":"","ImageUrl":"","ShortDesc":"","CategoryId":2255,"CategoryName":"Hosting How-To"},{"__type":"Nc:SimpleKB:Abstractions:Dtos:CategoryItemDto","ParentCategoryId":2253,"TreatAsTopicYN":false,"Description":"","ImageUrl":"","ShortDesc":"","CategoryId":2257,"CategoryName":"Sales & Payments How-To"},{"__type":"Nc:SimpleKB:Abstractions:Dtos:CategoryItemDto","ParentCategoryId":2253,"TreatAsTopicYN":false,"Description":"","ImageUrl":"","ShortDesc":"","CategoryId":2258,"CategoryName":"cPanel Email How-To"},{"__type":"Nc:SimpleKB:Abstractions:Dtos:CategoryItemDto","ParentCategoryId":93,"TreatAsTopicYN":false,"Description":"","ImageUrl":"","ShortDesc":"","CategoryId":2260,"CategoryName":"Private Email Contacts and Calendars Setup"},{"__type":"Nc:SimpleKB:Abstractions:Dtos:CategoryItemDto","ParentCategoryId":2253,"TreatAsTopicYN":false,"Description":"","ImageUrl":"","ShortDesc":"","CategoryId":2262,"CategoryName":"EasyWP How-To"},{"__type":"Nc:SimpleKB:Abstractions:Dtos:CategoryItemDto","ParentCategoryId":0,"TreatAsTopicYN":false,"Description":"","ImageUrl":"https://download.namecheap.com/assets/img/domainvault-red@2x.png","ShortDesc":"","CategoryId":2289,"CategoryName":"Domain Vault","SubCategories":[]},{"__type":"Nc:SimpleKB:Abstractions:Dtos:CategoryItemDto","ParentCategoryId":14,"TreatAsTopicYN":false,"Description":"","ImageUrl":"","ShortDesc":"","CategoryId":2290,"CategoryName":"CSR code"},{"__type":"Nc:SimpleKB:Abstractions:Dtos:CategoryItemDto","ParentCategoryId":12,"TreatAsTopicYN":false,"Description":"","ImageUrl":"","ShortDesc":"","CategoryId":2291,"CategoryName":"Webuzo questions"},{"__type":"Nc:SimpleKB:Abstractions:Dtos:CategoryItemDto","ParentCategoryId":2265,"TreatAsTopicYN":false,"Description":"","ImageUrl":"","ShortDesc":"","CategoryId":2292,"CategoryName":"Browser Extensions"},{"__type":"Nc:SimpleKB:Abstractions:Dtos:CategoryItemDto","ParentCategoryId":14,"TreatAsTopicYN":false,"Description":"","ImageUrl":"","ShortDesc":"","CategoryId":2293,"CategoryName":"Automated SSL management"},{"__type":"Nc:SimpleKB:Abstractions:Dtos:CategoryItemDto","ParentCategoryId":2228,"TreatAsTopicYN":false,"Description":"","ImageUrl":"","ShortDesc":"","CategoryId":2298,"CategoryName":"Site Maker"},{"__type":"Nc:SimpleKB:Abstractions:Dtos:CategoryItemDto","ParentCategoryId":12,"TreatAsTopicYN":false,"Description":"","ImageUrl":"","ShortDesc":"","CategoryId":27,"CategoryName":"Getting Started"},{"__type":"Nc:SimpleKB:Abstractions:Dtos:CategoryItemDto","ParentCategoryId":0,"TreatAsTopicYN":false,"Description":"","ImageUrl":"/assets/img/pictograms/150/support-red.png","ShortDesc":"","CategoryId":5,"CategoryName":"General & Support","SubCategories":[]},{"__type":"Nc:SimpleKB:Abstractions:Dtos:CategoryItemDto","ParentCategoryId":2200,"TreatAsTopicYN":false,"Description":"","ImageUrl":"","ShortDesc":"","CategoryId":7,"CategoryName":"Billing FAQ"},{"__type":"Nc:SimpleKB:Abstractions:Dtos:CategoryItemDto","ParentCategoryId":2209,"TreatAsTopicYN":false,"Description":"","ImageUrl":"","ShortDesc":"","CategoryId":8,"CategoryName":"Transfer Information"},{"__type":"Nc:SimpleKB:Abstractions:Dtos:CategoryItemDto","ParentCategoryId":12,"TreatAsTopicYN":false,"Description":"","ImageUrl":"","ShortDesc":"","CategoryId":22,"CategoryName":"Hosting Information"},{"__type":"Nc:SimpleKB:Abstractions:Dtos:CategoryItemDto","ParentCategoryId":14,"TreatAsTopicYN":false,"Description":"","ImageUrl":"","ShortDesc":"","CategoryId":38,"CategoryName":"SSL General"},{"__type":"Nc:SimpleKB:Abstractions:Dtos:CategoryItemDto","ParentCategoryId":9,"TreatAsTopicYN":false,"Description":"","ImageUrl":"","ShortDesc":"","CategoryId":45,"CategoryName":"Account Security"},{"__type":"Nc:SimpleKB:Abstractions:Dtos:CategoryItemDto","ParentCategoryId":34,"TreatAsTopicYN":false,"Description":"","ImageUrl":"","ShortDesc":"","CategoryId":46,"CategoryName":"Domain Management"},{"__type":"Nc:SimpleKB:Abstractions:Dtos:CategoryItemDto","ParentCategoryId":2211,"TreatAsTopicYN":false,"Description":"","ImageUrl":"","ShortDesc":"","CategoryId":63,"CategoryName":"Namecheap API"},{"__type":"Nc:SimpleKB:Abstractions:Dtos:CategoryItemDto","ParentCategoryId":2228,"TreatAsTopicYN":false,"Description":"","ImageUrl":"","ShortDesc":"","CategoryId":177,"CategoryName":"Google Workspace (formerly G Suite)"},{"__type":"Nc:SimpleKB:Abstractions:Dtos:CategoryItemDto","ParentCategoryId":93,"TreatAsTopicYN":false,"Description":"","ImageUrl":"","ShortDesc":"","CategoryId":2179,"CategoryName":"Private Email: General Information"},{"__type":"Nc:SimpleKB:Abstractions:Dtos:CategoryItemDto","ParentCategoryId":2265,"TreatAsTopicYN":false,"Description":"","ImageUrl":"","ShortDesc":"","CategoryId":2274,"CategoryName":"General"},{"__type":"Nc:SimpleKB:Abstractions:Dtos:CategoryItemDto","ParentCategoryId":2239,"TreatAsTopicYN":false,"Description":"","ImageUrl":"","ShortDesc":"","CategoryId":2280,"CategoryName":"Getting Started"},{"__type":"Nc:SimpleKB:Abstractions:Dtos:CategoryItemDto","ParentCategoryId":2239,"TreatAsTopicYN":false,"Description":"","ImageUrl":"","ShortDesc":"","CategoryId":2279,"CategoryName":"General Information"},{"__type":"Nc:SimpleKB:Abstractions:Dtos:CategoryItemDto","ParentCategoryId":93,"TreatAsTopicYN":false,"Description":"","ImageUrl":"","ShortDesc":"","CategoryId":2215,"CategoryName":"Private Email: Mailbox Management"},{"__type":"Nc:SimpleKB:Abstractions:Dtos:CategoryItemDto","ParentCategoryId":2211,"TreatAsTopicYN":false,"Description":"","ImageUrl":"","ShortDesc":"","CategoryId":2196,"CategoryName":"WHMCS module for SSL"},{"__type":"Nc:SimpleKB:Abstractions:Dtos:CategoryItemDto","ParentCategoryId":0,"TreatAsTopicYN":false,"Description":"","ImageUrl":"/assets/img/pictograms/150/savings-red.png","ShortDesc":"","CategoryId":2200,"CategoryName":"Checkout & Billing","SubCategories":[{"__type":"Nc:SimpleKB:Abstractions:Dtos:CategoryItemDto","ParentCategoryId":2200,"TreatAsTopicYN":false,"Description":"","ImageUrl":"","ShortDesc":"","CategoryId":7,"CategoryName":"Billing FAQ"},{"__type":"Nc:SimpleKB:Abstractions:Dtos:CategoryItemDto","ParentCategoryId":2200,"TreatAsTopicYN":false,"Description":"","ImageUrl":"","ShortDesc":"","CategoryId":2201,"CategoryName":"Domains Billing"},{"__type":"Nc:SimpleKB:Abstractions:Dtos:CategoryItemDto","ParentCategoryId":2200,"TreatAsTopicYN":false,"Description":"","ImageUrl":"","ShortDesc":"","CategoryId":21,"CategoryName":"Hosting Billing"},{"__type":"Nc:SimpleKB:Abstractions:Dtos:CategoryItemDto","ParentCategoryId":2200,"TreatAsTopicYN":false,"Description":"","ImageUrl":"","ShortDesc":"","CategoryId":71,"CategoryName":"SSL Certificates Billing"},{"__type":"Nc:SimpleKB:Abstractions:Dtos:CategoryItemDto","ParentCategoryId":2200,"TreatAsTopicYN":false,"Description":"","ImageUrl":"","ShortDesc":"","CategoryId":2177,"CategoryName":"Private Email"}]},{"__type":"Nc:SimpleKB:Abstractions:Dtos:CategoryItemDto","ParentCategoryId":2200,"TreatAsTopicYN":false,"Description":"","ImageUrl":"","ShortDesc":"","CategoryId":2201,"CategoryName":"Domains Billing"},{"__type":"Nc:SimpleKB:Abstractions:Dtos:CategoryItemDto","ParentCategoryId":14,"TreatAsTopicYN":false,"Description":"","ImageUrl":"","ShortDesc":"","CategoryId":67,"CategoryName":"Activation"},{"__type":"Nc:SimpleKB:Abstractions:Dtos:CategoryItemDto","ParentCategoryId":2209,"TreatAsTopicYN":false,"Description":"","ImageUrl":"","ShortDesc":"","CategoryId":83,"CategoryName":"Transfer to Namecheap"},{"__type":"Nc:SimpleKB:Abstractions:Dtos:CategoryItemDto","ParentCategoryId":9,"TreatAsTopicYN":false,"Description":"","ImageUrl":"","ShortDesc":"","CategoryId":43,"CategoryName":"Profile Management"},{"__type":"Nc:SimpleKB:Abstractions:Dtos:CategoryItemDto","ParentCategoryId":34,"TreatAsTopicYN":false,"Description":"","ImageUrl":"","ShortDesc":"","CategoryId":10,"CategoryName":"DNS Questions"},{"__type":"Nc:SimpleKB:Abstractions:Dtos:CategoryItemDto","ParentCategoryId":12,"TreatAsTopicYN":false,"Description":"","ImageUrl":"","ShortDesc":"","CategoryId":29,"CategoryName":"cPanel questions"},{"__type":"Nc:SimpleKB:Abstractions:Dtos:CategoryItemDto","ParentCategoryId":2200,"TreatAsTopicYN":false,"Description":"","ImageUrl":"","ShortDesc":"","CategoryId":21,"CategoryName":"Hosting Billing"},{"__type":"Nc:SimpleKB:Abstractions:Dtos:CategoryItemDto","ParentCategoryId":34,"TreatAsTopicYN":false,"Description":"","ImageUrl":"","ShortDesc":"","CategoryId":11,"CategoryName":"Dynamic DNS"},{"__type":"Nc:SimpleKB:Abstractions:Dtos:CategoryItemDto","ParentCategoryId":9,"TreatAsTopicYN":false,"Description":"","ImageUrl":"","ShortDesc":"","CategoryId":44,"CategoryName":"Account Access"},{"__type":"Nc:SimpleKB:Abstractions:Dtos:CategoryItemDto","ParentCategoryId":2209,"TreatAsTopicYN":false,"Description":"","ImageUrl":"","ShortDesc":"","CategoryId":84,"CategoryName":"Transfer to another provider"},{"__type":"Nc:SimpleKB:Abstractions:Dtos:CategoryItemDto","ParentCategoryId":14,"TreatAsTopicYN":false,"Description":"","ImageUrl":"","ShortDesc":"","CategoryId":68,"CategoryName":"Validation"},{"__type":"Nc:SimpleKB:Abstractions:Dtos:CategoryItemDto","ParentCategoryId":12,"TreatAsTopicYN":false,"Description":"","ImageUrl":"","ShortDesc":"","CategoryId":2182,"CategoryName":"cPanel: Software Management"},{"__type":"Nc:SimpleKB:Abstractions:Dtos:CategoryItemDto","ParentCategoryId":93,"TreatAsTopicYN":false,"Description":"","ImageUrl":"","ShortDesc":"","CategoryId":2214,"CategoryName":"Email Forwarding"},{"__type":"Nc:SimpleKB:Abstractions:Dtos:CategoryItemDto","ParentCategoryId":2265,"TreatAsTopicYN":false,"Description":"","ImageUrl":"","ShortDesc":"","CategoryId":2270,"CategoryName":"Routers"},{"__type":"Nc:SimpleKB:Abstractions:Dtos:CategoryItemDto","ParentCategoryId":2239,"TreatAsTopicYN":false,"Description":"","ImageUrl":"","ShortDesc":"","CategoryId":2281,"CategoryName":"WordPress Migration"},{"__type":"Nc:SimpleKB:Abstractions:Dtos:CategoryItemDto","ParentCategoryId":2239,"TreatAsTopicYN":false,"Description":"","ImageUrl":"","ShortDesc":"","CategoryId":2282,"CategoryName":"Plugins and Themes"},{"__type":"Nc:SimpleKB:Abstractions:Dtos:CategoryItemDto","ParentCategoryId":2265,"TreatAsTopicYN":false,"Description":"","ImageUrl":"","ShortDesc":"","CategoryId":2272,"CategoryName":"TV"},{"__type":"Nc:SimpleKB:Abstractions:Dtos:CategoryItemDto","ParentCategoryId":12,"TreatAsTopicYN":false,"Description":"","ImageUrl":"","ShortDesc":"","CategoryId":2187,"CategoryName":"cPanel: WordPress"},{"__type":"Nc:SimpleKB:Abstractions:Dtos:CategoryItemDto","ParentCategoryId":2209,"TreatAsTopicYN":false,"Description":"","ImageUrl":"","ShortDesc":"","CategoryId":219,"CategoryName":"Canceled Transfers"},{"__type":"Nc:SimpleKB:Abstractions:Dtos:CategoryItemDto","ParentCategoryId":2200,"TreatAsTopicYN":false,"Description":"","ImageUrl":"","ShortDesc":"","CategoryId":71,"CategoryName":"SSL Certificates Billing"},{"__type":"Nc:SimpleKB:Abstractions:Dtos:CategoryItemDto","ParentCategoryId":93,"TreatAsTopicYN":false,"Description":"","ImageUrl":"","ShortDesc":"","CategoryId":2176,"CategoryName":"Private Email: DNS Settings"},{"__type":"Nc:SimpleKB:Abstractions:Dtos:CategoryItemDto","ParentCategoryId":14,"TreatAsTopicYN":false,"Description":"","ImageUrl":"","ShortDesc":"","CategoryId":69,"CategoryName":"Installation"},{"__type":"Nc:SimpleKB:Abstractions:Dtos:CategoryItemDto","ParentCategoryId":0,"TreatAsTopicYN":false,"Description":"","ImageUrl":"/assets/img/pictograms/150/reseller-red.png","ShortDesc":"","CategoryId":34,"CategoryName":"Domains","SubCategories":[{"__type":"Nc:SimpleKB:Abstractions:Dtos:CategoryItemDto","ParentCategoryId":34,"TreatAsTopicYN":false,"Description":"","ImageUrl":"","ShortDesc":"","CategoryId":2232,"CategoryName":"DNSSEC"},{"__type":"Nc:SimpleKB:Abstractions:Dtos:CategoryItemDto","ParentCategoryId":34,"TreatAsTopicYN":false,"Description":"","ImageUrl":"","ShortDesc":"","CategoryId":2234,"CategoryName":"Google Workspace (formerly G Suite)"},{"__type":"Nc:SimpleKB:Abstractions:Dtos:CategoryItemDto","ParentCategoryId":34,"TreatAsTopicYN":false,"Description":"","ImageUrl":"","ShortDesc":"","CategoryId":2237,"CategoryName":"Host records setup"},{"__type":"Nc:SimpleKB:Abstractions:Dtos:CategoryItemDto","ParentCategoryId":34,"TreatAsTopicYN":false,"Description":"","ImageUrl":"","ShortDesc":"","CategoryId":46,"CategoryName":"Domain Management"},{"__type":"Nc:SimpleKB:Abstractions:Dtos:CategoryItemDto","ParentCategoryId":34,"TreatAsTopicYN":false,"Description":"","ImageUrl":"","ShortDesc":"","CategoryId":10,"CategoryName":"DNS Questions"},{"__type":"Nc:SimpleKB:Abstractions:Dtos:CategoryItemDto","ParentCategoryId":34,"TreatAsTopicYN":false,"Description":"","ImageUrl":"","ShortDesc":"","CategoryId":11,"CategoryName":"Dynamic DNS"},{"__type":"Nc:SimpleKB:Abstractions:Dtos:CategoryItemDto","ParentCategoryId":34,"TreatAsTopicYN":false,"Description":"","ImageUrl":"","ShortDesc":"","CategoryId":35,"CategoryName":"Registrations"},{"__type":"Nc:SimpleKB:Abstractions:Dtos:CategoryItemDto","ParentCategoryId":34,"TreatAsTopicYN":false,"Description":"","ImageUrl":"","ShortDesc":"","CategoryId":2207,"CategoryName":"Renewal questions"},{"__type":"Nc:SimpleKB:Abstractions:Dtos:CategoryItemDto","ParentCategoryId":34,"TreatAsTopicYN":false,"Description":"","ImageUrl":"","ShortDesc":"","CategoryId":36,"CategoryName":"Domains with extended attributes"},{"__type":"Nc:SimpleKB:Abstractions:Dtos:CategoryItemDto","ParentCategoryId":34,"TreatAsTopicYN":false,"Description":"","ImageUrl":"","ShortDesc":"","CategoryId":51,"CategoryName":"FreeDNS"},{"__type":"Nc:SimpleKB:Abstractions:Dtos:CategoryItemDto","ParentCategoryId":34,"TreatAsTopicYN":false,"Description":"","ImageUrl":"","ShortDesc":"","CategoryId":15,"CategoryName":"Namecheap Market"},{"__type":"Nc:SimpleKB:Abstractions:Dtos:CategoryItemDto","ParentCategoryId":34,"TreatAsTopicYN":false,"Description":"","ImageUrl":"","ShortDesc":"","CategoryId":2208,"CategoryName":"3rd Party Services Setup"},{"__type":"Nc:SimpleKB:Abstractions:Dtos:CategoryItemDto","ParentCategoryId":34,"TreatAsTopicYN":false,"Description":"","ImageUrl":"","ShortDesc":"","CategoryId":2278,"CategoryName":"Handshake TLDs"}]},{"__type":"Nc:SimpleKB:Abstractions:Dtos:CategoryItemDto","ParentCategoryId":34,"TreatAsTopicYN":false,"Description":"","ImageUrl":"","ShortDesc":"","CategoryId":35,"CategoryName":"Registrations"},{"__type":"Nc:SimpleKB:Abstractions:Dtos:CategoryItemDto","ParentCategoryId":14,"TreatAsTopicYN":false,"Description":"","ImageUrl":"","ShortDesc":"","CategoryId":70,"CategoryName":"Reissuance"},{"__type":"Nc:SimpleKB:Abstractions:Dtos:CategoryItemDto","ParentCategoryId":0,"TreatAsTopicYN":false,"Description":"","ImageUrl":"/assets/img/pictograms/150/protection-red.png","ShortDesc":"","CategoryId":37,"CategoryName":"Domain Privacy Protection","SubCategories":[]},{"__type":"Nc:SimpleKB:Abstractions:Dtos:CategoryItemDto","ParentCategoryId":2200,"TreatAsTopicYN":false,"Description":"","ImageUrl":"","ShortDesc":"","CategoryId":2177,"CategoryName":"Private Email"},{"__type":"Nc:SimpleKB:Abstractions:Dtos:CategoryItemDto","ParentCategoryId":93,"TreatAsTopicYN":false,"Description":"","ImageUrl":"","ShortDesc":"","CategoryId":2178,"CategoryName":"Private Email: Webmail Features"},{"__type":"Nc:SimpleKB:Abstractions:Dtos:CategoryItemDto","ParentCategoryId":34,"TreatAsTopicYN":false,"Description":"","ImageUrl":"","ShortDesc":"","CategoryId":2207,"CategoryName":"Renewal questions"},{"__type":"Nc:SimpleKB:Abstractions:Dtos:CategoryItemDto","ParentCategoryId":12,"TreatAsTopicYN":false,"Description":"","ImageUrl":"","ShortDesc":"","CategoryId":2210,"CategoryName":"cPanel Add-ons"},{"__type":"Nc:SimpleKB:Abstractions:Dtos:CategoryItemDto","ParentCategoryId":2265,"TreatAsTopicYN":false,"Description":"","ImageUrl":"","ShortDesc":"","CategoryId":2273,"CategoryName":"Gaming Consoles"},{"__type":"Nc:SimpleKB:Abstractions:Dtos:CategoryItemDto","ParentCategoryId":2239,"TreatAsTopicYN":false,"Description":"","ImageUrl":"","ShortDesc":"","CategoryId":2284,"CategoryName":"WordPress Management"},{"__type":"Nc:SimpleKB:Abstractions:Dtos:CategoryItemDto","ParentCategoryId":2239,"TreatAsTopicYN":false,"Description":"","ImageUrl":"","ShortDesc":"","CategoryId":2285,"CategoryName":"SFTP and Database access"},{"__type":"Nc:SimpleKB:Abstractions:Dtos:CategoryItemDto","ParentCategoryId":2265,"TreatAsTopicYN":false,"Description":"","ImageUrl":"","ShortDesc":"","CategoryId":2268,"CategoryName":"macOS"},{"__type":"Nc:SimpleKB:Abstractions:Dtos:CategoryItemDto","ParentCategoryId":93,"TreatAsTopicYN":false,"Description":"","ImageUrl":"","ShortDesc":"","CategoryId":2175,"CategoryName":"Private Email: Client Setup"},{"__type":"Nc:SimpleKB:Abstractions:Dtos:CategoryItemDto","ParentCategoryId":0,"TreatAsTopicYN":false,"Description":"","ImageUrl":"/assets/img/pictograms/150/status-red.png","ShortDesc":"","CategoryId":2209,"CategoryName":"Domain Transfers","SubCategories":[{"__type":"Nc:SimpleKB:Abstractions:Dtos:CategoryItemDto","ParentCategoryId":2209,"TreatAsTopicYN":false,"Description":"","ImageUrl":"","ShortDesc":"","CategoryId":8,"CategoryName":"Transfer Information"},{"__type":"Nc:SimpleKB:Abstractions:Dtos:CategoryItemDto","ParentCategoryId":2209,"TreatAsTopicYN":false,"Description":"","ImageUrl":"","ShortDesc":"","CategoryId":83,"CategoryName":"Transfer to Namecheap"},{"__type":"Nc:SimpleKB:Abstractions:Dtos:CategoryItemDto","ParentCategoryId":2209,"TreatAsTopicYN":false,"Description":"","ImageUrl":"","ShortDesc":"","CategoryId":84,"CategoryName":"Transfer to another provider"},{"__type":"Nc:SimpleKB:Abstractions:Dtos:CategoryItemDto","ParentCategoryId":2209,"TreatAsTopicYN":false,"Description":"","ImageUrl":"","ShortDesc":"","CategoryId":219,"CategoryName":"Canceled Transfers"}]},{"__type":"Nc:SimpleKB:Abstractions:Dtos:CategoryItemDto","ParentCategoryId":12,"TreatAsTopicYN":false,"Description":"","ImageUrl":"","ShortDesc":"","CategoryId":48,"CategoryName":"VPS"},{"__type":"Nc:SimpleKB:Abstractions:Dtos:CategoryItemDto","ParentCategoryId":34,"TreatAsTopicYN":false,"Description":"","ImageUrl":"","ShortDesc":"","CategoryId":36,"CategoryName":"Domains with extended attributes"},{"__type":"Nc:SimpleKB:Abstractions:Dtos:CategoryItemDto","ParentCategoryId":0,"TreatAsTopicYN":true,"Description":"","ImageUrl":"/assets/img/pictograms/150/server-red.png","ShortDesc":"","CategoryId":12,"CategoryName":"Hosting","SubCategories":[{"__type":"Nc:SimpleKB:Abstractions:Dtos:CategoryItemDto","ParentCategoryId":12,"TreatAsTopicYN":false,"Description":"","ImageUrl":"","ShortDesc":"","CategoryId":2219,"CategoryName":"PHP Configuration"},{"__type":"Nc:SimpleKB:Abstractions:Dtos:CategoryItemDto","ParentCategoryId":12,"TreatAsTopicYN":false,"Description":"","ImageUrl":"","ShortDesc":"","CategoryId":2225,"CategoryName":"SEO"},{"__type":"Nc:SimpleKB:Abstractions:Dtos:CategoryItemDto","ParentCategoryId":12,"TreatAsTopicYN":false,"Description":"","ImageUrl":"","ShortDesc":"","CategoryId":2252,"CategoryName":"InterWorx questions"},{"__type":"Nc:SimpleKB:Abstractions:Dtos:CategoryItemDto","ParentCategoryId":12,"TreatAsTopicYN":false,"Description":"","ImageUrl":"","ShortDesc":"","CategoryId":2291,"CategoryName":"Webuzo questions"},{"__type":"Nc:SimpleKB:Abstractions:Dtos:CategoryItemDto","ParentCategoryId":12,"TreatAsTopicYN":false,"Description":"","ImageUrl":"","ShortDesc":"","CategoryId":27,"CategoryName":"Getting Started"},{"__type":"Nc:SimpleKB:Abstractions:Dtos:CategoryItemDto","ParentCategoryId":12,"TreatAsTopicYN":false,"Description":"","ImageUrl":"","ShortDesc":"","CategoryId":22,"CategoryName":"Hosting Information"},{"__type":"Nc:SimpleKB:Abstractions:Dtos:CategoryItemDto","ParentCategoryId":12,"TreatAsTopicYN":false,"Description":"","ImageUrl":"","ShortDesc":"","CategoryId":29,"CategoryName":"cPanel questions"},{"__type":"Nc:SimpleKB:Abstractions:Dtos:CategoryItemDto","ParentCategoryId":12,"TreatAsTopicYN":false,"Description":"","ImageUrl":"","ShortDesc":"","CategoryId":2182,"CategoryName":"cPanel: Software Management"},{"__type":"Nc:SimpleKB:Abstractions:Dtos:CategoryItemDto","ParentCategoryId":12,"TreatAsTopicYN":false,"Description":"","ImageUrl":"","ShortDesc":"","CategoryId":2187,"CategoryName":"cPanel: WordPress"},{"__type":"Nc:SimpleKB:Abstractions:Dtos:CategoryItemDto","ParentCategoryId":12,"TreatAsTopicYN":false,"Description":"","ImageUrl":"","ShortDesc":"","CategoryId":2210,"CategoryName":"cPanel Add-ons"},{"__type":"Nc:SimpleKB:Abstractions:Dtos:CategoryItemDto","ParentCategoryId":12,"TreatAsTopicYN":false,"Description":"","ImageUrl":"","ShortDesc":"","CategoryId":48,"CategoryName":"VPS"},{"__type":"Nc:SimpleKB:Abstractions:Dtos:CategoryItemDto","ParentCategoryId":12,"TreatAsTopicYN":false,"Description":"","ImageUrl":"","ShortDesc":"","CategoryId":2188,"CategoryName":"Dedicated Server"},{"__type":"Nc:SimpleKB:Abstractions:Dtos:CategoryItemDto","ParentCategoryId":12,"TreatAsTopicYN":false,"Description":"","ImageUrl":"","ShortDesc":"","CategoryId":30,"CategoryName":"WHM questions"},{"__type":"Nc:SimpleKB:Abstractions:Dtos:CategoryItemDto","ParentCategoryId":12,"TreatAsTopicYN":false,"Description":"","ImageUrl":"","ShortDesc":"","CategoryId":32,"CategoryName":"DNS settings"},{"__type":"Nc:SimpleKB:Abstractions:Dtos:CategoryItemDto","ParentCategoryId":12,"TreatAsTopicYN":false,"Description":"","ImageUrl":"","ShortDesc":"","CategoryId":103,"CategoryName":"LVE (CloudLinux)"},{"__type":"Nc:SimpleKB:Abstractions:Dtos:CategoryItemDto","ParentCategoryId":12,"TreatAsTopicYN":false,"Description":"","ImageUrl":"","ShortDesc":"","CategoryId":89,"CategoryName":"SSH Access"},{"__type":"Nc:SimpleKB:Abstractions:Dtos:CategoryItemDto","ParentCategoryId":12,"TreatAsTopicYN":false,"Description":"","ImageUrl":"","ShortDesc":"","CategoryId":205,"CategoryName":"FTP questions"},{"__type":"Nc:SimpleKB:Abstractions:Dtos:CategoryItemDto","ParentCategoryId":12,"TreatAsTopicYN":false,"Description":"","ImageUrl":"","ShortDesc":"","CategoryId":2180,"CategoryName":"MySQL questions"},{"__type":"Nc:SimpleKB:Abstractions:Dtos:CategoryItemDto","ParentCategoryId":12,"TreatAsTopicYN":false,"Description":"","ImageUrl":"","ShortDesc":"","CategoryId":2199,"CategoryName":"Hosting Migration"},{"__type":"Nc:SimpleKB:Abstractions:Dtos:CategoryItemDto","ParentCategoryId":12,"TreatAsTopicYN":false,"Description":"","ImageUrl":"","ShortDesc":"","CategoryId":2194,"CategoryName":"Tips & Tricks"},{"__type":"Nc:SimpleKB:Abstractions:Dtos:CategoryItemDto","ParentCategoryId":12,"TreatAsTopicYN":false,"Description":"","ImageUrl":"","ShortDesc":"","CategoryId":239,"CategoryName":"WHMCS"},{"__type":"Nc:SimpleKB:Abstractions:Dtos:CategoryItemDto","ParentCategoryId":12,"TreatAsTopicYN":false,"Description":"","ImageUrl":"","ShortDesc":"","CategoryId":33,"CategoryName":"SSL Installation"}]},{"__type":"Nc:SimpleKB:Abstractions:Dtos:CategoryItemDto","ParentCategoryId":93,"TreatAsTopicYN":false,"Description":"","ImageUrl":"","ShortDesc":"","CategoryId":2171,"CategoryName":"Private Email: Active Sync (Exchange) Setup"},{"__type":"Nc:SimpleKB:Abstractions:Dtos:CategoryItemDto","ParentCategoryId":12,"TreatAsTopicYN":false,"Description":"","ImageUrl":"","ShortDesc":"","CategoryId":2188,"CategoryName":"Dedicated Server"},{"__type":"Nc:SimpleKB:Abstractions:Dtos:CategoryItemDto","ParentCategoryId":2265,"TreatAsTopicYN":false,"Description":"","ImageUrl":"","ShortDesc":"","CategoryId":2269,"CategoryName":"iOS"},{"__type":"Nc:SimpleKB:Abstractions:Dtos:CategoryItemDto","ParentCategoryId":2239,"TreatAsTopicYN":false,"Description":"","ImageUrl":"","ShortDesc":"","CategoryId":2286,"CategoryName":"Domains questions"},{"__type":"Nc:SimpleKB:Abstractions:Dtos:CategoryItemDto","ParentCategoryId":2239,"TreatAsTopicYN":false,"Description":"","ImageUrl":"","ShortDesc":"","CategoryId":2288,"CategoryName":"Billing questions"},{"__type":"Nc:SimpleKB:Abstractions:Dtos:CategoryItemDto","ParentCategoryId":2265,"TreatAsTopicYN":false,"Description":"","ImageUrl":"","ShortDesc":"","CategoryId":2271,"CategoryName":"Linux"},{"__type":"Nc:SimpleKB:Abstractions:Dtos:CategoryItemDto","ParentCategoryId":12,"TreatAsTopicYN":false,"Description":"","ImageUrl":"","ShortDesc":"","CategoryId":30,"CategoryName":"WHM questions"},{"__type":"Nc:SimpleKB:Abstractions:Dtos:CategoryItemDto","ParentCategoryId":93,"TreatAsTopicYN":false,"Description":"","ImageUrl":"","ShortDesc":"","CategoryId":31,"CategoryName":"cPanel Email FAQs"},{"__type":"Nc:SimpleKB:Abstractions:Dtos:CategoryItemDto","ParentCategoryId":34,"TreatAsTopicYN":false,"Description":"","ImageUrl":"","ShortDesc":"","CategoryId":51,"CategoryName":"FreeDNS"},{"__type":"Nc:SimpleKB:Abstractions:Dtos:CategoryItemDto","ParentCategoryId":0,"TreatAsTopicYN":false,"Description":"","ImageUrl":"/assets/img/pictograms/150/email-red.png","ShortDesc":"","CategoryId":93,"CategoryName":"Email service","SubCategories":[{"__type":"Nc:SimpleKB:Abstractions:Dtos:CategoryItemDto","ParentCategoryId":93,"TreatAsTopicYN":false,"Description":"","ImageUrl":"","ShortDesc":"","CategoryId":2216,"CategoryName":"Spam Protection"},{"__type":"Nc:SimpleKB:Abstractions:Dtos:CategoryItemDto","ParentCategoryId":93,"TreatAsTopicYN":false,"Description":"","ImageUrl":"","ShortDesc":"","CategoryId":2226,"CategoryName":"Email Migration"},{"__type":"Nc:SimpleKB:Abstractions:Dtos:CategoryItemDto","ParentCategoryId":93,"TreatAsTopicYN":false,"Description":"","ImageUrl":"","ShortDesc":"","CategoryId":2260,"CategoryName":"Private Email Contacts and Calendars Setup"},{"__type":"Nc:SimpleKB:Abstractions:Dtos:CategoryItemDto","ParentCategoryId":93,"TreatAsTopicYN":false,"Description":"","ImageUrl":"","ShortDesc":"","CategoryId":2179,"CategoryName":"Private Email: General Information"},{"__type":"Nc:SimpleKB:Abstractions:Dtos:CategoryItemDto","ParentCategoryId":93,"TreatAsTopicYN":false,"Description":"","ImageUrl":"","ShortDesc":"","CategoryId":2215,"CategoryName":"Private Email: Mailbox Management"},{"__type":"Nc:SimpleKB:Abstractions:Dtos:CategoryItemDto","ParentCategoryId":93,"TreatAsTopicYN":false,"Description":"","ImageUrl":"","ShortDesc":"","CategoryId":2214,"CategoryName":"Email Forwarding"},{"__type":"Nc:SimpleKB:Abstractions:Dtos:CategoryItemDto","ParentCategoryId":93,"TreatAsTopicYN":false,"Description":"","ImageUrl":"","ShortDesc":"","CategoryId":2176,"CategoryName":"Private Email: DNS Settings"},{"__type":"Nc:SimpleKB:Abstractions:Dtos:CategoryItemDto","ParentCategoryId":93,"TreatAsTopicYN":false,"Description":"","ImageUrl":"","ShortDesc":"","CategoryId":2178,"CategoryName":"Private Email: Webmail Features"},{"__type":"Nc:SimpleKB:Abstractions:Dtos:CategoryItemDto","ParentCategoryId":93,"TreatAsTopicYN":false,"Description":"","ImageUrl":"","ShortDesc":"","CategoryId":2175,"CategoryName":"Private Email: Client Setup"},{"__type":"Nc:SimpleKB:Abstractions:Dtos:CategoryItemDto","ParentCategoryId":93,"TreatAsTopicYN":false,"Description":"","ImageUrl":"","ShortDesc":"","CategoryId":2171,"CategoryName":"Private Email: Active Sync (Exchange) Setup"},{"__type":"Nc:SimpleKB:Abstractions:Dtos:CategoryItemDto","ParentCategoryId":93,"TreatAsTopicYN":false,"Description":"","ImageUrl":"","ShortDesc":"","CategoryId":31,"CategoryName":"cPanel Email FAQs"},{"__type":"Nc:SimpleKB:Abstractions:Dtos:CategoryItemDto","ParentCategoryId":93,"TreatAsTopicYN":false,"Description":"","ImageUrl":"","ShortDesc":"","CategoryId":2186,"CategoryName":"cPanel Email: Client Setup"},{"__type":"Nc:SimpleKB:Abstractions:Dtos:CategoryItemDto","ParentCategoryId":93,"TreatAsTopicYN":false,"Description":"","ImageUrl":"","ShortDesc":"","CategoryId":2204,"CategoryName":"Private Email: Video Overview"}]},{"__type":"Nc:SimpleKB:Abstractions:Dtos:CategoryItemDto","ParentCategoryId":12,"TreatAsTopicYN":false,"Description":"","ImageUrl":"","ShortDesc":"","CategoryId":32,"CategoryName":"DNS settings"},{"__type":"Nc:SimpleKB:Abstractions:Dtos:CategoryItemDto","ParentCategoryId":34,"TreatAsTopicYN":false,"Description":"","ImageUrl":"","ShortDesc":"","CategoryId":15,"CategoryName":"Namecheap Market"},{"__type":"Nc:SimpleKB:Abstractions:Dtos:CategoryItemDto","ParentCategoryId":93,"TreatAsTopicYN":false,"Description":"","ImageUrl":"","ShortDesc":"","CategoryId":2186,"CategoryName":"cPanel Email: Client Setup"},{"__type":"Nc:SimpleKB:Abstractions:Dtos:CategoryItemDto","ParentCategoryId":2265,"TreatAsTopicYN":false,"Description":"","ImageUrl":"","ShortDesc":"","CategoryId":2266,"CategoryName":"Windows"},{"__type":"Nc:SimpleKB:Abstractions:Dtos:CategoryItemDto","ParentCategoryId":2239,"TreatAsTopicYN":false,"Description":"","ImageUrl":"","ShortDesc":"","CategoryId":2287,"CategoryName":"SSL questions"},{"__type":"Nc:SimpleKB:Abstractions:Dtos:CategoryItemDto","ParentCategoryId":2265,"TreatAsTopicYN":false,"Description":"","ImageUrl":"","ShortDesc":"","CategoryId":2267,"CategoryName":"Android"},{"__type":"Nc:SimpleKB:Abstractions:Dtos:CategoryItemDto","ParentCategoryId":34,"TreatAsTopicYN":false,"Description":"","ImageUrl":"","ShortDesc":"","CategoryId":2208,"CategoryName":"3rd Party Services Setup"},{"__type":"Nc:SimpleKB:Abstractions:Dtos:CategoryItemDto","ParentCategoryId":93,"TreatAsTopicYN":false,"Description":"","ImageUrl":"","ShortDesc":"","CategoryId":2204,"CategoryName":"Private Email: Video Overview"},{"__type":"Nc:SimpleKB:Abstractions:Dtos:CategoryItemDto","ParentCategoryId":0,"TreatAsTopicYN":false,"Description":"","ImageUrl":"/assets/img/pictograms/150/security-red.png","ShortDesc":"","CategoryId":14,"CategoryName":"SSL Certificates","SubCategories":[{"__type":"Nc:SimpleKB:Abstractions:Dtos:CategoryItemDto","ParentCategoryId":14,"TreatAsTopicYN":false,"Description":"","ImageUrl":"","ShortDesc":"","CategoryId":2217,"CategoryName":"Renewal"},{"__type":"Nc:SimpleKB:Abstractions:Dtos:CategoryItemDto","ParentCategoryId":14,"TreatAsTopicYN":false,"Description":"","ImageUrl":"","ShortDesc":"","CategoryId":2218,"CategoryName":"cPanel SSL Plugin"},{"__type":"Nc:SimpleKB:Abstractions:Dtos:CategoryItemDto","ParentCategoryId":14,"TreatAsTopicYN":false,"Description":"","ImageUrl":"","ShortDesc":"","CategoryId":2221,"CategoryName":"Multi-Domain SSL Certificates"},{"__type":"Nc:SimpleKB:Abstractions:Dtos:CategoryItemDto","ParentCategoryId":14,"TreatAsTopicYN":false,"Description":"","ImageUrl":"","ShortDesc":"","CategoryId":2222,"CategoryName":"Cancellation"},{"__type":"Nc:SimpleKB:Abstractions:Dtos:CategoryItemDto","ParentCategoryId":14,"TreatAsTopicYN":false,"Description":"","ImageUrl":"","ShortDesc":"","CategoryId":2223,"CategoryName":"Browser errors"},{"__type":"Nc:SimpleKB:Abstractions:Dtos:CategoryItemDto","ParentCategoryId":14,"TreatAsTopicYN":false,"Description":"","ImageUrl":"","ShortDesc":"","CategoryId":2224,"CategoryName":"Site Seal, Logo"},{"__type":"Nc:SimpleKB:Abstractions:Dtos:CategoryItemDto","ParentCategoryId":14,"TreatAsTopicYN":false,"Description":"","ImageUrl":"","ShortDesc":"","CategoryId":2238,"CategoryName":"SSL installation errors"},{"__type":"Nc:SimpleKB:Abstractions:Dtos:CategoryItemDto","ParentCategoryId":14,"TreatAsTopicYN":false,"Description":"","ImageUrl":"","ShortDesc":"","CategoryId":2290,"CategoryName":"CSR code"},{"__type":"Nc:SimpleKB:Abstractions:Dtos:CategoryItemDto","ParentCategoryId":14,"TreatAsTopicYN":false,"Description":"","ImageUrl":"","ShortDesc":"","CategoryId":2293,"CategoryName":"Automated SSL management"},{"__type":"Nc:SimpleKB:Abstractions:Dtos:CategoryItemDto","ParentCategoryId":14,"TreatAsTopicYN":false,"Description":"","ImageUrl":"","ShortDesc":"","CategoryId":38,"CategoryName":"SSL General"},{"__type":"Nc:SimpleKB:Abstractions:Dtos:CategoryItemDto","ParentCategoryId":14,"TreatAsTopicYN":false,"Description":"","ImageUrl":"","ShortDesc":"","CategoryId":67,"CategoryName":"Activation"},{"__type":"Nc:SimpleKB:Abstractions:Dtos:CategoryItemDto","ParentCategoryId":14,"TreatAsTopicYN":false,"Description":"","ImageUrl":"","ShortDesc":"","CategoryId":68,"CategoryName":"Validation"},{"__type":"Nc:SimpleKB:Abstractions:Dtos:CategoryItemDto","ParentCategoryId":14,"TreatAsTopicYN":false,"Description":"","ImageUrl":"","ShortDesc":"","CategoryId":69,"CategoryName":"Installation"},{"__type":"Nc:SimpleKB:Abstractions:Dtos:CategoryItemDto","ParentCategoryId":14,"TreatAsTopicYN":false,"Description":"","ImageUrl":"","ShortDesc":"","CategoryId":70,"CategoryName":"Reissuance"}]},{"__type":"Nc:SimpleKB:Abstractions:Dtos:CategoryItemDto","ParentCategoryId":0,"TreatAsTopicYN":true,"Description":"","ImageUrl":"/assets/img/pictograms/150/performance-red.png","ShortDesc":"","CategoryId":9,"CategoryName":"My Account","SubCategories":[{"__type":"Nc:SimpleKB:Abstractions:Dtos:CategoryItemDto","ParentCategoryId":9,"TreatAsTopicYN":false,"Description":"","ImageUrl":"","ShortDesc":"","CategoryId":45,"CategoryName":"Account Security"},{"__type":"Nc:SimpleKB:Abstractions:Dtos:CategoryItemDto","ParentCategoryId":9,"TreatAsTopicYN":false,"Description":"","ImageUrl":"","ShortDesc":"","CategoryId":43,"CategoryName":"Profile Management"},{"__type":"Nc:SimpleKB:Abstractions:Dtos:CategoryItemDto","ParentCategoryId":9,"TreatAsTopicYN":false,"Description":"","ImageUrl":"","ShortDesc":"","CategoryId":44,"CategoryName":"Account Access"}]},{"__type":"Nc:SimpleKB:Abstractions:Dtos:CategoryItemDto","ParentCategoryId":34,"TreatAsTopicYN":false,"Description":"","ImageUrl":"","ShortDesc":"","CategoryId":2278,"CategoryName":"Handshake TLDs"},{"__type":"Nc:SimpleKB:Abstractions:Dtos:CategoryItemDto","ParentCategoryId":12,"TreatAsTopicYN":false,"Description":"","ImageUrl":"","ShortDesc":"","CategoryId":103,"CategoryName":"LVE (CloudLinux)"},{"__type":"Nc:SimpleKB:Abstractions:Dtos:CategoryItemDto","ParentCategoryId":0,"TreatAsTopicYN":false,"Description":"","ImageUrl":"/assets/img/pictograms/150/affiliates-red.png","ShortDesc":"","CategoryId":55,"CategoryName":"Affiliates","SubCategories":[]},{"__type":"Nc:SimpleKB:Abstractions:Dtos:CategoryItemDto","ParentCategoryId":12,"TreatAsTopicYN":false,"Description":"","ImageUrl":"","ShortDesc":"","CategoryId":89,"CategoryName":"SSH Access"},{"__type":"Nc:SimpleKB:Abstractions:Dtos:CategoryItemDto","ParentCategoryId":0,"TreatAsTopicYN":false,"Description":"","ImageUrl":"/assets/img/pictograms/150/tools-red.png","ShortDesc":"","CategoryId":2211,"CategoryName":"API & Resellers","SubCategories":[{"__type":"Nc:SimpleKB:Abstractions:Dtos:CategoryItemDto","ParentCategoryId":2211,"TreatAsTopicYN":false,"Description":"","ImageUrl":"","ShortDesc":"","CategoryId":2227,"CategoryName":"SSL Resellers"},{"__type":"Nc:SimpleKB:Abstractions:Dtos:CategoryItemDto","ParentCategoryId":2211,"TreatAsTopicYN":false,"Description":"","ImageUrl":"","ShortDesc":"","CategoryId":2229,"CategoryName":"Hosting Resellers"},{"__type":"Nc:SimpleKB:Abstractions:Dtos:CategoryItemDto","ParentCategoryId":2211,"TreatAsTopicYN":false,"Description":"","ImageUrl":"","ShortDesc":"","CategoryId":63,"CategoryName":"Namecheap API"},{"__type":"Nc:SimpleKB:Abstractions:Dtos:CategoryItemDto","ParentCategoryId":2211,"TreatAsTopicYN":false,"Description":"","ImageUrl":"","ShortDesc":"","CategoryId":2196,"CategoryName":"WHMCS module for SSL"}]},{"__type":"Nc:SimpleKB:Abstractions:Dtos:CategoryItemDto","ParentCategoryId":0,"TreatAsTopicYN":false,"Description":"","ImageUrl":"/assets/img/pictograms/150/timer-red.png","ShortDesc":"","CategoryId":2212,"CategoryName":"Legacy Products","SubCategories":[]},{"__type":"Nc:SimpleKB:Abstractions:Dtos:CategoryItemDto","ParentCategoryId":12,"TreatAsTopicYN":false,"Description":"","ImageUrl":"","ShortDesc":"","CategoryId":205,"CategoryName":"FTP questions"},{"__type":"Nc:SimpleKB:Abstractions:Dtos:CategoryItemDto","ParentCategoryId":12,"TreatAsTopicYN":false,"Description":"","ImageUrl":"","ShortDesc":"","CategoryId":2180,"CategoryName":"MySQL questions"},{"__type":"Nc:SimpleKB:Abstractions:Dtos:CategoryItemDto","ParentCategoryId":12,"TreatAsTopicYN":false,"Description":"","ImageUrl":"","ShortDesc":"","CategoryId":2199,"CategoryName":"Hosting Migration"},{"__type":"Nc:SimpleKB:Abstractions:Dtos:CategoryItemDto","ParentCategoryId":0,"TreatAsTopicYN":false,"Description":"","ImageUrl":"/assets/img/pictograms/150/premiumdns-red.png","ShortDesc":"","CategoryId":2231,"CategoryName":"PremiumDNS","SubCategories":[]},{"__type":"Nc:SimpleKB:Abstractions:Dtos:CategoryItemDto","ParentCategoryId":12,"TreatAsTopicYN":false,"Description":"","ImageUrl":"","ShortDesc":"","CategoryId":2194,"CategoryName":"Tips & Tricks"},{"__type":"Nc:SimpleKB:Abstractions:Dtos:CategoryItemDto","ParentCategoryId":0,"TreatAsTopicYN":false,"Description":"","ImageUrl":"https://static.nc-img.com/live-resource/icons/knowledgebase/fastVPN_icon-150px.png","ShortDesc":"","CategoryId":2265,"CategoryName":"FastVPN","SubCategories":[{"__type":"Nc:SimpleKB:Abstractions:Dtos:CategoryItemDto","ParentCategoryId":2265,"TreatAsTopicYN":false,"Description":"","ImageUrl":"","ShortDesc":"","CategoryId":2292,"CategoryName":"Browser Extensions"},{"__type":"Nc:SimpleKB:Abstractions:Dtos:CategoryItemDto","ParentCategoryId":2265,"TreatAsTopicYN":false,"Description":"","ImageUrl":"","ShortDesc":"","CategoryId":2274,"CategoryName":"General"},{"__type":"Nc:SimpleKB:Abstractions:Dtos:CategoryItemDto","ParentCategoryId":2265,"TreatAsTopicYN":false,"Description":"","ImageUrl":"","ShortDesc":"","CategoryId":2270,"CategoryName":"Routers"},{"__type":"Nc:SimpleKB:Abstractions:Dtos:CategoryItemDto","ParentCategoryId":2265,"TreatAsTopicYN":false,"Description":"","ImageUrl":"","ShortDesc":"","CategoryId":2272,"CategoryName":"TV"},{"__type":"Nc:SimpleKB:Abstractions:Dtos:CategoryItemDto","ParentCategoryId":2265,"TreatAsTopicYN":false,"Description":"","ImageUrl":"","ShortDesc":"","CategoryId":2273,"CategoryName":"Gaming Consoles"},{"__type":"Nc:SimpleKB:Abstractions:Dtos:CategoryItemDto","ParentCategoryId":2265,"TreatAsTopicYN":false,"Description":"","ImageUrl":"","ShortDesc":"","CategoryId":2268,"CategoryName":"macOS"},{"__type":"Nc:SimpleKB:Abstractions:Dtos:CategoryItemDto","ParentCategoryId":2265,"TreatAsTopicYN":false,"Description":"","ImageUrl":"","ShortDesc":"","CategoryId":2269,"CategoryName":"iOS"},{"__type":"Nc:SimpleKB:Abstractions:Dtos:CategoryItemDto","ParentCategoryId":2265,"TreatAsTopicYN":false,"Description":"","ImageUrl":"","ShortDesc":"","CategoryId":2271,"CategoryName":"Linux"},{"__type":"Nc:SimpleKB:Abstractions:Dtos:CategoryItemDto","ParentCategoryId":2265,"TreatAsTopicYN":false,"Description":"","ImageUrl":"","ShortDesc":"","CategoryId":2266,"CategoryName":"Windows"},{"__type":"Nc:SimpleKB:Abstractions:Dtos:CategoryItemDto","ParentCategoryId":2265,"TreatAsTopicYN":false,"Description":"","ImageUrl":"","ShortDesc":"","CategoryId":2267,"CategoryName":"Android"}]},{"__type":"Nc:SimpleKB:Abstractions:Dtos:CategoryItemDto","ParentCategoryId":12,"TreatAsTopicYN":false,"Description":"","ImageUrl":"","ShortDesc":"","CategoryId":239,"CategoryName":"WHMCS"},{"__type":"Nc:SimpleKB:Abstractions:Dtos:CategoryItemDto","ParentCategoryId":12,"TreatAsTopicYN":false,"Description":"","ImageUrl":"","ShortDesc":"","CategoryId":33,"CategoryName":"SSL Installation"}],"status":200,"statusText":"OK"}}
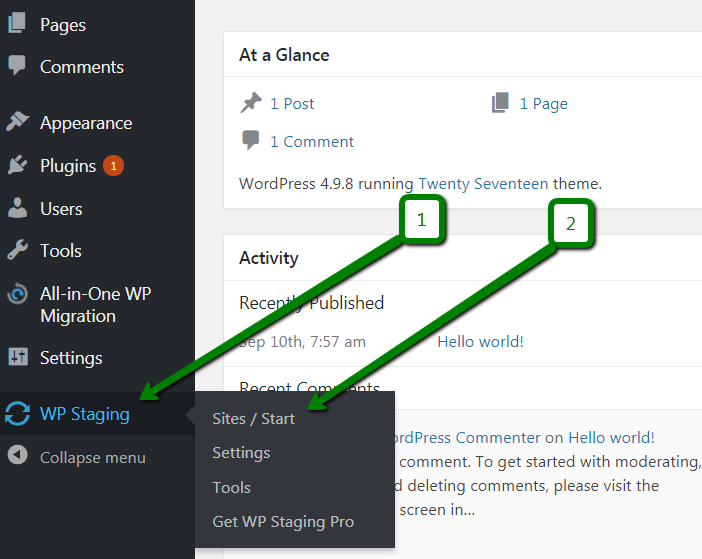
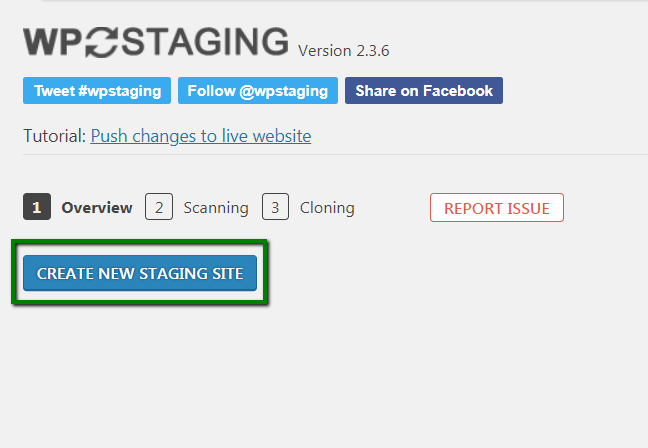
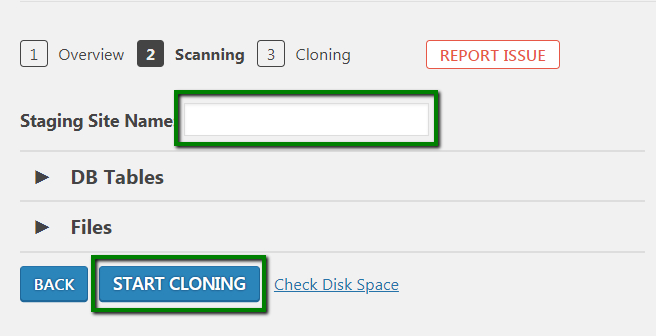
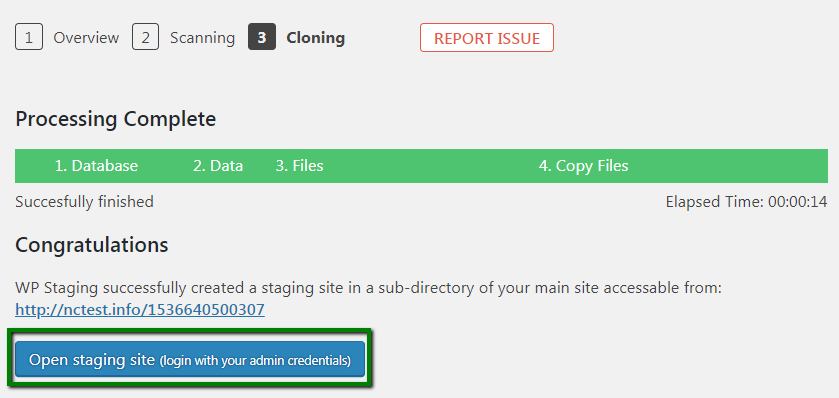
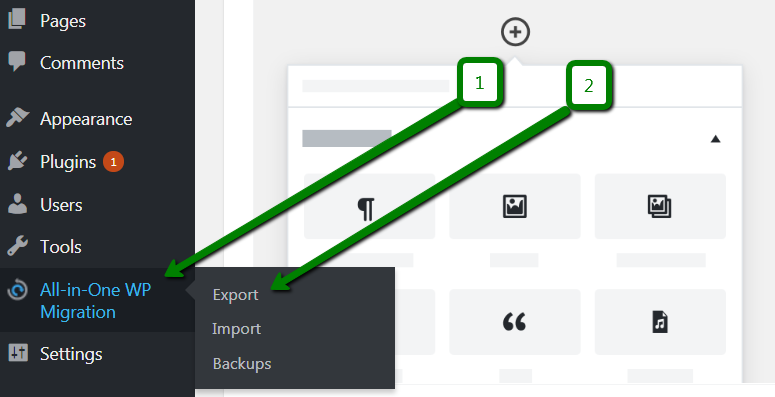
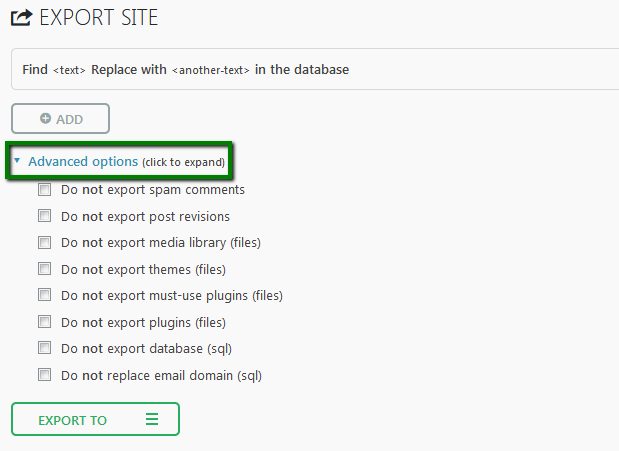
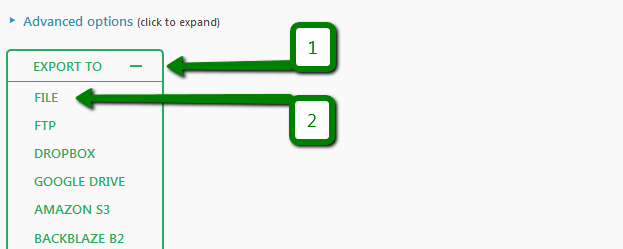
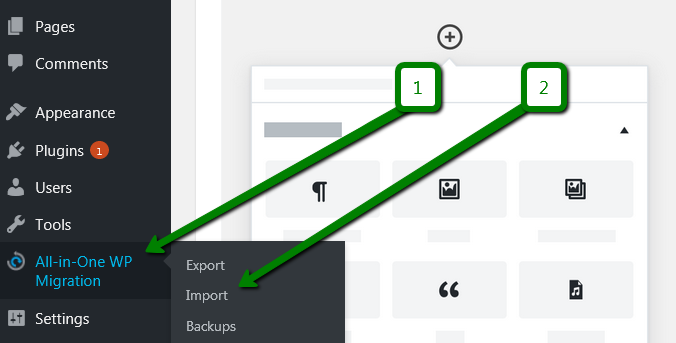
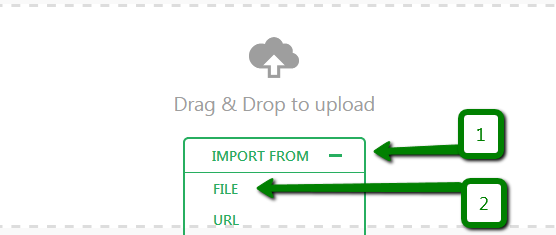
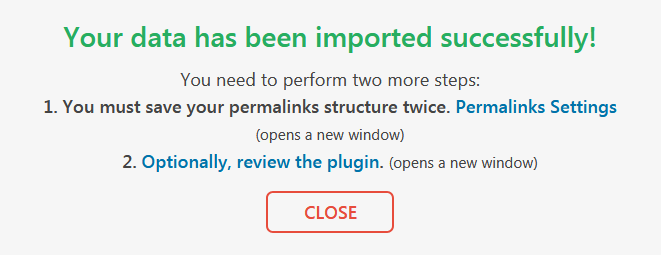
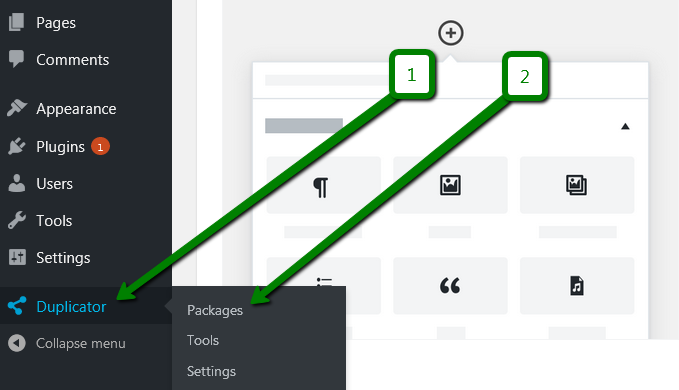
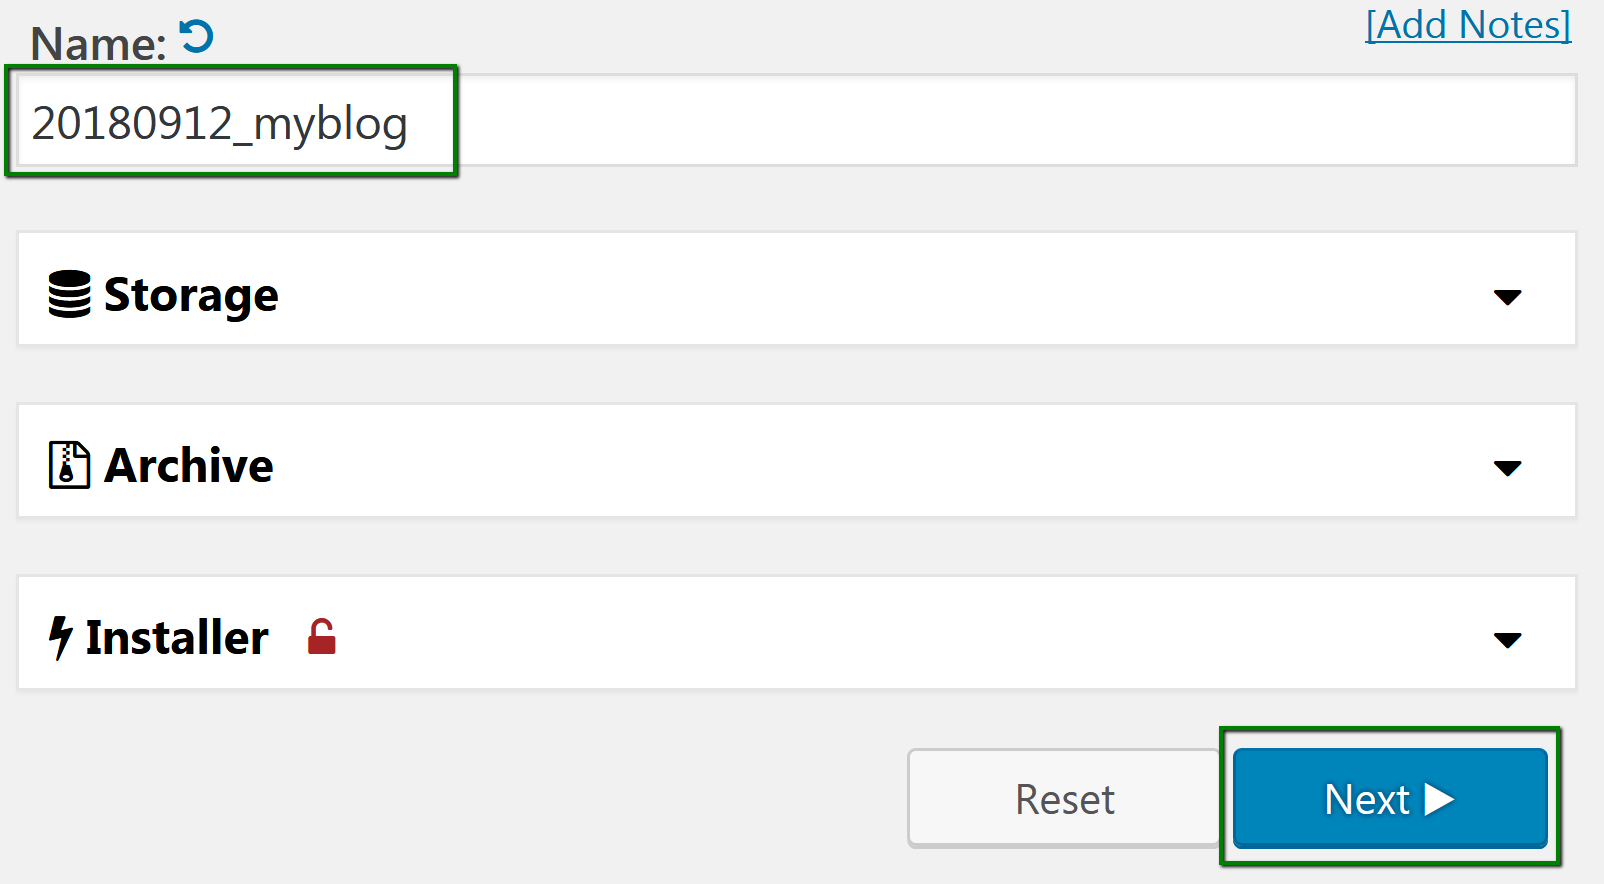
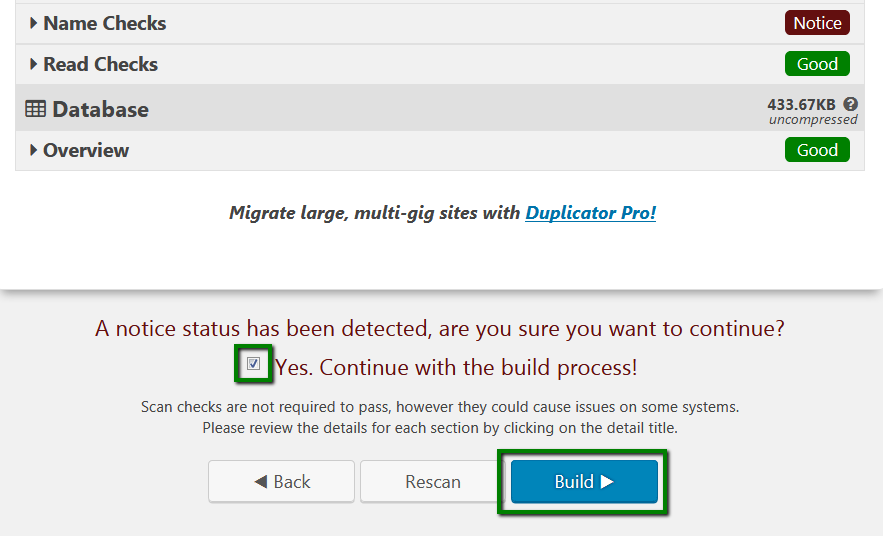
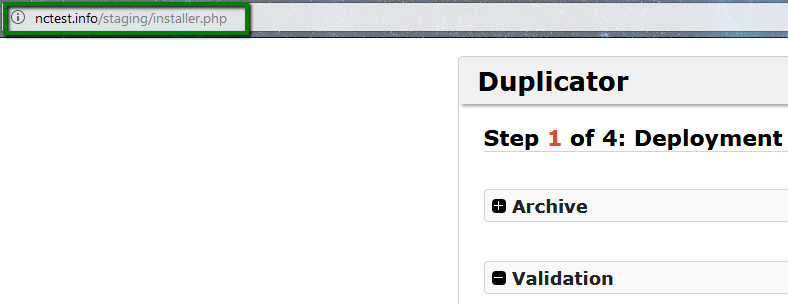
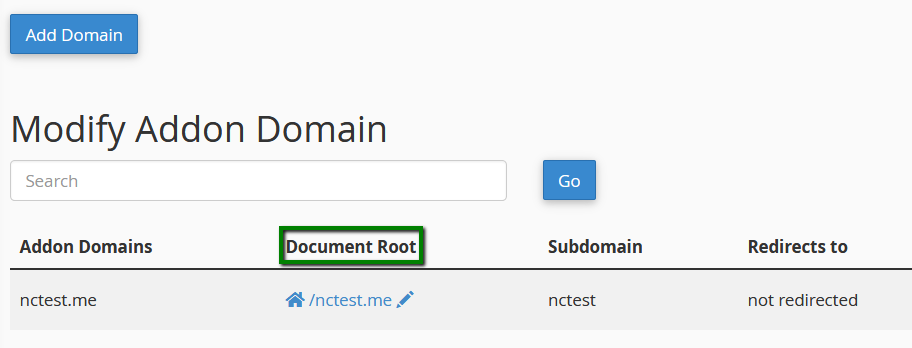
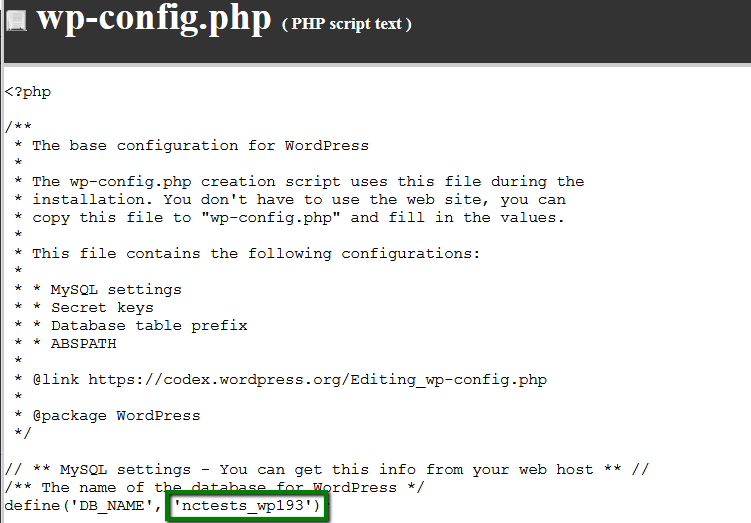
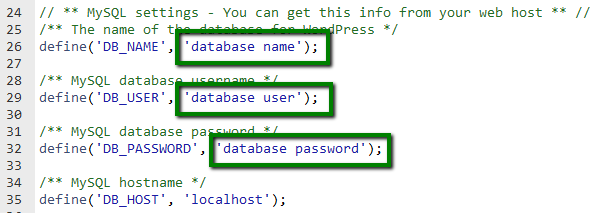
{}Need help? We're always here for you.
{}