| Subtotal | $0.00 |
USD
U.S. DollarEuroBritish PoundCanadian DollarsAustralian DollarsIndian RupeesChina Yuan RMBMore Info →

| Subtotal | $0.00 |
No time to install SSL? Try our installation service.
Heroku is moving away from using SSL Endpoints and replacing it with a new feature: Heroku SSL. Heroku SSL is a free feature that allows for the managing of SSL/TLS encryption for custom domains and relies on the Server Name Indication (SNI). Please note that Heroku SSL is currently available under Heroku paid plans only.
Prerequisites
Once the activation and validation steps are completed, your certificate will be issued and you can proceed with the SSL installation. In order to install the SSL certificate via Heroku SSL, the following files should be used:
| Please keep in mind that for Heroku, it’s necessary to combine the certificate and the CA Bundle into one file. You can open the .crt and .ca-bundle files using any plain text editor, pasting the codes from the .ca-bundle file just below the code in .crt file. Make sure that there are no spaces between the codes. |
In corresponding command line, you can combine the files using the following command:
cat yourcertificate.crt bundle.ca-bundle > server.crt
You can also create a combined file using this tool: https://decoder.link. Simply paste your certificate code in the box >> click on Decode >> download the file in the Bundle (Nginx) field.
Installation via Heroku Dashboard
To install the certificate in your Heroku Dashboard, select the necessary application from the list, and open the Settings tab.
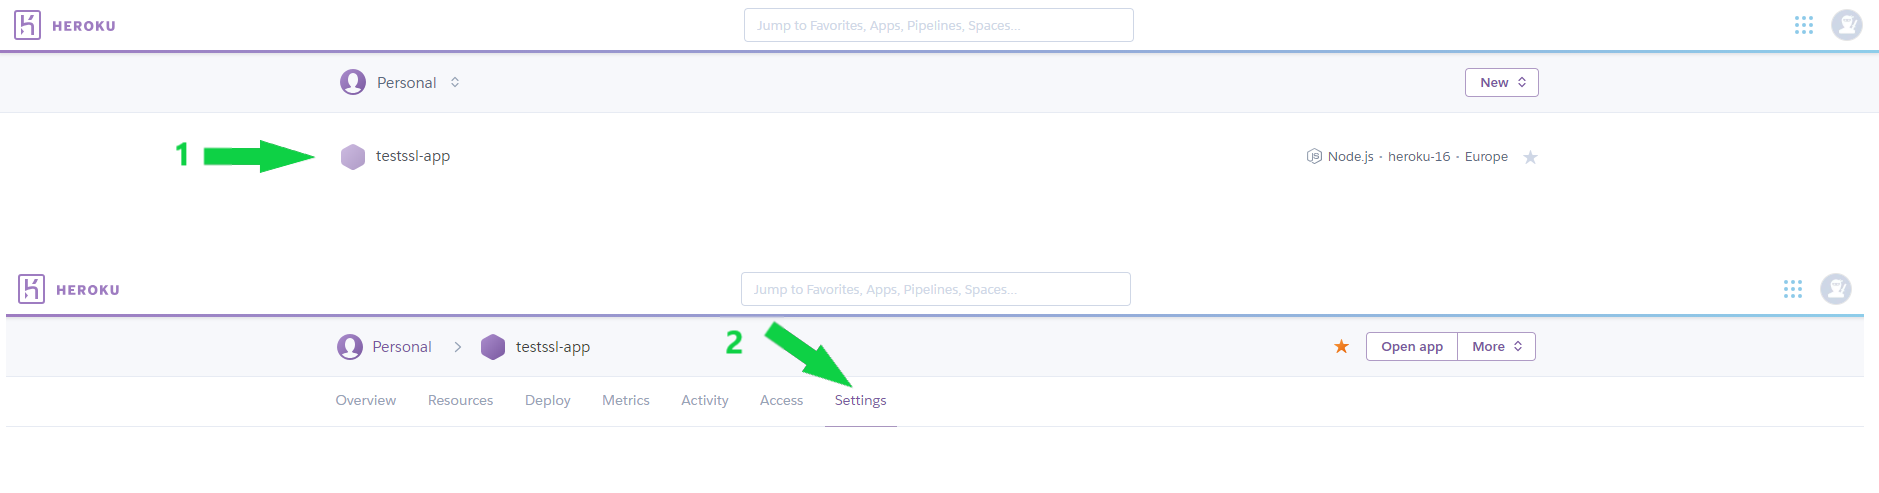
Then, scroll down the page to the SSL Certificates section and select the Configure SSL button.

In the window that appears on the right side of your screen, select Manual Certificate from the options list and click Next.
Simply drag and drop the combined certificate + CA bundle file to the Your public certificate box.
After that, drag and drop the Private Key file to the Your private certificate box and click Next.

It’s also possible to paste the certificate codes manually using the hyperlink present in both boxes. Open the files with any text editor (like Notepad for Windows or TextEdit for Mac), copy the contents, and paste them into the boxes.
In the next step, select the domain where you want to install the SSL certificate and click Next. Then, verify if the certificate details are correct and click Finish.

That’s it. Within a few minutes, Heroku will apply your SSL certificate to the domain, and it will be accessible via an HTTPS connection.
You can verify the installation by using this tool.
Installation via CLI
Another way to install the certificate is via the command line.
The process is pretty short. Upload the certificate + bundle (combined as described in Prerequisites section of this guide) and Private Key files to Heroku using the heroku certs:add server.crt server.key command.
In case when there is no default Heroku app, you will need to specify it as well using the --app flag, so the command will look like this: heroku certs:add server.crt server.key --app yourappname.
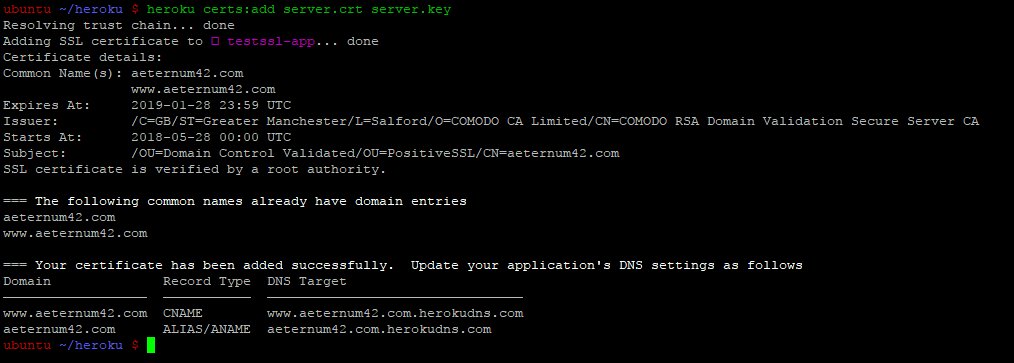
To check if the correct certificate is installed at the moment, you can run the heroku certs:info command.

Please note that you may get an 'Internal server error' message when adding your certificate. The reason may be that you are using an outdated version of the Heroku CLI. In this case, you can check your CLI installation and update it to the latest version with the heroku update command or reinstall the CLI itself.
Removing Certificates
You can remove a certificate via the same Settings tab of the app’s menu.
Navigate to the SSL Certificates section and click on the gears icon near the certificate you want to remove.

In the window that appears on the right side of your screen, click the Remove button.
You will be prompted to confirm the certificate removal by entering the app’s name.
Once done, click Remove SSL.

Updating Certificates
When you need to replace an installed certificate with another one (e.g., if the certificate was reissued, you received a completely new certificate file, or it’s time to renew), you can do so via the same Settings tab of the app’s menu.
You can update a certificate by navigating to the SSL Certificates section and clicking on the gear icon near the certificate.

In the window that appears on the right side of your screen, click Update certificate.
After that, the steps of adding certificate files/codes are the same as for the initial installation.

Need help? We're always here for you.